How to Remove and Replace the Ice Maker in a Samsung RS27T5200SR Refrigerator
The Samsung RS27T5200SR is a side-by-side refrigerator with the ice maker assembly mounted inside the freezer compartment on the right side. Whether your ice maker has stopped producing ice, is leaking, or is making grinding noises, removing and replacing the unit is a straightforward repair that most homeowners can complete in 20 to 30 minutes with basic hand tools. This guide walks you through the exact process, from preparation through reinstallation and testing.
Quick Overview: What You’re Working With
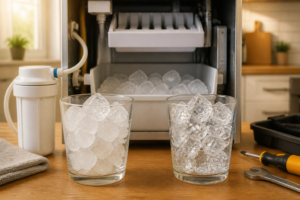
The RS27T5200SR ice maker assembly is a self-contained module that sits in the freezer section. It connects to the refrigerant-cooled evaporator plate, receives water from the inlet valve via a fill tube, and deposits finished ice cubes into a removable bucket. The entire assembly is held in place with three to four Phillips-head mounting screws and secured electrically through a single wiring harness connector. No special skills are required—just patience and attention to detail.
Total removal and replacement time: 20–30 minutes, depending on how easily the connector releases and whether the old unit is frozen in place.
Before You Start: Safety and Preparation
Unplug or Disable Power
The safest approach is to unplug the entire refrigerator from the wall outlet. If unplugging is inconvenient, you may turn off the ice maker via the control panel—but unplugging is strongly recommended during any internal repairs. Wait at least five minutes after disconnecting power before touching any electrical components.
Shut Off the Water Supply
Locate the water supply valve behind the refrigerator (usually a small ball valve or lever valve on the line feeding the RS27T5200SR). Turn it clockwise to the fully closed position. This prevents water from spraying out when you disconnect the fill tube.
Empty and Remove the Ice Bucket
Open the freezer door and remove the ice bucket from beneath the ice maker assembly. Empty any remaining ice into a sink or bowl. Set the bucket aside—you will reinstall it after the new ice maker is in place.
Locate the bucket’s release mechanism (usually a simple pull or slide-out action) and withdraw it completely from the RS27T5200SR. Do not force it; if it sticks, gently rock it side to side.
Step-by-Step Ice Maker Removal
Step 1: Locate and Remove the Ice Maker Mounting Screws
With the bucket removed, you now have a clear view of the ice maker assembly mounted above the bucket cavity. Look for three to four Phillips-head screws securing the unit to the freezer wall. On the RS27T5200SR, these screws are typically located:
- One or two on the upper left corner of the assembly
- One on the upper right corner
- One at the rear or side (sometimes recessed)
Use a Phillips screwdriver to remove each screw. Keep them in a small cup or container so they do not fall into the freezer or get lost. Do not overtighten when you reinstall—snug is sufficient.
Step 2: Support the Assembly and Begin Lowering
Once the screws are removed, the ice maker assembly will be held only by gravity and the electrical connector at the rear. Use one hand to support the weight of the assembly from below (or wedge a thin piece of wood or cardboard under it temporarily). With your other hand, prepare to access the wiring harness connector.
The assembly is relatively light but awkward to angle; do not allow it to hang by the electrical cord, as this can damage the connector and wires.
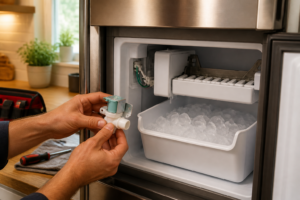
Step 3: Disconnect the Wiring Harness Connector
The electrical connector on the RS27T5200SR ice maker is located at the rear of the assembly, usually near the top. It is a plastic multi-pin connector with a locking tab (a small lever or clip on one side).
Do not pull on the wires themselves. Instead:
- Locate the locking tab on the connector
- Press or slide the tab gently in the direction indicated (usually outward or upward)
- Once the tab is released, carefully pull the connector body straight out
- If resistance is felt, press the tab again and verify it is fully released
The connector should separate smoothly. If it is stuck, do not force it—wiggle it gently side to side while pressing the tab, or spray a small amount of isopropyl alcohol around the connector to help loosen mineral deposits or corrosion.
Step 4: Remove Any Ground Screw or Clip
Some RS27T5200SR units include a ground screw or a plastic clip holding the wiring harness or fill tube in place. Inspect the rear and sides of the assembly for any additional fasteners. Remove any you find before fully extracting the ice maker.
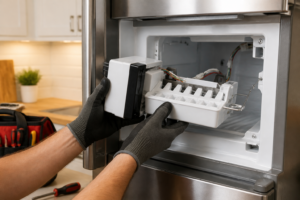
Step 5: Extract the Assembly Completely
Once the electrical connector is free and all screws are removed, carefully slide or pull the ice maker assembly straight out of the freezer compartment. Lower it gently and set it on a clean towel or workbench. The fill tube (water inlet) may still be attached to the assembly; do not yank on it. If the tube does not pull free easily, you may need to disconnect it from the inlet valve on the back wall of the RS27T5200SR—see Step 6 below.
Step 6: Disconnect the Fill Tube (If Necessary)
If the fill tube is still connected to the inlet valve, you will need to disconnect it. The tube is typically held with a plastic compression fitting or a small clip. Gently unscrew the fitting (turn counterclockwise) or press the clip release to remove the tube. Have a small towel or cup nearby to catch any residual water.
Once the tube is free, the old ice maker assembly is completely removed.
If the Ice Maker is Frozen in Place: Safe Defrosting
If the mounting area is frozen or the assembly seems stuck, do not pry hard with a screwdriver or hammer. Prying can crack the plastic interior liner of the RS27T5200SR freezer compartment, leading to costly damage.
Instead, use one of these gentle methods:
- Hair dryer method: Set a hair dryer to low or medium heat and aim it at the mounting area and edges of the assembly for 2–5 minutes. The gentle warmth will melt any ice buildup without damaging components.
- Warm towel method: Wet a towel with warm (not boiling) water and drape it over the frozen area for 10–15 minutes. Reapply as the towel cools.
- Wait and defrost: If you have time, simply prop the freezer door open slightly (use a wedge or book) and allow the RS27T5200SR to defrost naturally over several hours. Air circulation will melt the ice.
Once the ice has melted, retry the removal steps above. If the assembly still resists, repeat the defrosting process before applying any force.
Identifying the Correct Replacement Ice Maker for Your RS27T5200SR
Samsung produces ice makers in multiple variations. To ensure you order the correct replacement, you must match the part number to your exact RS27T5200SR model and production run.
Check the Part Label on the Old Assembly
The easiest method is to look at the old ice maker itself. A white or silver label on the back or underside of the assembly will display the Samsung part number. This number typically begins with “DA” or “AW” and is followed by a series of digits (for example, DA97-01868-A or similar). Write down this entire part number.
Cross-Reference Your Model and Serial Number
The RS27T5200SR model designation includes a suffix that indicates the production run (for example, RS27T5200SR/AA, RS27T5200SR/AB, etc.). Check your refrigerator’s serial number label, usually found on the inside of the freezer compartment or on the back of the unit. Different production runs of the RS27T5200SR may use slightly different ice maker assemblies, even though they look nearly identical.
Do not assume that an ice maker from another Samsung side-by-side model will fit. While Samsung designs are often shared across model lines, the mounting holes, water inlet connection, and electrical harness vary. Verify the part number at a Samsung parts lookup website or contact Samsung customer service with your model number and serial number before purchasing.
Where to Find the Model and Serial Number
- Model number: Inside the freezer compartment on a label near the top, or on a sticker on the back of the unit
- Serial number: On the same label, usually a longer alphanumeric string
- Suffix: The two letters at the end of the RS27T5200SR model number (e.g., /AA, /AB)
Having this information prevents ordering the wrong part and ensures your new ice maker will fit and function correctly in your RS27T5200SR.
Installing the Replacement Ice Maker
Preparation and Inspection
Before installing the new ice maker, inspect it for any damage during shipping. Look for cracked plastic, bent fill tube connections, or loose internal parts. If anything appears damaged, contact the supplier immediately for a replacement.
Lay the new assembly on a clean towel and compare its mounting holes and connector type to photographs of your old unit. This quick visual check confirms you have the correct part for your RS27T5200SR.
Reconnect the Fill Tube
If you disconnected the fill tube in Step 6 above, now is the time to reconnect it. Insert the tube fitting into the inlet valve on the back wall of the freezer compartment and turn clockwise to tighten, or press the connector into place if it uses a clip-style fitting. Do not overtighten; hand-tight plus a quarter turn is sufficient. Check that the connection is secure and does not leak when water is restored later.
Reconnect the Electrical Harness
Locate the wiring harness connector on the new ice maker assembly (usually at the rear, near the top). Align the connector with the corresponding port on the refrigerator’s internal wiring and push straight in until you hear or feel a click. The locking tab should engage automatically. Gently tug on the connector to verify it is seated; there should be no movement.
Mount the Assembly in the Freezer
Carefully slide the new ice maker assembly into the freezer compartment, aligning the mounting holes with the threaded inserts or screw holes in the wall. Once positioned, insert the mounting screws you saved from the old unit (or use new Phillips-head screws of the same size if the old ones are bent or stripped).
Tighten the screws snugly but do not overtighten. Over-tightening can crack plastic mounting points or strip threads. A good rule: tighten until snug, then stop. If the screw requires significant extra force, back it out and check for misalignment.
Reinstall the Ice Bucket
Slide the ice bucket back into place beneath the ice maker assembly. It should fit snugly and level. Ensure it is fully seated and any release mechanisms are engaged properly.
After Installation: Restoring Water and Testing
Restore the Water Supply
Turn the water supply valve back on by rotating it counterclockwise. Turn it slowly at first to allow air to bleed from the line, then open it fully. Check the fill tube connection and the inlet valve area for any leaks. A small drip is normal during the initial fill; allow water to run for a few seconds before checking again.
Restore Power to the RS27T5200SR
Plug the refrigerator back in or press the power button if you had only disabled the ice maker. The display should illuminate and the compressor should start running within a few seconds.
Run a Test Cycle
Many Samsung refrigerators, including the RS27T5200SR, have an ice maker test cycle accessible via the control panel or a hidden test button. Check your user manual for the specific sequence (often holding a button for 3–5 seconds or accessing a service menu). Running a test cycle forces the ice maker to fill and freeze immediately, rather than waiting for the normal operation cycle.
If your RS27T5200SR does not have a test button, simply allow it to operate normally. The ice maker will begin filling and freezing once the freezer temperature drops to the set point (usually 0°F or below).
First Ice Harvest Timeline
After installation and power-on, expect your first batch of ice cubes to be ready in 8 to 24 hours, depending on the freezer temperature and ambient conditions. Initial ice may be smaller or discolored (containing more water minerals and air). Discard the first batch or two before consuming ice, as it ensures the lines are properly purged.
Listen for the fill cycle (a distinctive buzzing or humming sound as water is pumped in) and the ejection cycle (a grinding or clicking sound as cubes are pushed into the bucket). These sounds are normal and indicate the ice maker is functioning.
When Ice Maker Removal Is Not the Solution
Removing and replacing the ice maker assembly is the correct fix if the unit is mechanically broken, leaking, or making strange grinding noises from internal damage. However, if your RS27T5200SR ice maker keeps stopping or repeatedly freezes up even after replacement, the issue likely lies elsewhere in the refrigeration system.
For detailed troubleshooting on these recurring problems, see our related guides:
- RS27T5200SR ice maker stopped working – covers inlet valve failures, control board issues, and sensor problems
- RS27T5200SR ice maker freezing up – addresses thermostat faults, water inlet leaks, and defrost cycle failures
- Fan noise and defrost drain problems on the RS27T5200SR – explains ice bucket overflow, drain clogs, and evaporator fan issues
If your replacement ice maker still exhibits problems, consult these guides before assuming another part failure.
⚠️ Safety Warning
Electrical Hazard: The RS27T5200SR contains electrical components and a compressor that operate at high voltage. Always unplug the refrigerator or turn off the circuit breaker before removing any internal parts. Do not touch the compressor, capacitor, or wiring harness while power is connected. Allow at least five minutes after disconnecting power before beginning work.
Water Hazard: The RS27T5200SR is connected to a pressurized water supply line. Always shut off the water valve before disconnecting any water lines or the ice maker assembly. Have a towel or bucket available to catch residual water. Do not rely solely on turning off the ice maker via the control panel; physically close the water supply valve.
Freezer Compartment Damage: Do not pry or hammer on the ice maker assembly, mounting area, or freezer walls. Applying excessive force can crack the plastic interior liner, which is expensive to repair or replace. Use gentle heat (hair dryer, warm towels) to defrost frozen connections instead.
Refrigerant: The RS27T5200SR contains sealed refrigerant. Do not attempt to open or repair any refrigerant lines or the sealed evaporator. If you suspect a refrigerant leak (indicated by loss of cooling or an oil smell), contact a certified refrigeration technician.
Frequently Asked Questions
How do I know if my RS27T5200SR ice maker is broken and needs replacement?
Common signs of a failed ice maker include no ice production for more than 24 hours (after testing water supply and power), visible cracks or leaks in the assembly, grinding or scraping noises from the unit, or water leaking into the bucket during the freeze cycle. If the ice maker does not respond to a test cycle and all water, power, and inlet valve checks pass, replacement is usually the correct fix. However, if the unit simply stopped producing ice, check our RS27T5200SR ice maker stopped working guide first, as the inlet valve or control board may be the culprit instead of the ice maker assembly itself.
Can I use a universal ice maker replacement instead of a Samsung-specific part?
No. Universal ice maker kits are not recommended for the RS27T5200SR. Samsung side-by-side refrigerators use specific mounting brackets, electrical connectors, and water inlet fittings designed for OEM assemblies. A universal or aftermarket part may not fit, align properly, or function with your refrigerator’s control board. Always verify the part number against your model number and serial number before purchasing.
What if the electrical connector is stuck and will not release?
Do not pull on the wires or apply excessive force to the connector. Instead, press the locking tab firmly and wiggle the connector gently side to side while pulling. If it remains stuck, spray a small amount of isopropyl alcohol around the connector base and wait a few minutes, then retry. A stuck connector usually indicates mineral buildup or corrosion; alcohol helps dissolve it. If the connector still will not budge, you may need to consult a Samsung technician to avoid damaging the wiring harness.
Is it normal for the ice maker to make noise during the fill and freeze cycle?
Yes. The ice maker in your RS27T5200SR will produce buzzing or humming sounds during the water fill phase (as the inlet valve opens and water is pumped in) and clicking or grinding sounds during the ej
Recommended Tools
Digital Multimeter
Nearly every diagnosis in this guide comes down to a continuity or voltage reading, and a basic digital multimeter handles all of them. Check current pricing on Amazon.
Appliance Repair Tool Set
A dedicated appliance tool set with nut drivers, Torx bits, and panel spudgers makes the disassembly steps in this guide far easier and prevents scratched panels and stripped screws. Check current pricing on Amazon.