GE Washing Machine Lid Lock Circuit Problems: Complete Troubleshooting Guide
GE washing machine owners frequently encounter issues where the washer won’t start, the lid won’t unlock, or error codes appear related to the lid lock circuit. However, there are two completely different systems that can cause “lock” problems on GE washers, and diagnosing which one is failing will save you time and money. This guide covers both the control lock feature (a user-activated button lock that disables all controls) and the lid lock circuit (a safety interlock that physically prevents lid opening during spin cycles and must close before the washer can start).
Quick Diagnosis: Control Lock vs. Lid Lock Circuit
Before you troubleshoot further, identify which system is actually causing your problem:
- Control Lock (LoC or Padlock Icon on Display): This is a feature you can intentionally activate to prevent accidental button presses. When active, you’ll see “LoC” or a padlock symbol on the display. The washer’s mechanical operation is unaffected—you simply can’t press buttons. This is operator-controlled and always reversible in seconds.
- Lid Lock Circuit (Mechanical/Electrical Safety Interlock): This is a system that physically locks the lid during spinning and electrically prevents the washer from starting or filling if the lid isn’t properly latched. If this circuit fails, the washer either won’t start, won’t fill, displays error codes, or the lid becomes stuck shut. This requires diagnosis and often component replacement.
If you see “LoC” on your display and can’t press buttons, jump to the Control Lock section below. If your washer won’t start, the lid is stuck, or you’re seeing error codes, proceed to the Lid Lock Circuit section.
Turning OFF the Control Lock Feature
If your GE washer display shows “LoC” or a padlock icon and won’t respond to button presses, the control lock feature is activated. This is not a mechanical failure—it’s an intentional lock you can disable instantly.
How to Disable Control Lock on GE Washers
The exact button varies by model, but the procedure is consistent:
- Locate the button labeled with a small padlock icon. On many GE models, this is the Lock button, or it may be combined with Delay Wash or Deep Fill (check your model’s button labels).
- Press and hold that button for approximately 3 seconds.
- Watch the display—”LoC” or the padlock icon should disappear, and buttons will become responsive again.
- If the display doesn’t change, try pressing the button for up to 5 seconds, as some models require a longer hold.
- If you’re unsure which button, consult your user manual or the Quick Start guide on the lid’s interior—GE always labels the control lock button clearly.
Once the control lock is off, your washer should operate normally. This is a software-level feature, not a hardware failure.
Understanding the GE Lid Lock Circuit: How It Works
On GE top-load washers (including GTW335, GTW465, GTW485, GTW720 families and similar models), the lid lock circuit is a critical safety system that:
- Prevents the lid from opening during the spin cycle (high-speed rotation creates a safety hazard).
- Prevents the washer from starting, filling, or spinning unless the lid is fully closed and latched.
- Consists of a physical locking solenoid mounted to the lid assembly, a switch that detects lid position, and electrical wiring connecting to the main control board.
When you close the GE washer lid, a mechanical latch engages. The control board detects this via the lid lock switch. During spin cycles, the control board energizes the lid lock solenoid (typically at 120VAC), which actively holds the lid shut. When the cycle ends and the drum stops, the solenoid de-energizes and the lid releases, allowing you to open it manually.
If any component in this circuit fails—the solenoid, the switch, the wiring, or the control board’s relay—the washer will not operate normally.
Symptoms of a Failed Lid Lock Circuit
A failing or failed lid lock circuit on a GE washer typically shows one or more of these symptoms:
- Washer beeps and won’t start: The control board detects an open lid lock switch, even though the lid is closed.
- Lid lock light flashing: On washers with an indicator light for the lid lock, constant or intermittent flashing indicates a circuit fault.
- Washer starts but won’t fill: The circuit is partially functional, but the safety interlock prevents fill.
- Lid is stuck locked shut: The solenoid energized but won’t de-energize, or the mechanical lock mechanism failed.
- Error codes: GE washers may display codes like “F3” or “Ld” (varies by model) indicating a lid lock circuit fault.
- Intermittent operation: The washer works sometimes but not others, suggesting a loose wire or marginal switch contact.
If you’re experiencing any of these symptoms, the lid lock circuit (not the control lock feature) is the issue.
How to Open a Locked Lid When the Washer Won’t Release
If your GE washer lid is stuck shut and won’t unlock after a cycle, try these steps before forcing the lid open (forcing can damage the latch mechanism):
Step 1: Power Reset
- Unplug the washer from the electrical outlet.
- Wait a full 10 minutes. This allows the control board’s memory to clear and the solenoid coil to fully discharge.
- Plug the washer back in and attempt to open the lid.
- If the lid opens, the solenoid was over-energized and the reset cleared the fault. The lid lock circuit still needs diagnosis, but you can now access the machine.
Step 2: Manual Release Tab (If Equipped)
Some GE top-load models have a manual release tab or cord inside the washer tub. If present:
- Open the washer cabinet (remove side panels or open the top if accessible).
- Look for a red or blue plastic tab or cord near the lid lock assembly.
- Pull firmly in the direction indicated on the tab.
- This mechanically releases the solenoid lock, allowing the lid to open.
- Consult your user manual for the exact location on your model.
Step 3: Do Not Force the Lid
Forcing a stuck lid risks breaking the latch, hinge, or the solenoid assembly itself, leading to a much more expensive repair. If the above steps don’t work, proceed to professional diagnosis and repair.
Testing the Lid Lock Circuit with a Multimeter
⚠️ Safety Warning: The lid lock solenoid operates on 120VAC during normal washing cycles. Never test live circuits with a multimeter unless you are trained and qualified to work with live voltage. Always unplug the washer before disconnecting wires, testing switch contacts, or measuring coil resistance. If you must measure solenoid voltage during operation for diagnostic purposes, use extreme caution, keep one hand in your pocket, and never touch both the solenoid terminal and ground simultaneously.
Testing the Lid Lock Switch
The lid lock switch is usually a simple mechanical contact that closes when the lid is latched:
- Unplug the washer completely.
- Locate the lid lock assembly on the top edge of the washer cabinet (varies by model; consult your service manual or look near the hinges).
- Find the electrical connector leading from the lid lock assembly to the wiring harness. Carefully disconnect this connector.
- Set your multimeter to the continuity (Ω) or resistance setting.
- Place the multimeter probes on the two contacts inside the lid lock connector.
- With the lid open: Multimeter should read infinite resistance (open circuit) or show no continuity beep.
- Close the lid firmly and latch it: Multimeter should read very low resistance (near 0Ω) or beep continuously, indicating a closed circuit.
- If the switch reads the opposite (closed when open, open when closed) or doesn’t change, the switch is faulty and the lid lock assembly must be replaced.
Testing the Lid Lock Solenoid Coil
The solenoid is the electromagnetic component that actually locks the lid:
- With the washer unplugged and the connector still disconnected, identify the solenoid terminals. On most GE lid locks, there are typically two main solenoid coil terminals.
- Set your multimeter to resistance (Ω).
- Touch one probe to each solenoid terminal.
- A functioning solenoid coil typically reads between 100Ω and 1,000Ω (this varies by model—verify in the service manual if possible). Check for the specific resistance range for your model.
- If the solenoid reads 0Ω (short circuit), it is burned out or shorted internally.
- If the solenoid reads infinite resistance (open circuit), the coil winding is broken.
- Either condition indicates the solenoid coil is faulty and requires replacement.
Interpreting Test Results
- Switch and solenoid test normal: The fault is likely in the wiring harness or the control board. Proceed to wiring and control board checks below.
- Switch tests bad: The lid lock assembly (or at minimum the switch portion) must be replaced.
- Solenoid tests bad: The lid lock assembly must be replaced.
Checking the Wiring Harness
The wiring between the lid lock assembly and the control board is a common failure point on GE washers. The harness runs near the hinges where the lid flexes repeatedly, and insulation can become rubbed through, causing shorts or open circuits.
Visual Wiring Inspection
- Unplug the washer.
- Open the washer and look along the wiring path from the lid lock assembly toward the control board. This path typically runs down the side of the cabinet near the hinges.
- Look for any visible damage:
- Rubbed-through insulation exposing bare copper wire.
- Discolored or burned wire insulation.
- Wires pinched or crushed between cabinet parts.
- Corroded or greenish terminal connectors.
- If you find damage, the harness must be replaced. Do not attempt to splice lid lock wiring, as it carries high voltage.
Continuity Testing of the Harness
If visual inspection shows no obvious damage:
- Unplug the washer.
- Locate both ends of the wiring harness—at the lid lock connector and at the control board connector.
- Disconnect both connectors.
- Set your multimeter to continuity.
- Touch one probe to a wire terminal at the lid lock end and the other probe to the corresponding terminal at the control board end.
- Test each wire individually. All should show continuity (a beep or low resistance).
- If any wire shows no continuity, it is broken internally or disconnected somewhere along the harness. The harness must be replaced.
When the Control Board Is the Problem
If you’ve tested the lid lock switch, solenoid, and wiring harness and all show normal resistance and continuity, the fault lies in the control board itself.
The control board contains a relay or solid-state switch that energizes the lid lock solenoid during the spin cycle. If this relay or switch fails, the solenoid will never receive power, even though the mechanical switch is detecting a closed lid correctly. Symptoms include the washer beeping and refusing to start despite the lid being fully closed and latched, or the lid remaining locked after the cycle even after a power reset.
Diagnosing a failed control board relay requires advanced troubleshooting: With the washer plugged in and running a cycle (or attempting to), a technician would measure voltage at the solenoid terminals during operation. A functioning board will deliver approximately 120VAC to the solenoid coil during the spin phase. If 0VAC is present, the board’s relay has failed.
This is not a repair most DIY homeowners should attempt. Control board replacement is typically more expensive than lid lock assembly replacement and requires proper board handling (static electricity risks). If your testing points to the control board, consider professional service or verify the exact board part number for your model before proceeding.
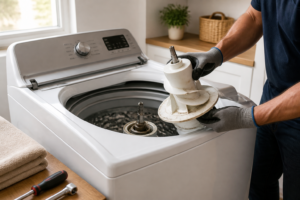
Replacing the Lid Lock Assembly on GE Top-Load Washers
If testing confirms the lid lock assembly (solenoid or switch) is faulty, replacement is the solution. The procedure varies slightly by model, but the basic process is consistent on GTW-series washers:
Parts and Tools Needed
- Replacement lid lock assembly (verify the exact part number for your model number against GE’s parts documentation).
- Phillips and flathead screwdrivers.
- Needle-nose pliers.
- Multimeter.
- Work gloves and safety glasses.
Removal Overview
- Unplug the washer. Wait 5 minutes for capacitors to discharge.
- Open the washer lid fully and prop it up or support it so it doesn’t close on you.
- Locate the lid lock assembly—on GE top-loaders, it’s typically mounted to the cabinet just inside the top edge, usually on one side (left or right varies by model).
- Disconnect the electrical connector from the assembly.
- Unscrew the mounting bolts or rivets holding the assembly to the cabinet. Some models use screws; others use rivets that must be drilled out.
- Carefully remove the old assembly.
- Install the new lid lock assembly in the same position, securing with the appropriate fasteners (consult the new part’s instructions—it may include new screws if the old model used rivets).
- Reconnect the electrical connector, ensuring it’s fully seated.
- Close the lid and test by running a short cycle. The washer should fill, spin, and unlock normally.
For detailed, model-specific instructions, refer to the service manual for your GE washer. For an example of this process on a specific model, see our detailed guide on replacing the lid switch assembly on the GE GTW720BSNWS.
⚠️ Safety Warning: Electrical Hazard
GE washing machine lid lock circuits operate on 120VAC household voltage. Electrical safety is paramount:
- Always unplug the washer before disconnecting any electrical components. Even with the power off, capacitors in the control board may hold a charge. Waiting 5-10 minutes after unplugging allows these capacitors to discharge safely.
- Never test live voltage unless you are trained and qualified to do so. If you must measure solenoid voltage during operation for troubleshooting, use a properly rated multimeter, keep one hand in your pocket to prevent a complete circuit through your body, and never touch both the solenoid and ground or cabinet metal simultaneously.
- Do not attempt to splice or repair wiring carrying the solenoid voltage. Always replace damaged harnesses with original GE parts.
- If you are uncomfortable working with electrical components, stop and contact a professional. Electrical injury or damage to the control board can result from improper handling.
Frequently Asked Questions
How do I unlock the control lock on my GE washer?
The control lock feature (displayed as “LoC” or a padlock icon on the screen) is unlocked by pressing and holding the button labeled with a padlock icon for 3 seconds. This button is usually the dedicated Lock button or may be combined with functions like Delay Wash or Deep Fill. Check the button labels on your specific model. Once you press and hold for 3 seconds, the display should clear the “LoC” indicator and buttons will respond normally.
Why is my GE washer lid stuck closed and won’t unlock?
A stuck closed lid indicates a failure in the lid lock solenoid or mechanical latch mechanism. Try unplugging the washer for 10 minutes to allow the solenoid to fully discharge, then plug it back in and attempt to open the lid. If it opens, the solenoid was over-energized. If it remains stuck, do not force it—you risk breaking the latch assembly. Check for a manual release tab (red or blue cord) inside the cabinet, or contact a professional. The lid lock assembly will likely need replacement.
Can I bypass the lid lock on a G
Recommended Tools
Digital Multimeter
Nearly every diagnosis in this guide comes down to a continuity or voltage reading, and a basic digital multimeter handles all of them. Check current pricing on Amazon.
Appliance Repair Tool Set
A dedicated appliance tool set with nut drivers, Torx bits, and panel spudgers makes the disassembly steps in this guide far easier and prevents scratched panels and stripped screws. Check current pricing on Amazon.