Complete Samsung RS27T5200SR Troubleshooting Guide: Fan Noise, Defrost Drain, and Ice Bucket Problems
The Samsung RS27T5200SR is a popular French-door refrigerator known for reliability, but like all refrigeration units, it can develop issues with cooling fans, drainage systems, and ice makers. This comprehensive guide walks you through diagnosing and fixing the three most common problems homeowners encounter with this model: excessive fan noise, clogged defrost drains, and frozen ice buckets that won’t move. Each issue requires a different approach, but all are repairable without professional service calls.
Understanding the Samsung RS27T5200SR Fan System
Your RS27T5200SR contains two separate cooling fans that work together to maintain proper refrigeration. Understanding which fan is making noise is the first step toward a quiet refrigerator.
The Evaporator Fan (Freezer Compartment)
The evaporator fan is located inside the freezer compartment, typically behind the back wall panel. This fan circulates cold air from the freezing coils throughout both the freezer and refrigerator sections. When functioning properly, it produces a low, consistent humming sound. The evaporator fan in the RS27T5200SR operates almost constantly during normal cooling cycles.
The Condenser Fan (Rear Exterior)
The condenser fan sits at the bottom rear of your RS27T5200SR, near the compressor. This fan pulls air through the condenser coils to dissipate heat. It typically runs in shorter cycles than the evaporator fan and produces a moderate motor sound with some air-movement noise.
Identifying Fan Noise Problems in the RS27T5200SR
Normal vs. Abnormal Fan Sounds
Your RS27T5200SR will always produce some fan noise during operation. Learning to distinguish normal operation from problems saves you time and money.
Normal sounds: Low humming from the freezer area, occasional whooshing as air moves through ducts, rhythmic clicking when the compressor cycles on or off.
Problem sounds requiring investigation: Loud grinding or squealing, rattling or vibration, grinding that sounds like ice scraping, fan blade contact with housing, loud chattering sounds.
The Ice Scraping Sound: Evaporator Fan Ice Buildup
The most common fan noise complaint for the RS27T5200SR is a loud scraping or grinding sound coming from the freezer. This typically indicates that ice has accumulated on the evaporator fan blades or the fan is partially frozen in place. As the fan tries to spin, the ice-covered blades contact the fan housing, creating a distinctive grinding noise.
This problem develops because the evaporator coils naturally frost during operation. A defrost cycle should melt this frost and drain it away through the defrost drain system. When that drain becomes blocked (which we’ll address later), water backs up and refreezes on the evaporator fan.
Squealing from the RS27T5200SR Rear Fan
If you hear squealing from the back of your RS27T5200SR, especially near the bottom, the condenser fan motor bearings are likely failing. This indicates the motor requires replacement. Squealing is different from normal motor noise and will worsen over time.
Rattling and Vibration Issues
Rattling sounds suggest loose components. Check that your RS27T5200SR is level—use a bubble level on both front-to-back and side-to-side axes. Also verify that nothing is stored in the bottom drawers in a way that vibrates during fan operation.
How to Quiet a Noisy Evaporator Fan in the RS27T5200SR
If the noise is coming from the freezer area (ice scraping sounds), follow these steps to defrost the evaporator fan and restore quiet operation.
Step 1: Unplug Your RS27T5200SR
Always disconnect power before performing any internal work. Unplug the refrigerator from the wall outlet. Wait 5 minutes to allow capacitors to discharge.
Step 2: Remove the Freezer Back Panel
Inside the freezer compartment of your RS27T5200SR, you’ll see a plastic panel covering the back wall. This panel is typically held in place with 4-6 screws and slots that engage with the freezer frame.
- Remove any ice bins or shelves blocking access
- Locate screws along the top, sides, and bottom of the back panel
- Use a Phillips head screwdriver to remove all fasteners
- Gently pull the panel away from the wall—there may be slots that require slight upward movement before the panel releases
- Set the panel aside carefully to avoid damaging it
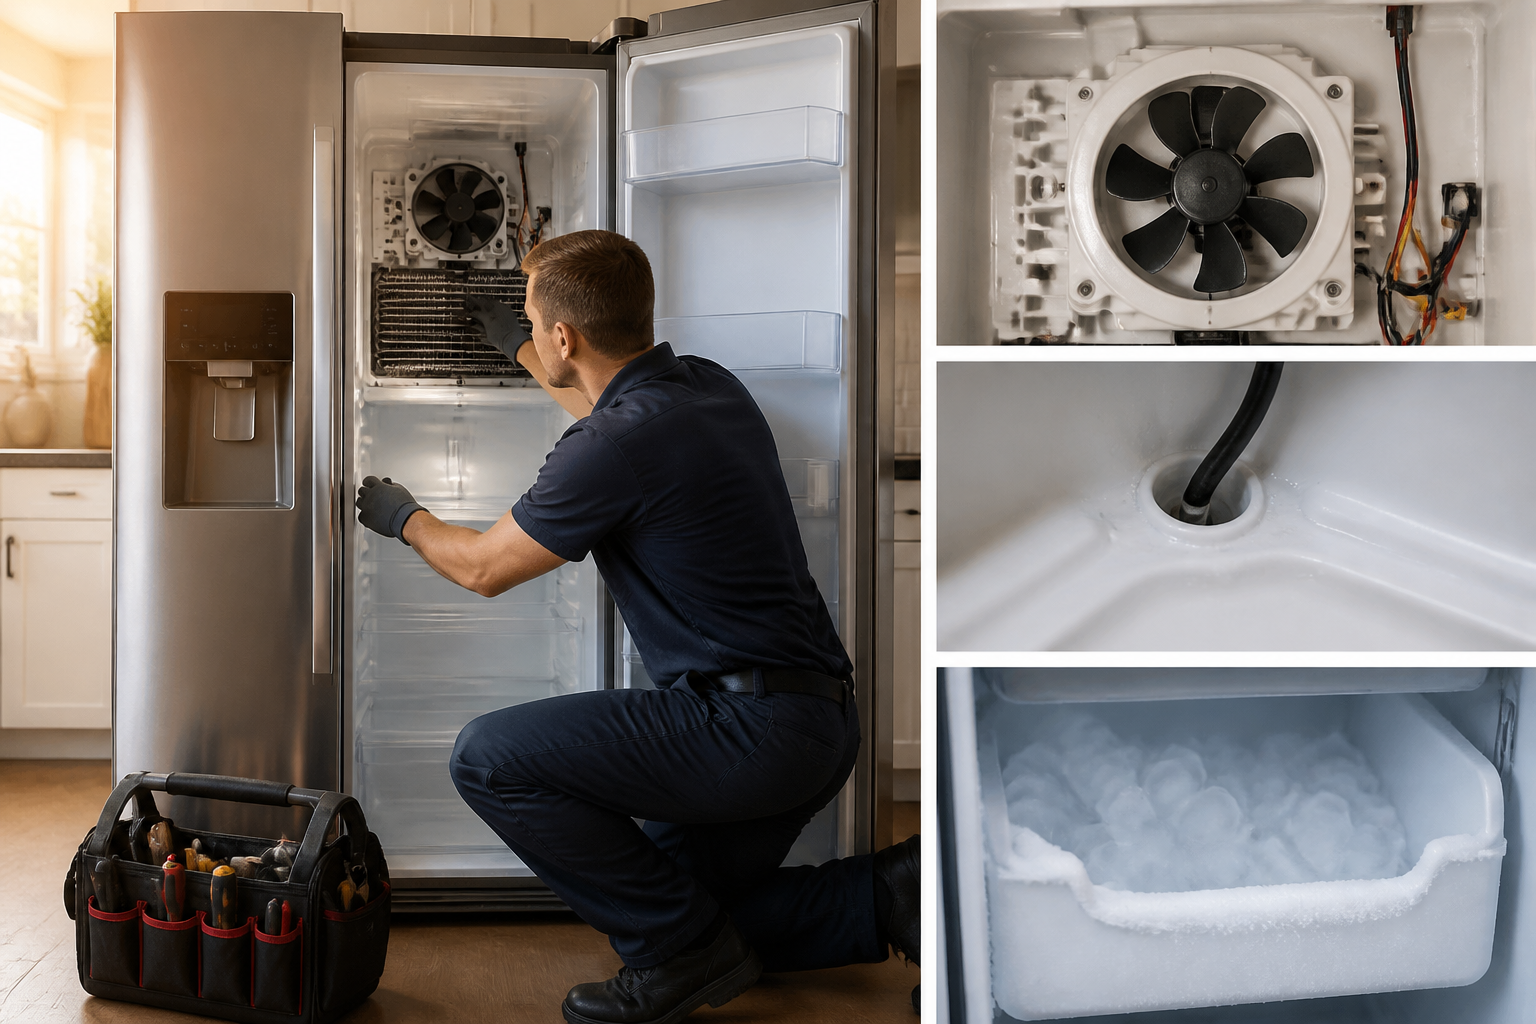
Step 3: Inspect the Evaporator Fan Blades
Behind the back panel, you’ll see the evaporator fan assembly for your RS27T5200SR. The fan consists of a motor with 2-4 plastic blades. Examine whether ice has accumulated on the blades or around the fan housing.
You’re looking for:
- Thick ice coating on fan blades
- Frozen buildup inside the fan housing shroud
- Ice bridge between blade tips and the plastic housing
- Visible frost that blocks blade movement
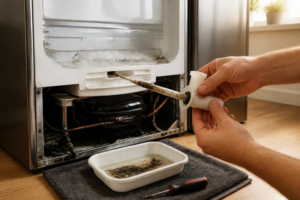
Step 4: Defrost the Evaporator Fan
The safest method to defrost the evaporator fan in your RS27T5200SR is passive thawing combined with gentle removal of ice.
- Leave the freezer empty and the refrigerator unplugged (you’ve already done this)
- Place towels on the freezer floor to catch meltwater
- If substantial ice is visible, you can carefully pour room-temperature water over the affected areas—do NOT use hot water as sudden temperature changes can crack plastic components
- Use a plastic (not metal) scraper to gently loosen ice buildup around the fan housing. Work slowly; aggressive scraping can damage the shroud or fan blades
- Allow 2-4 hours for complete thawing if the ice buildup is heavy
- Once thawed, manually rotate the fan blades slowly with your finger—they should spin freely with no resistance
Step 5: Verify Blade Clearance
Before reassembling, ensure the evaporator fan in your RS27T5200SR has proper clearance. Spin the blades gently and listen for any contact noise. The blades should rotate smoothly without touching the housing at any point. If you hear scraping, more ice remains or the housing is bent.
Step 6: Check the Defrost Drain Connection
While you have the back panel removed from your RS27T5200SR, inspect the small tube or opening at the bottom of the evaporator compartment. This is part of the defrost drain system. Look for ice crystals or debris blocking the opening. If blocked, this is why ice accumulated on your fan. We’ll address drain cleaning in the next section.
Step 7: Reassemble and Test
Reinstall the back panel by reversing the removal steps. Ensure all screws are tight and slots are properly engaged. Plug in your RS27T5200SR, set the temperature control to its normal setting, and run the refrigerator for 30 minutes. Listen for the fan—it should produce only quiet humming with no grinding or scraping sounds.
The Defrost Drain System on the RS27T5200SR
How the Defrost System Works
Your RS27T5200SR uses an automatic defrost cycle that prevents frost accumulation on cooling coils. During this cycle, heating elements warm the evaporator coils, melting any frost buildup. The resulting water must drain out of the freezer compartment and flow toward the condenser unit at the back of the refrigerator, where it evaporates in normal operation.
The defrost drain on the RS27T5200SR is a small tube located at the bottom rear of the freezer compartment, typically behind the back panel you just removed. The drain connects to a larger tube that runs behind the refrigerator cabinet, eventually connecting to the drain pan beneath the unit.
Why the Defrost Drain Clogs
The defrost drain on your RS27T5200SR can become blocked by:
- Ice crystals that form when the drain partially freezes
- Food particles, dust, or debris pulled into the drain during defrost cycles
- Algae or mold growth inside the drain tube (usually black slime)
- Bent or kinked drain tubing that traps water
- Ice cream or other substances accidentally dropped into the drain opening
When the defrost drain clogs on your RS27T5200SR, water from the defrost cycle has nowhere to go. It backs up into the freezer, refreezes, and collects on the evaporator coils and fan—leading directly to the ice scraping noise you heard earlier.
Locating the Defrost Drain on the RS27T5200SR
The primary drain opening on your RS27T5200SR is found at the very bottom of the freezer compartment, behind the back wall panel, toward the rear corner. It’s a small opening (typically ⅜ to ½ inch diameter) with a short plastic tube. You may need to remove the evaporator fan shroud or move it aside slightly to access it clearly, though on the RS27T5200SR, the drain is usually visible once the back panel is removed.
Cleaning the Defrost Drain on Your RS27T5200SR
Supplies You’ll Need
- Warm water (not boiling)
- Small turkey baster or syringe (without needle) for injecting water
- Flexible plastic tubing or pipe cleaner sized to fit the drain opening (typically ⅜ inch)
- Soft-bristled brush
- Towels for catching water
- Access to the area beneath your RS27T5200SR
Step 1: Prepare the Work Area
Your RS27T5200SR will have water drain out during this procedure. Lay towels both inside the freezer compartment and on the floor beneath the refrigerator to catch runoff.
Step 2: Locate and Clear the Freezer Drain Opening
With the back panel removed (from the fan noise repair above), find the defrost drain opening at the bottom rear of the freezer on your RS27T5200SR. You may see ice or slime around this opening. Use your plastic tubing or a straightened (but not kinked) plastic pipe cleaner to gently probe the drain opening, trying to dislodge any immediate blockage.
Do not use metal objects, as they can puncture the plastic drain tubing or crack the freezer wall.
Step 3: Flush with Warm Water
Using a turkey baster or syringe, inject warm water into the drain opening on your RS27T5200SR. Squeeze the water slowly and observe whether it flows through. If water backs up, you’ve found a clog.
Continue injecting warm water and gently probing with the plastic tube simultaneously. This combination often dislodges blockages. You should feel resistance give way as the clog breaks free.
Step 4: Access the Drain Tube Behind the Refrigerator
The defrost drain on your RS27T5200SR runs from the freezer compartment down to a larger drain pan beneath the unit. To fully clear the system, you need access to this tube.
- Unplug the RS27T5200SR
- Pull the refrigerator away from the wall carefully (it may take two people—don’t bend the water supply line if it has an ice maker)
- Look at the bottom rear of the unit for a plastic drain pan and the drain tube running into it
- The drain tube is typically ½ inch black or clear plastic tubing
- Locate where this tube enters the pan (there’s usually a simple slip connection)
Step 5: Clean the Main Drain Tube
At the bottom of your RS27T5200SR, the drain tube leading into the drip pan can also become clogged with the same debris affecting the freezer drain.
- Carefully disconnect the drain tube from the pan by gently twisting and pulling—don’t force it
- Over a bucket or sink, pour warm water through the tube to flush it
- If water doesn’t flow, insert flexible plastic tubing (smaller diameter than the drain tube) and gently work it through to clear the blockage
- Once clear, flush with warm water one more time
- Reconnect the tube to the drain pan, ensuring the connection is tight
Step 6: Clean the Drain Pan
The drain pan beneath your RS27T5200SR collects the defrost water. Over time, algae and mold grow in this stagnant water, producing foul smells and potentially blocking the drain tube opening on the pan itself.
- Slide the drain pan out from under the RS27T5200SR (it typically pulls straight out)
- Empty any standing water
- Scrub the pan with a soft brush and warm water mixed with a small amount of white vinegar
- Rinse thoroughly
- Slide the pan back into place, ensuring the drain tube opening on the pan aligns properly with the incoming tube
Step 7: Final Flush and Reassembly
Plug in your RS27T5200SR and let it run through one defrost cycle (approximately 4 hours, though cycles vary). Observe the drain pan beneath the unit—you should see water accumulation as the defrost cycle completes, indicating proper drainage. The water will eventually evaporate from the pan during normal operation.
If no water appears in the pan after a full defrost cycle, the freezer drain on your RS27T5200SR may still be partially blocked. Repeat the flushing procedure.
Frozen Ice Bucket Problems on the RS27T5200SR
Why the Ice Maker Bucket Freezes in Place
The ice bucket on your RS27T5200SR sits in the freezer compartment, collecting ice produced by the ice maker mechanism. Under normal conditions, the bucket slides freely in and out of its housing for refilling and cleaning.
However, ice can accumulate around the bucket’s edges and bottom, eventually freezing it in place. This happens because:
- Excess water from the ice maker freezes on the bucket exterior
- Humidity in the freezer causes condensation that freezes on the bucket
- Ice buildup inside the housing freezes the bucket’s support rails
- A defrost drain clog causes water to back up into the ice maker area (connecting back to the drainage issues discussed previously)
A frozen-in-place ice bucket on your RS27T5200SR is not just an inconvenience—it can damage both the bucket and the ice maker housing if you force it out.
Safe Removal of a Frozen Ice Bucket
Never yank or apply excessive force to a frozen ice bucket on your RS27T5200SR. This will crack the plastic bucket and potentially break the guide rails in the ice maker housing.
Gentle Thawing Method
- Unplug your RS27T5200SR
- Fill a spray bottle with room-temperature water (not hot—avoid thermal shock to plastic)
- Spray the sides and edges of the ice bucket where it meets the housing, allowing water to run into the seams
- Wait 5-10 minutes for the ice to soften
- Gently attempt to pull the bucket straight out—do not rock or twist it
- If it doesn’t move, repeat the spraying and waiting process
- Once the bucket begins to move even slightly, pull steadily but slowly—do not jerk
- If it becomes stuck again, repeat the spraying process
Using Warm Water for Faster Thawing
If the gentle spray method isn’t working after 20 minutes, you can use warm (not hot) water:
- Have your RS27T5200SR unplugged
- Carefully pour warm (approximately 110-120°F) water around the perimeter of the ice bucket
- Pay special attention to the corners and the bottom where the bucket sits in the housing
- Let the water work for 5 minutes
- Gently pull the bucket straight out
- Immediately dry both the bucket and the interior of the ice maker housing with towels to prevent refreezing
Critical warning: Do not use boiling water. The sudden temperature change can crack the plastic bucket or the ice maker housing on your RS27T5200SR.
What to Do Once the Bucket Is Free
After successfully removing the frozen ice bucket from your RS27T5200SR:
- Empty any ice from the bucket
Recommended Parts & Tools
Samsung Refrigerator Defrost Drain Unclogger Kit
A clogged defrost drain is the primary cause of frozen ice buckets and water backup in Samsung refrigerators. This specialized kit includes flexible cleaning tools and brushes designed to reach and clear the drain line without damaging the tubing. Check current pricing on Amazon.
Evaporator Fan Motor for Samsung RS27T5200SR
If the fan noise persists after cleaning the drain, the evaporator fan motor may be failing and require replacement. This OEM-compatible motor is specifically designed for Samsung side-by-side refrigerators and restores proper airflow while eliminating grinding or rattling sounds. Check current pricing on Amazon.
Professional Appliance Cleaning Brush Set
These stainless steel brushes and pipe cleaners are essential for removing ice buildup and debris from the defrost drain system and condenser coils during maintenance. The variety of brush sizes allows you to access tight spaces and restore proper drainage throughout the refrigerator. Check current pricing on Amazon.
The Defrost Drain Unclogger That Actually Clears Ice Buildup in the RS27T5200SR
If water’s pooling under your crisper drawers or the ice maker is backing up, a frozen or debris-clogged defrost drain is almost always the culprit on this model. This kit gives you the right tools to flush and clear the line without having to pull the fridge apart further than necessary.
What works
- The pressure-flush design actually breaks through ice blockages in the drain line—not just pushing water around them like a turkey baster does.
- Comes with flexible tubing sized for Samsung’s defrost drain port, so you’re not improvising with garden hoses or cramming standard plumbing fittings into tight spaces.
- Lets you test the drain flow before you reassemble everything, saving you the frustration of buttoning it back up only to find water still pooling a week later.
What doesn’t
- If the blockage is deep in the main drain line running under the fridge, this kit clears the accessible defrost drain port but may not reach a clogged main line—you’ll need a wet-vac or professional drain snake for that.
- Requires you to pull the kickplate and access panels; if you’re uncomfortable removing a few screws and working around water, this becomes more stressful than it should be.
Most of the time I order parts based on the symptom alone—pooling water usually points to the evaporator drain—but I’ve had jobs where the blockage was stubborn enough that I tried this kit three times over two weeks before finally calling in to replace the entire drain assembly. Don’t wait that long; if it doesn’t clear on the first solid flush, move to replacing the drain line itself. Samsung Refrigerator Defrost Drain Unclogger Kit
This post contains affiliate links. As an Amazon Associate, I earn from qualifying purchases at no extra cost to you.