Complete Guide to Replacing the Samsung DA97-15217B Ice Maker
The Samsung DA97-15217B ice maker module is a critical component in many Samsung refrigerator models. If your refrigerator has stopped producing ice or is making unusual noises from the ice maker compartment, you may need to replace this unit. This comprehensive guide walks you through the entire replacement process, from identifying the problem to testing your newly installed ice maker.
Understanding the DA97-15217B vs. DA97-15217A: What Changed
The DA97-15217B represents an updated version of the earlier DA97-15217A ice maker module. While both units share identical physical dimensions and mounting points, making them true direct replacements, the DA97-15217B includes several internal improvements that make it worth specifying when ordering a replacement.
- Improved ice maker module: The DA97-15217B features a redesigned internal ejector mechanism that reduces ice jam occurrences and improves overall reliability
- Enhanced thermostat assembly: The B revision includes a more precise temperature sensor that better detects when ice has properly frozen before attempting ejection
- Updated solenoid valve connection: Minor design improvements to the water inlet valve connector reduce corrosion-related failures
- Same physical fitment: Despite internal improvements, the DA97-15217B maintains 100% compatibility with all refrigerators that originally used the DA97-15217A
If you have an older Samsung refrigerator currently using the DA97-15217A and it fails, installing the DA97-15217B is not only acceptable but recommended, as you’ll receive the benefit of these reliability improvements without any modifications to your appliance.
Compatible Samsung Refrigerator Models for the DA97-15217B
The DA97-15217B ice maker module is compatible with numerous Samsung refrigerator models. Check your refrigerator’s model number on the interior wall or your documentation to confirm compatibility before purchasing a replacement unit.
- Samsung RS25J500D series (all sub-models)
- Samsung RF25HMEDBSR and RF25HMEDBSS
- Samsung RF28HMEDBSR and RF28HMEDBSS
- Samsung RFG293HARS and RFG293HARV
- Samsung RH25H5611SR series
- Samsung RF265BEAESR and RF265BEAEWW
- Samsung RF268BEAESR series
- Samsung RF30HMEDBSR
- Samsung RSG309 series (select models)
- Samsung RSH1DTBP series
This is not an exhaustive list. If your model is not listed, contact Samsung customer service with your complete model number to verify compatibility. The model number is typically located on a sticker inside the refrigerator, often on the interior wall near the top.
Symptoms That Indicate You Need to Replace the DA97-15217B Ice Maker
Before replacing your ice maker module, confirm that the symptoms you’re experiencing genuinely indicate ice maker failure rather than other refrigerator issues.
- No ice production: The refrigerator has been running normally for 24+ hours with water supply connected, but the ice bin remains empty
- Intermittent ice production: The ice maker occasionally produces ice but long periods pass without any ice ejection
- Unusual grinding or buzzing sounds: Loud mechanical noises coming from the ice maker compartment during the ice-making cycle, often indicating a seized ejector motor
- Cracked plastic housing: Physical damage to the DA97-15217B ice maker body visible in the freezer compartment
- Water leaking into the ice bucket: Water trickling directly into the ice bin rather than freezing properly inside the ice maker module
- Ice maker arm stuck in up position: The feeler arm that signals when to stop ice production remains raised even when the bucket is empty
Before replacing the ice maker, verify that your refrigerator has water pressure at the inlet valve and that the water line is not kinked or frozen. A non-functional DA97-15217B is the correct diagnosis only after confirming water supply issues have been ruled out.
Tools and Materials You’ll Need
Gather these items before beginning your replacement to avoid interruptions during the repair process.
- Replacement DA97-15217B ice maker module
- Flathead screwdriver (for removing mounting screws)
- Phillips head screwdriver (for any cabinet screws if needed)
- Towel or bucket (to catch any residual water)
- Needle-nose pliers (optional, for handling small connectors)
- Multimeter (optional, for testing electrical connections before replacement)
You do not need to remove the entire refrigerator cabinet or drain the water system for this replacement. The DA97-15217B can be accessed and replaced with the refrigerator in place and operational.
⚠️ Safety Warning for Ice Maker Replacement
Before beginning any work on your Samsung refrigerator ice maker:
- Turn off the water supply: Locate the water shut-off valve for your refrigerator (typically located beneath the sink or at the main water line) and close it completely. This prevents water from flowing into the ice maker during disconnection
- Unplug the refrigerator: Disconnect the power cord from the electrical outlet. This eliminates electrical shock risk when handling the wire harness connected to the DA97-15217B
- Wait 5 minutes: Allow residual electrical charge to dissipate from the refrigerator’s control circuits before touching any internal components
- Do not force components: The wire harness and mounting screws should disconnect smoothly. Excessive force can damage the new DA97-15217B before installation
Step-by-Step Replacement Guide for the DA97-15217B Ice Maker
Step 1: Prepare Your Refrigerator and Work Area
- Turn off the water supply to your refrigerator at the shut-off valve
- Unplug the refrigerator from the electrical outlet
- Wait 5 minutes for electrical discharge
- Spread a towel on the floor beneath the ice maker compartment to catch any water that drips during disconnection
- Open the freezer door and locate the ice bucket directly below the DA97-15217B ice maker module
Step 2: Remove the Ice Bucket
- Grasp the ice bucket with both hands on either side
- Pull the bucket straight outward toward you with steady, even pressure
- Do not tilt or angle the bucket; pulling straight out prevents damage to the bucket edges and the ice maker mounting area
- Set the bucket aside on your towel. Some residual water may still be in the bottom
- Inspect the interior of the ice maker compartment for any visible ice buildup, which should be cleared away before proceeding
Step 3: Locate and Remove the Mounting Screws
- Look directly at the DA97-15217B ice maker module, which should now be fully visible without the bucket in place
- Identify three mounting screws: two on the left side of the module and one on the right side
- The left screws are positioned approximately 2 inches from the top and bottom of the ice maker housing
- The right screw is located at approximately the midpoint height of the module
- Using your flathead screwdriver, loosen all three screws by turning counterclockwise until they are completely removed
- Place the three screws in a small container so they don’t get lost
- Do not attempt to remove the screws from their holes too forcefully; they should come free with moderate pressure
Step 4: Disconnect the Wire Harness
- Behind or beneath the DA97-15217B ice maker module, locate the wire harness connector
- The connector typically has a small plastic tab or clip on one side
- Press the clip inward (toward the connector) while gently pulling the harness away from the ice maker
- The connector should separate without resistance; if it doesn’t, ensure you are pressing the release clip correctly
- Set the disconnected harness aside carefully so the connector is not bent or damaged
- Inspect the connector pins on both the harness and the ice maker module for any visible corrosion or damage; they should be shiny and evenly spaced
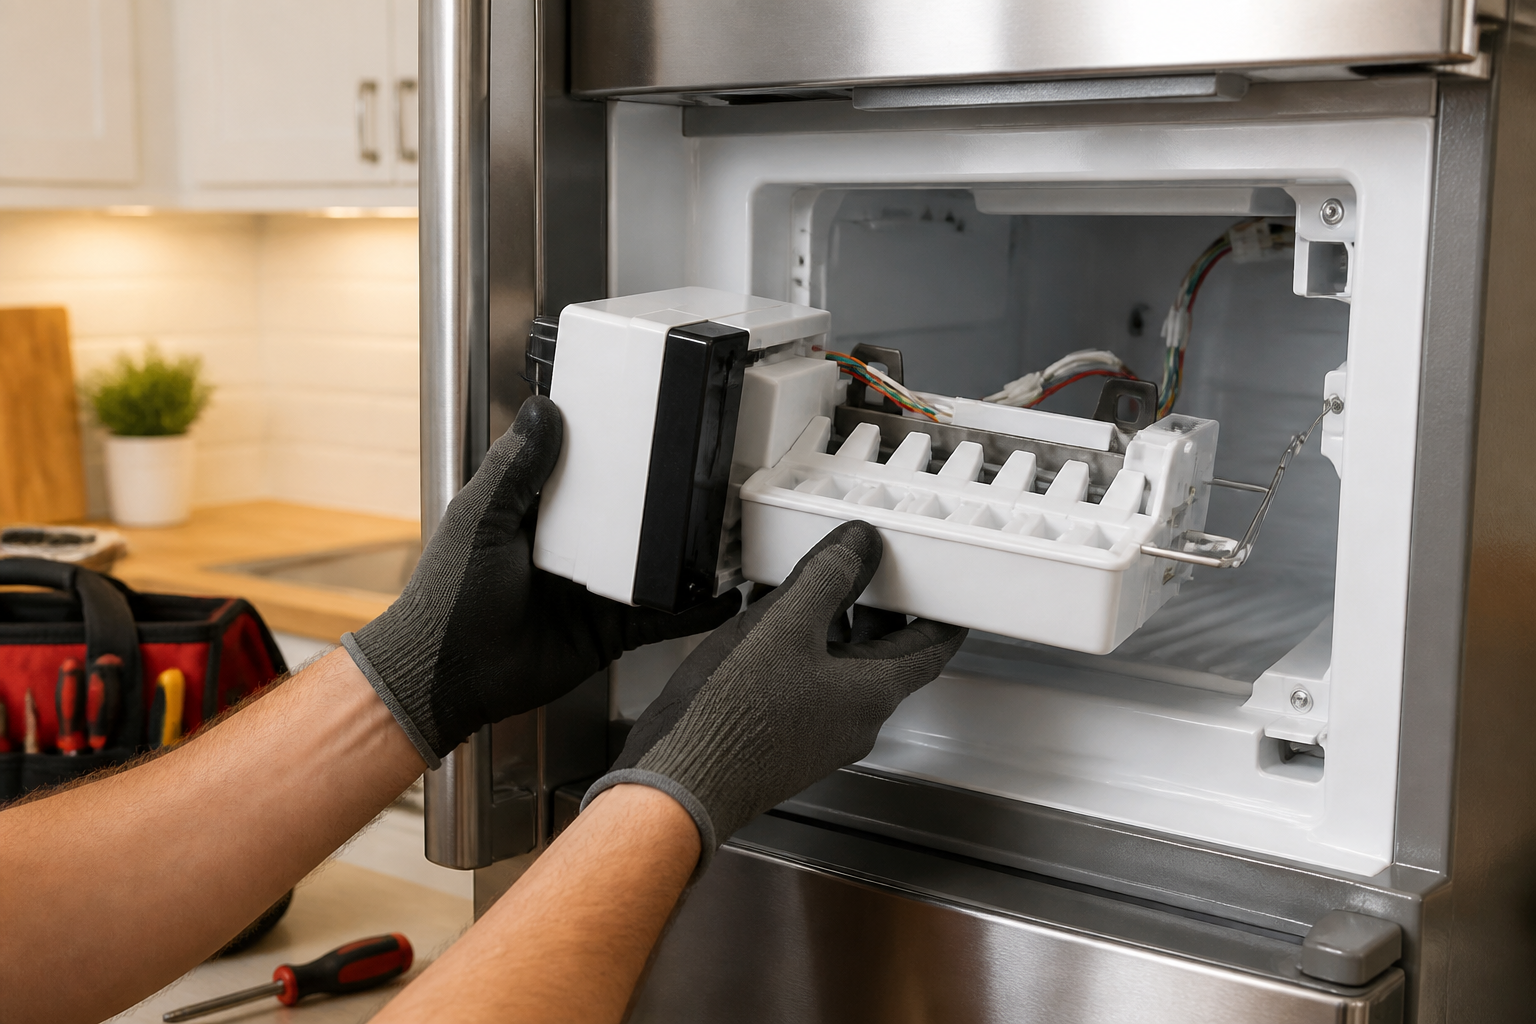
Step 5: Remove the Old Ice Maker Module
- With the screws removed and the wire harness disconnected, the DA97-15217B’s predecessor should now be free to move
- Grasp the ice maker module on both sides and pull it straight outward, parallel to the freezer wall
- Slide it out completely, checking for any additional clips or restraints that may be holding it (most models have only the three screws and one connector)
- Place the old ice maker module on your towel to catch any remaining water
- Inspect the empty mounting location for any debris, ice buildup, or water. Wipe the area clean with a dry cloth
Step 6: Install the New DA97-15217B Ice Maker Module
- Before installation, compare the new DA97-15217B with the mounting location to ensure it is oriented correctly. The ice chute (the opening where ice exits) should face downward into the ice bucket area
- Carefully slide the new DA97-15217B ice maker module into the mounting location, inserting it straight inward with even pressure
- The module should slide smoothly into place. Stop if you feel excessive resistance
- Position the module flush with the freezer compartment wall
- Using your flathead screwdriver, insert and tighten the three mounting screws into their original positions: two on the left and one on the right
- Tighten screws firmly but do not over-tighten, which can crack the plastic housing of the DA97-15217B. Screws should be snug with moderate pressure from the screwdriver
Step 7: Connect the Wire Harness
- Locate the wire harness that was disconnected from the old ice maker
- Position the connector so it aligns with the matching port on the new DA97-15217B
- Push the connector onto the DA97-15217B port with steady, straight pressure until you hear or feel a click
- Verify that the clip on the connector is fully seated against the DA97-15217B
- Gently tug on the harness to confirm it is securely connected and does not pull free
- The wire harness should be routed neatly behind the ice maker module, not pinched or bent at sharp angles
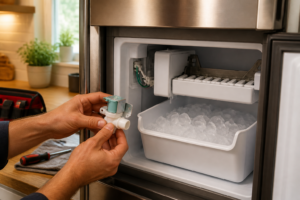
Step 8: Reinstall the Ice Bucket
- Grasp the ice bucket with both hands
- Align the bucket opening with the ice chute on the DA97-15217B ice maker module
- Push the bucket straight inward until it seats fully against the rear of the freezer compartment
- The bucket should fit snugly with no gaps between the bucket edge and the surrounding freezer walls
- Verify that the bucket is level and not tilted
Step 9: Restore Power and Water Supply
- Plug the refrigerator back into the electrical outlet
- Turn on the water supply at the shut-off valve by rotating it counterclockwise until it stops
- Wait 30 seconds for water pressure to stabilize in the line
- Close the freezer door and allow the refrigerator to return to normal operation
- Check for any water leaks around the ice maker compartment by inspecting the exterior and interior for drips
Initial Setup and Testing of Your New DA97-15217B Ice Maker
Force-Cycle Test
After installation, force your new DA97-15217B ice maker through a test cycle to verify correct operation before trusting it to produce ice automatically.
- Open the freezer door and locate the feeler arm (a thin metal or plastic arm extending from the side of the DA97-15217B)
- Manually push this arm downward and hold it in the down position for 3-5 seconds
- Release the arm and listen for a clicking sound, indicating the ice maker cycle has been triggered
- Within 5-10 seconds, you should hear the water inlet valve open and water flowing into the ice maker’s ice tray
- If you hear the valve but see no water, or if you hear no sounds at all, turn off the water supply and recheck your wire harness connection
First Ice Production Timeline
Under normal circumstances, your new DA97-15217B should produce its first batch of ice within 6-8 hours of installation. Complete one full cycle for optimal results:
- Hours 0-2: Water fills the ice tray inside the DA97-15217B and begins freezing
- Hours 2-6: Ice continues to freeze and solidify in the ice maker module
- Hours 6-8: Temperature sensors on the DA97-15217B detect that ice has fully frozen; the heating element briefly warms the tray, and the ejector mechanism pushes completed ice cubes into the bucket
- Hours 8+: The cycle repeats automatically every 90-120 minutes as long as the bucket has space
Do not be concerned if your first ice cubes are smaller than usual or appear slightly cloudy. This is normal for a newly installed DA97-15217B and typically clears within 2-3 ice cycles.
Troubleshooting: Ice Maker Not Producing Ice After DA97-15217B Installation
If your new DA97-15217B ice maker module has been installed and connected correctly but still produces no ice after 8+ hours, the issue likely involves water supply rather than the ice maker itself. Follow these diagnostic steps.
Check the Water Inlet Valve
The water inlet valve is the solenoid-controlled component that opens and closes to allow water into the DA97-15217B ice maker. Even a newly installed ice maker cannot produce ice without water pressure.
- Locate your refrigerator’s water inlet valve, typically positioned at the back of the refrigerator near the bottom or side where the water line enters
- Verify that the water supply line connected to this valve is not kinked, pinched, or frozen
- If the line appears frozen, turn off the water supply and allow the line to thaw at room temperature (this may take 1-2 hours)
- Open the freezer door and manually push the feeler arm downward to trigger an ice maker cycle
- Listen for a clicking sound at the water inlet valve (located externally on the refrigerator back). This click indicates the solenoid is opening
- If you hear the click but see no water flowing in the freezer, the valve itself may be blocked or defective
- If you hear no click at all, the electrical connection between the refrigerator’s control circuit and the water inlet valve is broken
Test Water Pressure at the Source
Insufficient water pressure can prevent the DA97-15217B from filling properly with water.
- Turn off the water supply to the refrigerator at the shut-off valve
- Locate the water line where it attaches to the refrigerator’s inlet valve
- Disconnect the water line by turning the fitting counterclockwise (use a small wrench if necessary)
- Turn the water supply back on briefly and direct the line’s water flow into a bucket or sink
- Observe the water pressure. A steady, continuous stream indicates adequate pressure; weak dribbling indicates insufficient pressure
- If pressure is weak, check the main water supply shut-off valve under your sink or in the basement and verify it is fully open
- If pressure remains weak after opening the main valve, contact your water utility to report low water pressure in your area
- Once you’ve verified adequate pressure, turn off the water supply and reconnect the water line to the refrigerator inlet valve
Inspect the Wire Harness Connection on the DA97-15217B
Even if the wire harness appears connected, a loose or corroded connection can prevent the ice maker module from receiving power signals.
- Unplug the refrigerator from the electrical outlet
- Wait 5 minutes for electrical discharge
- Open the freezer door and locate the wire harness connected to the DA97-15217B
- Gently grasp the connector and disconnect it by pressing the release clip
- Inspect the connector pins on both the harness end and the DA97-15217B end
- Look for any green or white corrosion on the pins, which indicates oxidation
- If pins are corroded, use a dry cloth
Recommended Parts & Tools
Samsung DA97-15217B Ice Maker Assembly
This is the direct replacement part for your Samsung refrigerator ice maker. Having the exact OEM part on hand ensures compatibility and proper functionality after installation. Check current pricing on Amazon.
Appliance Repair Tool Set
This comprehensive set includes the screwdrivers, hex keys, and socket tools needed to safely disconnect and remove the old ice maker assembly. Having the right tools prevents damage to your refrigerator’s interior components during the replacement process. Check current pricing on Amazon.
White Vinegar Food Grade Cleaning Solution
Use this to clean the ice maker housing and water line connections before installing your new assembly, removing any mineral deposits or debris that could affect performance. Proper cleaning ensures optimal ice production and prevents future clogs. Check current pricing on Amazon.
The Ice Maker Assembly That Actually Stops Your Samsung from Going Silent
If your Samsung refrigerator has completely stopped making ice or the ice maker is cycling but producing nothing, this is the part you need—not a cleaning fix or a water line adjustment. The DA97-15217B is the entire ice maker module, and when it fails, there’s no getting around a replacement.
What works
- Fits multiple Samsung models without adapter plates or modifications—the connector and mounting tabs align exactly as Samsung designed them.
- The motor and fill mechanism come pre-assembled, so you’re not hunting for five different subcomponents and trying to snap them together in a cramped freezer space.
- Ice production resumes immediately after installation and water line reconnection—no priming or extended run-in period needed.
What doesn’t
- Not compatible with older Samsung models (pre-2012 roughly)—always verify your fridge’s model number matches the compatibility list before ordering.
- Installation requires unplugging the refrigerator and removing the ice bucket, which means you lose cold storage for 20–30 minutes during the swap.
I’ve had customers order a new water valve or assume the problem was a frozen fill tube, only to discover the ice maker motor itself had burned out—the symptoms look the same from the outside. If you’ve already ruled out a clogged water line and the ice maker isn’t even trying to cycle, order the Samsung DA97-15217B Ice Maker Assembly and plan for a 30-minute installation.
This post contains affiliate links. As an Amazon Associate, I earn from qualifying purchases at no extra cost to you.