How to Replace the Drum Belt on Your Whirlpool WED4815EW Electric Dryer
The Whirlpool WED4815EW is a reliable electric dryer, but like all dryers with drum systems, the belt will eventually wear out and break. When this happens, your drum stops spinning entirely, even though the motor continues to run. This comprehensive guide walks you through the complete drum belt replacement process for the WED4815EW, including inspection of related components that commonly fail at the same time.
Symptoms of a Broken Drum Belt on the WED4815EW
Before you begin disassembly, confirm that the belt is actually the problem. The WED4815EW exhibits several distinct symptoms when the drum belt fails:
- Drum does not spin at all: You hear the motor running, feel heat being generated, but the drum remains completely stationary.
- Motor runs but no tumbling action: The blower wheel and motor operate normally, producing heated air, but the drum never rotates during the cycle.
- Visible belt pieces inside the dryer: You may see shredded rubber or felt material inside the drum or lint trap when you open the door.
- Squealing or grinding noises before failure: A worn WED4815EW belt often makes high-pitched squealing sounds for days or weeks before breaking completely.
- Clothes remain wet after a full cycle: Since the drum isn’t tumbling, moisture cannot be removed from garments.
Correct Replacement Belt Part Number for the WED4815EW
The correct replacement belt for the Whirlpool WED4815EW is part number 341241. This is the OEM (Original Equipment Manufacturer) belt designed specifically for the WED4815EW and related Whirlpool electric dryer models. The belt is a serpentine-style rubber belt approximately 94 inches in circumference with a felt wear surface on the drum contact side.
Do not confuse this with part number 661570V, which is a different belt assembly used in other Whirlpool dryer models. Always verify the part number matches your WED4815EW before ordering to ensure compatibility.
Tools and Materials You’ll Need
Gathering the correct tools before you start makes the repair significantly faster and prevents damage to your WED4815EW components:
- Replacement belt part number 341241 (specific to WED4815EW)
- Needle-nose pliers
- Putty knife or flat-head screwdriver (for releasing spring clips)
- Work gloves to protect hands from sharp edges
- Flashlight or headlamp for interior visibility
- Socket set (10mm and 15mm sockets recommended)
- Ratchet wrench
- Wire connector or masking tape for labeling disconnected wires
- Drum roller assembly (optional, but recommended for replacement)
- Idler pulley assembly (recommended for replacement while disassembled)
⚠️ Safety Warnings
Electrical Hazard: Unplug the WED4815EW from the wall outlet before beginning work. Do not attempt this repair while the dryer remains plugged in. Even with the power off, wait 5-10 minutes to allow the heating element to cool completely, as it can reach temperatures exceeding 300°F during operation.
Entanglement Risk: Ensure the motor cannot accidentally turn on during reassembly. Keep the power cord disconnected from the electrical outlet throughout the entire repair process.
Sharp Edges: The metal cabinet and internal components of the WED4815EW have sharp edges. Wear work gloves and move slowly to avoid cuts.
Step-by-Step Drum Belt Replacement for the WED4815EW
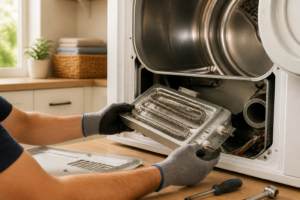
Step 1: Remove the Lint Screen and Housing
Start by opening the dryer door of your WED4815EW and locating the lint screen on the upper right interior edge of the door. Grasp the lint screen handle and pull it straight out. The lint screen sits inside a plastic housing. Once the lint screen is removed, you can see the housing clearly. Note the position of the lint screen housing for reassembly, as you’ll need to disconnect it from the exhaust duct.
The lint housing on the WED4815EW connects to the blower wheel exhaust duct with a spring clip. Use your fingers or needle-nose pliers to release this clip, then gently pull the lint screen housing away from the interior. Set it aside in a safe location.
Step 2: Release the Top Panel Using Putty Knife Clips
The top panel of the WED4815EW is secured by two spring clips located at the front left and front right corners of the cabinet. These clips are intentionally designed to be easy to release for maintenance.
Locate the seam where the top panel meets the front panel on both sides. Insert your putty knife into this seam at approximately a 45-degree angle, positioning it to contact the spring clip underneath the top panel. Gently push the putty knife forward to release the clip from its catch point. You should hear or feel a small click when the clip disengages. Repeat this process on the opposite side (right front corner) of the WED4815EW.
Once both clips are released, carefully lift the top panel toward the back of the dryer. The top panel is hinged at the rear, so it will open like a hood. Do not force it or you risk cracking the plastic. Set the top panel aside in a secure location where it won’t get damaged.
Step 3: Disconnect the Door Switch Wires
With the top panel open, you now have access to the door switch assembly on the WED4815EW. Locate the door switch on the left side of the interior, attached to the metal frame. The door switch has two wire connectors: typically a white wire and a blue or black wire.
Before disconnecting anything, photograph these wire positions with your smartphone for reference during reassembly. Use needle-nose pliers to gently squeeze the connector tabs and disconnect the wires from the door switch. Label these wires with masking tape if necessary to prevent confusion during reassembly.
Step 4: Remove the Front Panel
The front panel of the WED4815EW is held in place by several fasteners. Locate the metal clips at the top front corners of the cabinet—these release with gentle upward pressure. You should also find one or two bolts at the bottom front corners (typically 15mm bolts). Use your ratchet wrench and socket to remove these bottom bolts, then lift the front panel away from the dryer frame.
The front panel may have a slight lip that slides under the cabinet edge, so you may need to tilt it slightly as you pull to fully separate it. Set the front panel carefully aside, as it is relatively fragile.
Step 5: Remove the Drum Assembly
Now you can see inside the WED4815EW cabinet clearly. The drum is the large cylindrical component in the center. Before removing it, look at the routing of the broken belt around the drum, idler pulley, and motor pulley. Take a photograph of the current belt path for reference during reassembly.
The drum is held in place by a center support bearing in the rear and drum rollers at the front. To remove the drum, you must first disconnect the blower wheel duct (if not already done) and then slide the drum forward and out of the cabinet.
On the WED4815EW, the drum may have a retaining ring or clip at the front. Locate this component and release it using your needle-nose pliers if necessary. With these disconnected, you can now grasp the front edge of the drum and carefully pull it straight out toward you. The drum is heavy (approximately 15-20 pounds), so use proper lifting technique and ask for assistance if needed.
Once the drum is completely removed, set it on a clean work surface where you have clear visibility of the interior surfaces.
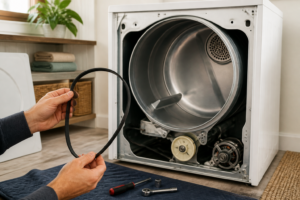
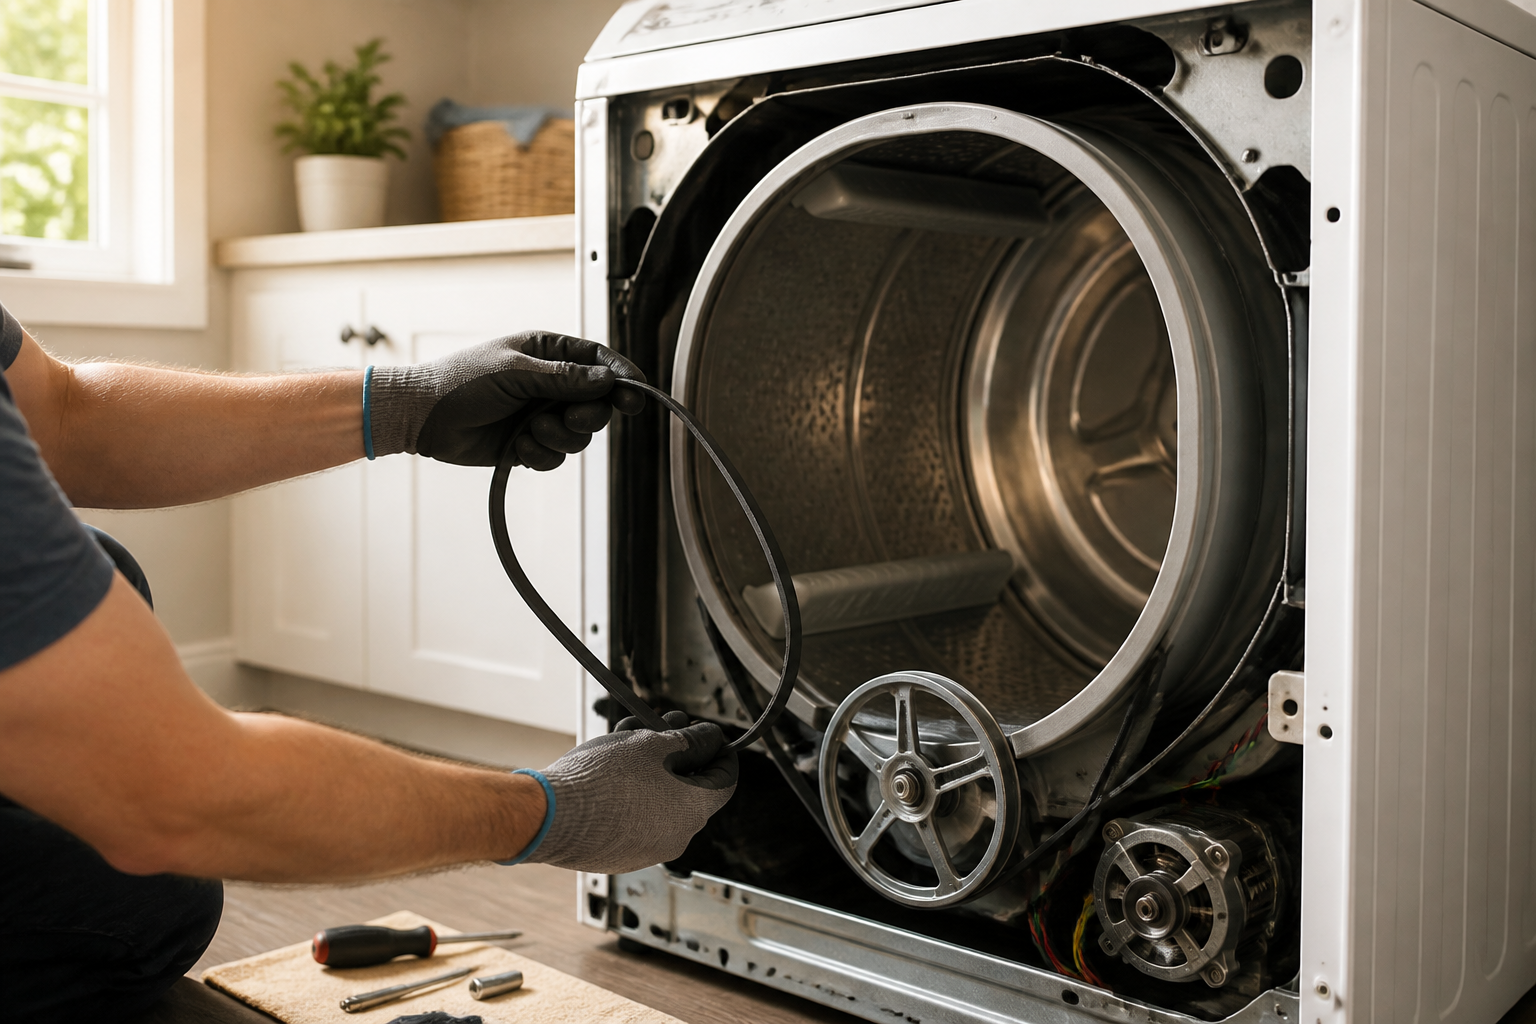
Understanding Belt Routing on the WED4815EW
Before installing the new belt (part number 341241), you must understand how the belt routes through the dryer mechanism. The WED4815EW belt path follows this sequence:
- The belt wraps around the outer circumference of the drum (the felt side of the belt contacts the drum surface)
- The belt extends from the drum down and around the idler pulley on the right side of the cabinet
- From the idler pulley, the belt continues down and under the motor pulley on the left-bottom side
- The belt completes its path by returning to the drum, creating a continuous loop that drives the drum rotation when the motor turns the pulley
The idler pulley maintains tension on the belt by using a spring mechanism. The motor pulley is connected directly to the motor shaft and rotates at high speed, pulling the belt and causing the drum to turn.
Inspect the Idler Pulley and Drum Rollers
While you have the WED4815EW disassembled, this is the ideal time to inspect components that work in conjunction with the belt. These parts often wear out simultaneously and should be replaced to prevent future breakdowns.
Idler Pulley Inspection
Locate the idler pulley on the right side of the WED4815EW cabinet. This pulley is spring-loaded and maintains tension on the belt. To check it, spin the pulley by hand. It should rotate freely and smoothly without grinding sounds or excessive wobbling.
If the pulley feels rough, makes grinding noises, or wobbles excessively, replace it immediately. A worn idler pulley will cause the new belt to slip and wear prematurely. The idler pulley can be removed by disconnecting the spring tension and unbolting it from the mounting bracket.
Drum Roller Inspection
The WED4815EW uses two drum rollers at the front to support the drum as it rotates. These rollers are mounted on the front support frame. Spin each roller by hand to check for smooth rotation. Any grinding, excessive friction, or flat spots on the roller surface indicate replacement is necessary.
If rollers are worn, they can cause uneven drum rotation and accelerate belt wear. Replacing these at the same time as the belt (part number 341241) ensures optimal dryer performance.
Installing the New Belt on the WED4815EW
Now that the drum is removed and you’ve inspected the idler pulley and rollers, you’re ready to install the new belt (part number 341241).
- Position the belt: Take the new part number 341241 belt and drape it over the top of the drum while the drum sits on your work surface. The felt (smooth) side should face outward, toward the drum surface.
- Guide the belt down the back: Pull the belt down and around the back of the drum opening, ensuring it sits evenly in the drum groove.
- Route around the idler pulley: Feed the belt down and around the idler pulley on the right side. The belt should sit in the pulley groove.
- Route around the motor pulley: Continue the belt path under the motor pulley at the bottom left. The belt should sit fully in this pulley groove as well.
- Return to the drum: Complete the belt loop by guiding it back up and around the front of the drum, ensuring even tension and proper seating.
- Verify routing: Compare your installed belt path to the photograph you took earlier. The belt should form a smooth, even loop without twists or crossed sections.
- Check pulley alignment: Spin the drum by hand to ensure the belt stays properly seated on all three components (drum, idler pulley, and motor pulley) during rotation.
Reassembling Your WED4815EW
With the new belt installed and the drum rollers/idler pulley inspected or replaced, you’re ready to reassemble the WED4815EW in reverse order.
- Reinstall the drum: Carefully slide the drum back into the WED4815EW cabinet, ensuring the belt stays properly seated around it. Align the drum with the center support bearing and ensure proper fit before fully inserting it.
- Reconnect any drum retaining clips or rings: Secure the drum in place using the fasteners you removed during disassembly.
- Reattach the lint screen housing: Reconnect the lint screen housing to the exhaust duct using the spring clip.
- Reinstall the front panel: Position the front panel back onto the WED4815EW, aligning the top clips and bottom bolt holes. Tighten the bottom bolts securely with your ratchet wrench.
- Reconnect door switch wires: Using your photograph from earlier, reconnect the white and blue/black wires to the door switch in their original positions.
- Close and secure the top panel: Carefully lower the top panel and press down on both front corners until you hear the spring clips engage with a click.
- Reinstall the lint screen: Insert the lint screen into its housing on the door interior, ensuring it sits fully in the opening.
- Close the dryer door: Shut the door securely.
Testing Your WED4815EW After Repair
Before you consider the job complete, perform a test run on your WED4815EW to confirm the repair was successful.
- Plug in the dryer: Reconnect the WED4815EW to the electrical outlet.
- Run a test cycle: Load a few towels into the drum to add weight and realistic load conditions.
- Select a high-heat cycle: Start a normal drying cycle on your WED4815EW using the highest heat setting.
- Listen and observe: Listen for normal motor and blower sounds. The drum should rotate smoothly without grinding or squealing noises.
- Check for heat output: Feel the exhaust vent to confirm heated air is exiting the dryer.
- Verify drum rotation: Open the door after 2-3 minutes (the drum will stop immediately when you open it) and look at the towel position. The towels should have moved position, confirming the drum was rotating.
- Complete the cycle: Close the door and allow the full cycle to complete.
- Inspect towels: Remove and inspect the towels. They should be dry and warm, not damp.
If the WED4815EW passes all these tests, your belt replacement repair is complete and successful. The dryer should return to normal operation with many more years of reliable service ahead.
Frequently Asked Questions
What is the correct replacement belt part number for the Whirlpool WED4815EW?
The correct part number is 341241. This is the OEM belt designed specifically for the WED4815EW and should be the only belt you consider for this model. Do not substitute with part number 661570V or any other belt, as compatibility issues may result in poor performance or additional component damage.
Can I replace just the belt on my WED4815EW, or should I replace the idler pulley and drum rollers too?
While it’s technically possible to replace only the belt, best practice recommends replacing the idler pulley and drum rollers at the same time. These components wear in tandem with the belt, and a worn idler pulley or rollers will cause premature failure of your new belt. The small additional cost now prevents a second disassembly in the near future.
How long does it take to replace the belt on a WED4815EW?
For someone with moderate mechanical experience, the complete belt replacement on a WED4815EW typically takes 2-4 hours, including disassembly, inspection, installation, and reassembly. Your first attempt may take longer as you familiarize yourself with the component locations and routing. Taking photographs during disassembly significantly speeds up reassembly.
Is it difficult to route the new belt correctly on the WED4815EW?
The belt routing on the WED4815EW is straightforward once you understand the three contact points: the drum, the idler pulley, and the motor pulley. Take a photograph before disassembly, and you’ll have a clear reference guide. Always verify the belt sits fully in each pulley groove and test-rotate the drum by hand before reassembling the cabinet.
How do I know if my WED4815EW belt is about to break?
Common warning signs include squealing noises during the drying cycle, visible fraying or tears in the belt when you open the dryer door, or gradually increasing difficulty in tumbling clothes. If you hear squealing from your WED4815EW, the belt is likely wearing out and should be replaced soon, even if it hasn’t broken yet.
What happens if I don’t replace a broken WED4815EW belt?
A broken belt means the drum cannot rotate, so your clothes will not dry. Additionally, the motor will continue to run while the belt is disconnected or broken, generating heat without tumbling action. This can potentially damage the motor or heating element over time. Replace the belt as soon as you notice the problem.
Can I use a universal belt instead of part number 341241 for my WED4815EW?
It is not recommended. Universal belts may have slightly different lengths, groove depths, or materials that don’t match the precise specifications of the WED4815EW. Using a non-OEM belt risks poor fit, slipping, and premature failure. Always use part number 341241 for your WED4815EW to ensure proper function and longevity.
Do I need to replace the drum seal on my WED4815EW when replacing the belt?
Recommended Parts & Tools
Whirlpool WED4815EW Drum Roller Replacement Kit
While replacing the drum belt on your WED4815EW, this roller kit is essential to have on hand since drum rollers often wear out simultaneously with the belt. Replacing them together prevents premature failure and additional service calls in the future. Check current pricing on Amazon.
OEMTOOLS 27151 Multi-Bit Screwdriver Set
This multi-bit screwdriver set provides the various Phillips and flathead sizes needed to remove the front panel and internal components of your dryer during belt replacement. Having the correct screwdriver bits prevents stripped screws and makes the job much faster. Check current pricing on Amazon.
Appliance Repair Vacuum Filter and Cleaning Brush Kit
This cleaning kit helps you remove lint and debris accumulated inside the dryer during disassembly, which improves airflow and efficiency once reassembled. A clean dryer interior extends the life of your new belt and other components. Check current pricing on Amazon.
The Drum Roller Kit That Prevents a Repeat Belt Failure on the WED4815EW
While you’re in there replacing the belt, inspect the drum rollers—they wear at the same rate as the belt, and a failed roller will shred a brand-new belt in weeks. Getting both done in one job saves you from opening up the dryer again in six months.
What works
- The rollers in this kit fit the WED4815EW without any modification—they’re the OEM part number, so no guessing on compatibility.
- Replacing them while the front panel is already off takes maybe an extra 15 minutes and eliminates the most common cause of premature belt wear.
- The kit includes the felt seal, which also wears down and can let lint into the drum cavity if left alone.
What doesn’t
- If your rollers still look smooth and spin freely, you don’t need this kit yet—only replace them if they’re visibly worn or noisy.
- This kit assumes you’re already inside the dryer for the belt job; it’s not worth ordering separately if the belt is still holding up.
I’ve had customers call back three weeks after a belt-only repair saying the drum is making noise again—nine times out of ten, it’s worn rollers grinding against the drum. Take 15 extra minutes now and swap them out while you have the dryer open. Whirlpool WED4815EW Drum Roller Replacement Kit
This post contains affiliate links. As an Amazon Associate, I earn from qualifying purchases at no extra cost to you.