
Samsung Ice Maker DA97-15217A Complete Replacement Guide
The Samsung DA97-15217A ice maker assembly is one of the most commonly replaced components in modern Samsung French door refrigerators. This comprehensive guide will walk you through the complete replacement process, helping you restore ice production to your refrigerator without the need for expensive service calls.
⚠️ Safety Warnings
Before beginning any repair work, follow these critical safety precautions:
- Unplug the refrigerator from the electrical outlet and wait at least 5 minutes before starting work
- Turn off the water supply valve behind the refrigerator to prevent water leakage
- Wear safety glasses when working with small parts and tools
- Keep fingers clear of moving parts during installation
- Have towels ready to catch any residual water from the water line connection
- Never force connections – damaged threads can cause water leaks
Compatible Samsung Refrigerator Models
The DA97-15217A ice maker assembly is specifically designed for Samsung French door refrigerators manufactured between 2018-2023. This part is compatible with the following model series:
- RF28 Series: RF28R7351SR, RF28R7201SR, RF28T5001SR, RF28T5021SR, RF28T5241SR, RF28M9580SG
- RF27 Series: RF27T5201SR, RF27T5241SR, RF27T5501SR, RF27R7351WG
- RF23 Series: RF23M8070SR, RF23M8090SG, RF23M8570SG, RF23R2823SR
- RF22 Series: RF22R7351SR, RF22A4121SR (select models)
The DA97-15217A replaces several older part numbers including DA97-12650A, DA97-13718A, and DA97-14474A. Always verify your model number on the refrigerator’s data plate before ordering the replacement part.
Symptoms Requiring Ice Maker Replacement
Before replacing your ice maker, confirm that the DA97-15217A assembly is actually defective by checking for these common symptoms:
- No ice production after performing a manual reset (holding the test button for 5 seconds)
- Ice maker motor not cycling – no humming or mechanical sounds during the harvest cycle
- Partial ice formation where cubes freeze but don’t drop into the collection bin
- Error codes on display: 22E (Ice Maker Error), 41C (Ice Room Fan Error)
- Continuous water filling without ice cube formation
- Ice cubes stuck to evaporator and requiring manual removal
- Mechanical grinding noises during operation indicating gear failure
Pre-Replacement Diagnostics
Before installing the new DA97-15217A, check the water inlet valve (part number DA97-07827B). A faulty water valve can cause similar symptoms and may damage your new ice maker. Test the water valve by:
- Accessing the valve behind the lower kick panel
- Using a multimeter to check resistance across the valve coil terminals (should read 200-500 ohms)
- Inspecting the valve screen for mineral buildup or debris
- Verifying water pressure at the valve inlet (minimum 20 PSI required)
Required Tools and Materials
Gather these tools before beginning the DA97-15217A replacement:
- Phillips head screwdriver (size #2)
- 1/4-inch nut driver or socket wrench
- Needle-nose pliers
- Flashlight or headlamp for visibility
- Clean towels for water cleanup
- Small container for collecting screws
- Digital camera (optional, for reference photos)
Step-by-Step DA97-15217A Installation Process
Step 1: Preparation and Access
🔨 Pro Tip from Dave
When you unplug the wiring harness from the old ice maker, take a photo first and look closely at the connector lock tab — these tabs are brittle on refrigerators over three years old and snap easily if you pull at the wrong angle, leaving you with a damaged harness that turns a $60 repair into a much bigger headache. Release the tab with a small flathead screwdriver while pulling straight back, not at an angle.
- Unplug the refrigerator and turn off the water supply valve
- Remove all ice from the ice bucket and set aside
- Open the freezer door and locate the ice maker assembly mounted on the left wall
- Take a reference photo of the wire connections before disconnecting anything
Step 2: Remove Ice Bucket and Access Panel
- Lift the ice bucket straight up to remove it from the freezer compartment
- Locate the clear plastic access cover below the ice maker (if equipped)
- Remove the access cover by pressing the tabs and pulling forward
- You should now see the ice maker mounting screws and wire connections
Step 3: Disconnect Electrical Connections
- Locate the main wire harness connector behind the ice maker assembly
- The connector is a white plastic housing with 6-8 wires leading to the main control board
- Gently press the locking tab on the connector and pull straight out
- If present, disconnect the secondary harness for the ice level sensor (2-wire connector)
- Carefully move the wire harnesses out of the way
Step 4: Remove Water Line Connection
- Locate the water supply line connection at the rear of the ice maker (1/4-inch blue or clear tubing)
- The connection uses a quick-disconnect fitting – do not use tools on this connection
- Press the release collar on the fitting while gently pulling the tubing straight out
- Have a towel ready to catch any residual water (approximately 1-2 ounces may drain)
- Inspect the tubing end for damage or excessive mineral buildup
Step 5: Remove Mounting Hardware
- Locate the three Phillips head mounting screws securing the ice maker to the freezer wall
- The screws are typically positioned: two on the top edge and one on the bottom right
- Remove the top-left screw first, then the top-right screw
- Support the ice maker assembly while removing the final bottom screw
- Keep all screws in a safe container – they will be reused with the new DA97-15217A
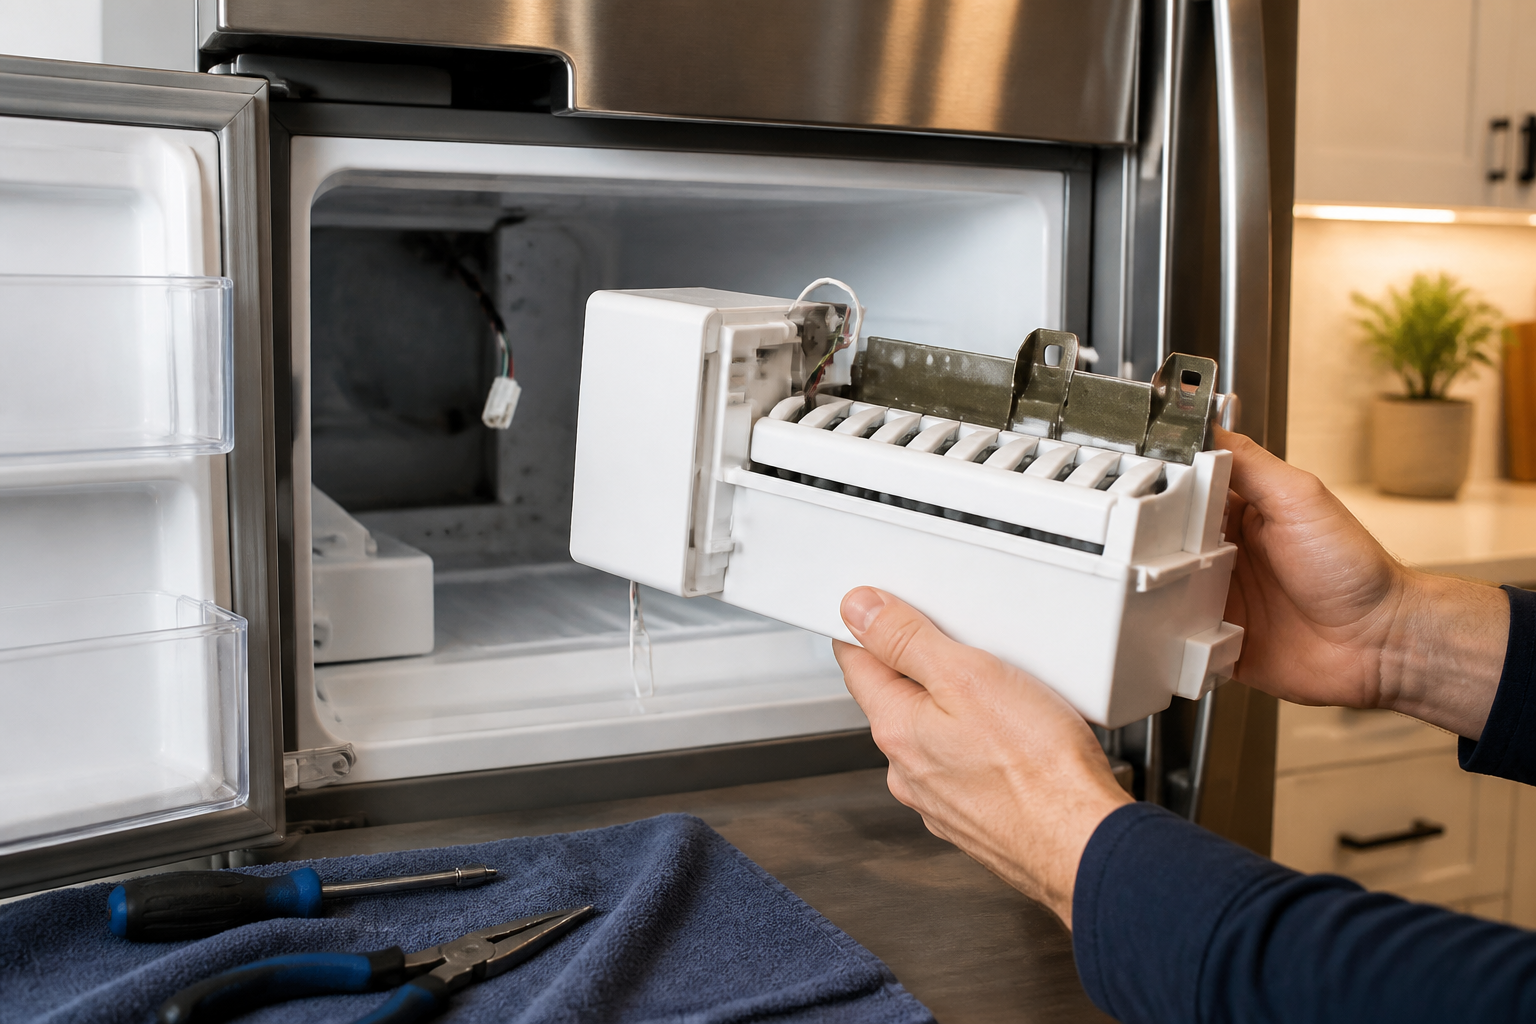
Step 6: Remove Old Ice Maker Assembly
- With all connections and screws removed, carefully lift the old ice maker assembly up and out
- The unit weighs approximately 3-4 pounds – support it with both hands
- Inspect the mounting area for any ice buildup or debris
- Clean the mounting surface with a damp cloth if necessary
- Allow the area to dry completely before installing the new DA97-15217A
Step 7: Install New DA97-15217A Assembly
- Remove the new DA97-15217A from its packaging and inspect for shipping damage
- Position the new assembly in the mounting location, aligning the screw holes
- Install the bottom mounting screw first, threading it in 2-3 turns by hand
- Install the two top mounting screws, ensuring the ice maker sits flush against the wall
- Tighten all three screws securely but do not over-torque (12-15 inch-pounds maximum)
Step 8: Reconnect Water Supply Line
- Inspect the water line quick-connect fitting on the new DA97-15217A for protective caps
- Remove any shipping plugs or protective covers from the water inlet
- Push the water supply tubing firmly into the quick-connect fitting until it seats completely
- Give the tubing a gentle tug to verify it’s locked in place
- The tubing should not pull out with reasonable force
Step 9: Reconnect Electrical Harnesses
- Connect the main wire harness to the DA97-15217A, ensuring proper alignment of the connector
- Push the connector in until you hear or feel a positive click
- If equipped, reconnect the ice level sensor harness (2-wire connector)
- Verify all connections are secure and no wires are pinched
- Route the wire harnesses so they won’t interfere with ice maker operation
Step 10: Final Assembly and Testing
- Replace the access cover (if equipped) by aligning the tabs and pushing into place
- Reinstall the ice bucket, ensuring it seats properly in the collection area
- Turn on the water supply valve behind the refrigerator
- Plug the refrigerator back into the electrical outlet
- Allow the refrigerator to reach operating temperature (approximately 2-4 hours)
Post-Installation Setup and Break-In Period
After successfully installing your new DA97-15217A ice maker, follow this initialization procedure:
- Initial Reset: Press and hold the Test/Reset button for 5-7 seconds until you hear a chime
- First Fill Cycle: The ice maker will begin its first fill cycle within 24 hours
- First Ice Batch: Expect the first ice to be produced within 24-48 hours
- Discard Initial Ice: Throw away the first 2-3 batches to flush any manufacturing residues
- Full Production: Normal ice production (8-10 pounds per day) begins after 72 hours
Break-In Period Expectations
The DA97-15217A requires a break-in period for optimal performance:
- Days 1-3: Ice production may be slower than normal (4-6 pounds per day)
- Days 4-7: Production increases to rated capacity (8-10 pounds per day)
- Ice Quality: Early batches may have small or oddly shaped cubes
- Cycle Timing: Initial cycles may take 90-120 minutes vs. normal 60-90 minutes
Troubleshooting Common Installation Issues
Water Line Leaks
If you notice water pooling after installation:
- Verify the water line is fully seated in the quick-connect fitting
- Check that the tubing is not damaged or kinked
- Ensure the water supply valve is not over-tightened
- Inspect the DA97-15217A inlet for cross-threading
No Power to Ice Maker
If the DA97-15217A shows no signs of operation:
- Verify the wire harness connector is fully seated
- Check that the ice maker switch is in the ON position
- Test for 120V AC at the ice maker connector using a multimeter
- Inspect the main control board for blown fuses or loose connections
DA97-15217A vs. Previous Part Numbers
The DA97-15217A incorporates several improvements over earlier Samsung ice makers:
- Enhanced Motor Design: Improved gear reduction system reduces mechanical failures
- Better Water Fill Control: Upgraded fill valve prevents overflow conditions
- Improved Ice Release: Modified heating element provides more reliable harvest cycles
- Updated Electrical Connections: Gold-plated contacts reduce corrosion issues
The DA97-15217A directly replaces these older part numbers without any modifications:
- DA97-12650A (2018-2019 models)
- DA97-13718A (2019-2020 models)
- DA97-14474A (2020-2021 models)
- DA97-08259A (select RF22 series models)
Maintenance Tips for Extended Life
To maximize the lifespan of your new DA97-15217A ice maker:
- Replace Water Filter: Change the refrigerator’s water filter every 6 months (part DA29-00020B or DA29-00003G)
- Clean Ice Bucket: Wash the ice bucket monthly with mild soap and warm water
- Check Water Quality: Install a whole-house water softener if your water hardness exceeds 7 grains
- Regular Cleaning: Wipe the ice maker exterior monthly with a damp cloth
- Vacation Mode: Turn off the ice maker when away for more than one week
Frequently Asked Questions
How long does the DA97-15217A ice maker last?
With proper maintenance and average use, the DA97-15217A typically lasts 5-7 years. Factors that affect lifespan include water quality, usage frequency, and ambient temperature. Hard water (above 10 grains hardness) can reduce lifespan to 3-4 years due to mineral buildup.
Can I install the DA97-15217A myself or do I need a technician?
The DA97-15217A replacement is considered a moderate DIY repair suitable for homeowners with basic tool skills. The process takes 45-60 minutes and requires no specialized equipment. However, if you’re uncomfortable working with electrical connections or water lines, professional installation is recommended.
Why is my new DA97-15217A making noise after installation?
New ice makers typically produce more noise during the first week as internal components break in. Normal sounds include water filling (60-90 seconds), motor cycling (10-15 seconds), and ice dropping (2-3 seconds). Continuous grinding or loud clicking indicates improper installation or a defective unit.
How do I know if my refrigerator needs the DA97-15217A specifically?
Check your refrigerator’s model number on the data plate inside the fresh food compartment. The DA97-15217A is compatible with RF23, RF27, RF28, and select RF22 series models manufactured after 2018. Verify compatibility with Samsung’s parts lookup tool using your exact model number.
What should I do if the DA97-15217A doesn’t fit in my ice maker compartment?
If the new ice maker doesn’t fit properly, stop installation immediately. Verify you have the correct part number for your specific model. The DA97-15217A has specific mounting dimensions and may not be compatible with older refrigerator designs that require different part numbers.
How much ice should the DA97-15217A produce daily?
Under optimal conditions, the DA97-15217A produces 8-10 pounds of ice per 24-hour period. Production depends on freezer temperature (recommended 0°F), water temperature, and ambient room temperature. Higher ambient temperatures or frequent door openings can reduce daily production to 6-8 pounds.
Can hard water damage my new DA97-15217A ice maker?
Yes, hard water (above 7 grains) can significantly reduce the lifespan of the DA97-15217A by causing mineral buildup in the water lines and fill valve. Install a water softener or use a high-quality refrigerator filter to protect your investment. Replace filters more frequently (every 3-4 months) in hard water areas.
What warranty comes with the DA97-15217A replacement part?
Samsung provides a 1-year manufacturer warranty on the DA97-15217A ice maker assembly covering defects in materials and workmanship. The warranty does not cover damage from hard water, power surges, or improper installation. Keep your purchase receipt and installation date for warranty claims.
When to Call a Professional
Most of the repairs in this guide are within reach for a careful DIYer with basic tools. In my experience, if you’re finding that the replacement ice maker still won’t produce ice after confirming proper installation, correct freezer temperature, and an unobstructed water supply line, that’s the point to call a technician — because you’re likely dealing with a failed water inlet valve, a control board issue, or an intermittent wiring fault that requires proper diagnostic equipment and component-level testing to isolate safely. When in doubt, a diagnostic service call typically costs $80–$120 and can save you from a misdiagnosis that costs more in parts.
Recommended Parts & Tools
Samsung DA97-15217A Ice Maker Assembly
This is the exact replacement ice maker assembly for your Samsung refrigerator. The DA97-15217A is a genuine OEM part that ensures proper fit and function, eliminating ice production issues and mechanical failures. Check current pricing on Amazon.
Klein Tools 32500 Multi-Bit Screwdriver
You’ll need a reliable screwdriver set to remove the mounting screws and electrical connections during ice maker replacement. This multi-bit driver includes all the common screw types found in Samsung refrigerator repairs, including Phillips and flathead bits. Check current pricing on Amazon.
Affresh Refrigerator Cleaner
Before installing your new ice maker, it’s essential to thoroughly clean the ice maker compartment and water lines to remove mineral buildup and bacteria. This cleaner is specifically formulated for refrigerator and ice maker cleaning, ensuring your new unit starts with a clean slate. Check current pricing on Amazon.


