Ice Maker Water Inlet Valve Replacement for Maytag MFI2570FEZ French Door Refrigerator
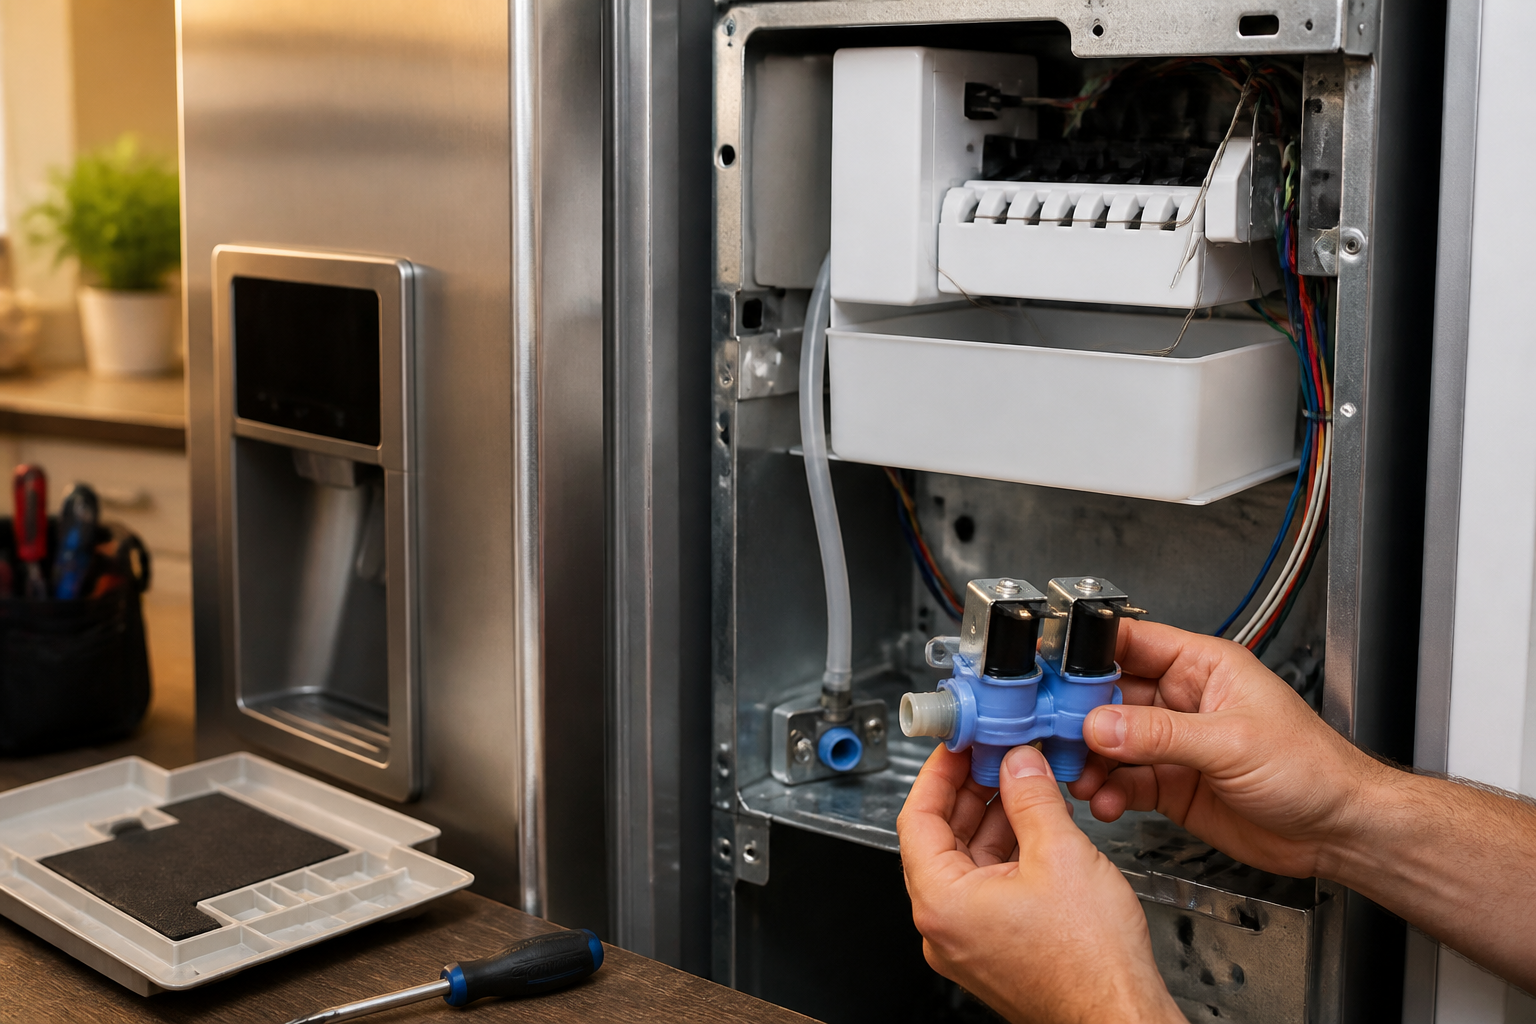
The water inlet valve is a critical component in your Maytag MFI2570FEZ that controls water flow to the ice maker and water dispenser. When this solenoid-operated valve fails, it typically stops opening to allow water through, or conversely, fails to close properly causing continuous water flow. This electromechanical valve is located behind the refrigerator and connects to your home’s water supply line. Common failure causes include mineral buildup from hard water, electrical component failure, or mechanical wear after years of operation. The valve operates on 120V AC and uses dual solenoids to control water flow to different components. This repair is rated as MODERATE difficulty, requiring basic electrical knowledge, comfort working with water connections, and the ability to move the refrigerator to access rear components. The repair typically takes 60-90 minutes and can save $200-300 compared to professional service calls.
Symptoms
- Ice maker produces no ice cubes despite being properly connected and powered on
- Water dispenser fails to dispense water when paddle is pressed on the Maytag MFI2570FEZ door panel
- Continuous water dripping or flowing sounds from behind the refrigerator even when not dispensing
- Ice maker cycles but never fills with water during the fill cycle
- Water dispenser works intermittently, sometimes dispensing and sometimes not responding
- Error codes related to water fill timeout appearing on the digital display panel
⚠️ Safety Warning
Always unplug the Maytag MFI2570FEZ from the electrical outlet before beginning any repair work to prevent electrical shock. Turn off the water supply valve connected to the refrigerator and be prepared for water spillage when disconnecting water lines. This refrigerator weighs approximately 300 pounds, so ensure you have adequate help when moving it away from the wall. Wear safety glasses when working behind the unit to protect from debris. Keep a bucket and towels nearby to catch water from disconnected lines. If you smell gas or suspect any gas line interference, stop immediately and contact a professional. Never attempt electrical testing with wet hands or while standing in water.
Parts Needed
- Maytag Water Inlet Valve Assembly – Part Number W10408179 (dual solenoid valve rated for 120V AC)
- Water line compression fittings 1/4-inch if existing fittings are damaged during removal
- Electrical wire nuts or crimp connectors if wire splicing is required
- Teflon tape for threaded water connections
- Replacement water line tubing 1/4-inch OD if existing lines show wear or damage
Tools Required
- Digital multimeter capable of measuring 120V AC and continuity
- Adjustable wrench set (7/16-inch and 1/2-inch for water line fittings)
- Phillips head screwdriver and flat-head screwdriver set
- Needle-nose pliers for electrical connections
- Flashlight or headlamp for visibility behind refrigerator
- Bucket for catching water and absorbent towels
- Wire strippers for electrical connection work
Step-by-Step Instructions
Step 1: Preparation and Power Disconnection
🔨 Pro Tip from Dave
On the MFI2570FEZ, the dual-coil inlet valve has a secondary solenoid dedicated solely to the ice maker — before you replace the whole valve, use a multimeter to test each solenoid coil individually, because a reading outside the 200–500 ohm range on just one coil means only that coil has failed, which confirms the valve is your culprit and saves you from chasing a different diagnosis. The single most common mistake I see DIYers make on this job is overtightening the brass compression fitting on the 1/4-inch water supply line, which cracks the valve body and creates a slow leak behind the fridge that goes unnoticed for weeks.
Unplug the Maytag MFI2570FEZ from the wall outlet and turn off the water supply valve located behind the refrigerator or under the kitchen sink. Carefully pull the refrigerator away from the wall approximately 3 feet to provide adequate working space. The water inlet valve is located on the lower rear panel, approximately 12 inches from the bottom and 8 inches from the left side when viewing from behind. Remove any items from the freezer and refrigerator sections to reduce weight if necessary.
Step 2: Locate and Access the Water Inlet Valve
The water inlet valve on the Maytag MFI2570FEZ is mounted behind a plastic cover panel on the lower rear section. Remove the rectangular plastic cover by unscrewing two Phillips head screws located at the top corners of the panel. The valve assembly will be visible as a cylindrical component with two electrical solenoids on top and water line connections on the bottom and sides.
Step 3: Disconnect Water Supply Lines
Using an adjustable wrench, carefully disconnect the incoming water supply line from the inlet side of the valve (typically marked “IN” or located on the left side). Have your bucket ready as residual water will drain from the line. Next, disconnect the two outgoing water lines that feed the ice maker and water dispenser. These are typically 1/4-inch compression fittings that can be removed by turning counterclockwise while holding the valve steady.
Step 4: Test the Existing Valve Electrically
Before removing the valve completely, use your multimeter to test the solenoid coils for continuity. Each solenoid should show approximately 200-500 ohms of resistance between its two wire terminals. If either solenoid shows infinite resistance (open circuit) or zero resistance (short circuit), the valve requires replacement. The Maytag MFI2570FEZ uses a dual solenoid valve where one solenoid controls ice maker water flow and the other controls dispenser water flow.
Step 5: Disconnect Electrical Connections
Carefully disconnect the electrical harness connected to the water inlet valve. The Maytag MFI2570FEZ typically uses a multi-pin connector with four wires: two for each solenoid coil. Take a photo of the wire connections before disconnecting to ensure proper reconnection. The connector should release with a gentle pull after pressing any locking tabs.
Step 6: Remove the Mounting Bracket
The water inlet valve is secured to the refrigerator frame with a metal mounting bracket held by two screws. Remove these screws using a Phillips head screwdriver. The bracket and valve assembly will come free as a single unit. Note the orientation of the valve for proper installation of the replacement.
Step 7: Install the New Water Inlet Valve
Mount the new water inlet valve (Part Number W10408179) in the same orientation as the original, securing it with the mounting bracket and two screws. Ensure the valve is positioned so that all water line connections can be made without strain or kinking of the water lines. The electrical solenoids should face upward and be easily accessible for electrical connections.
Step 8: Reconnect Electrical Connections
Connect the electrical harness to the new valve, ensuring proper alignment of the connector pins. The connection should click into place securely. Verify that each wire matches your reference photo taken during disassembly. The solenoid connections are typically color-coded with specific wire colors for each solenoid circuit.
Step 9: Reconnect Water Lines
Reconnect the incoming water supply line to the inlet port of the new valve, applying Teflon tape to threaded connections if necessary. Tighten with an adjustable wrench until snug but avoid over-tightening which can crack the valve body. Connect the two outgoing water lines to their respective ports, ensuring the ice maker and water dispenser lines go to the correct outlets.
Step 10: System Testing and Leak Check
Turn the water supply back on and carefully check all connections for leaks. Plug the Maytag MFI2570FEZ back into the electrical outlet and allow the system to stabilize for 15 minutes. Test the water dispenser by pressing the dispenser paddle and verify water flows properly. Test the ice maker by initiating a manual ice-making cycle if your model has this feature.
Step 11: Final Installation and Positioning
Replace the rear access panel and secure with the two Phillips head screws. Carefully push the refrigerator back into position, ensuring no water lines or electrical connections are pinched or strained. Allow 24 hours for the ice maker to complete its first full ice-making cycle and verify proper operation.
Troubleshooting
- If water still doesn’t flow after replacement, check that the water supply valve is fully open and verify adequate water pressure (minimum 20 PSI required for proper operation)
- If the ice maker runs but doesn’t fill with water, verify the correct solenoid is connected to the ice maker water line and check for kinked or blocked water lines
- If water continuously flows, ensure all electrical connections are secure and check that the valve is receiving the correct voltage signals from the control board
- If neither dispenser nor ice maker works, verify the electrical harness connection is fully seated and check for blown fuses in the main control board
- If water pressure is low at the dispenser, check for mineral buildup in the new valve or restrictions in the water filter that may need replacement
- If the valve operates intermittently, measure the supply voltage during operation to ensure consistent 120V AC is reaching the valve solenoids
When to Call a Professional
- If you discover damaged or corroded electrical connections in the main control board that require circuit board repair or replacement
- If the refrigerator requires gas line disconnection or if you detect any gas odors during the repair process
- If the water supply connection requires new plumbing installation or modification of existing household water lines
- If multiple components appear to have failed simultaneously, indicating a more complex electrical system problem that requires diagnostic equipment and technical expertise
When to Call a Professional
Most of the repairs in this guide are within reach for a careful DIYer with basic tools. In my experience, if you’ve replaced the inlet valve and the ice maker still isn’t producing, or if you’re seeing frost buildup on the back wall of the freezer alongside the water issue, it’s time to call a certified technician — those symptoms together point to a sealed system or defrost control problem that requires EPA 608 certification, specialized diagnostic tools, and refrigerant handling that go well beyond a DIY parts swap. When in doubt, a diagnostic service call typically costs $80–$120 and can save you from a misdiagnosis that costs more in parts.
Recommended Parts & Tools
Refrigerator Water Inlet Valve WPW10348269
This OEM water inlet valve is specifically designed for Maytag refrigerators and is compatible with the MFI2570FEZ model. The valve controls water flow to your ice maker and water dispenser, making it the exact replacement part needed for this repair. Check current pricing on Amazon.
KAIWEETS Digital Multimeter KM100
A reliable digital multimeter is essential for testing the water inlet valve’s electrical continuity before and after replacement on your Maytag MFI2570FEZ. This tool helps diagnose whether the valve is actually faulty and ensures proper installation of the new component. Check current pricing on Amazon.