Samsung DVE45T3400W Dryer Relay Replacement Guide
The Samsung DVE45T3400W is a popular electric dryer model that uses a sophisticated control board to manage heating elements, drum rotation, and cycle timing. One of the most critical components on this control board is the heating element relay, which acts as an electrical switch controlling power delivery to the dryer’s heating element. When this relay fails, your DVE45T3400W will run through cycles but fail to generate heat, leaving your clothes damp and cold. This comprehensive guide will walk you through diagnosing and replacing the faulty relay in your DVE45T3400W dryer.
Understanding the DVE45T3400W Relay System
What Relay Controls Heating on the DVE45T3400W
The DVE45T3400W contains multiple relays on its main control board, but the most critical for heating operation is the heating element relay (also called the main heating relay or heat relay). This component is a electromechanical switch that receives a low-voltage signal from the dryer’s control module and uses that signal to switch high-voltage power (typically 240 volts) to the heating element.
On the DVE45T3400W control board, the heating element relay is responsible for completing the circuit between the incoming 240-volt supply and the heating element. Without this relay functioning properly, voltage never reaches the heating element, resulting in no heat generation regardless of whether the drum rotates and the fan runs normally.
The DVE45T3400W also contains additional relays for controlling the blower motor and drum motor circuits, but these typically continue functioning even when the heating relay fails, which explains why your dryer may run but not heat.
How the Relay Works in the DVE45T3400W
The heating relay in the DVE45T3400W operates on a simple electromagnetic principle. When the control board sends a low-voltage signal (typically 24 or 120 volts depending on the specific control board revision) through the relay coil, it creates a magnetic field that pulls a metal switch contact to a closed position. This closed contact allows the 240-volt high-voltage current to flow through to the heating element. When the control board de-energizes the coil, the contacts spring back to the open position, cutting power to the heating element.
Symptoms of a Failed DVE45T3400W Heating Relay
Common Warning Signs
- Dryer runs but no heat: The drum rotates and the fan operates, but clothes come out cold and damp—the most common indicator of relay failure on the DVE45T3400W
- Intermittent heating: Heat works sometimes but cuts out randomly during a cycle, suggesting the relay contacts are partially worn or corroded
- Audible clicking from the control board: A rapid clicking sound coming from inside the DVE45T3400W indicates the relay is attempting to engage repeatedly, typically caused by a failing coil
- Burning smell: A burnt or acrid odor from the control board area suggests relay contacts have arced and burned, a sign of imminent complete failure
- Relay visible damage: Physical swelling, blackening, or visible burn marks on the relay body itself indicate internal failure
- Partial heat output: Clothes dry slowly over extended cycles, suggesting reduced heating power due to high contact resistance
Identifying the Failed Relay on Your DVE45T3400W
Visual Inspection of the Control Board
The first step in diagnosing a bad relay on your DVE45T3400W is to visually inspect the control board for obvious damage. Before you begin, ensure the dryer is disconnected from electrical power at the circuit breaker.
Open your DVE45T3400W and locate the control board (typically mounted near the top-front of the unit). Look for any of these visual indicators of relay failure:
- Swollen or bulging relay body indicating internal arcing and gas buildup
- Black or brown discoloration on the relay casing
- Burnt or melted plastic around the relay terminals
- White or green corrosion on relay contact pins
- Cracked or split relay housing
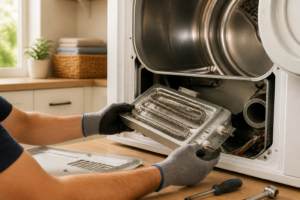
On the DVE45T3400W control board, the heating element relay is typically one of the larger electromechanical relays, measuring approximately 1 inch by 0.75 inches. It will be clearly distinct from smaller capacitors and solid-state components.
Relay Location on the Control Board
The heating relay on the DVE45T3400W is located on the main control board, which is accessed by removing the top panel of the dryer. The exact position varies slightly depending on the board revision, but it is typically positioned toward the middle-to-right portion of the board when viewed from the front. The relay will be labeled on the circuit board (commonly marked as “RL1,” “K1,” or “HT” depending on the schematic revision).
Accessing the Control Board on the DVE45T3400W
Step-by-Step Disassembly
- Disconnect power: Unplug the DVE45T3400W from the electrical outlet and turn off the circuit breaker for an additional safety measure
- Remove the top panel: Open the dryer door and locate the two screws at the front edge of the top panel. Remove these screws and lift the top panel up and away from the dryer body
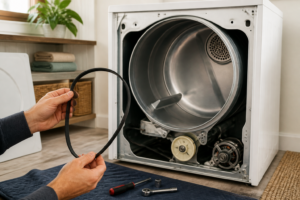
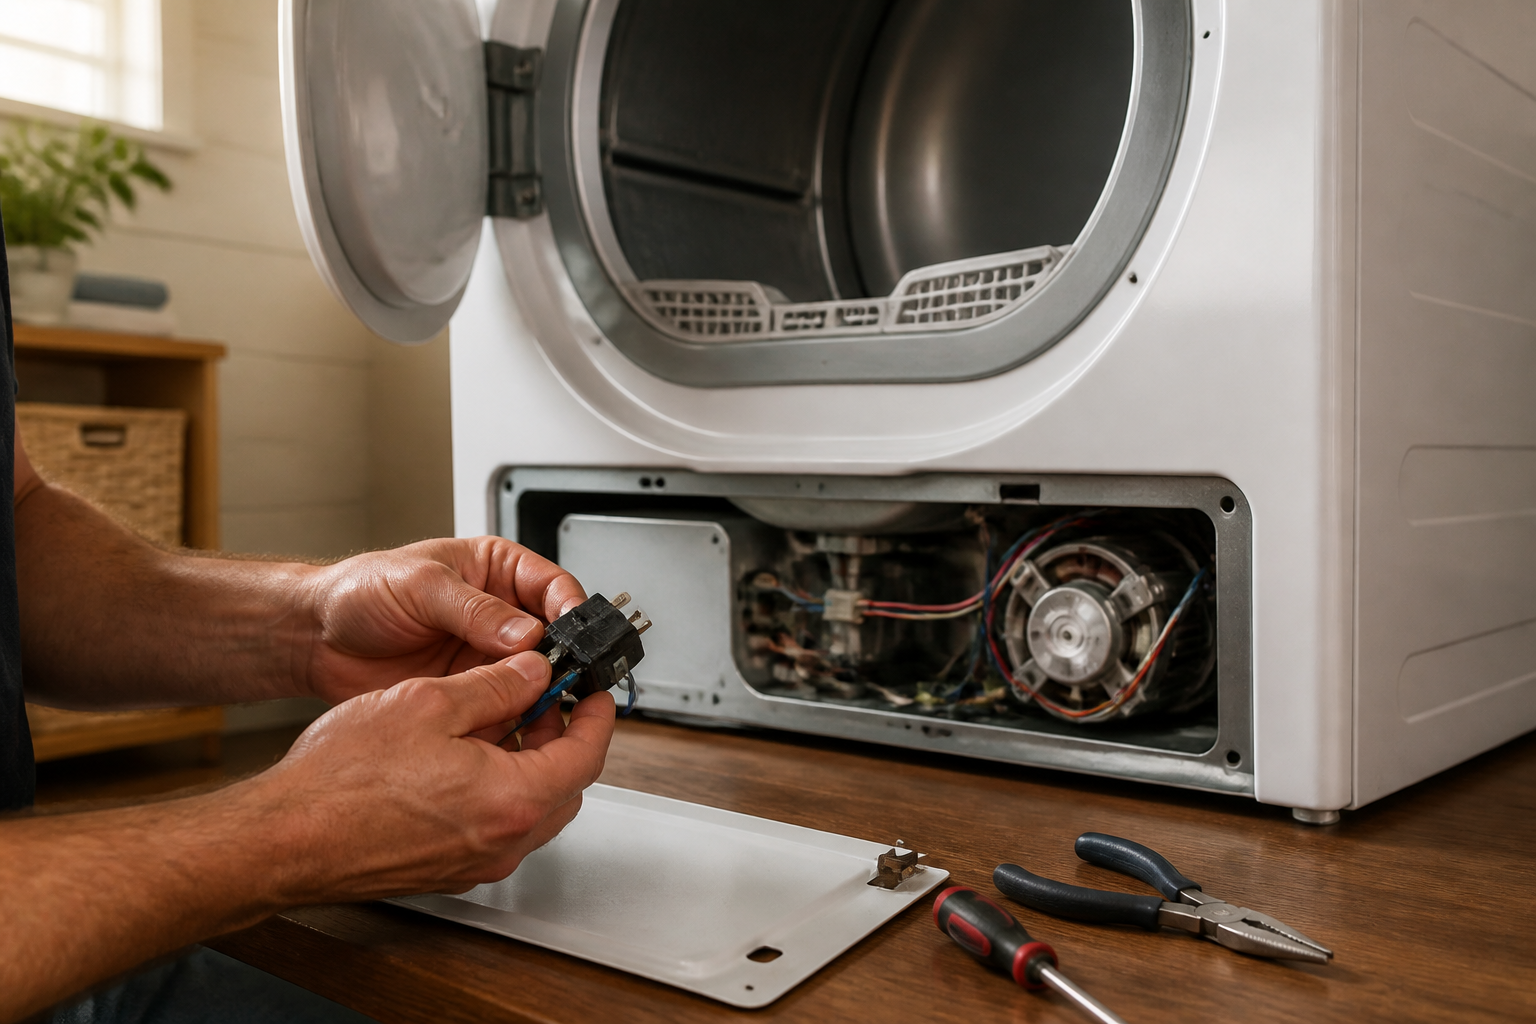
- Access the control board area: With the top panel removed, you’ll see the back of the control console. The control board on the DVE45T3400W is located inside the console housing
- Remove console screws: Look for 2-3 screws securing the control console to the cabinet. Remove these screws carefully
- Disconnect wire harnesses: Gently pull the console assembly upward and away from the cabinet. You’ll see several wire harnesses connected to the control board. Photograph these connections before disconnecting them, or label each wire with painter’s tape
- Disconnect the main control board: The primary harness connecting to the control board should disconnect with a gentle pulling motion. The DVE45T3400W control board typically has one or two large connectors that must be fully seated when reassembling
- Remove the control board: Once all harnesses are disconnected, remove any remaining screws holding the control board to the console housing and carefully lift it out
⚠️ Safety Warning: Even with the DVE45T3400W unplugged, the control board may retain residual electrical charge in capacitors. Do not touch component leads or attempt any work on the board until you have safely discharged this residual energy. Avoid touching the board unnecessarily, and consider grounding yourself by touching a metal part of the dryer frame before handling the board.
Testing the Relay with a Multimeter
Coil Resistance Test
Before committing to relay replacement on your DVE45T3400W, you can perform preliminary testing to confirm relay failure:
- Set your multimeter to the resistance (ohms) setting: Use the 200-ohm scale initially
- Locate the relay coil terminals: On the DVE45T3400W control board, the relay will have distinct terminals. Typically, a relay has 4-8 pins arranged in two groups: the coil pins (usually on one side) and the contact pins (usually on the opposite side)
- Place multimeter probes on coil terminals: Identify the coil terminals (consult the control board schematic if needed—they’re usually labeled on the board) and place one probe on each coil terminal
- Record the resistance reading: A healthy relay coil will show resistance between 200-2000 ohms depending on the specific relay design used in your DVE45T3400W. A reading of infinite resistance (∞ or OL) indicates an open coil and definite relay failure. A reading of 0 ohms or very low resistance may indicate a short circuit
Contact Resistance Test
The contact resistance test is more definitive for diagnosing heating relay problems on the DVE45T3400W:
- Energize the relay: This is tricky on a removed board, but if you have the ability to safely apply the control voltage to the relay coil (consult the DVE45T3400W manual for the correct voltage), you can do so
- Alternatively, attempt manual contact closure: Some technicians gently press on the relay armature to manually close the contacts, then test resistance across the contact pins
- With contacts closed, measure resistance: Healthy relay contacts should show nearly 0 ohms (less than 1 ohm ideally). A reading higher than 5 ohms suggests contact corrosion. A reading of infinite resistance means the contacts won’t close—definite failure of your DVE45T3400W heating relay
⚠️ Safety Warning: If you attempt to apply voltage to the relay coil to test it, ensure you are using the correct voltage specified for the DVE45T3400W control board (typically 24V or 120V AC) and that you have isolated the control board from all high-voltage circuits. Incorrect voltage application could damage the board or cause injury.
Relay Replacement Options for the DVE45T3400W
Option 1: Desoldering and Replacing the Relay
If you have soldering skills and the proper equipment, you can desolder the failed relay from the DVE45T3400W control board and solder in a replacement relay. This is the most economical option but requires:
- A suitable replacement relay with identical specifications (same voltage ratings and contact configuration)
- A quality soldering iron (40-60 watts minimum) or desoldering station
- Solder wick or a desoldering pump
- Flux cleaner for board cleaning after desoldering
- Steady hands and soldering experience
The cost of a replacement relay (typically $15-40) is significantly less than replacing the entire board, making this option attractive if you have the skills. However, if you don’t have soldering experience, mistakes could damage the board beyond repair, potentially costing more than a full replacement.
Option 2: Replacing the Entire Control Board
This is the recommended option for most DIY homeowners attempting to repair the DVE45T3400W. A complete control board replacement eliminates the risk of soldering damage and comes with a warranty from the manufacturer or parts supplier.
DVE45T3400W Control Board Part Number: The main control board for the DVE45T3400W is commonly part number DC92-01624C or DC92-01649C (depending on board revision). Verify the exact part number on your original board or consult the DVE45T3400W service manual to ensure you order the correct version.
Cost Comparison: A replacement control board for the DVE45T3400W typically costs $150-300. When combined with the potential cost of a failed soldering attempt, the control board replacement is often the safer financial decision for DIY repair.
Steps for Control Board Replacement on the DVE45T3400W
- Obtain the correct replacement board: Order a new DVE45T3400W control board using the part number identified above. Ensure it matches your exact dryer model
- With the original board removed, disconnect all remaining connections: Document every wire, connector, and harness attached to the old board with photographs or detailed notes
- Remove the board from its housing: Unscrew any mounting screws holding the board to the console backing plate
- Install the new board: Position the new board in the same orientation as the original and secure it with screws
- Reconnect all harnesses: Carefully reconnect each wire harness in the same configuration as it was on the original board. The connectors are typically keyed to fit only in one direction, reducing the chance of error
- Reassemble the console and cabinet: Follow the disassembly steps in reverse order, ensuring all screws are tight and all connections are secure
Post-Repair Testing of Your DVE45T3400W
Initial Inspection
Before running a full test cycle on your DVE45T3400W, perform these safety checks:
- Verify all screws and fasteners are tightened on the cabinet and console
- Confirm all wire harnesses are fully seated and locked in place
- Check that no wires are pinched between panels
- Ensure the top panel is fully seated and secured
Functional Testing
Once reassembly is complete on your DVE45T3400W:
- Plug in the dryer: Reconnect your DVE45T3400W to the electrical outlet
- Run a test cycle: Start a heat dry cycle (typically “Normal Dry” mode) with a small load of damp towels
- Monitor heating: After 2-3 minutes, carefully touch the lint trap area (not directly on the heating element housing which becomes very hot). It should be distinctly warm. Place your hand near the exhaust vent outside the dryer and feel for warm air discharge
- Complete the cycle: Allow the dryer to run for 10-15 minutes and assess whether clothes are drying properly
- Check for abnormal sounds: Listen for the relay click when the cycle starts and periodically during operation. A single click at cycle start is normal; continuous rapid clicking indicates a problem
Temperature Testing
For more precise verification that your DVE45T3400W heating relay is functioning correctly:
- Use an infrared thermometer: Point the thermometer at the exhaust vent of your DVE45T3400W while it’s running in heat mode
- Verify temperature: Exhaust air temperature should exceed 120°F (49°C) within the first few minutes of operation. Typical exhaust temperature for a functioning DVE45T3400W is 130-160°F (54-71°C)
- Record multiple readings: Take readings at the 3-minute mark, 5-minute mark, and 10-minute mark to ensure heat output remains consistent throughout the cycle
Frequently Asked Questions
Can I replace just the relay on my DVE45T3400W or must I replace the entire control board?
You can replace just the relay if you have soldering skills, but replacing the entire control board is recommended for most homeowners. Desoldering requires equipment and experience—a mistake could damage the DVE45T3400W board irreparably, potentially costing more than a full board replacement. Complete board replacement is safer and comes with manufacturer warranties.
What is the correct part number for the DVE45T3400W control board?
The DVE45T3400W typically uses part number DC92-01624C or DC92-01649C for the main control board, depending on the manufacturing date and revision. Check your original board or consult the DVE45T3400W manual to confirm the exact part number before ordering. Always verify compatibility before purchasing.
How long does it take to replace the relay on a DVE45T3400W?
Complete control board replacement on the DVE45T3400W typically takes 1-2 hours for a DIY homeowner with basic mechanical skills. This includes disassembly, board replacement, and reassembly. If you’re desoldering and replacing just the relay, add 30-60 minutes depending on your soldering proficiency.
Why is my DVE45T3400W dryer running but not heating after I replaced the relay?
If your DVE45T3400W still doesn’t heat after relay replacement, verify that all wire harnesses are fully connected to the new control board, especially the connector to the heating element circuit. Also confirm that you installed the correct replacement board part number. Test continuity through the entire heating circuit including the thermal fuse and high-limit thermostat, which can also prevent heating if they fail.
Can a faulty relay on the DVE45T3400W cause other problems besides no heat?
While the heating relay’s primary function is controlling heat, a relay failure on the DVE45T3400W can sometimes cause control board errors or prevent other cycles from functioning if the relay shorts and damages the board. However, most relay failures result specifically in loss of heating while other dryer functions continue normally.
Is it safe to test the relay on my DVE45T3400W with a multimeter?
Yes, testing the relay with a multimeter is safe after the DVE45T3400W is unplugged. Resistance testing and coil continuity testing carry no electrical risk. However, avoid touching other board components and discharge any residual charge before handling the board. Do not attempt to apply power to the coil unless you fully understand the control board’s voltage requirements.
Where can I find the heating relay on the DVE45T3400W control board?
The heating relay on the DVE45T3400W is located on the main control board, typically toward the center-right area when viewing the board from the front. It’s one of the larger electromechanical components and will be labeled with a designator like “RL1” or “K1” on the circuit board. Consult the DVE45T3400W service manual for the exact position if you cannot identify it visually.
Recommended Parts & Tools
Samsung Dryer Thermal Fuse & Relay Kit
This OEM-compatible relay replacement kit is specifically designed for Samsung dryers like the DVE45T3400W and includes the exact relay component needed for this repair. Having the correct replacement relay ensures your dryer functions safely and restores proper heating cycles. Check current pricing on Amazon.
Uxcell T10 Torx Security Screwdriver Set
Samsung dryers use Torx screws to secure the front panel and internal components, making this screwdriver set essential for accessing the relay without stripping fasteners. A quality Torx set prevents damage to your dryer’s casing during disassembly. Check current pricing on Amazon.
Spares2go Dryer Lint Trap Cleaning Brush
While replacing the relay, cleaning out accumulated lint from the dryer vent and heating chamber improves efficiency and prevents future relay failures caused by overheating. This specialized brush removes stubborn lint buildup that standard cleaning tools cannot reach. Check current pricing on Amazon.
The Relay Kit That Fixes the DVE45T3400W’s No-Heat Running Cycles
If your DVE45T3400W is spinning but throwing cold air, the heating element relay on the control board has almost certainly failed. This kit gives you both the relay and thermal fuse in one order, so you’re not making a second trip to the parts supplier when you discover the fuse blew too.
What works
- The relay itself matches the Samsung board pinout exactly—no guessing about which terminals connect where on a replacement.
- Bundling the thermal fuse saves time since both components sit in the same control board cavity and you’ll often need both when the relay fails.
- Soldering a new relay onto the board is straightforward if you have basic solder skills—the pads are accessible and the component sits flat against the board.
What doesn’t
- You’ll need a soldering iron and solder—this isn’t a plug-and-play swap like replacing a thermal fuse by itself, so if you’ve never soldered before, there’s a learning curve.
- The kit doesn’t always include desoldering wick or flux, so you may need those separately to cleanly remove the old relay without damaging the board traces.
I’ve seen homeowners misdiagnose this as a heating element failure first because the symptoms look identical—but the element almost never goes bad on this model, and you’ll waste $80 on a part you don’t need. Grab Samsung Dryer Thermal Fuse & Relay Kit and confirm the relay is actually open with a continuity test before you solder.
This post contains affiliate links. As an Amazon Associate, I earn from qualifying purchases at no extra cost to you.