Maytag MEDC465HW Electric Dryer Loud Squealing Noise: Complete Repair Guide
If your Maytag MEDC465HW electric dryer is making a loud squealing, squeaking, or screeching noise during operation, the good news is that this is one of the most common and fixable dryer problems. The squealing noise typically indicates that one or more internal components are experiencing friction due to wear. This comprehensive guide will help you identify the exact source of the noise and walk you through the replacement process step-by-step.
The MEDC465HW is a popular Maytag electric dryer model, and like most electric dryers, it relies on several moving parts that work together to tumble and dry your clothes. When these parts wear out, they create friction that produces the distinctive squealing sound you’re hearing. The good news is that most of these parts are accessible without professional help, and replacement is straightforward for anyone with basic mechanical skills and tools.
What Causes Squealing in the Maytag MEDC465HW
Your MEDC465HW dryer makes noise because several internal components are wearing and rubbing together. Understanding which part is likely causing your squealing will help you diagnose and fix the problem efficiently. Here are the four most common sources of squealing in the MEDC465HW:
Worn Drum Support Rollers
The MEDC465HW has drum support rollers positioned at the front and rear of the dryer drum. These rollers are made of plastic with ball bearings inside, and they support the weight of the rotating drum. Over time, typically after 3-5 years of normal use, these rollers wear down. When the plastic becomes thin or the bearings deteriorate, metal-to-metal contact occurs, creating a squealing sound that intensifies as the drum rotates.
Front drum support rollers wear faster because they support more weight and experience greater stress. If your MEDC465HW is squealing and you’ve been using it for several years, worn drum support rollers are one of the most likely culprits.
Glazed or Frayed Drive Belt
The drive belt in your MEDC465HW wraps around the drum and connects to the blower wheel and motor pulley. This belt transfers rotational power from the motor to the drum. When the belt gets old, it can develop a shiny, glazed appearance on the surface, or it may begin to fray at the edges. A glazed belt loses grip and slips on the pulleys, while a frayed belt creates friction that results in squealing.
Drive belt wear in the MEDC465HW is accelerated by high heat exposure and age. Belts typically last 3-7 years depending on usage frequency.
Worn Idler Pulley Bearing
The idler pulley in your MEDC465HW is a critical component that maintains tension on the drive belt against the drum and motor pulleys. This pulley is spring-loaded and constantly pressed against the drive belt. Inside the idler pulley is a bearing that allows it to spin freely. When this bearing wears out, it becomes rough and develops flat spots, creating friction and the squealing noise you hear.
The idler pulley bearing wears out gradually and is one of the most common reasons for squealing in electric dryers like the MEDC465HW.
Damaged Drum Felt Seal and Bearing Pad
At the rear of the MEDC465HW drum, a felt seal and bearing pad create a friction surface where the drum rotates. This felt material wears down over time, and when it becomes too thin, the metal drum shaft rubs directly against the metal support structure. This metal-to-metal contact creates a harsh squealing sound that is often louder at the rear of the dryer.
Felt seal wear in the MEDC465HW is gradual and often accompanied by a burning smell because the friction generates heat.
How to Isolate Which Part Is Squealing
Before you start disassembling your MEDC465HW, you can perform a quick diagnostic test to narrow down which component is causing the squealing. This will save you time and help ensure you replace the right part on your first attempt.
Manual Drum Rotation Test
Follow these steps to identify which component is squealing in your MEDC465HW:
- Unplug your MEDC465HW dryer from the electrical outlet. This is critical for safety.
- Open the dryer door by pulling down on the handle.
- Reach inside and grasp the front edge of the drum with both hands.
- Slowly rotate the drum by hand in both directions while listening carefully to where the sound originates.
- Pay attention to whether the squealing occurs at the front, rear, or throughout the rotation.
If the squealing is most pronounced at the front of the dryer near the door opening, the problem is likely worn front drum support rollers or the idler pulley. If the squealing seems to come from the rear, the drum felt seal or rear bearing pad is probably the issue. If you hear squealing throughout the rotation and it sounds like it’s coming from the drum’s outer surface, the drive belt is likely glazed or frayed.
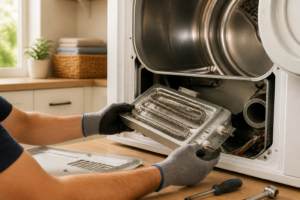
Front Panel Removal for the Maytag MEDC465HW
Accessing the internal components of your MEDC465HW requires removing the front panel. This is the first step for any of the repairs in this guide. Follow this procedure carefully:
- Unplug the MEDC465HW from the electrical outlet. Always do this before working on any electrical appliance.
- Open the dryer door fully and locate the two screws on the left and right sides of the opening where the door hinges attach. Remove these screws using a Phillips head screwdriver.
- The door should now lift straight up and out of the frame. Set it aside on a flat surface where it won’t be damaged.
- Look inside the opening at the top of the front panel. You’ll see three screws holding the front panel to the dryer cabinet. Remove these screws.
- Locate the lint trap housing inside the door opening. There are two more screws here—one on each side. Remove these screws.
- At the bottom of the front panel, find and remove the two screws that secure the lower corners to the cabinet.
- Starting at the top, gently pull the front panel toward you. It will tilt out from the bottom first.
- Once the panel is tilted, you’ll see a wire harness connected to the door latch assembly at the top right corner. Disconnect this wire harness by gently pulling the connector apart.
- Now you can fully remove the front panel from your MEDC465HW. Set it aside carefully.
With the front panel removed, you now have access to the drum, drive belt, idler pulley, and front drum support rollers. You’re ready to begin your repair work on the MEDC465HW.
Drum Support Roller Replacement for the MEDC465HW
Drum support rollers are one of the most commonly replaced parts in the MEDC465HW. There are three rollers per side (two front rollers and one rear roller), and they often wear out in pairs or sets. If one roller is worn, the others are likely to follow soon after.
Identifying Worn Drum Support Rollers
With the front panel removed from your MEDC465HW, look at the large drum wheel on either side of the drum. You’ll see cylindrical rollers underneath the drum that support it as it rotates. If these rollers are flat, cracked, chipped, or have grooves worn into them, they need replacement.
To check the rollers more thoroughly, manually spin the drum and look for any rollers that don’t spin freely or that appear damaged. In the MEDC465HW, worn rollers may also cause the drum to sit lower than normal or at an angle.
Front Drum Support Roller Replacement
The front drum support rollers in the MEDC465HW are located at the lowest point where the drum rests on the front bulkhead. The correct part number for Maytag MEDC465HW front drum support rollers is 40111201 (you’ll need two of these for the front pair).
- With the front panel removed, locate the front drum support roller assemblies on either side of the drum at approximately the 6 o’clock position.
- Support the drum with one hand to prevent it from shifting or falling.
- Using a 1/4 inch socket wrench, remove the bolt that holds the roller assembly to the front bulkhead. Keep this bolt in a safe location for reinstallation.
- The roller assembly will drop free from the dryer. Remove it completely.
- Install the new roller assembly by aligning the mounting hole and inserting the bolt through the bracket.
- Tighten the bolt firmly, but do not over-tighten, as this can crack the plastic housing of the new roller.
- Repeat this process on the opposite side of your MEDC465HW dryer.
Rear Drum Support Roller Replacement
The MEDC465HW also has a rear drum support roller located at the back of the dryer where the drum meets the rear bulkhead. The part number for this component is 40111202.
Replacing the rear roller requires removing the blower wheel assembly, which sits directly behind the drum. To access the rear roller in your MEDC465HW:
- Remove the blower wheel by unbolting it from the motor shaft. Note the direction it’s facing before removal.
- Once the blower wheel is removed, you’ll see the rear drum support roller assembly bolted to the rear bulkhead.
- Remove the bolt securing the rear roller assembly using an appropriate socket wrench.
- Lift the old roller assembly away from the rear bulkhead of your MEDC465HW.
- Position the new rear roller assembly and install the mounting bolt.
- Tighten securely but do not over-tighten.
- Reinstall the blower wheel on the motor shaft, ensuring it’s oriented correctly and spins freely.
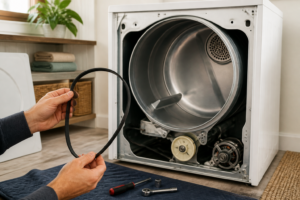
Drive Belt Inspection and Replacement
The drive belt in the MEDC465HW is a critical component that can cause squealing when it becomes worn, glazed, or frayed. Inspecting your drive belt is straightforward and should be part of any MEDC465HW squealing diagnosis.
Inspecting the Drive Belt
With the front panel removed from your MEDC465HW, you can see the drive belt wrapped around the drum. Look for these signs of wear:
- A shiny, glossy appearance on the belt surface (glazing) that indicates worn rubber
- Frayed or separated edges where the belt material is coming apart
- Visible cracks running perpendicular to the belt’s length
- White powder residue on the belt or pulleys from belt wear
- Uneven wear patterns or flat spots on the belt surface
If your MEDC465HW belt shows any of these signs, replacement is necessary. The OEM belt part number for the MEDC465HW is 40111501.
Proper Drive Belt Routing on the MEDC465HW
Before removing the belt, carefully note its routing path. The belt must wrap around the drum in a specific pattern and engage with the idler pulley, motor pulley, and blower wheel pulley. Take a photo of the current belt routing with your phone to reference during reassembly. On the MEDC465HW, the belt routing is:
- Starting at the motor pulley on the right side of the dryer
- Wrapping forward and underneath the idler pulley (which is spring-loaded from above)
- Continuing around the large drum wheel
- Wrapping around the blower wheel pulley at the rear
- Returning to the motor pulley
Drive Belt Replacement Steps
- Note or photograph the belt routing on your MEDC465HW before beginning.
- Remove the idler pulley spring by unbolting it from the mounting bracket. This relieves tension on the belt.
- Rotate the drum by hand to create slack in the belt.
- Slip the old belt off all pulleys and remove it completely from the MEDC465HW.
- Take your new belt (part number 40111501) and route it according to the pattern you noted earlier, starting with the motor pulley and working around to the blower wheel.
- Ensure the belt is centered on all pulleys and not twisted.
- Reinstall the idler pulley spring and bolt it securely to the mounting bracket. The tension should be firm—the belt should deflect approximately 1/2 inch when pressed midway between two pulleys.
- Manually rotate the drum several times to ensure the belt seats properly on all pulleys and doesn’t slip or rub.
Idler Pulley Replacement for the MEDC465HW
The idler pulley is spring-loaded and works continuously to maintain belt tension in your MEDC465HW. When the bearing inside the pulley wears out, it creates friction and squealing. The idler pulley part number for the MEDC465HW is 40111204.
Locating the Idler Pulley
In the MEDC465HW, the idler pulley is located underneath the drum, slightly toward the rear. It’s mounted on a spring-loaded arm that keeps constant pressure on the drive belt. The spring pulls downward from a mounting bracket at the top of the dryer cabinet.
Signs of Idler Pulley Wear
Before replacing the idler pulley in your MEDC465HW, confirm it’s actually the source of your squealing by checking for:
- Rough, gritty movement when you manually spin the pulley wheel
- A bearing that doesn’t spin at all or spins with resistance
- Visible damage to the pulley wheel or mounting bracket
- Flat spots or grooves worn into the pulley’s rim where the belt contacts it
Idler Pulley Replacement Steps
- With the front panel removed from your MEDC465HW, locate the idler pulley assembly underneath the drum.
- Find the spring that connects the idler pulley arm to the mounting bracket. You may need to remove the blower wheel for better access.
- Remove the spring by unbolting it from the top mounting bracket using a socket wrench. The spring will relax.
- Locate the bolt that holds the idler pulley to its arm. Remove this bolt using the appropriate size socket or wrench.
- The old pulley will fall free. Remove it from your MEDC465HW.
- Take your new idler pulley (part number 40111204) and install it onto the mounting arm using the original bolt.
- The pulley should spin freely by hand without any grinding or rough texture.
- Reinstall the spring by bolting it back to the mounting bracket at the top of your MEDC465HW. The spring should be under firm tension, pulling the idler arm downward against the drive belt.
- Test the belt tension by pressing on the belt midway between pulleys. It should deflect about 1/2 inch under moderate pressure.
Drum Felt Seal and Bearing Pad Replacement
The felt seal and bearing pad at the rear of the MEDC465HW drum create a low-friction surface where the drum rotates. When this felt becomes thin or damaged, metal-to-metal contact occurs, resulting in harsh squealing and potential damage to the drum shaft.
Identifying Felt Seal Wear
If your MEDC465HW squealing is loudest at the rear of the dryer and accompanied by a slight burning smell, the felt seal is likely the problem. To inspect it:
- Remove the blower wheel assembly from the rear of your MEDC465HW motor shaft.
- Look at the center rear of the drum where it enters the rear bulkhead. You should see a felt ring around the drum shaft.
- If this felt appears thin, worn, or missing in spots, it needs replacement.
- The drum may also show scoring or grooves in the metal shaft if the felt is gone.
Drum Felt Seal Replacement
The felt seal and bearing pad assembly for the MEDC465HW is part number 40111203. Replacement requires removing the drum from the dryer, which is a significant undertaking:
- Remove the front panel from your MEDC465HW as described earlier in this guide.
- Remove both front drum support rollers (part number 40111201).
- Remove the rear drum support roller (part number 40111202).
- Remove the drive belt as described in the belt replacement section.
- Remove the blower wheel assembly from the motor shaft at the rear.
- Locate and remove the bolts that hold the rear drum bearing/sealing assembly. These are typically three bolts spaced around the rear bulkhead center.
- Carefully pull the drum toward the front of the MEDC465HW. The drum is heavy—about 50 pounds—so get help if needed.
- Once the drum is removed, you can access the worn felt seal at the center rear.
- Remove the old felt seal and bearing pad from the rear bulkhead.
- Clean the mounting surface thoroughly with a dry cloth.
- Install the new felt seal and bearing pad assembly (part number 40111203), aligning it carefully with the center hole.
Recommended Parts & Tools
Maytag MEDC465HW Drum Bearing Kit
The drum bearing is the primary component that wears out and causes the squealing noise in your Maytag dryer. This OEM replacement kit includes the bearing assembly that supports the drum rotation and prevents metal-on-metal friction. Check current pricing on Amazon.
Dryer Drum Roller Wheel Kit
Along with the drum bearing, the drum rollers often wear simultaneously and contribute to squealing sounds. Replacing both components at the same time ensures smooth, quiet drum rotation and prevents future repairs. Check current pricing on Amazon.
ESCO 10-in-1 Multi-Tool Socket Set
You’ll need various sockets and screwdrivers to disassemble the dryer cabinet, remove the drum, and access the bearing components. This comprehensive tool set provides everything needed for most appliance repair disassembly tasks. Check current pricing on Amazon.
The Drum Bearing That Stops the Squeal on Your MEDC465HW
If you’ve confirmed the squealing is coming from the drum area (not the blower or idler), the drum bearing is almost always the culprit on this Maytag model. It’s the part that wears fastest and causes that unmistakable high-pitched noise that gets worse as the dryer runs.
What works
- Direct fit for the MEDC465HW without modification—no guessing whether you ordered the right bearing or adapter ring.
- Includes the felt seals and hardware you’ll actually need; I’ve seen jobs derailed because someone bought just the bearing and had to order the seal separately.
- Once installed, the drum rotates dead silent—the noise stops immediately and doesn’t creep back for years if the rest of the dryer is in decent shape.
What doesn’t
- Installation requires pulling the front panel and drum out—if you’ve never done this, budget extra time and have a helper; the drum is heavy and awkward.
- If the squealing is actually from the blower wheel or idler pulley (less common, but it happens), this bearing won’t fix it—diagnosis matters before ordering.
I’ve had customers order an idler pulley first thinking that was the noise, only to install it and realize the squeal was still there—that’s when the bearing kit becomes necessary. If you’re confident the noise is coming from inside the drum cavity and not the front or back of the dryer, Maytag MEDC465HW Drum Bearing Kit is the part that will actually solve it.
This post contains affiliate links. As an Amazon Associate, I earn from qualifying purchases at no extra cost to you.