How to Replace the Thermal Fuse on a GE GTD33EASKWW Electric Dryer
The thermal fuse is one of the most critical safety components in your GE GTD33EASKWW electric dryer. When this single-use device fails, your dryer will run but produce no heat. This comprehensive guide walks you through diagnosing a blown thermal fuse, understanding why it failed, and replacing it correctly to restore your dryer to full function.
Understanding the Thermal Fuse in Your GTD33EASKWW
What Does the Thermal Fuse Do?
The thermal fuse is a one-time safety device that protects your GE GTD33EASKWW dryer from catastrophic overheating. Unlike a traditional fuse or circuit breaker that can reset, the thermal fuse melts permanently when the internal temperature exceeds approximately 340°F (170°C). Once blown, it cuts electrical power to the heating element, preventing fires and damage to the drum and cabinet.
The thermal fuse sits on the exhaust duct inside your GTD33EASKWW where hot air flows toward the vent. If airflow becomes restricted or the cycling thermostat fails to cycle the heating element off properly, temperatures rise rapidly. The thermal fuse detects this dangerous condition and sacrifices itself to shut down the heater before damage occurs. This is why it must be replaced—it cannot be reset.
Why the Thermal Fuse Blows: Root Cause Analysis
Critical Point: If you replace the thermal fuse on your GTD33EASKWW without identifying why it blew, it will blow again, often within a few drying cycles. The thermal fuse is a symptom indicator, not the primary problem. You must inspect and correct the underlying cause.
Common reasons the thermal fuse fails on the GTD33EASKWW include:
- Clogged exhaust vent: The most frequent cause. Lint accumulation in the dryer vent hose, vent cap, or ducting restricts airflow, causing heat to build up inside the dryer cabinet and exhaust duct area where the thermal fuse is located.
- Damaged or kinked vent hose: A crushed or improperly routed dryer vent hose reduces airflow and traps heat.
- Failed cycling thermostat: This component cycles the heating element on and off to maintain proper drying temperature. When it fails, the heating element stays on continuously, causing excessive heat buildup.
- Restricted lint trap: A heavily soiled lint filter forces air through restricted pathways, increasing internal temperature.
- Faulty heating element: In rare cases, an element that stays energized longer than designed can overheat the dryer.
Symptoms of a Blown Thermal Fuse on the GTD33EASKWW
When the thermal fuse in your GTD33EASKWW fails, you’ll notice these specific symptoms:
- The dryer motor runs and the drum rotates normally, but no hot air is produced.
- Clothes come out cold or barely warm, even on high heat settings.
- The dryer may run for the full cycle time, but clothes remain completely damp.
- The blower wheel pushes cool air through the drum.
- No burning smell or visible damage inside the dryer cabinet.
This symptom pattern—drum turning but no heat—is the classic indicator of a blown thermal fuse on the GTD33EASKWW. Do not confuse it with a heating element failure, which produces similar symptoms but requires a different repair.
Confirming the Thermal Fuse is Blown: Multimeter Test
Before disassembling your GTD33EASKWW, confirm the thermal fuse is the problem with a continuity test using a digital multimeter.
Multimeter Continuity Testing Steps
- Unplug the GTD33EASKWW from the electrical outlet and allow it to cool for at least 30 minutes.
- Locate the thermal fuse on the exhaust duct. This is visible once you remove the back panel (instructions follow below).
- Set your digital multimeter to the continuity setting (usually marked with a sound wave symbol or Ω resistance mode).
- Touch one multimeter probe to each thermal fuse terminal without disconnecting the wires yet.
- Observe the multimeter reading: A working thermal fuse shows continuity (the meter beeps or displays near 0 ohms). A blown fuse shows no continuity (the meter displays “OL” for over limit or shows infinite resistance).
If the multimeter confirms no continuity through the thermal fuse, you have confirmed the fuse is blown and needs replacement on your GTD33EASKWW.
⚠️ Safety Warning for GTD33EASKWW Thermal Fuse Replacement
Electric shock hazard: The GTD33EASKWW is a 240-volt electric dryer. Always unplug the dryer from the wall outlet before beginning any repair work. Do not rely on the control panel power switch—it does not disconnect power from all internal components.
Burn hazard: Even after unplugging, internal components retain heat. Wait at least 30 minutes for the dryer to cool completely before touching the exhaust duct, heating element area, or any metal parts inside the cabinet.
Proper grounding: Before touching internal metal components, ground yourself by touching a bare metal part of the dryer frame to discharge static electricity that could damage electronic controls.
Gas-safe operation: This guide covers the GTD33EASKWW electric model only. Do not attempt this repair on gas dryers; they require different safety procedures.
Parts and Tools You’ll Need
Replacement Thermal Fuse for GTD33EASKWW
OEM Part Number: WE4M519
This is the exact thermal fuse designed for the GE GTD33EASKWW. It is a ceramic thermal fuse with two male spade terminals that connect via push-on wire connectors. Always use the OEM part number WE4M519 or a verified equivalent to ensure proper temperature rating and safety compliance. Do not substitute universal thermal fuses of different amperage or temperature ratings.
Tools Required
- Phillips head screwdriver
- Nut driver or socket set (10mm and 5/16″ sockets)
- Digital multimeter with continuity setting
- Needle-nose pliers (optional, for removing wire terminals)
- Flashlight or work light
- Shop towels and small container for fasteners
- Vacuum with hose attachment for lint cleaning
Step-by-Step Disassembly of the GTD33EASKWW
Step 1: Prepare the Dryer
- Unplug the GTD33EASKWW from the electrical outlet completely.
- Move the dryer away from the wall far enough to access the back panel. You need approximately 12-18 inches of clearance.
- Disconnect the vent hose from the back of the dryer by loosening the hose clamp or duct tape securing it.
- Allow the dryer to cool for at least 30 minutes before proceeding.
Step 2: Remove the Back Panel
The thermal fuse on the GTD33EASKWW is accessible once the back panel is removed.
- Locate the fasteners securing the back panel. The GTD33EASKWW back panel is held with 10mm hex head bolts positioned at the top two corners and bottom two corners of the cabinet.
- Using a 10mm socket or nut driver, remove all four fasteners. Place them in a small container so you don’t lose them.
- Carefully lift and remove the back panel. On the GTD33EASKWW, the back panel is metal and weighs approximately 8-10 pounds. Support its weight as you remove it to prevent it from dropping.
- Set the back panel aside in a safe location where it won’t be damaged or cause a tripping hazard.
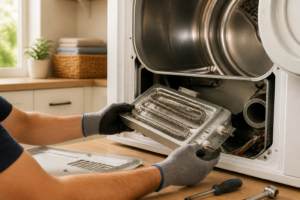
Step 3: Locate the Thermal Fuse on the GTD33EASKWW
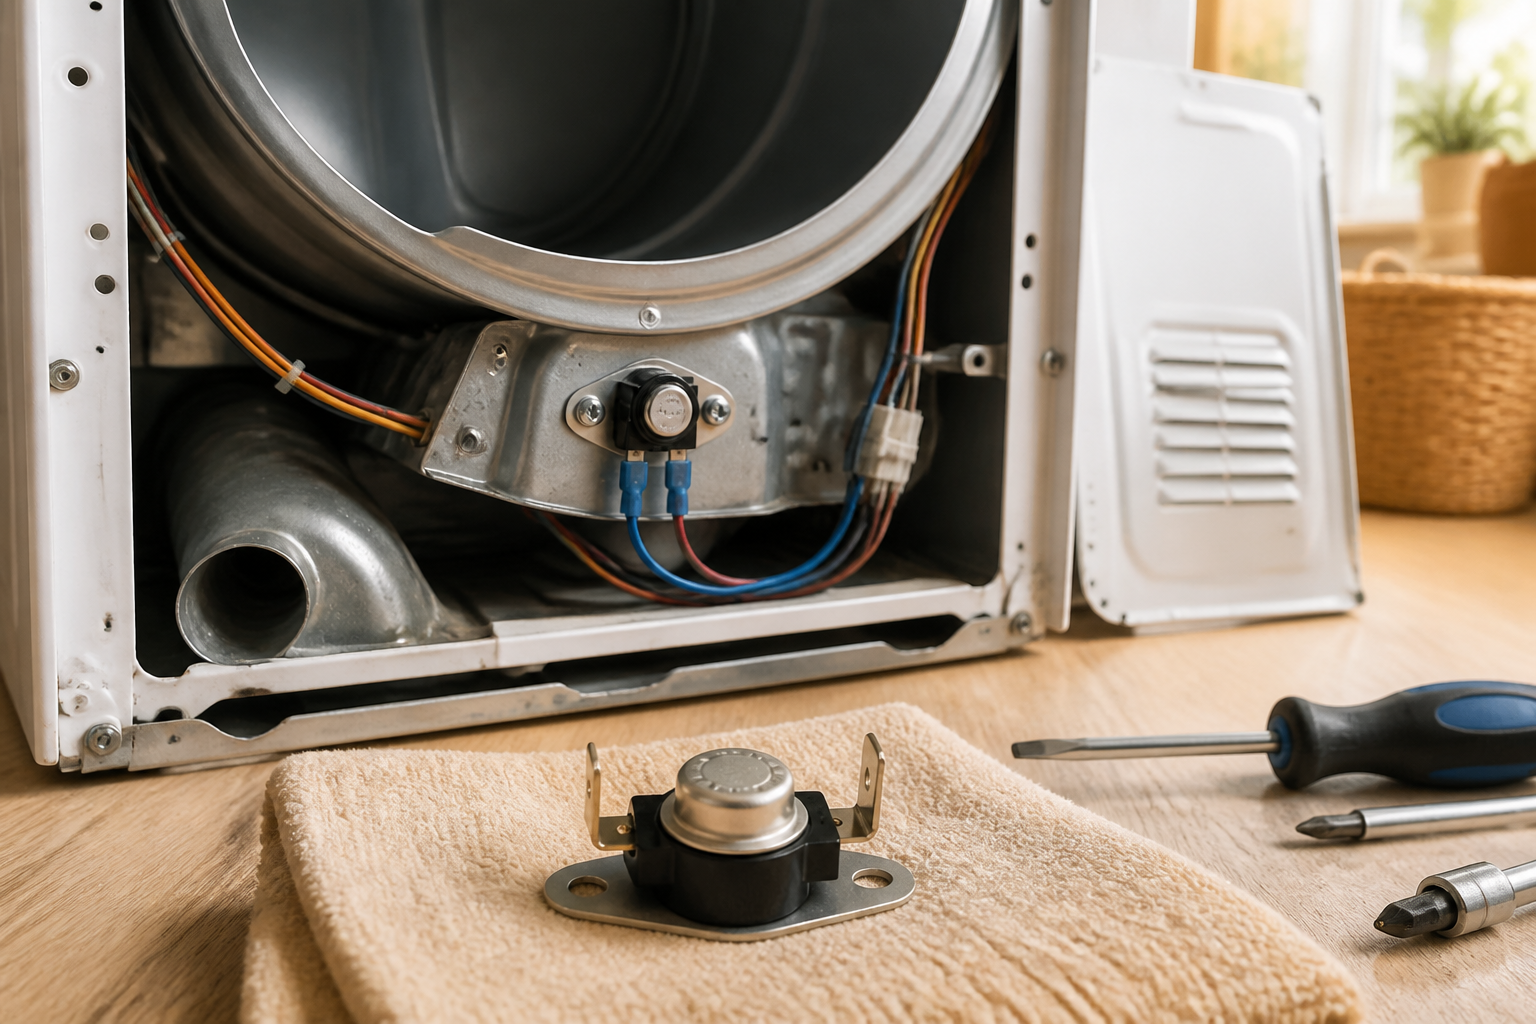
With the back panel removed from your GTD33EASKWW, look toward the bottom rear of the dryer cabinet. The thermal fuse is mounted on the exhaust duct assembly—a curved metal tube that directs hot air from the blower toward the vent hose connection. The thermal fuse is positioned on the outside of this exhaust duct where it can sense the temperature of the exiting hot air.
On the GTD33EASKWW, the thermal fuse is a small ceramic cylinder approximately 1.5 inches long and 0.5 inches in diameter. It has two male spade terminals sticking out from one end. Two wire harness connectors push onto these terminals. Look for the fuse mounted with a metal bracket or clip that secures it to the duct.
Removing and Replacing the Thermal Fuse
Step 4: Document Wire Connections
Before disconnecting anything from the thermal fuse on your GTD33EASKWW, take a photograph of the wire configuration with your phone. This photograph will be your reference when reconnecting the new fuse. Note the color of each wire and which terminal it connects to.
On the GTD33EASKWW, the thermal fuse typically has two wires: one black (or hot) and one white (or neutral). However, your specific model may vary, so the photograph ensures you reconnect correctly.
Step 5: Disconnect the Old Thermal Fuse
- Grasp the first wire connector (the cylindrical push-on terminal) firmly with your fingers or needle-nose pliers.
- Pull the connector straight off the thermal fuse spade terminal on your GTD33EASKWW. Do not twist or rock the connector; pulling straight prevents damage to the terminal.
- Repeat for the second wire connector.
- Once both wires are disconnected, note the mounting bracket or clip holding the thermal fuse to the exhaust duct on your GTD33EASKWW. If it uses a clip, you may be able to remove it; if it uses a screw, remove that fastener with the appropriate screwdriver.
- Remove the old thermal fuse and set it aside. Do not discard it until you have confirmed the new fuse is working properly; you may need to return it for verification if you need a warranty claim.
Step 6: Inspect the Thermal Fuse Location
Before installing the new thermal fuse on your GTD33EASKWW, inspect the exhaust duct area for lint, debris, or corrosion. This is a critical step because lint buildup around the thermal fuse is a common reason it fails prematurely.
- Use a shop vacuum with the hose attachment to carefully remove any lint or debris from the exhaust duct area surrounding where the fuse mounts.
- Inspect the duct for dents, kinks, or damage that might restrict airflow.
- If the duct surface is heavily corroded or damaged, note this as a potential root cause of the fuse failure and plan to address it later.
Step 7: Install the New Thermal Fuse
- Unpack the new WE4M519 thermal fuse for your GTD33EASKWW. Verify the part number matches exactly.
- Position the thermal fuse on the exhaust duct in the same location as the old fuse. On the GTD33EASKWW, the fuse should sit on top of the exhaust duct with the two spade terminals pointing upward or toward the wire connections.
- Secure the thermal fuse with its bracket or mounting clip using the fastener you removed earlier. Tighten firmly but do not overtighten, as excessive force can crack the ceramic body.
- Verify the fuse is stable and does not rock or move when gently pushed by hand.
Step 8: Reconnect the Wire Terminals
- Reference the photograph you took earlier of the original wire configuration.
- Push the first wire connector (usually the black wire on the GTD33EASKWW) firmly onto the corresponding spade terminal of the new thermal fuse. Push straight on; you should feel it seat with a slight click.
- Push the second wire connector onto the remaining spade terminal of the new fuse.
- Gently tug on each wire to confirm the connectors are fully seated and will not pull off easily.
- Visually inspect both connections to ensure they are clean, free of corrosion, and fully engaged on the spade terminals.
Addressing Root Causes Before Reassembly
Step 9: Inspect and Clean the Exhaust Vent System
With the back panel off your GTD33EASKWW, this is the perfect time to address the most common cause of thermal fuse failure: a clogged vent system. A blocked vent will cause the new thermal fuse to fail again within a few cycles.
- Inspect the vent hose connection: Look at where the vent hose attaches to the back of the GTD33EASKWW. Check for crushed sections, kinks, or compression damage that restricts airflow.
- Check the exhaust duct inside the dryer: The metal exhaust duct visible with the back panel removed should have clear airflow pathway. Use your flashlight to look through the duct from the blower side toward the vent connection. If you see a significant lint blockage, use a long brush or vacuum hose to clear it.
- Inspect the blower wheel: The blower wheel (visible as a fan near the back of the dryer drum) should spin freely with no lint buildup. A heavily blocked blower restricts airflow and causes heat buildup.
- Plan external vent cleaning: While you have the back panel off, plan to clean the external vent hose and outdoor vent cap using a dryer vent cleaning kit. A clogged external vent is the leading cause of thermal fuse failure on the GTD33EASKWW.
Step 10: Check the Cycling Thermostat
The cycling thermostat is the second most common cause of thermal fuse failure on the GTD33EASKWW. With the back panel removed, you can visually inspect it and perform a basic continuity test.
- Locate the cycling thermostat: On the GTD33EASKWW, the cycling thermostat is a cylindrical component mounted on or near the exhaust duct. It looks similar to the thermal fuse but is typically larger and has an adjustable temperature setting dial or screw on top.
- Visually inspect the thermostat: Look for corrosion, burnt contacts, or any visible damage to the component or its wire connections.
- Perform a continuity test: Using your multimeter set to continuity mode, test the cycling thermostat by touching the probes to its two terminals. The thermostat should show continuity (beep or display near 0 ohms) when cold. If it displays “OL” or infinite resistance when the dryer is cool, the thermostat is faulty and should be replaced.
- Note thermostat condition: If the cycling thermostat appears burned or fails the continuity test, plan to replace it as part of this repair. A faulty thermostat will cause repeated thermal fuse failure on the GTD33EASKWW.
Step 11: Clean the Lint Filter Area
While the back panel is off your GTD33EASKWW, clean the lint filter slot area to ensure proper airflow through the filter.
- Access the lint filter from the front of the dryer (or rear, depending on your model).
- Remove the lint filter and inspect it for damage, tears, or permanent lint buildup that cannot be cleaned.
- Wash the filter with warm water and a soft brush to remove all lint and buildup.
- Use a shop vacuum to clean the filter slot and surrounding area inside the dryer cabinet to remove lint that has bypassed the filter.
- Reinstall the clean filter, ensuring it sits fully in its slot.
Reassembling the GTD33EASKWW
Step 12: Reinstall the Back Panel
- Carefully position the back panel against the rear of the GTD33EASKWW cabinet, aligning the four mounting holes.
- Insert the four 10mm fasteners (the bolts you removed earlier) into the mounting holes at the top and bottom corners.
- Tighten each fastener firmly with your 10mm socket or nut driver. Apply enough force to create a secure seal, but do not overtighten, which can strip the threads or bend the panel.
- Verify the back panel is seated flush against the cabinet with no gaps.
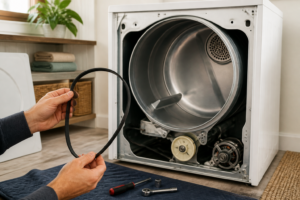
Step 13: Reconnect the Vent Hose
- Reattach the vent hose to the
Recommended Parts & Tools
GE WE4M315 Thermal Fuse for Dryer
This is the direct replacement thermal fuse for the GTD33EASKWW dryer model. The thermal fuse is the critical component you’ll be replacing during this repair, and having the correct OEM part ensures your dryer will function safely and reliably. Check current pricing on Amazon.
Nut Driver and Screwdriver Set
You’ll need various drivers to remove the lint trap housing, blower wheel, and thermal fuse assembly during this repair. A quality multi-bit screwdriver or driver set makes the job much faster and reduces the risk of stripping fasteners. Check current pricing on Amazon.
Lint Trap Cleaner and Dryer Vent Brush
While you have your dryer disassembled for the thermal fuse replacement, cleaning out lint buildup in the vent system is essential to prevent future thermal fuse failures. This brush kit helps remove accumulated lint that restricts airflow and causes overheating. Check current pricing on Amazon.
The Exact Thermal Fuse That Stops the GTD33EASKWW No-Heat Problem
When a GTD33EASKWW dryer runs but produces zero heat, nine times out of ten it’s this fuse that’s blown. You need the OEM part number match—the WE4M315 is the correct replacement for this model, and ordering the wrong thermal fuse means another trip back into the dryer cabinet.
What works
- Exact OEM part number fit—no adapter needed, no guessing whether it’ll seat properly in the blower housing
- Comes with the correct amperage rating (258°F trip point), which prevents nuisance blows and premature failures from recurring airflow blockages
- One-time use design means once you install it correctly and clear the vent blockage that likely caused the original failure, you won’t see this part again for years
What doesn’t
- Only solves the symptom if you’ve actually diagnosed the root cause—a clogged vent or lint trap will blow this fuse again within weeks, so cleaning must happen first
- Won’t help if your dryer’s heating element is the real problem; the fuse protects against overtemp, so if you’re not getting heat after replacement, the element itself may be dead
The most common mistake I see is customers ordering a generic thermal fuse or the wrong GE part number, then having to disassemble the dryer a second time. Before you buy, verify this is the WE4M315 and also commit to cleaning out your vent line—I’ve replaced this fuse on the same dryer twice in one week because the homeowner ignored the blockage. Get the GE WE4M315 Thermal Fuse for Dryer and do the vent cleaning at the same time.
This post contains affiliate links. As an Amazon Associate, I earn from qualifying purchases at no extra cost to you.