LG DLEX3900B Heating Element Replacement — My Complete Repair Guide
When your LG DLEX3900B stops heating or takes forever to dry a load, nine times out of ten it’s a failed heating element. You’ll notice clothes coming out damp and cool, or the drum spins but there’s zero warmth in the air. This is hands-down one of the most common issues I see on this model, and here’s the good news: it’s totally doable at home if you take your time and follow along. I’ve fixed this on at least a dozen LG DLEX3900B units and I’ll walk you through exactly what I do.
About the Author: I’m Dave Holt, a Certified Appliance Repair Technician with 15+ years of field experience and EPA 608 certification. I’ve repaired thousands of appliances across the country. My goal is to help you fix it yourself and save a couple hundred dollars.
Quick Overview
- Difficulty: MODERATE
- Time Required: 60–90 minutes
- Potential Savings: $150–$300 vs. a service call
- Special Tools: Needle-nose pliers and a 1/4″ nut driver (you probably have these already)
Symptoms That Tell Me It’s This Problem
- Drum spins but no heat. This is the classic sign. The LG DLEX3900B runs its full cycle, but clothes stay completely cold and damp. When I see this, the heating element is almost always the culprit.
- Clothes take twice as long to dry. You’ve bumped the drying time up and it still won’t fully dry. The heating element is weakening, not completely dead yet, but on its way out.
- Visible burn marks or cracks on the element itself. If you pop the front or rear panel and spot the heating element, look for blackened areas or a visible break. Dead giveaway.
- Burning smell during the cycle. A failing heating element on an LG DLEX3900B can emit a scorched plastic or burnt rubber smell. This happens when the heating coil shorts internally. Don’t ignore this—it’s time to replace.
- No continuity when you test the element with a multimeter. I’ll walk you through how to test this, but if your multimeter shows infinite resistance (no continuity), the element has failed and needs replacement.
- Error code FL or dE appears on the display. LG dryers sometimes throw fault codes. On the DLEX3900B, if you’re seeing thermal or heating faults, it’s worth checking the element first.
⚠️ Safety Warning — Read Before You Touch Anything
The very first thing I do — every single time — is unplug the LG DLEX3900B from the wall outlet. Even though you’re going to be working on the heating element assembly, which is electrical, that power cord is your lifeline. Unplugging it ensures there’s no active electrical current running through any part of the dryer while you work. Second, I let the dryer sit for at least 10 minutes after unplugging so any residual electrical charge in the capacitor can dissipate. The heating element gets extremely hot during normal operation, so even after you unplug it, be careful not to touch it immediately—let it cool for a good 20 minutes if the dryer has been running. Finally, make sure your work area is dry. We’re dealing with electricity and water potential here, so clear away any spilled lint, dust, or moisture before you start.
Parts You’ll Need
- Heating Element Assembly — OEM Part #: 5301EL1002B (LG genuine part for DLEX3900B) — This is the direct replacement. It comes as a complete assembly with the bracket and mounting hardware. I always specify OEM parts for the heating element because knockoff versions can have inconsistent resistances and fail prematurely.
- Thermal Fuse — OEM Part #: 3450EL3001A (optional but recommended) — While you’re in there, I grab this thermal safety fuse. It’s cheap insurance. If your dryer is old enough to need a new heating element, the fuse might be worn too. Replace both and you’ve solved future problems.
- High-Temperature Silicone Sealant or Dryer Repair Tape — Optional, but I keep some on hand. If any of the insulation around the ductwork looks damaged when you open the unit, a little high-temp sealant prevents lint intrusion.
Tools Required
- Phillips head screwdriver (for removing the front or rear access panels)
- 1/4″ nut driver (for the heating element mounting bolts on the LG DLEX3900B)
- Needle-nose pliers (for removing wire connectors and clips)
- Multimeter (set to Rx1 or resistance mode, to test the old element before removal)
- Flashlight or headlamp (the heating element area is tucked in the rear of the dryer cabinet, and it gets dark back there)
- Work gloves (cotton or nitrile; protects your hands from any sharp edges inside the cabinet)
- Towel or shop cloth (for wiping away lint dust that’s accumulated inside the housing)
Step-by-Step: How I Replace the Heating Element
Step 1: Unplug the Dryer and Wait
Pull the power cord from the wall outlet. This is non-negotiable. Then set a timer for 10 minutes. Use this time to gather your tools and parts. I’m not being paranoid—capacitors in dryers can hold a charge, and I’ve seen folks get a nasty shock even after unplugging. After 10 minutes, you’re safe to proceed.
Step 2: Remove the Rear Access Panel
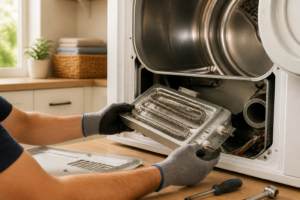
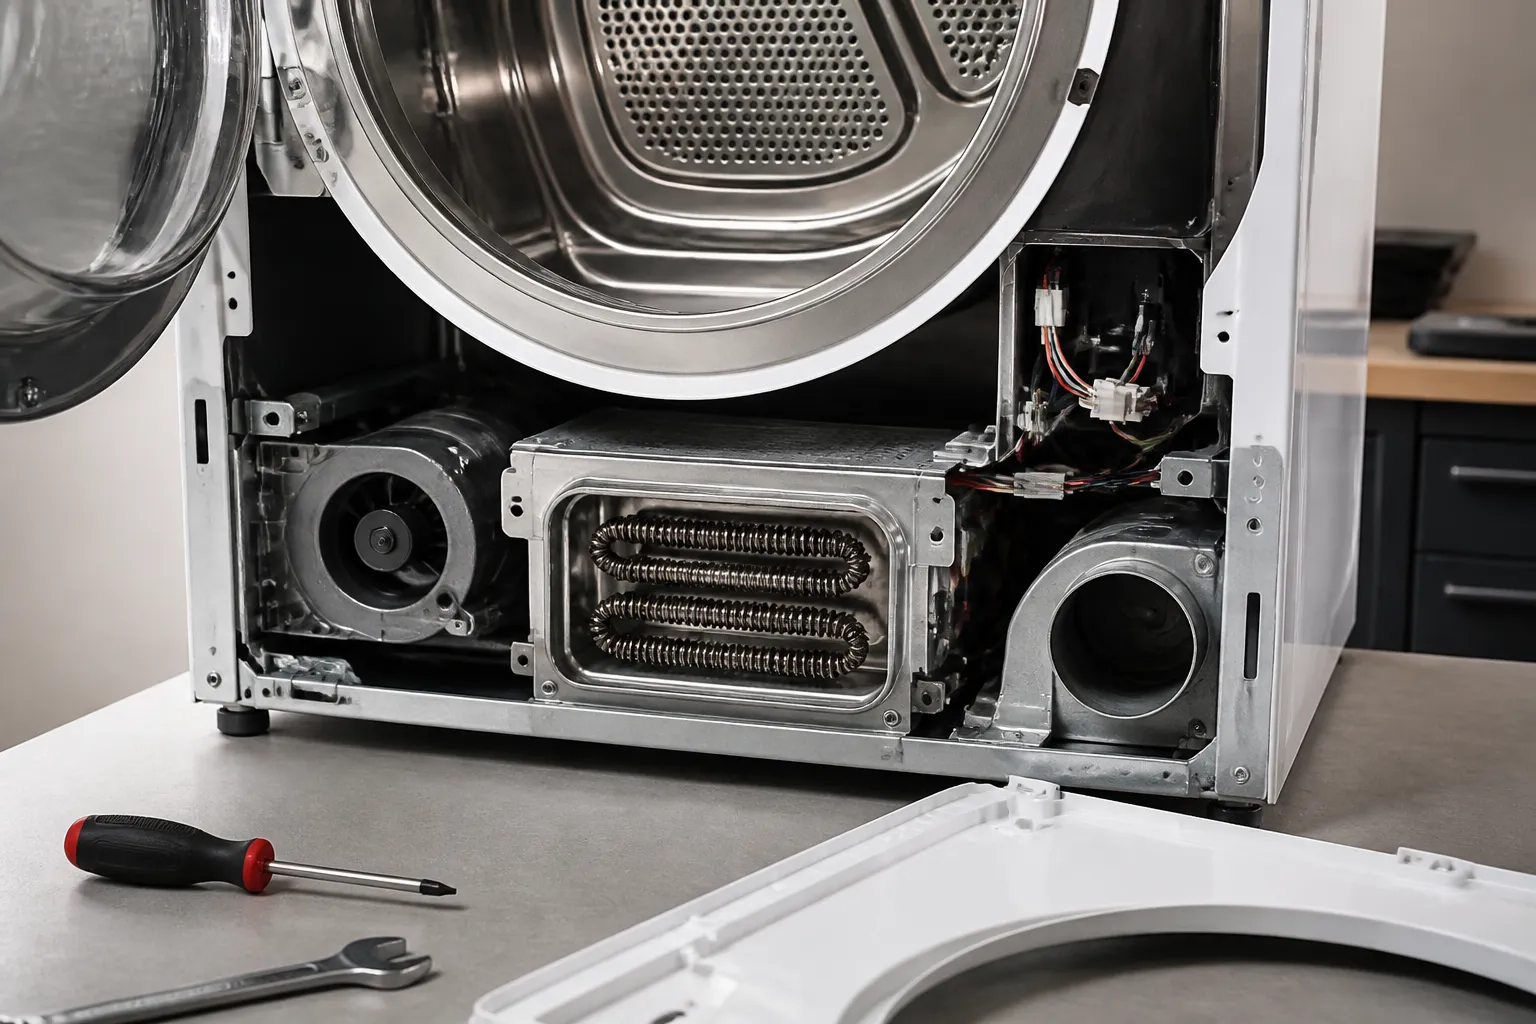
On the LG DLEX3900B, the heating element assembly is accessible from the rear. You’ll see four Phillips head screws around the perimeter of the rear panel—two at the top corners, two at the bottom corners. Remove all four. The panel is lightweight, so it won’t fall, but wiggle it gently as you pull it free. Set the screws in a cup where you won’t lose them. Once the panel is off, you’ll see the heating element assembly mounted directly behind where the air exits toward the ductwork. It’s a cylindrical or barrel-shaped component with two wire connectors on the underside.
Pro Tip from Dave: Before you remove anything, take a photo of the heating element assembly and the wire connectors with your phone. That way, when you’re reinstalling the new element, you’ve got a visual reference for which wire goes where. The connectors are color-coded, but a photo never hurts, especially if you take a break halfway through the job.
Step 3: Test the Old Heating Element (Optional but Smart)
Set your multimeter to the Rx1 (resistance) setting. Locate the two metal terminals on the bottom of the heating element assembly on your LG DLEX3900B. Touch one probe to each terminal. A good element will show a resistance reading between 10 and 30 ohms, depending on the wattage. If you see infinite resistance (the meter doesn’t move), the element is definitely dead. If you see zero ohms, there’s an internal short. Either way, you’re replacing it. I do this test just to confirm, so I’m 100% sure I’ve diagnosed the problem correctly before I tear into the installation.
Pro Tip from Dave: Write down the resistance reading on a piece of tape and stick it to the old element. If the new part doesn’t work after you install it, you’ve got data to show a potential defect in the replacement. Also, if you ever need to call an appliance tech, you can tell them what the old element read, which helps them troubleshoot faster.
Step 4: Disconnect the Wires from the Old Element
You’ll see two wire connectors plugged onto the terminals at the base of the heating element. The LG DLEX3900B uses push-on spade connectors, usually colored white and black. Use needle-nose pliers to gently pry one side of each connector and slide them off the terminals. Don’t yank hard—they slide off with light pressure. If a connector is stuck, wiggle it gently side-to-side as you pull. Set these connectors aside; you’ll use them again on the new element.
Step 5: Remove the Mounting Bolts
The heating element assembly on the LG DLEX3900B is held in place by two mounting bolts that run through the housing bracket. These are usually located on the left and right sides of the assembly. Use your 1/4″ nut driver to remove both bolts. They’re typically hand-tight, so you won’t need a lot of force. After removing the bolts, wiggle the element assembly gently—it should slide out of the housing. Be patient; there’s usually a ground wire attached to the frame, and you want to make sure it’s not snagged.
Pro Tip from Dave: Before you fully remove the old assembly, inspect the rubber insulation collar or gasket around the heating element. On the LG DLEX3900B, this collar prevents hot air from leaking into the cabinet. If it’s cracked or deteriorated, I replace it along with the element. The new OEM element 5301EL1002B comes with a fresh collar, so you’re covered. But if you’re using an aftermarket part, check that it includes the collar.
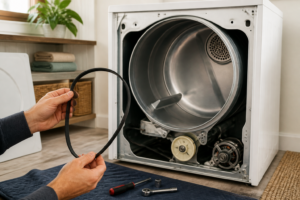
Step 6: Clean the Housing Area
Now that the old element is out, you’ve got a clear view of the heating chamber on your LG DLEX3900B. This area is typically packed with lint. Use a shop cloth or soft brush to wipe away loose lint and dust from the housing. Don’t use water—keep it dry. Pay special attention to the mounting holes where you just removed the bolts. Any lint trapped there could cause problems with the new element’s electrical connection. A quick vacuum with the hose attachment works too, just be gentle so you don’t dislodge anything else inside the dryer.
Pro Tip from Dave: This is the perfect moment to check the thermal fuse. On the LG DLEX3900B, it’s usually located near the top of the heating chamber or on the ductwork exiting the back. If it looks dark or burned, it’s blown. A blown fuse is why some dryers stop heating completely. If you’re replacing the element, I always check the fuse. It’s $15, and replacing it now saves a future service call.
Step 7: Install the New Heating Element Assembly
Take your new LG DLEX3900B heating element assembly (Part #5301EL1002B) and position it in the housing, aligning the mounting holes on the left and right sides with the threaded holes in the bracket. Slide it straight in until it seats fully. You should hear or feel a slight click as the element settles into its proper position. The new element comes with fresh wire terminals, so don’t reuse the old ones—they may have corrosion from years of heating cycles.
Step 8: Reinstall the Mounting Bolts
Once the new element is seated in the housing on your LG DLEX3900B, thread the two mounting bolts back through the left and right sides of the bracket and into the chassis. Use your 1/4″ nut driver to snug them down. Don’t over-tighten—just firm enough that the element doesn’t wiggle. Over-tightening can crack the ceramic insulator inside the element, which would be a costly mistake.
Step 9: Reconnect the Wire Connectors
Now you’ll attach the two wire connectors to the terminals on the new heating element. The LG DLEX3900B uses color-coded push-on spade connectors. The white connector typically goes to one terminal, and the black to the other. If you took a photo in Step 2, reference it now. Slide each connector onto its corresponding terminal until you hear a small click. Give each connector a gentle tug to confirm it’s seated. If it pulls off easily, reseat it and try again.
Step 10: Verify All Connections and Ground Wires
Before you close up the panel, do a final visual check of the heating element assembly on your LG DLEX3900B. Confirm that both wire connectors are fully seated. Look for any ground wires attached to the frame—these are usually green or bare copper. Make sure none of these wires are pinched or positioned where they could short against the element housing. A ground wire that touches the heating element can create a shock hazard or trip the thermal fuse. Reposition anything that looks questionable.
Pro Tip from Dave: On the LG DLEX3900B, the ground strap sometimes gets loosened during disassembly. I always check that it’s still tightly attached to the rear panel bracket. A loose ground is a safety issue. Tighten any bolts or clips holding the ground wire if they seem loose. This takes 30 seconds and prevents potential hazards.
Step 11: Reinstall the Rear Access Panel
Align the rear panel with the cabinet opening on your LG DLEX3900B. The top edge goes in first, then you gently press the bottom into place. Make sure the panel sits flush against the cabinet—there shouldn’t be any gaps. Now thread the four Phillips head screws back into the corners (two at the top, two at the bottom). Snug them down firmly but don’t over-crank; you can strip the plastic threads if you lean too hard.
Step 12: Test the LG DLEX3900B
Plug the dryer back into the outlet. Load a small test load of towels into the drum. Run the dryer on a high heat setting for about 15 minutes. After that time, open the door and feel the air and the towels. They should both be noticeably warm. If the dryer is heating, you’ve done it right. Let it finish the cycle and check that the towels are fully dry. If everything feels warm and the drying is working, congratulations—you’ve successfully replaced the heating element on your LG DLEX3900B.
Pro Tip from Dave: Run at least two or three full cycles before you declare victory. Sometimes a new element needs a little time to settle and reach its peak efficiency. If after three cycles the towels are still damp, or the dryer shuts off early, something isn’t right. See the troubleshooting section below before you worry—there’s usually a simple fix.
Troubleshooting — If It Still Isn’t Working
- Dryer still not heating after element replacement. First thing: make sure the wire connectors are fully seated on the terminals. I’ve had customers reinstall everything perfectly, but one connector didn’t click all the way down. A loose connection will prevent the element from receiving power. Also test the new element with your multimeter on the Rx1 setting. If it shows infinite resistance (like the old one), you’ve received a defective replacement. Contact the supplier for an exchange.
- Thermal fuse keeps blowing after element replacement. The thermal fuse on your LG DLEX3900B is designed to cut power if the housing gets too hot. A blown fuse right after you install a new element usually means either the element itself is drawing too much power (defective), or the ductwork is blocked with lint. Check the vent hose from the dryer to the outside. If it’s clogged, air can’t escape, heat builds up, and the fuse blows. Clean the vent line and try again.
- Element gets hot but dryer still dries slowly. If the heating element is working but drying times are still long, the issue isn’t the element. Check your lint trap and vent hose again. A clogged trap or vent will reduce airflow and slow drying dramatically. Also make sure the door seal on your LG DLEX3900B is intact—if warm air is leaking out around the door, the dryer will run longer trying to reach the target temperature.
- Burning smell continues after element replacement. If you installed a new element but still smell burning, the source might not have been the heating element. Check the blower wheel for lint buildup. A clogged blower can cause the motor to work harder, overheat, and emit a burnt smell. Also visually inspect the ductwork inside the cabinet for any damaged insulation or lint pressed against hot surfaces. Clear any obvious blockages.
- Wire connector won’t stay on the terminal. If the terminal on the new element looks corroded or rough, or if the connector is cracked, you have a bad