
GE GTW720BSNWS Lid Switch Assembly Replacement — My Complete Repair Guide
When a GE GTW720BSNWS won’t start, won’t fill, or runs through cycles with the lid wide open, nine times out of ten it’s the lid switch assembly that’s shot. I’ve fixed this on at least a dozen GE GTW720BSNWS units over the years, and it’s one of the most straightforward repairs you can tackle yourself — takes me about an hour from start to finish, and you’ll pocket the repair cost instead of calling a service tech.
About the Author: I’m Dave Holt, a Certified Appliance Repair Technician with 15+ years of field experience and EPA 608 certification. I’ve repaired thousands of appliances across the country. My goal is to help you fix it yourself and save a couple hundred dollars.
Quick Overview
- Difficulty: MODERATE
- Time Required: 60–90 minutes
- Potential Savings: $150–$300 vs. a service call
- Special Tools: Multimeter (to test continuity) and a 1/4″ nut driver or socket
Symptoms That Tell Me It’s This Problem
- Machine won’t start even though the lid is closed: The most common one I see on the GE GTW720BSNWS. The lid switch tells the washer’s control board that the lid is secure, and without that signal, the machine won’t energize the motor or fill valve.
- Machine starts and runs even with the lid open: This means the switch is stuck in the “closed” position internally. You can actually watch the tub spin while the lid’s up — a safety hazard and a sign of a failing switch.
- Cycle stops mid-wash if you crack the lid open: The switch used to work but now it’s intermittent. Sometimes it registers the open lid, sometimes it doesn’t.
- You hear a clicking sound near the lid area during start-up: When I hear this on a GE GTW720BSNWS, it’s usually the switch mechanism failing to make clean contact.
- Error code F21 or F24 appears (though less common on this model): While F21 typically refers to a drain issue, sometimes a faulty lid switch can trigger control board confusion and throw related codes.
- The lid latch feels loose or the switch doesn’t “click” when you close the lid: If the mechanical connection between the lid and the switch is degraded, the switch won’t activate properly.
⚠️ Safety Warning — Read Before You Touch Anything
The very first thing I do — every single time — is unplug the GE GTW720BSNWS from the electrical outlet. This machine holds residual electrical charge in the control board capacitors, and touching live circuits can hurt you. I also shut off the water supply valves behind the machine (turn the knobs clockwise). Once those are done, open the lid, prop it up, and let any standing water drain from the tub into a bucket or towel before you start taking things apart. Water and electricity don’t mix, and I’ve seen too many DIYers get a nasty shock because they skipped this step.
Parts You’ll Need
- Lid Switch Assembly — OEM Part #: WH12X10347 (GE original equipment manufacturer part, fits the GE GTW720BSNWS exactly) — This is the complete switch unit including the actuator plunger and the electrical switch body. Don’t settle for a knockoff here; I always use genuine GE parts for this one.
- Wire Connector Terminal Kit (optional but recommended) — OEM Part #: WH02X10116 — If the spade terminals on the old switch are corroded or the wires are brittle, fresh terminals make the new connection rock-solid. I grab these whenever I’m doing a lid switch on older GE models.
Tools Required
- 1/4″ nut driver (or 1/4″ socket with a ratchet)
- Flathead screwdriver (for prying open the top panel trim)
- Multimeter set to Rx1 (Ohms × 1 scale) to test switch continuity
- Needle-nose pliers (for removing wire connectors)
- Small flashlight or headlamp (the switch assembly sits in a tight corner under the lid)
- Masking tape and a marker (to label wires before disconnecting)
- Towel or rag (to wipe up any residual water)
Step-by-Step: How I Replace the Lid Switch Assembly Replacement
Step 1: Unplug and Prepare
Unplug the GE GTW720BSNWS from the wall outlet right now. Then walk around the back of the machine and shut off the hot and cold water supply valves by turning them clockwise all the way. Don’t skip this — I’ve had water spray everywhere because someone tried to work with the valves still live. Once the power is off and the water is shut off, open the lid fully and prop it up with a stick or a piece of wood. Let any water in the tub drain into a bucket, and wipe the tub dry with a towel. This takes five minutes and saves you a mess and a potential electrical hazard.
Pro Tip from Dave: On the GE GTW720BSNWS, there’s usually a little bit of lint and water trapped in the hinge area under the lid. Grab a dry rag and wipe that out before you start. It keeps the hinges from rusting and gives you a cleaner workspace.
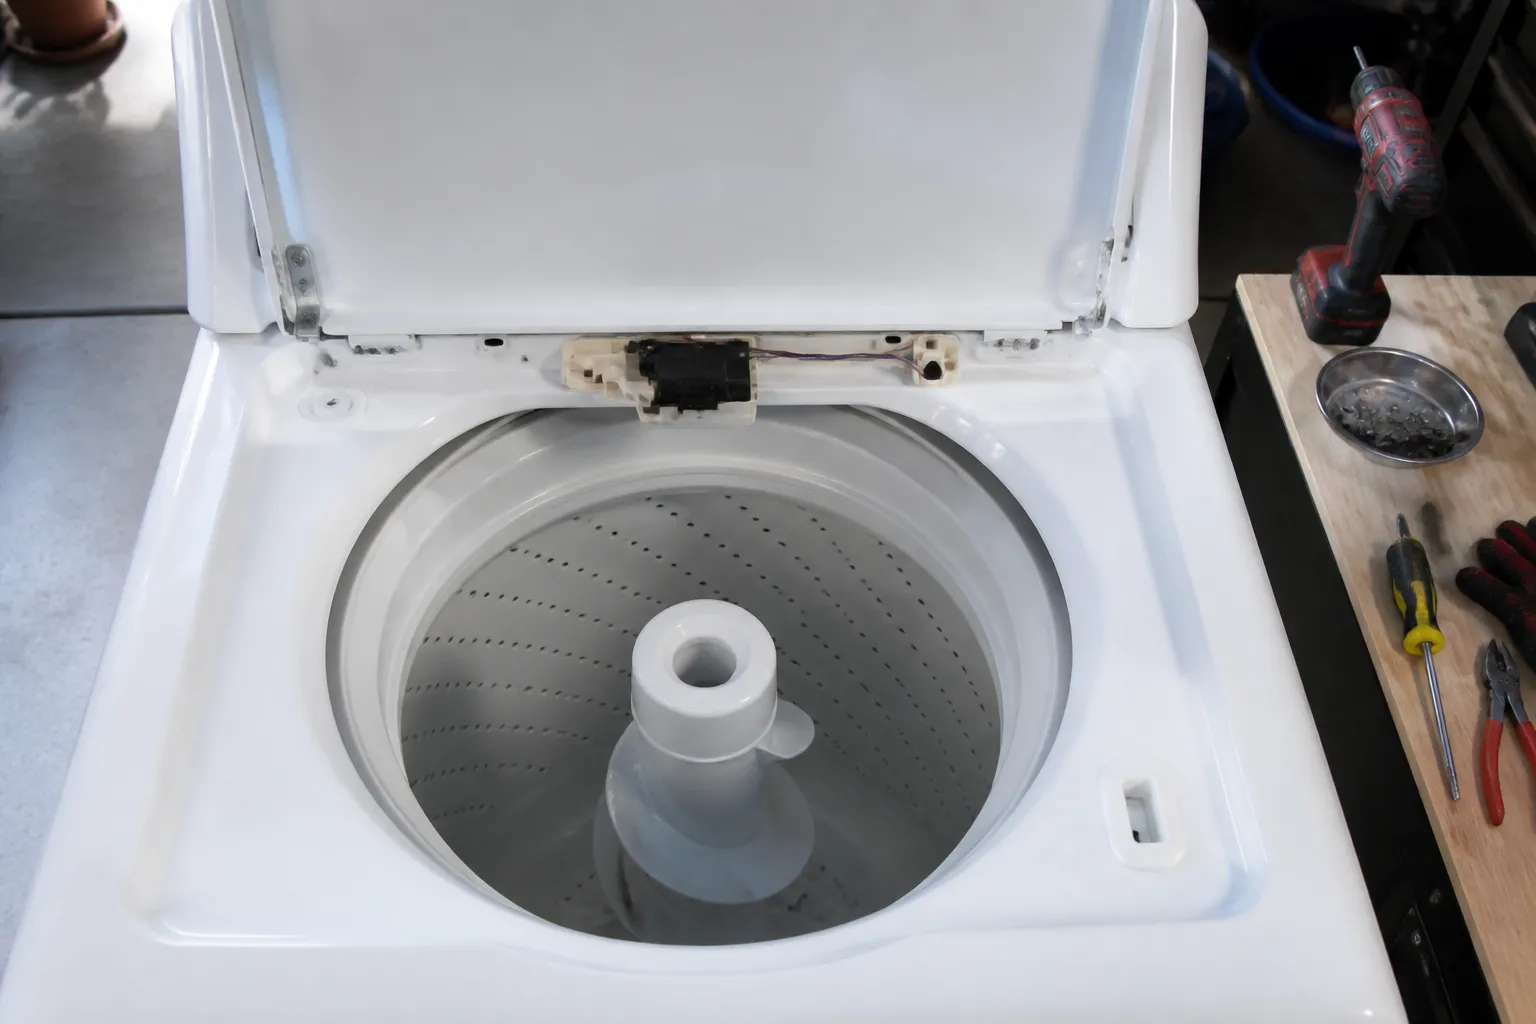
Step 2: Access the Lid Switch Assembly Location
The lid switch assembly on the GE GTW720BSNWS is mounted on the left-hand side of the tub rim, right under where the lid hinges down. You’ll see it sitting in a molded plastic pocket just inside the top edge of the cabinet. To get to it, you need to carefully pry open the decorative top panel trim that runs along the inside edge of the lid opening. Using a flathead screwdriver, gently work the trim away from the cabinet — start at one end and work along the length. It’s held in with plastic clips, and they release pretty easily if you take your time. Once the trim is loose and set aside, you’ll have clear access to the switch assembly underneath.
Step 3: Test the Old Switch Before Removing It
Before I pull the old switch out, I always test it with my multimeter to confirm it’s actually dead. Set your multimeter to the Rx1 (Ohms × 1) scale. Locate the two wire terminals on the back of the switch assembly — they’ll be spade-type connectors, usually white or clear plastic housings. Disconnect the wires gently by squeezing the connector tab with your needle-nose pliers and sliding the connector off. Now touch the multimeter probes to the two metal terminals on the back of the switch itself. With the switch in the “closed” position (the way it sits when the lid is down), you should read continuity — that’s a very low resistance, typically between 0 and 10 ohms. If you get no continuity or very high resistance (infinity), that confirms the switch is bad and ready to be replaced. If it does show continuity, the problem might be elsewhere — but on a GE GTW720BSNWS, I’d still replace it since the mechanical part might be on its way out.
Pro Tip from Dave: Write down which wire goes to which terminal on the switch before you disconnect anything. I use masking tape and a marker — just write “terminal 1” and “terminal 2” on two small pieces of tape and stick them to the wires. On the GE GTW720BSNWS, both wires are usually the same color (white or red), so labeling them saves you from guessing later.
Step 4: Remove the Mounting Bolts
The switch assembly is held in place by two 1/4″ bolts that screw into threaded holes in the tub rim. Grab your 1/4″ nut driver and locate these bolts — one is usually on the upper left of the switch body, and one is lower right. Turn them counterclockwise with the nut driver until they’re loose enough to come out by hand. Keep these bolts safe; they’re small and easy to lose, and you’ll be reusing them with the new switch. On the GE GTW720BSNWS, these bolts are stainless steel and rarely strip, so you shouldn’t need replacements.
Step 5: Disconnect the Wire Terminals Completely
If you haven’t already, now is the time to fully disconnect the two wire terminals from the back of the old switch assembly. Squeeze the connector tab gently with your needle-nose pliers and slide the connector straight off the spade terminal. Do this for both wires. You may see a little white or clear plastic housing around the terminal — that’s normal. Gently pull the wires toward the front of the machine so they’re not in your way when you pull out the old switch.
Step 6: Remove the Old Switch Assembly
Now you can pull the old switch assembly straight out of its pocket on the tub rim. Wiggle it gently side to side if it feels tight — it should come free with just a light tug. On the GE GTW720BSNWS, these switches are held in by the bolts alone, and once those are out, there’s nothing else keeping it in place. Set the old switch aside. Take a moment to look at the pocket where it sat — if it’s dirty or has lint buildup, wipe it out with a dry rag so the new switch sits properly.
Pro Tip from Dave: Before you install the new switch, inspect the actuator plunger — that’s the small plastic rod that sticks out from the bottom of the switch body. On the GE GTW720BSNWS, this plunger is what physically touches the lid latch mechanism and triggers the switch. Make sure it’s not cracked or bent. The new WH12X10347 should have a clean, straight plunger. If the plunger on the new switch looks damaged, don’t install it; call your parts supplier and ask for a replacement unit.
Step 7: Position and Install the New Switch Assembly
Take the new lid switch assembly (the WH12X10347 part number) and position it in the same pocket on the tub rim where the old one sat. The actuator plunger should face downward and inward, toward the lid latch. On the GE GTW720BSNWS, the plunger needs to sit so that when the lid closes, the latch pushes it inward and opens the electrical contacts. Align the two bolt holes on the switch body with the threaded holes in the tub rim. You should be able to see the bolt holes line up when you look at the switch from the side. Insert both 1/4″ bolts through the switch mounting ears and into the threaded holes. Turn them hand-tight first — don’t torque them down yet.
Step 8: Reconnect the Wire Terminals
Once the new switch is positioned, reconnect the two wire terminals to the spade terminals on the back of the switch. Use your labels or your memory to match each wire to the correct terminal — on the GE GTW720BSNWS, both terminals are identical and recessed slightly, so make sure the connector slides all the way on until it seats firmly. Push each connector straight in; you should hear or feel a small click as it locks. Gently tug on each wire to make sure the connectors are snug and won’t slip off during operation.
Step 9: Tighten the Mounting Bolts
Now go back and tighten both 1/4″ bolts with your nut driver. Turn them clockwise firmly but not with all your strength — you want them snug enough that the switch assembly doesn’t move or rattle, but you don’t want to over-tighten and crack the plastic switch body. On the GE GTW720BSNWS, a firm quarter-turn past hand-tight is about right. Give the switch body a gentle wiggle with your hand; it should be solid and not move around.
Pro Tip from Dave: After tightening the bolts, close the lid slowly by hand and watch the actuator plunger on the new switch. You should see it move inward smoothly as the lid latch pushes against it. If the plunger doesn’t move or gets stuck, you may have the switch positioned slightly off, or the latch may be bent. Stop and adjust before you go further.
Step 10: Test the New Switch Before Reassembling
Before you close everything back up, test the new switch with your multimeter again. Disconnect the wires once more, set the multimeter to Rx1, and touch the probes to the switch terminals. With the lid closed (latch pushed down on the plunger), you should get continuity — a low resistance reading. Now open the lid, which should let the plunger pop back out, and test again. With the lid open, the switch should read no continuity or very high resistance (infinity). If you get those two readings, the new switch is working correctly. Reconnect the wires when you’re satisfied.
Step 11: Reinstall the Top Panel Trim
Snap the decorative top panel trim back into place along the inside edge of the lid opening. On the GE GTW720BSNWS, it has three or four plastic clips along its length that click back into the molded slots on the cabinet. Start at one end and work your way along, pressing down gently until you hear each clip snap into place. The trim should sit flush with no gaps.
Step 12: Restore Power and Water, Then Test
Close the lid and lower it gently. Now turn the hot and cold water supply valves back on (turn counterclockwise until they stop). Plug the GE GTW720BSNWS back into the electrical outlet. The machine should power up normally. Open the lid — you should see that the cycle pauses. Close the lid again — the cycle should resume. If the machine starts a cycle automatically when you plug it in, that’s normal; it means the new switch is already working and signaling that the lid is closed. Run a short test cycle with no clothes to make sure everything works smoothly. Check for any water leaks around the fill hose connections while it’s running.
Pro Tip from Dave: After you’ve run the test cycle, open the lid mid-cycle (if the machine stops like it should), and then close it again. The cycle should restart without any delay. If there’s a lag or if the machine doesn’t recognize the lid is closed, you may have a wiring issue or the new switch needs a tighter bolt. Check those things before you call it done.
Troubleshooting — If It Still Isn’t Working
- Machine still won’t start even with the new switch installed: If you’ve replaced the switch and the GE GTW720BSNWS still won’t start, the problem is probably not with the switch itself but with the wiring or the control board. Disconnect the wires one more time and test the new switch in isolation with the multimeter — if it shows continuity when the lid is closed, the switch is good. The issue is either a broken wire, a corroded connector, or a faulty control board that isn’t recognizing the signal. I’d trace the wires from the switch all the way to the control board looking for damage, then test continuity along the wire itself.
- Lid opens during the cycle and the machine doesn’t stop: This tells me the switch is stuck in the “closed” position and isn’t opening when the lid actually opens. That shouldn’t happen with a brand-new switch, but if it does, the new switch assembly you received might be defective. Test it with your multimeter to confirm — if the switch shows continuity even with the plunger extended (lid open position), send it back and get a replacement from your supplier.
- Machine starts and runs with the lid wide open: Same issue as above — the new switch isn’t opening when it should. Double-check that the plunger is making proper contact with the lid latch. If the latch itself is bent or worn, it might not be pushing the plunger in far enough to fully close the switch contacts. You may need to inspect or replace the lid latch assembly as well.
- Wire connectors keep popping off during a cycle: The connections aren’t seating properly, usually because the spade terminals are corroded or the connector housings are cracked. If you replaced the switch and the connectors are still loose, I’d grab that wire connector terminal kit (WH02X10116) and replace the old terminals with fresh ones. Crimp the new terminals onto the wires, and reconnect to the switch.
- You smell a burning odor coming from the switch area after you power it back on: This is a sign of an electrical arc or a short circuit. Kill the power immediately, unplug the machine, and don’t run it again until you figure out what went wrong. Check that the wires are fully inserted into the connectors and that there’s no water or moisture around the switch. If the wires look burned or melted, the new


