
Ice Maker Not Working After Filter Change – GE GSS25IYNFS Side-by-Side Refrigerator
Ice maker failure after a water filter replacement is a common issue with the GE GSS25IYNFS side-by-side refrigerator model. This problem typically occurs due to air trapped in the water lines, incorrect filter installation, or reset procedures not being followed properly after filter replacement. The ice maker system in this model requires specific steps to purge air and reset the control module after any water system maintenance. This repair is classified as MODERATE difficulty, requiring basic electrical knowledge and the ability to access internal components safely.
Symptoms
- Ice maker completely stops producing ice after filter replacement
- Water dispenser works normally but ice maker remains inactive
- Ice maker control arm moves but no water fills the ice mold
- Intermittent ice production with smaller than normal cubes
- Ice maker makes normal cycling sounds but produces no ice
- Water fills ice mold but freezing process appears incomplete
⚠️ Safety Warning
Before beginning any repair work on your GE GSS25IYNFS refrigerator, disconnect power at the circuit breaker or unplug the unit from the wall outlet. Water and electricity create serious shock hazards. The refrigerator weighs approximately 300 pounds and requires two people to move safely. When accessing internal components, be aware of sharp metal edges and refrigerant lines that should never be punctured or damaged. Always allow the unit to sit upright for at least 4 hours after moving before restoring power to prevent compressor damage.
Parts Needed
- GE MWF SmartWater Filter (part number MWF) – replacement if current filter is defective
- Ice maker water inlet valve (part number WR57X10051) – if valve is clogged or faulty
- Ice maker assembly (part number WR30X10093) – complete replacement if internal components are damaged
- Water line connector kit (part number WR02X11705) – if connections are damaged during repair
- Ice maker control module (part number WR55X10942) – if electronic controls are faulty
Tools Required
- Phillips head screwdriver set (#1 and #2)
- Flathead screwdriver (1/4 inch)
- Digital multimeter with continuity testing capability
- Needle-nose pliers with insulated handles
- Flashlight or headlamp for interior visibility
- Clean towels for water cleanup
- Small container for catching water during line disconnection
Step-by-Step Instructions
Step 1: Verify Filter Installation
🔨 Pro Tip from Dave
On the GSS25IYNFS, after a filter swap, most people dispense water for 2–3 minutes and call it done — but I always run at least 3 full gallons through the door dispenser before expecting the ice maker to cycle correctly, because residual air pockets sitting at the inlet valve will cause the first several fill cycles to produce hollow, malformed cubes or nothing at all, and homeowners panic thinking the ice maker is broken when it’s still just purging. If you skip this step and then run the ice maker diagnostic cycle, you’ll chase a ghost fault all day.
Remove the water filter from the upper right corner of the fresh food compartment in your GE GSS25IYNFS. The MWF filter should turn counterclockwise 1/4 turn to remove. Inspect the filter housing for the rubber O-ring seal and ensure it’s properly seated. Reinstall the filter by aligning the arrows and turning clockwise until it stops, then continue turning until the arrows align again (approximately 1/4 turn total). A properly installed filter will not turn further when fully seated.
Step 2: Reset Ice Maker Controls
Locate the ice maker ON/OFF switch on the freezer door interior, positioned above the ice bin. Turn the switch to OFF, wait 30 seconds, then turn back to ON. For models with wire bail arm controls, lift the wire arm up (OFF position), hold for 5 seconds, then lower completely (ON position). The ice maker should begin its initialization cycle within 5 minutes.
Step 3: Purge Air from Water Lines
Dispense water from the front door dispenser for 3-5 minutes continuously to remove air from the system. The GE GSS25IYNFS water system holds approximately 1.5 gallons, so expect to dispense at least 2 gallons before air bubbles disappear completely. Initial water flow may be sporadic or contain air bubbles, which is normal after filter replacement.
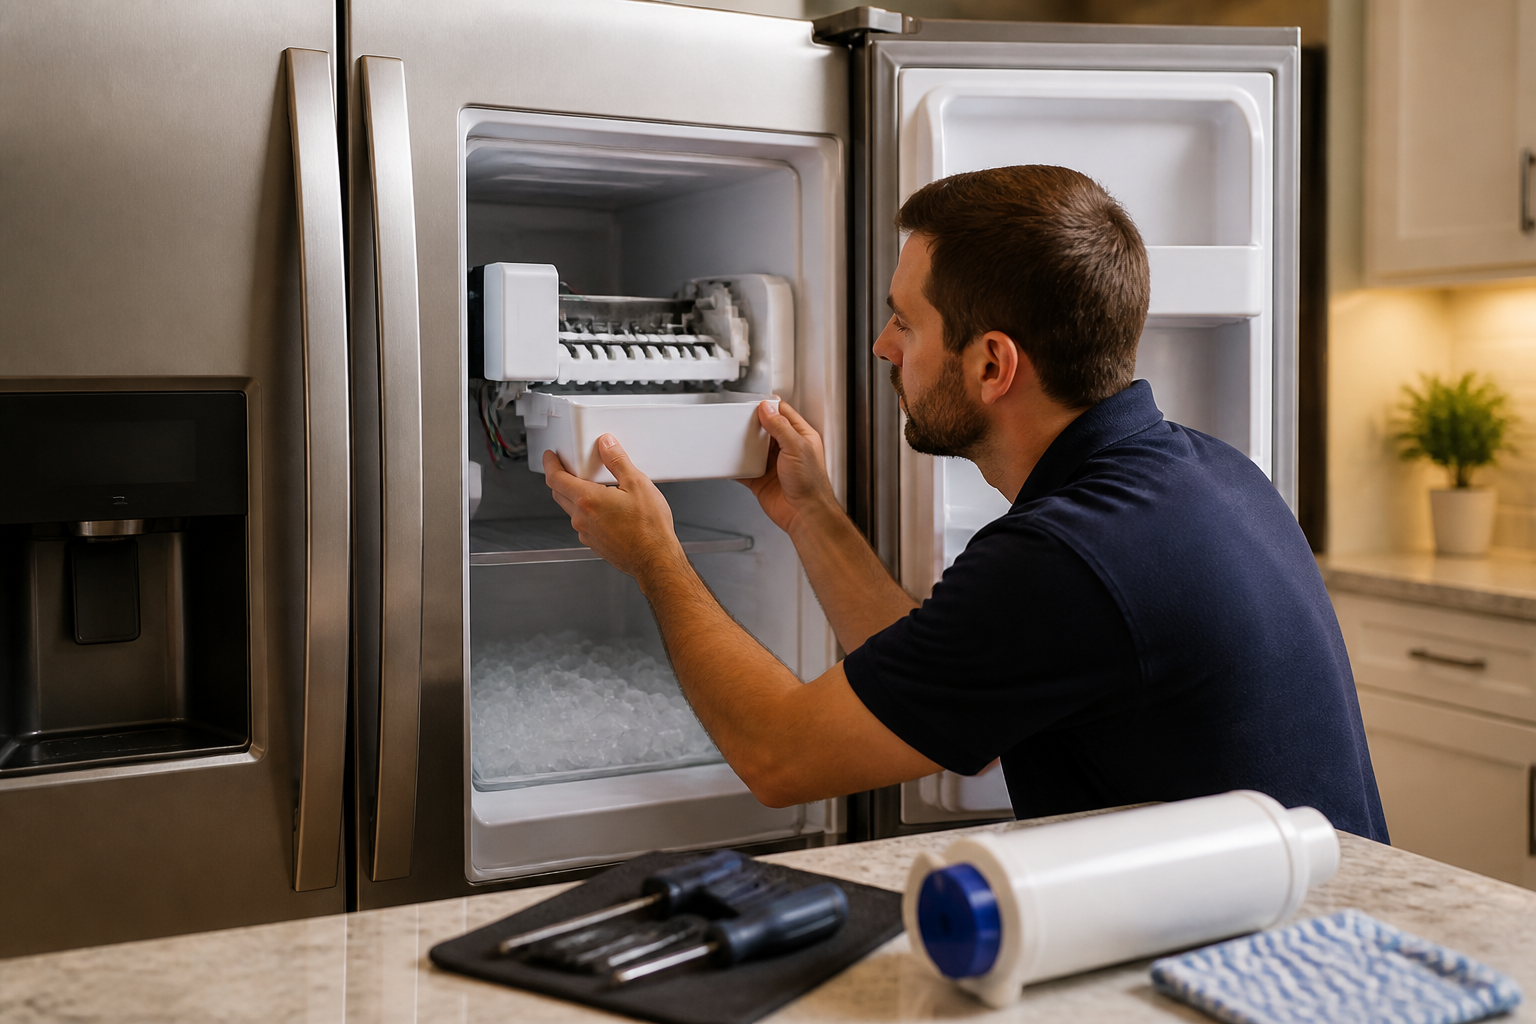
Step 4: Access Ice Maker Assembly
Open the freezer door and remove the ice bin by lifting straight up. Remove the wire shelving above the ice maker by lifting the right side first, then sliding left to disengage the left support tabs. Locate the ice maker assembly mounted to the left freezer wall, secured by four Phillips head screws in the corners.
Step 5: Inspect Water Fill Connection
Behind the ice maker assembly, locate the blue water fill tube connected to the bottom rear of the unit. This 1/4-inch tube should be firmly connected and free of kinks or ice blockages. Disconnect the tube by pressing the white release collar and pulling gently. Inspect for mineral deposits or debris that could restrict water flow to the ice mold.
Step 6: Test Water Inlet Valve
Remove the lower rear access panel of your GE GSS25IYNFS by removing six screws along the bottom edge. Locate the water inlet valve assembly, positioned 12 inches from the left side and 4 inches from the bottom. Using your multimeter, test continuity across the valve solenoid terminals (should read 200-500 ohms). No continuity indicates a failed solenoid requiring valve replacement.
Step 7: Check Ice Maker Control Module
Remove the ice maker assembly by disconnecting the white 6-pin harness connector and unscrewing the four mounting screws. Turn the unit over to access the control module on the bottom. Test the module by applying 120V AC across the water valve terminals while monitoring for 5-8 second activation cycles. The module should energize the fill valve every 90-130 minutes during normal operation.
Step 8: Verify Proper Water Fill Volume
With the ice maker removed, manually activate the fill cycle by jumping pins 1 and 3 on the control module connector with 120V applied. The fill cycle should last exactly 6.5 seconds, delivering approximately 4.5 ounces of water. Insufficient water indicates valve problems or water pressure issues below the required 20-120 PSI range.
Step 9: Clean Ice Mold and Components
Remove any ice or debris from the aluminum ice mold using warm water and mild detergent. Clean the harvest fingers (plastic ejector arms) ensuring they move freely without binding. Mineral deposits from hard water can cause these components to stick, preventing proper ice ejection and harvest cycles.
Step 10: Reassemble and Test System
Reinstall the ice maker assembly in reverse order, ensuring the water fill tube connects securely and the wiring harness seats completely in the 6-pin connector. Replace the rear access panel and interior shelving. Turn the ice maker ON and monitor for proper cycling. The first ice harvest should occur within 24 hours of successful repair.
Troubleshooting
- If ice maker cycles but produces no ice, check household water pressure – minimum 20 PSI required for proper operation
- White or cloudy ice indicates insufficient air purging – continue dispensing water until completely clear
- Small or hollow ice cubes suggest partial water line blockage or low water pressure to the inlet valve
- Ice maker runs continuously without stopping – check freezer temperature (must be 5°F or below) and ensure proper door sealing
- No power to ice maker assembly – verify 120V AC at the wire harness connector using multimeter voltage testing
- Water leaking from ice maker connections – inspect all tubing connections and replace damaged O-rings or compression fittings
When to Call a Professional
- Refrigerant system repairs or diagnosis – requires EPA certification and specialized equipment for the GE GSS25IYNFS cooling system
- Main control board replacement or programming – electronic modules require specific diagnostic tools and software updates
- Water line repairs behind walls or under flooring – plumbing modifications may require local permits and professional installation
- Electrical issues involving the main power supply or circuit breaker problems requiring electrical contractor services
When to Call a Professional
Most of the repairs in this guide are within reach for a careful DIYer with basic tools. In my experience, if you’ve confirmed the filter is properly installed, purged a full 3 gallons through the dispenser, performed the ice maker reset, and the unit still shows no fill cycle or no harvest cycle after a full 24-hour wait, that’s the point where a failed water inlet valve solenoid or a faulty ice maker control module is almost certainly involved — both of which require electrical testing with a multimeter and component-level diagnosis that goes beyond safe DIY territory. When in doubt, a diagnostic service call typically costs $80–$120 and can save you from a misdiagnosis that costs more in parts.
Recommended Parts & Tools
GE WR30X10093 Refrigerator Water Filter
This genuine GE water filter is compatible with the GSS25IYNFS model and ensures proper water flow to your ice maker. A faulty or incorrectly installed filter is often the culprit when ice makers stop working after a filter change. Check current pricing on Amazon.
GE WR57X10051 Ice Maker Assembly
This complete ice maker assembly is designed specifically for GE side-by-side refrigerators including the GSS25IYNFS model. If the ice maker components were damaged during the filter change process or the unit has failed completely, this replacement assembly will restore ice production. Check current pricing on Amazon.


