Whirlpool WRS325SDHZ Water Dispenser Troubleshooting Guide
The Whirlpool WRS325SDHZ is a popular side-by-side refrigerator model that combines ice and water dispensing in a convenient door-mounted unit. When the water dispenser stops working, the cause can range from a simple child lock activation to a faulty inlet valve. This comprehensive guide will walk you through every diagnostic step and repair procedure to restore your WRS325SDHZ water dispenser to full functionality.
⚠️ Safety Warning
Before beginning any repair on your WRS325SDHZ, disconnect the refrigerator from electrical power by unplugging it or switching off the circuit breaker. When working with the water inlet valve or water supply lines, water may spray or leak. Place towels around the work area and have a bucket ready to catch residual water. If your home has a water shutoff valve serving the refrigerator, close it before disconnecting any water lines. Do not attempt repairs if you smell gas or notice electrical damage. Contact a professional for those situations.
Step 1: Determine What’s Not Working — Water Only or Both Water and Ice?
The first diagnostic question is whether your WRS325SDHZ water dispenser is the only problem or if the ice maker is also affected. This distinction narrows down the cause significantly.
Water Dispenser Works but Ice Maker Doesn’t
If you can successfully dispense water from your WRS325SDHZ but the ice maker produces no ice, the problem is isolated to the ice maker circuit or the ice maker assembly itself. This indicates the main water inlet valve is functioning correctly and water is reaching the dispenser side of the dual-inlet valve system. The issue lies downstream in the ice maker’s water line, ejector pump, or ice maker module. Refer to ice maker-specific troubleshooting guides for this scenario.
Ice Maker Works but Water Dispenser Doesn’t
If your WRS325SDHZ produces ice normally but water will not dispense, the problem is specific to the water dispenser circuit. The main water supply and inlet valve are working, but the water is not reaching the dispenser outlet. This points to a frozen water tube, blocked filter, faulty dispenser actuator, defective door switch, or a control board issue affecting the dispenser outlet only.
Both Water and Ice Are Not Working
If neither the water dispenser nor the ice maker works on your WRS325SDHZ, the problem is upstream — affecting the entire water supply to the refrigerator. Start by checking your home’s water shutoff valve, the inlet water line, and the main water inlet valve. This is the most common scenario and the easiest to diagnose.
Step 2: Check for Child Lock Activation
Many users forget they’ve activated the child lock feature on their WRS325SDHZ, which completely disables the water dispenser. Before proceeding with complex diagnostics, verify this simple setting.
On the WRS325SDHZ, the child lock control is typically located on the ice and water dispenser panel on the refrigerator door. Look for a button or control labeled “LOCK” or “CHILD LOCK” — it is usually a small button on the upper right corner of the dispenser panel.
- Press and hold the child lock button for 3 seconds on your WRS325SDHZ
- You should hear a beep or see an indicator light change
- Try dispensing water again
If water suddenly flows, your problem is solved. The child lock on the WRS325SDHZ prevents accidental dispensing and is easily reactivated by pressing the button again for 3 seconds.
Step 3: Inspect the Water Dispenser Door Flap
The WRS325SDHZ has a small plastic door flap inside the dispenser recess that can become frozen shut in cold climates or freeze shut if water seeps into the mechanism. This flap prevents water from flowing when the dispenser is not in use but opens when you press the cup against the dispensing paddle. If this flap is frozen or stuck, no water will come out regardless of other components functioning correctly.
Visual Inspection
- Open your refrigerator door and look directly into the water dispenser recess on the WRS325SDHZ
- The flap is a small plastic or rubber component approximately 2-3 inches wide at the back of the dispenser opening
- Press the dispensing paddle and look for the flap to move or open
- If the flap does not move or appears white with frost, it is frozen
Thawing a Frozen Flap
- Unplug the WRS325SDHZ from the electrical outlet
- Prepare a heat source: a hair dryer on low heat, a heat gun on low setting, or warm (not boiling) water in a container
- Direct warm air or gently pour warm water into the dispenser recess, focusing on the flap area at the back
- Allow 10-15 minutes for ice to melt
- Use a soft cloth or plastic spoon to gently prod the flap and confirm it moves freely
- Do not use excessive force or sharp tools, as the flap is delicate
- Plug the WRS325SDHZ back in and test the dispenser
Prevention: Keep the refrigerator door closed as much as possible to prevent warm room air from entering the dispenser area. Ensure the water drip tray below the dispenser opening is not overflowing, which can cause water to seep into the flap mechanism.
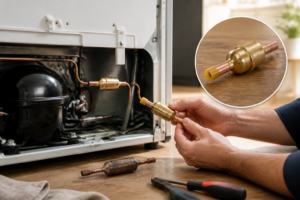
Step 4: Test the Water Inlet Valve (Dual-Inlet Design)
The WRS325SDHZ uses a dual-inlet water valve that serves both the ice maker and water dispenser. This valve, typically located at the rear bottom of the refrigerator or on the side panel, has two outlet ports: one supplies water to the ice maker, and one supplies water to the dispenser. If this valve fails, both systems are usually affected, but a partial failure can affect just one outlet.
Locating the Water Inlet Valve on the WRS325SDHZ
- Unplug the refrigerator from the electrical outlet
- Pull the WRS325SDHZ away from the wall to access the rear
- The water inlet valve is mounted on the back wall, typically in the lower right corner
- You will see the inlet water line coming from the wall connection, and two outlet water lines leading into the refrigerator interior
- The valve is a cylindrical or box-shaped component approximately 3-4 inches long
Checking for Water Shutoff Valve Closure
Before testing the inlet valve, confirm that your home’s water shutoff valve feeding the WRS325SDHZ is fully open. Locate this valve (usually under the kitchen sink or where the water line attaches to the wall) and verify it is turned counterclockwise to the fully open position. A partially closed valve is a common reason for low or no water pressure.
Visual Inspection and Listen Test
- Ensure the WRS325SDHZ is unplugged
- Inspect the inlet water line connection at the back of the valve for visible leaks or mineral buildup (white crusty deposits)
- Plug the refrigerator back in temporarily
- Place your hand or ear near the inlet valve on the WRS325SDHZ
- Press the water dispenser paddle
- You should hear a faint clicking or buzzing sound as the valve solenoid activates
- If you hear nothing, the valve is not receiving power or is mechanically stuck
Water Flow Test at the Valve Outlet
- Unplug the WRS325SDHZ again
- Locate the water line that connects the outlet port of the inlet valve to the dispenser line (this is separate from the ice maker outlet line)
- Place a towel underneath to catch water
- Carefully disconnect the water line from the dispenser outlet port of the inlet valve by loosening the compression fitting with a wrench or by pressing the quick-connect release collar
- Place a cup under the disconnected line
- Plug the WRS325SDHZ back in and press the water dispenser paddle
- If water flows from the outlet port, the valve is working and the problem is in the dispenser line or actuator
- If no water flows, the inlet valve is faulty and must be replaced
- Reconnect the water line and unplug the refrigerator before proceeding
Replacing the Water Inlet Valve on the WRS325SDHZ
Whirlpool part number for the dual-inlet valve in the WRS325SDHZ is typically W10405920 or W10568400 (verify with your specific serial number). The replacement procedure is as follows:
- Unplug the WRS325SDHZ and close the home water shutoff valve
- Access the valve at the rear bottom of the refrigerator
- Use a bucket to catch any remaining water in the lines
- Disconnect the inlet water line by loosening the compression fitting with a 7/16-inch wrench or by releasing the quick-connect collar
- Disconnect both outlet water lines in the same manner
- Disconnect the two solenoid electrical connectors from the valve (they plug onto terminals on the valve body)
- Remove the mounting screws (usually two) holding the valve bracket to the refrigerator frame
- Install the new valve in reverse order, ensuring all connections are hand-tight before fully tightening with a wrench
- Turn the home water shutoff valve back on and check for leaks at all connections
- Plug the WRS325SDHZ back in and test both the water dispenser and ice maker
Step 5: Check for Frozen Water Tube Inside the Door
The water supply line running through the WRS325SDHZ door can freeze if the door seal is compromised or if cold air is leaking excessively into the door cavity. A frozen tube prevents water from reaching the dispenser outlet even if the inlet valve is working correctly.
Testing for a Frozen Tube
- Unplug the WRS325SDHZ from the electrical outlet
- Prepare a heat source: a hair dryer on low heat or a heat lamp (not an open flame)
- Hold the heat source approximately 6 inches away from the dispenser area of the WRS325SDHZ door
- Apply heat for 10-15 minutes, moving the heat source around the entire dispenser recess area
- Use a heat gun on low setting (1000-1200°F) if you have one, keeping it moving to avoid melting the plastic door trim
- Alternatively, fill a spray bottle with warm (not boiling) water and spray the dispenser recess thoroughly
- Allow 20 minutes for ice to melt throughout the tube
- Plug the WRS325SDHZ back in and test the water dispenser
Preventing Future Freezing
- Inspect the door gasket (seal) on the WRS325SDHZ for cracks, tears, or warping. Replace if damaged.
- Ensure the refrigerator is set to the correct temperature (typically 37-40°F for the fresh food section)
- Do not block the cold air vents in the door or refrigerator interior
- Keep the dispenser opening clear of obstructions so warm room air can circulate when the door is open
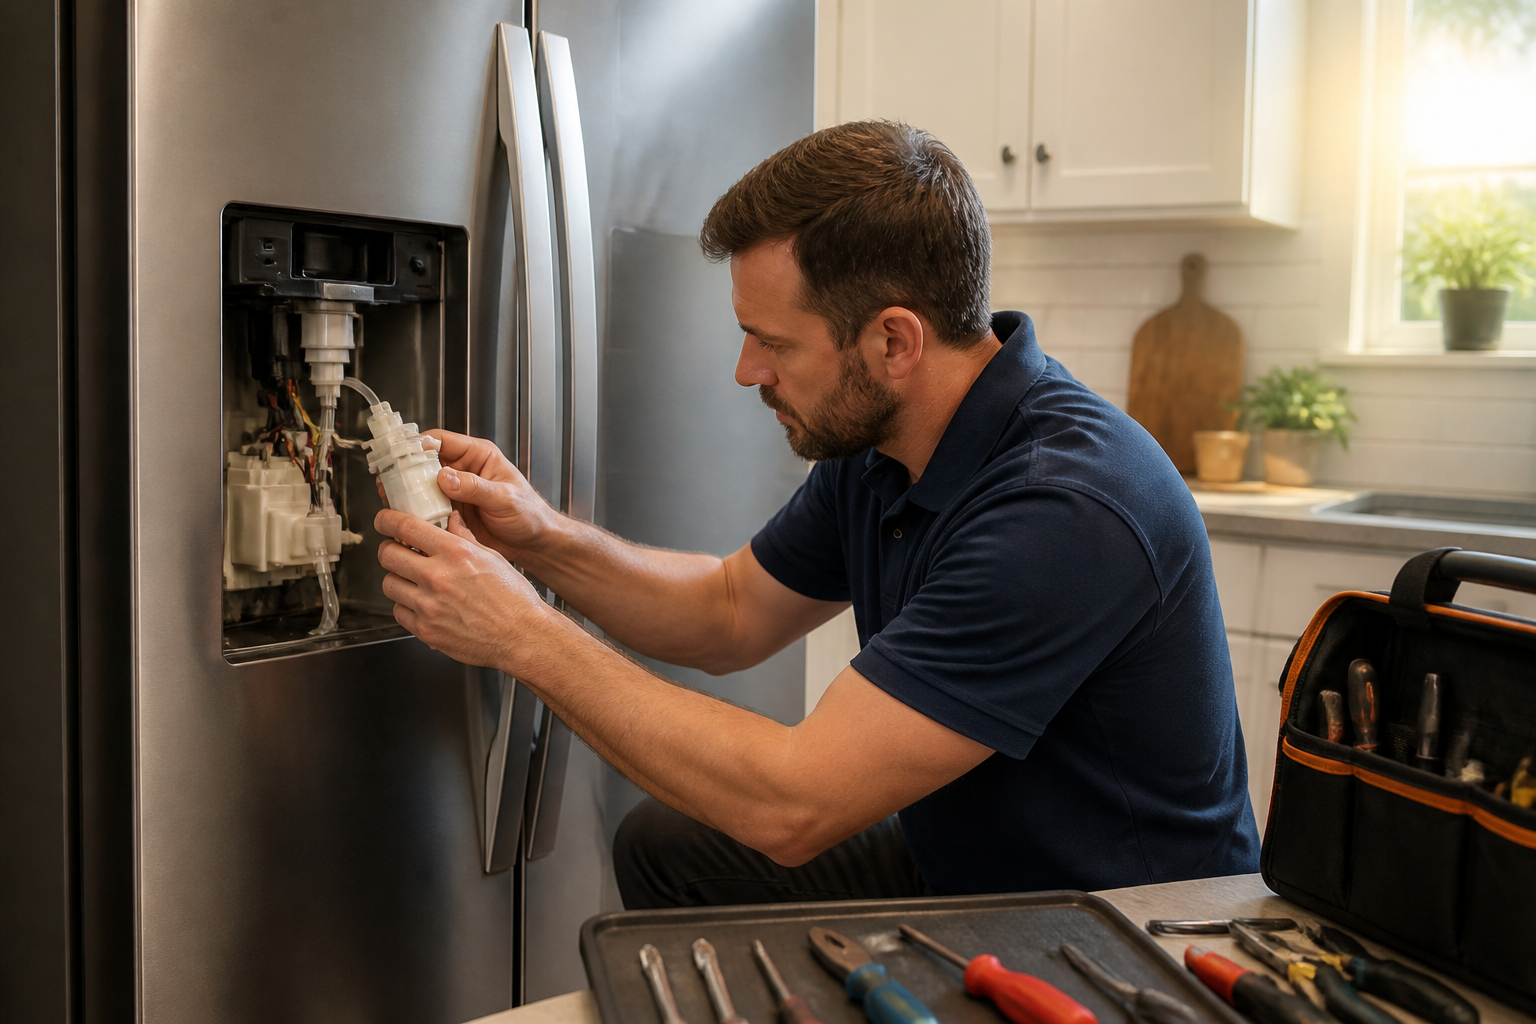
Step 6: Test the Water Dispenser Actuator Switch
The dispenser actuator is a mechanical and electrical switch that activates when you press the dispenser paddle on the WRS325SDHZ. When activated, it triggers the inlet valve to allow water to flow. If this switch fails, pressing the paddle sends no signal to the valve, and water will not dispense.
Locating the Dispenser Actuator
- Unplug the WRS325SDHZ from the electrical outlet
- Open the refrigerator door fully
- Look at the inside of the door, where the dispenser paddle extends outward
- The actuator is a plastic module mounted directly behind or adjacent to the paddle mechanism, inside the door
- It is typically a rectangular component about 3-4 inches wide with electrical connectors on top or back
Visual Inspection of the Actuator
- Visually inspect the actuator for cracks, moisture, or corrosion on the electrical connectors
- Check that the paddle moves smoothly and returns to its resting position without sticking
- If the paddle is stuck or makes grinding sounds, the actuator is damaged and must be replaced
- If you see visible water damage or corrosion inside the door, the actuator may have failed due to moisture intrusion
Electrical Testing of the Actuator
To test the actuator switch with a multimeter:
- Unplug the WRS325SDHZ
- Locate the actuator electrical connectors
- Carefully disconnect the connectors (they usually slide or pull straight off)
- Set a digital multimeter to the “Continuity” or “Ohms” setting
- Touch the multimeter probes to the two switch contacts on the actuator connector
- With the actuator at rest (paddle not pressed), the continuity should be “open” (no beep, infinite ohms)
- Press the paddle on the WRS325SDHZ dispenser
- While the paddle is held down, the continuity should be “closed” (beep sound, near 0 ohms)
- If continuity does not change when you press the paddle, the switch is faulty and must be replaced
- Release the paddle; continuity should return to open
Replacing the Dispenser Actuator on the WRS325SDHZ
The dispenser actuator part number for the WRS325SDHZ is typically W10140057. To replace it:
- Unplug the refrigerator
- Open the door fully and remove the plastic trim pieces around the dispenser area as needed to access the actuator mounting screws (usually 2-3 screws)
- Disconnect the electrical connectors from the old actuator
- Remove the mounting screws and pull the actuator straight out
- Position the new actuator in the same orientation and install the mounting screws
- Reconnect the electrical connectors firmly
- Reinstall any trim pieces
- Plug the WRS325SDHZ back in and test the water dispenser by pressing the paddle
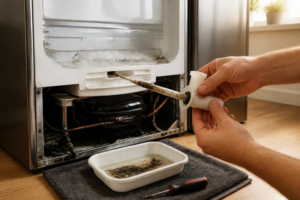
Step 7: Check the Water Filter and Perform a Bypass Test
The WRS325SDHZ is equipped with a water filter in the refrigerator interior, usually located in the upper right area of the fresh food section. A clogged or improperly installed filter can severely restrict water flow to the dispenser, resulting in no water or only a trickle.
Locating and Inspecting the Water Filter
- Look in the upper right corner of the fresh food section inside the WRS325SDHZ refrigerator
- The filter is a cylindrical cartridge approximately 2-3 inches in diameter and 4-5 inches tall
- It is usually mounted horizontally on a bracket or vertically in a filter head
- Note the direction of water flow (an arrow should be marked on the filter indicating the correct direction)
- Check the age of the filter; Whirlpool recommends replacement every 6 months for the WRS325SDHZ
Water Filter Bypass Test
To determine if a clogged filter is causing the lack of water dispenser flow, perform a bypass test by installing the filter bypass plug:
- Unplug the WRS325SDHZ from the electrical outlet
- Locate the water filter and note its position
- Carefully remove the filter by turning it counterclockwise (if mounted vertically) or by releasing the compression fitting (if mounted horizontally)
- Have a towel ready to catch residual water
- Locate the filter bypass plug (a small white plastic plug with an “O” ring) — it should have come with your WRS325SDHZ or be stored near the filter location
- Install the bypass plug in the filter head in the same location where the filter was mounted, ensuring the O-ring is seated properly
- Plug the WRS325SDHZ back in
- Test the water dispenser by pressing the paddle
- If water now flows freely, the filter was clogged and needs replacement
- If water still does not flow, the problem is not the filter; proceed to other diagnostic steps
- Do not operate the WRS325SDHZ with the bypass plug in place for extended periods — install a new filter as soon as possible
- Direct fit for the WRS325SDHZ without adapter pieces or modification—bolts straight into the water supply line connection behind the fridge with the two existing screws.
- Includes both the solenoid coil and valve body together, so you don’t end up ordering the coil only to discover the valve seat is cracked underneath.
- Water flow resumes immediately after install—no priming, no air locks, no secondary diagnostics needed if this was actually your problem.
- Won’t help if your real issue is a clogged water filter or a kinked line—you need to confirm the valve is actually the failure point first, or you’ll have a $80 part sitting in a box.
- Installation requires pulling the fridge away from the wall and accessing the back panel; if your space is tight or your water line is routed awkwardly, you may need extra hands or patience to maneuver the assembly in place.
Recommended Parts & Tools
Whirlpool Water Dispenser Valve Assembly
The water dispenser valve is one of the most common failure points in refrigerator water dispensers and is frequently the culprit behind a non-working dispenser on the WRS325SDHZ model. This OEM-compatible replacement valve restores proper water flow and pressure to your dispenser outlet. If your troubleshooting reveals low or no water pressure at the dispenser, replacing this valve will likely resolve the issue. Check current pricing on Amazon.
Refrigerator Water Line Cleaning Kit
Mineral buildup and sediment in the water lines are common causes of reduced or blocked water dispensing in refrigerators. This comprehensive cleaning kit includes brushes, vinegar solution, and flushing tools specifically designed to clear clogs from dispenser lines without damaging plastic tubing. Using this kit before replacing expensive parts can save you time and money by restoring water flow through existing lines. Check current pricing on Amazon.
Needle Nose Pliers and Flathead Screwdriver Set
Removing the dispenser panel, accessing internal water valve components, and disconnecting water line fittings on the WRS325SDHZ requires precision tools that won’t damage plastic clips and connectors. This professional-grade tool set provides the exact instruments needed for safe disassembly and reassembly during your repair. Check current pricing on Amazon.
The Inlet Valve Replacement That Actually Restores Water Flow on the WRS325SDHZ
If you’ve ruled out frozen lines, child lock, and water pressure issues, the inlet valve is almost always the culprit behind a dead water dispenser on this model. This is the part that opens to let water into the door assembly—when it fails electrically or mechanically, no amount of troubleshooting upstream will get water flowing again.
What works
What doesn’t
I’ve seen plenty of DIYers order this valve only to discover later that their dispenser was actually off because the filter was completely clogged or the water line had frozen inside the door—so before you buy, grab a multimeter and test for power at the solenoid coil while the dispenser button is pressed. Whirlpool Water Dispenser Valve Assembly
This post contains affiliate links. As an Amazon Associate, I earn from qualifying purchases at no extra cost to you.