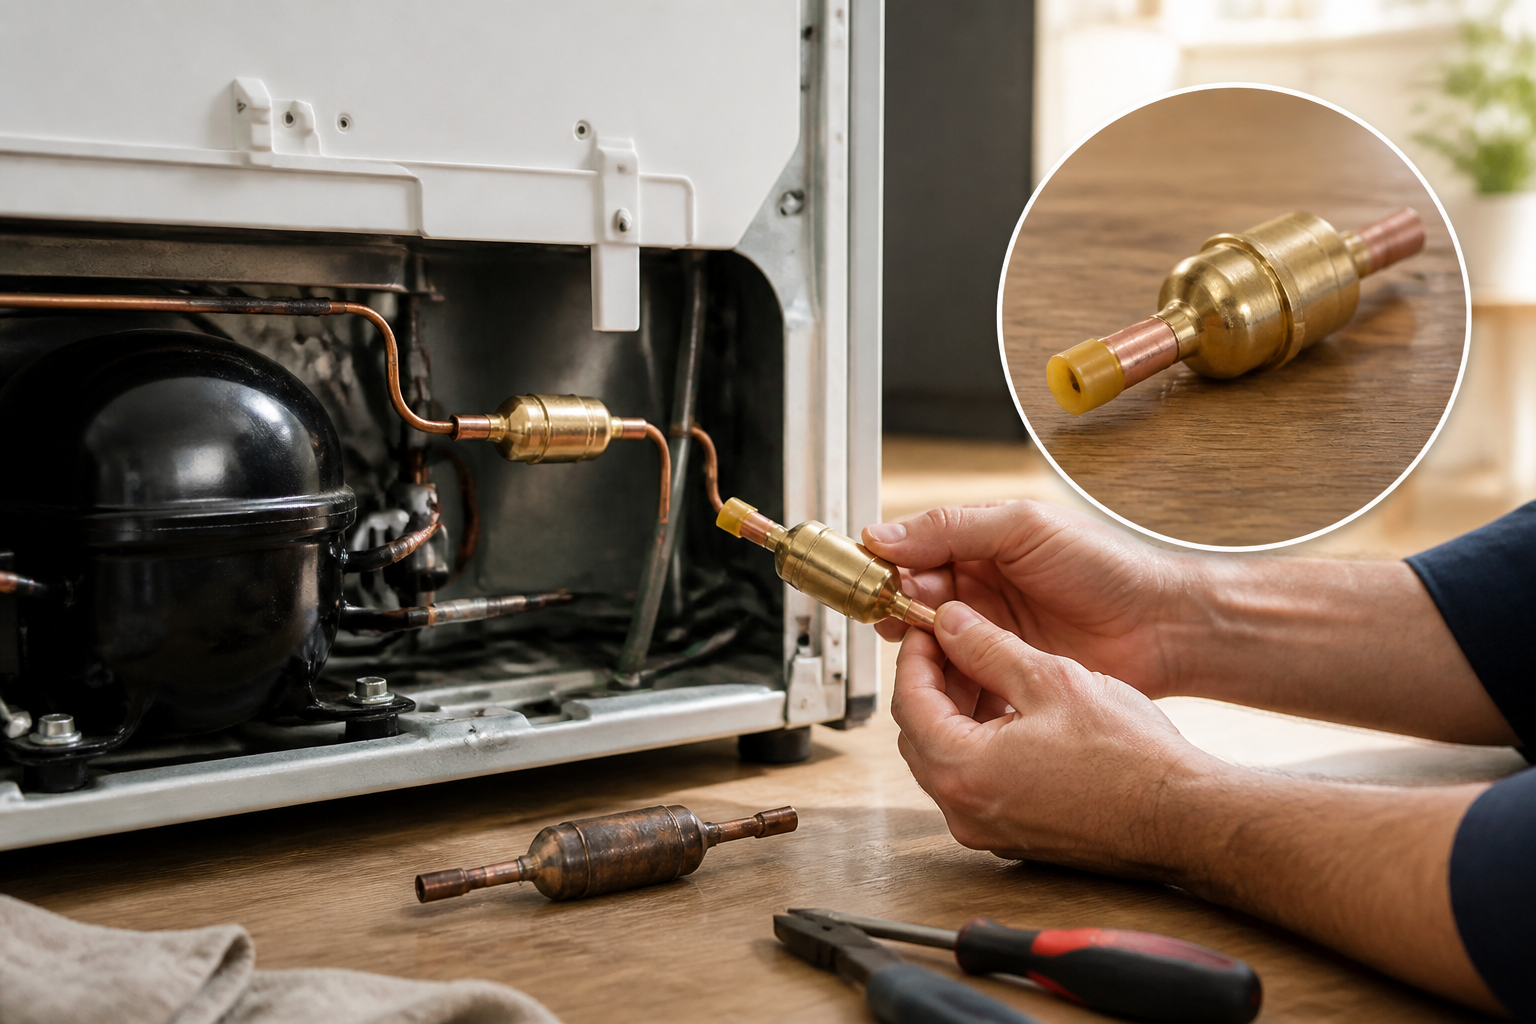
What Is a Bullet Valve (Saddle Valve)?
A bullet valve, more commonly known as a saddle valve or pierce-type valve, is a small specialized valve designed to tap into an existing water supply line without requiring you to cut or permanently alter the pipe. The valve features a sharp piercing needle that punctures through the copper water line when the valve body is tightened with its clamps. This creates a connection point for the refrigerator’s water supply line, typically a 1/4-inch plastic tubing that feeds water to your ice maker and water dispenser.
The valve gets its “bullet” nickname from its compact, cylindrical shape. It’s typically made of brass or plastic with stainless steel clamp bands that wrap around the copper pipe. When properly installed, the needle creates a small hole while the valve body seals against the pipe surface, allowing water to flow through the valve into your refrigerator’s supply line.
Why Bullet Valves Are Problematic
Despite their convenience and widespread use in original refrigerator installations, saddle valves have developed a reputation among professional plumbers as one of the least reliable water distribution components in residential plumbing. Understanding these problems will help you understand why replacement is strongly recommended.
Mineral Deposit Buildup and Clogging
The piercing needle creates a small, restrictive opening that becomes a prime location for mineral deposits. Hard water minerals like calcium and magnesium accumulate around the needle seat, gradually reducing water flow. Over months or years, the opening can become almost completely blocked, resulting in slow ice production or no ice production at all. The small internal passages of bullet valves make them particularly susceptible to this problem compared to standard shut-off valves with larger flow paths.
Corrosion and Material Degradation
Brass components in saddle valves can corrode when exposed to water with certain mineral compositions or pH levels. Plastic-bodied valves can become brittle over time, especially in cold environments like under kitchen sinks or in basements. The stainless steel clamps can develop rust spots, and the seal between the valve body and copper pipe degrades, leading to leaks that may not be immediately visible.
Slow and Hidden Leaks
Perhaps the most dangerous characteristic of failing saddle valves is their tendency to develop slow leaks that persist for months before becoming noticeable. Water can weep from the seal point and travel along the copper pipe or through walls, causing water damage, mold growth, and structural damage before you realize there’s a problem. Many homeowners discover these leaks only after significant damage has occurred.
Professional Recommendation
The majority of professional plumbers and appliance repair technicians recommend removing saddle valves entirely and replacing them with proper 1/4-inch compression shut-off valves. These traditional valves feature larger internal flow paths, more reliable seals, and are far less prone to clogging and leaking. While saddle valves may still be found on some new refrigerator installations, they should be considered a temporary solution at best.
Symptoms of a Failing Bullet Valve
Recognizing the signs of a failing saddle valve will help you address the problem before water damage occurs. These symptoms typically develop gradually over months or years:
- Ice maker stops producing ice – The ice maker may stop working entirely or produce significantly fewer cubes. You may notice the ice maker cycling on and off without producing ice, or producing only small, incomplete cubes.
- Slow water dispensing – Water flows from the refrigerator’s water dispenser very slowly or inconsistently, even though the main kitchen water pressure is normal.
- Water leak under the refrigerator – You notice standing water or wet spots under or behind the refrigerator, especially noticeable when you clean under the appliance.
- Water damage in walls or cabinets – Damp spots appear on cabinet walls or ceilings near where the water line runs. This indicates the leak is occurring inside walls or enclosed spaces.
- Hissing or dripping sounds – You hear water dripping or a faint hissing sound coming from under the sink or behind the refrigerator, especially when the ice maker is cycling.
- Visible corrosion on the valve – The valve body shows visible rust stains, white mineral deposits, or green corrosion (verdigris) on brass components.
- Refrigerator water filter replacement frequency increases – If your model has a water filter, it clogs much faster than normal because mineral buildup in the saddle valve is forcing water through the filter more slowly.
Locating Your Bullet Valve
The saddle valve is typically installed at the point where the water supply line branches off to feed your refrigerator. The exact location depends on your home’s plumbing layout and refrigerator position. Knowing where to look will help you assess the valve’s condition and plan your replacement.
Under the Kitchen Sink
This is the most common location in residential kitchens. Look under the kitchen sink where the hot or cold water supply lines enter. You’ll typically find the saddle valve clamped to a copper line, with a 1/4-inch plastic or vinyl tubing running from the valve toward the refrigerator. The valve will appear as a small cylindrical or bullet-shaped fitting with a clamp band around it.
Inside Kitchen Cabinets
In some installations, the saddle valve may be located inside the base cabinet directly adjacent to or behind the refrigerator. Open the cabinet doors and look for the copper water line. You may need to remove other items stored in the cabinet or disconnect cabinet shelving to access it.
Basement or Crawlspace
In homes with basements or crawlspaces, the water supply may originate from a basement-level shut-off valve or water softener. The saddle valve could be located here, with the water line running upward through walls to the kitchen. Look for the 1/4-inch tubing or small copper lines in these spaces.
Behind or Inside the Refrigerator
In rare cases, especially with older or unique refrigerator models, the saddle valve might be located directly at the refrigerator’s rear panel where the main water supply line enters the appliance. Check the rear of your refrigerator, particularly around the ice maker and water dispenser connections.
Step-by-Step Bullet Valve Replacement
Replacing a saddle valve with a proper compression shut-off valve is a straightforward project that most homeowners can complete in 30-60 minutes. This guide covers the complete replacement process, including preparation, removal of the old valve, and installation of the new one.
Tools and Materials Needed
- Adjustable wrench or open-end wrench set (7/16-inch and 1/2-inch sizes)
- Tubing cutter (specifically designed for copper pipe)
- 1/4-inch compression shut-off valve (brass, suitable for 1/4-inch copper line)
- Compression fittings or ferrules (if not included with valve)
- Teflon tape (plumber’s tape)
- Towels or bucket for water drips
- Flashlight for visibility
- Optional: deburring tool for smoothing cut pipe edges
Step 1: Turn Off the Main Water Supply
Before beginning any work, shut off the main water supply to your home. Locate your main water shut-off valve, typically found where the water line enters your home (basement, crawlspace, or exterior wall). Turn the valve clockwise until it stops. If you cannot locate your main shut-off, contact your local water utility for assistance.
After shutting off the main water, open a faucet in your home to release pressure from the lines. Leave the faucet open while working. This prevents water from dripping excessively when you cut the copper line.
Step 2: Disconnect the Refrigerator Water Line
Locate the 1/4-inch vinyl or plastic tubing running from the saddle valve to your refrigerator. Follow the line carefully, as it may run through walls, cabinets, or along the floor. At the point where the tubing connects to the saddle valve, you’ll find a small compression fitting or barbed connector.
If the connection uses a compression fitting with a nut, turn the nut counterclockwise with a wrench while holding the valve body steady. If the tubing is simply pushed over a barbed connector, carefully twist and pull the tubing to disconnect it. Some water may drip from the disconnected line; have a towel ready.
Step 3: Remove the Saddle Valve Clamps
The saddle valve is held against the copper water line by two or three stainless steel clamp bands. Each clamp is secured with a screw or bolt. Using an adjustable wrench or Phillips head screwdriver (depending on your valve model), loosen these fasteners. Turn counterclockwise and completely remove the clamp bolts or screws. Carefully pull the valve away from the copper line.
Inspect the copper line where the valve was mounted. You’ll likely see the small piercing hole and possibly some discoloration or corrosion around the area where the needle penetrated. This copper damage is normal and will be addressed in the next steps.
Step 4: Assess the Copper Pipe Condition
Examine the copper line at the point where the saddle valve was attached. Look for:
- The small hole created by the piercing needle
- Any cracks, splits, or corrosion damage in the copper
- Discoloration or mineral buildup
You have two options depending on the pipe condition:
Option A: Pipe is in good condition – If the pipe looks sound and the piercing hole is the only damage, proceed to Step 5 to cut the pipe cleanly above the damaged area.
Option B: Pipe is damaged or corroded – If you see cracks, splits, or significant corrosion extending beyond the piercing point, you’ll need to cut out the damaged section. See the “Repairing Damaged Copper Pipe” section below.
Step 5: Cut the Copper Line
Using a tubing cutter specifically designed for copper pipe, cut the water line at a clean section approximately 1-2 inches above where the saddle valve was attached. This removes the pierced section and ensures you’re working with undamaged copper.
Place the tubing cutter around the copper line and tighten the cutting wheel until it just touches the pipe. Rotate the cutter around the pipe, tightening the cutting wheel slightly with each rotation. Continue until the pipe separates cleanly. Do not use a hacksaw or reciprocating saw, as these create rough, uneven cuts.
After cutting, you may see copper shavings inside the pipe. Hold the pipe at an angle and gently tap the end to dislodge loose shavings. If available, use a deburring tool to smooth the cut edge inside and outside the pipe.
Step 6: Install the Compression Shut-Off Valve
A 1/4-inch compression shut-off valve is the standard replacement for saddle valves. This valve features a compression fitting designed to seal against the copper pipe without requiring solder or permanent connections.
To install:
- Ensure the valve handle is in the OFF position (turned clockwise)
- Locate the compression nut and ferrule that came with the valve (or acquire them separately if not included)
- Slide the compression nut onto the end of the copper pipe
- Slide the ferrule (a small metal or plastic ring) onto the copper pipe behind the nut
- Insert the copper pipe into the compression fitting port of the shut-off valve
- Hand-tighten the compression nut onto the valve fitting
- Using an adjustable wrench, turn the nut an additional 1 to 1.5 turns clockwise, holding the valve body steady with another wrench to prevent rotation
Do not over-tighten the compression nut, as this can damage the ferrule and compromise the seal. The connection should be snug but not excessively tight.
Step 7: Reconnect the Refrigerator Water Line
Take the 1/4-inch vinyl tubing that was previously connected to the saddle valve and connect it to the outlet port of the new compression shut-off valve. If the connection uses a compression fitting with a nut, apply one wrap of Teflon tape to the male threads of the valve outlet, then hand-tighten the nut and complete with a wrench. If using a barbed connector, push the tubing firmly over the connector until it seats completely.
Ensure the tubing runs safely without kinks, sharp bends, or areas where it could be pinched or damaged. If the existing tubing appears worn or cracked, replace it with new 1/4-inch food-grade vinyl tubing.
Step 8: Restore Water Supply and Test
Close the faucet you opened in Step 1, then slowly turn on the main water shut-off valve. Open it gradually by rotating counterclockwise to allow the system to refill slowly. This reduces water hammer and allows trapped air to escape.
Once the water is back on, check the new compression valve connection for leaks. Inspect both the connection between the valve and copper line, and the connection between the valve outlet and refrigerator water line. Look for any dripping or moisture.
Turn on the refrigerator’s water dispenser and allow it to run for 30 seconds. The water should flow at normal pressure. If water pressure is low or slow, the saddle valve wasn’t the problem, or there’s blockage further in the line (see troubleshooting below).
Press the ice maker cycle button on your refrigerator, or if automatic, verify that the ice maker begins its cycle. It may take several hours to notice ice production, as the system needs time to cool and cycle through.
Repairing Damaged Copper Pipe from the Old Valve
If the copper pipe shows damage beyond the piercing hole—such as cracks, splits, or significant corrosion—you have several repair options depending on the severity and location.
Small Cracks or Corrosion Spots
If damage is limited to a small area within 2-3 inches of where you plan to cut, simply cut the pipe further up to remove the damaged section entirely. This is the simplest and most reliable solution.
Extensive Damage Requiring Pipe Extension
If the damage extends more than a few inches along the copper line, or if the damage is in a location where additional cutting would compromise the pipe layout, you can splice the line using a compression coupling. A 1/4-inch compression coupling allows you to join two pieces of copper pipe without soldering.
To use a compression coupling:
- Cut out the damaged section entirely using a tubing cutter
- Measure the gap created by the removed section
- Obtain a new piece of 1/4-inch copper tubing cut to the exact length needed to bridge the gap
- Install compression fittings on both ends of the new copper section, then connect it to the existing pipe using compression couplings
This method maintains the original water line without requiring solder and can be completed in 20-30 minutes.
When Professional Help Is Needed
If the copper pipe is severely corroded throughout a large section, has multiple cracks, or if water is leaking from areas other than the saddle valve connection, contact a licensed plumber. Extensive copper corrosion may indicate a water chemistry issue that requires professional assessment.
⚠️ Safety Warning: Water System Precautions
Working with your home’s water supply carries important safety considerations:
- Always shut off the main water supply before cutting or disconnecting water lines. Failure to do so can result in water damage to your home.
- Ensure the water system is depressurized by opening a faucet before beginning work. This prevents water from spraying when you cut the line.
- Never work on water lines carrying hot water without allowing them to cool first. Hot water can cause burns.
- Do not attempt to repair a water line with active leaks by yourself if you’re unsure of your abilities. Water damage can escalate rapidly.
- Use food-grade tubing only for any connections between the water supply and refrigerator. Standard vinyl tubing may leach chemicals into drinking water.
- After completing work, check all connections for leaks before leaving the area. Monitor the area for at least 30 minutes to ensure no slow leaks develop.
Troubleshooting After Valve Replacement
If problems persist after replacing the saddle valve, the issue may lie elsewhere in the water supply system:
Water Pressure Still Low
If the new valve isn’t solving low water pressure to the ice maker or dispenser, check:
- Refrigerator water filter: A clogged water filter is the most common cause of low pressure. Replace the filter according to your refrigerator’s manual.
- Water line blockage: Mineral deposits may have accumulated in the vinyl tubing between the valve and refrigerator. Disconnect and flush the tubing with water, or replace it entirely.
- Ice maker inlet valve: The solenoid valve inside the refrigerator that controls water flow to the ice maker may be faulty. This requires removing the refrigerator’s back panel.
- Main water pressure: Check water pressure at other faucets. If all faucets have low pressure, the issue is with your home’s main water supply, not the refrigerator line.
Leaks Continue
If water is still leaking after you’ve replaced the saddle valve,
Recommended Parts & Tools
Refrigerator Water Inlet Valve Replacement Kit
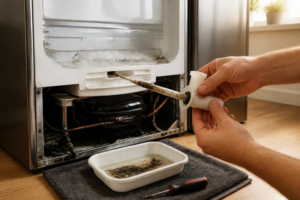
This universal water inlet valve kit is essential for replacing a faulty bullet valve in your refrigerator’s ice maker or water dispenser system. The kit includes the valve assembly along with necessary gaskets and seals to ensure a proper fit and prevent leaks after installation. Check current pricing on Amazon.
Adjustable Wrench Set for Appliance Repair
You’ll need reliable wrenches to disconnect the water lines and remove the old bullet valve from your refrigerator’s water supply connection. This adjustable wrench set provides multiple sizes in one tool, making it perfect for accessing tight spaces inside refrigerator compartments. Check current pricing on Amazon.
PTFE Thread Seal Tape for Water Lines
This thread seal tape is critical for wrapping around the water line connections when installing your new bullet valve, preventing leaks and ensuring a watertight seal. High-quality PTFE tape withstands the water pressure in refrigerator supply lines and is compatible with both plastic and metal fittings. Check current pricing on Amazon.
The Water Inlet Valve That Actually Stops Leaks from a Failed Bullet Valve
When a bullet valve fails—whether it’s leaking, clogged, or the piercing needle stripped—replacing it often means swapping out the entire water inlet valve assembly, not just the valve body itself. This kit gives you the complete replacement part most DIYers actually need when they discover the bullet valve is the culprit.
What works
- Comes with all necessary connectors and clamps, so you’re not hunting for matching fittings halfway through the repair.
- Eliminates the guesswork of trying to salvage just the valve itself—a full assembly swap is cleaner and more reliable than patching an old bullet valve.
- Compatible with most common refrigerator models, and the instructions account for both copper and plastic water line setups.
What doesn’t
- Overkill if your bullet valve is actually functional and the leak is coming from a cracked line elsewhere—you’ll want to diagnose the exact failure point first.
- Installation on some older fridge models can be tight, and you may still need to remove the fridge from the wall or access panels to reach the valve connection point.
I’ve seen plenty of DIYers order just a bullet valve cartridge and discover the real problem was a corroded inlet valve body, which then meant a second order and more downtime. Get the full assembly right the first time—Refrigerator Water Inlet Valve Replacement Kit.
This post contains affiliate links. As an Amazon Associate, I earn from qualifying purchases at no extra cost to you.