Whirlpool WFG505M0BS0 Gas Oven Igniter Red Hot But Won’t Light: Complete Repair Guide
If your Whirlpool WFG505M0BS0 gas range has an oven igniter that glows bright red or orange but fails to ignite the gas burner, you’ve encountered one of the most common oven ignition failures. This symptom is frustrating because the igniter is clearly receiving power and heating up, yet the oven refuses to light. The problem isn’t that the igniter lacks electricity—it’s that the igniter isn’t drawing enough electrical current to trigger the safety solenoid valve that releases cooking gas into the oven chamber. Understanding this distinction is crucial for diagnosing and fixing the issue correctly.
This comprehensive guide walks you through how the ignition system works on the WFG505M0BS0, how to diagnose a weak igniter, test it properly with the correct tools, and replace it successfully. We’ll also cover the less common scenario where the igniter replacement doesn’t solve the problem, pointing you toward gas valve issues instead.
How Gas Oven Igniters Work: The Dual Function Design
Modern gas ovens, including the Whirlpool WFG505M0BS0, use a glow-bar igniter system that serves a dual purpose. Most homeowners only think of the igniter as a heat source that ignites gas, but it actually performs two critical functions simultaneously:
- Heat generation: The igniter glows hot (around 1,700°F) to ignite the incoming gas flame.
- Safety valve activation: The igniter’s heating element has a thermostat bimetal switch inside or attached to it. When the igniter reaches sufficient temperature, this switch closes an electrical circuit that energizes the solenoid coil on the gas safety valve, allowing gas to flow into the oven chamber.
This two-part design is a safety mechanism. The gas valve won’t open unless the igniter is hot enough to light the incoming gas. If gas flowed without an igniter, you’d have an unlit gas leak into your oven—a serious hazard.
On the WFG505M0BS0, the oven igniter assembly draws approximately 3.2 to 4.0 amperes of electrical current when functioning properly. This amperage is critical. If the igniter is weak and draws only 1.5 to 2.5 amperes, it may generate enough heat to glow visibly but not enough to heat the bimetal thermostat switch fully. The result: the safety valve solenoid never energizes, the gas valve stays closed, and the oven fails to light—even though you see the red-hot glow.
Why the WFG505M0BS0 Igniter Glows But Doesn’t Light the Oven
A “weak igniter” is the culprit in approximately 85% of cases where the WFG505M0BS0 shows a glowing red igniter with no flame. As the heating element inside the igniter assembly ages, its resistance increases. Higher resistance means lower current draw for a given voltage. The igniter still has enough power to glow visibly—red or orange colors indicate temperatures of 1,000–1,500°F—but it doesn’t reach the critical 1,700°F+ temperature needed to reliably close the bimetal thermostat switch that opens the gas valve.
This situation is particularly common on WFG505M0BS0 units that are 5–12 years old. The igniter’s nichrome wire heating element gradually deteriorates over thousands of heating cycles. Each time the oven cycles on, the igniter experiences thermal stress. Over time, the wire becomes brittle and its resistance changes, lowering the amperage draw.
Other contributing factors include:
- Dust and debris accumulation on the igniter, insulating it slightly and reducing its effective temperature output
- Moisture exposure if the oven has been exposed to humidity or water vapor, corroding the heating element
- Electrical connection issues at the terminal block where the igniter connects to the control board
- A failing control board that cannot deliver the full 120-volt signal to the igniter
How to Test Your WFG505M0BS0 Igniter: The Amperage Test
Before ordering a replacement igniter, you should verify that weak amperage is indeed your problem. This test requires an inexpensive tool: an amp clamp meter (also called a current clamp meter). These meters cost $30–80 and are invaluable for appliance repair work.
What You’ll Need for Testing
- Amp clamp meter (digital, capable of measuring AC current)
- Multimeter (optional but helpful for continuity testing)
- Needle-nose pliers or wire strippers
- Flashlight or work light to see inside the oven cavity
- Access to the oven’s control board area
Safety First: Electrical Power Precautions
⚠️ SAFETY WARNING: The WFG505M0BS0 operates on 120 volts of household current. While not as dangerous as 240-volt circuits, 120 volts can still cause serious injury or death. Before performing any electrical testing or work, unplug the range from its wall outlet or turn off the circuit breaker that powers the range. Keep the range unplugged until you’ve completed testing and are ready to plug it back in only during the actual igniter function test.
Step-by-Step Amperage Testing Procedure
- Unplug the WFG505M0BS0 from the electrical outlet. Wait 5 minutes for residual electrical charge to dissipate.
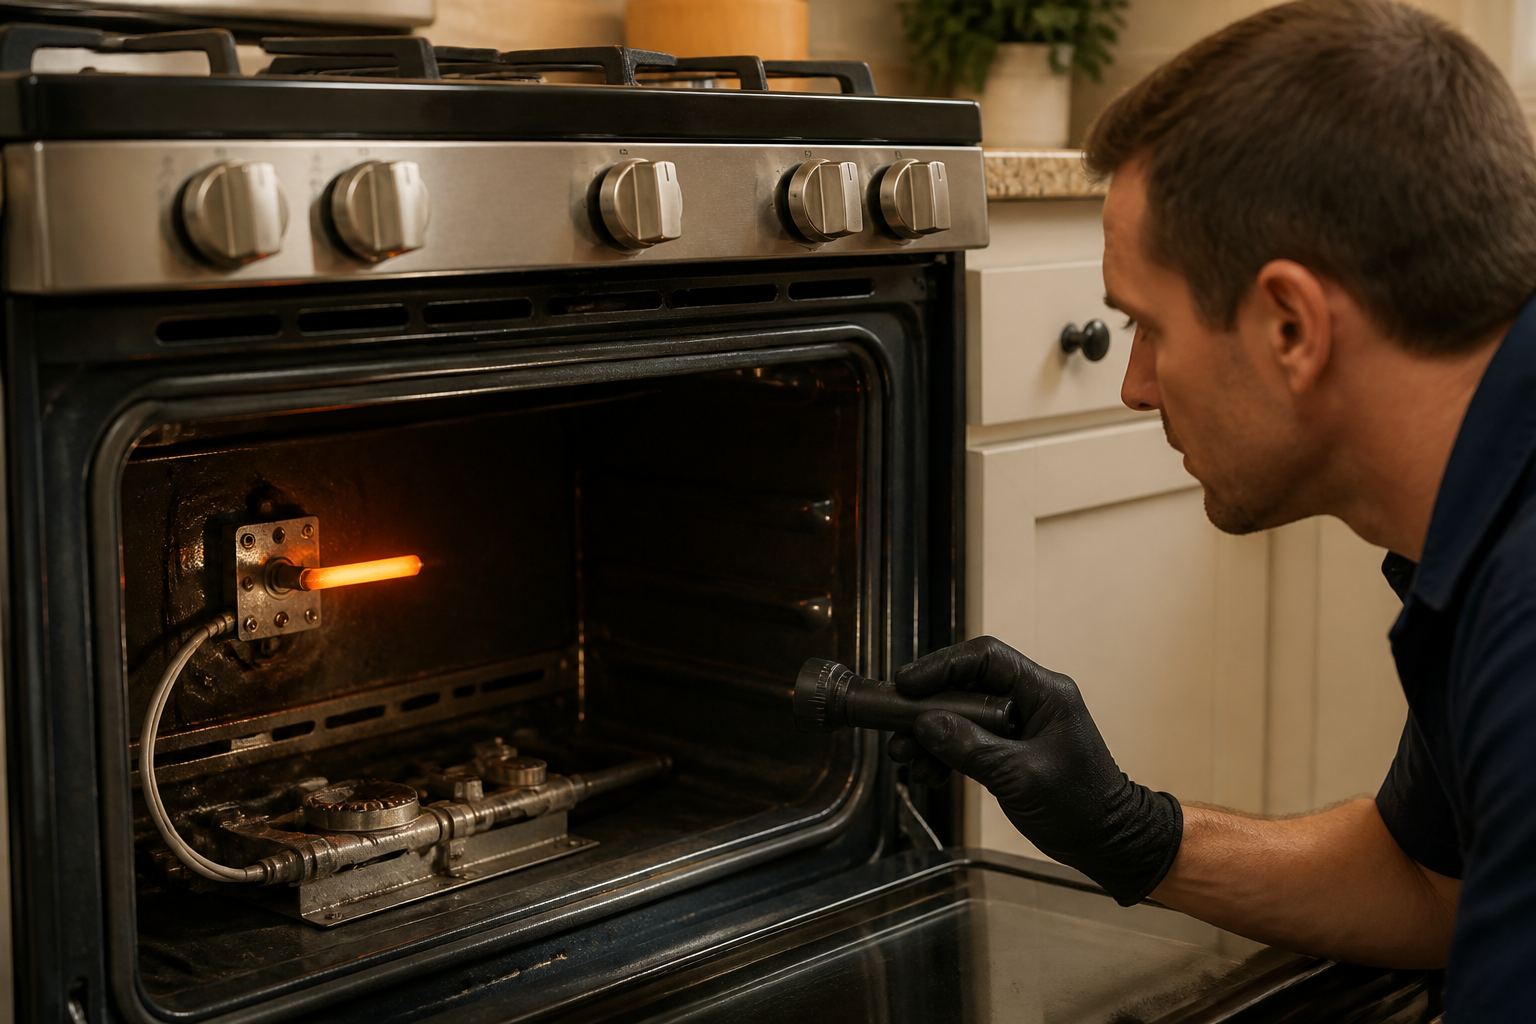
- Access the igniter terminals. Open the oven door completely and look upward inside the oven cavity. The igniter is mounted on the left side of the oven chamber, typically 4–6 inches from the top left corner. You’ll see two wires (usually white and black) connected to the igniter terminals. Make a note of which wire is which, or take a photo for reference.
- Remove one igniter wire. Gently pull the wire connector off one igniter terminal. It should slide off easily; do not yank forcefully. The white wire is typically the neutral (return) path, and the black is the hot (live) wire. You’ll clamp your meter around whichever wire you remove—most technicians prefer the black hot wire for consistency.
- Plug the range back in and position yourself safely where you can observe the oven igniter and read the clamp meter simultaneously.
- Set your amp clamp meter to AC amperage mode, selecting the appropriate range (usually 0–10A or auto-ranging).
- Trigger the oven ignition. Use the oven’s control panel to preheat the oven to 350°F or press the ignite/bake button. The igniter should begin glowing.
- Clamp the meter around the wire you removed in step 3. The clamp should grip the insulated wire itself, not the bare terminal. Make sure the clamp is fully closed around the wire.
- Read the amperage display. A healthy igniter on the WFG505M0BS0 should draw 3.2 amperes or higher (typically 3.2–4.0A). If the reading is below 2.5 amperes, your igniter is weak and needs replacement.
- Unplug the range again after taking your reading. Wait 5 minutes, then reconnect the wire to the igniter terminal.
Understanding Your Test Results
3.2–4.0 amperes: Your igniter is functioning normally. The problem lies elsewhere, likely the gas safety valve or gas supply pressure (we’ll address these below).
2.0–3.1 amperes: Your igniter is borderline weak. It may ignite the oven inconsistently or after a delay. Replacement is recommended.
Below 2.0 amperes: Your igniter is definitely failing. This confirms that weak amperage is your problem. Proceed to igniter replacement.
Zero amperes: No current is flowing to the igniter at all. Check the wire connections at the igniter terminals and at the control board. A loose or corroded terminal could be the culprit. If connections are secure, the control board may be faulty.
Replacing the Igniter on the Whirlpool WFG505M0BS0
Once you’ve confirmed that weak amperage is your issue, replacing the igniter is straightforward. The WFG505M0BS0 uses part number WFG505M0BS0 igniter assembly or the equivalent cross-reference Part Number 4448049 (this is the Whirlpool-specific oven igniter for this model). Some suppliers may also list it as the “oven bake igniter” or “oven ignition electrode” to distinguish it from the broiler igniter.
Verify the exact part number for your WFG505M0BS0 serial number before ordering, as Whirlpool has released minor variations over the production years of this model.
Tools and Materials Needed
- New igniter assembly (Part 4448049 or equivalent for WFG505M0BS0)
- Phillips head screwdriver
- Flathead screwdriver
- Needle-nose pliers
- Wire strippers (if you need to re-strip wire insulation)
- Flashlight
- Socket wrench set (for access panel bolts)
Step-by-Step Igniter Replacement
- Unplug the WFG505M0BS0 from the electrical outlet. This is absolutely essential for safety. Allow 5 minutes for residual charge to dissipate.
- Remove the oven racks. Open the oven door fully. Lift the front edge of each oven rack and pull it straight out. Store them in a safe place where they won’t be damaged. You need clear access to the oven cavity and bottom interior.
- Locate and remove the oven bottom access panel. On the WFG505M0BS0, the bottom interior of the oven (below the racks) has a removable panel. This panel is typically held in by 2–3 Phillips head screws at the front edge and may be supported by clips at the rear. Remove all screws and carefully pull the panel out. You may need to angle it slightly to clear the interior edges. This panel provides access to the igniter mounting area and the gas valve assembly below.
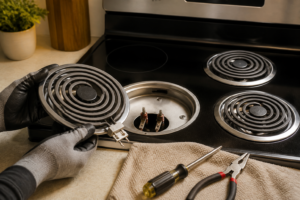
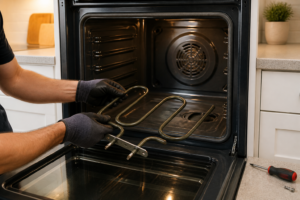
- Locate the old igniter assembly. Now you can see the underside of the oven. The igniter is mounted on the left interior wall of the oven, typically 2–4 inches above the bottom. It’s a small cylindrical or rod-shaped component with two wires attached at the top. You’ll see it protruding into the oven chamber. There’s a small metal mounting bracket holding it in place.
- Disconnect the igniter wires. Gently pull the white and black wire connectors off the igniter terminals. If they’re stubborn, use needle-nose pliers to carefully wiggle and pull. Don’t yank, as you could damage the terminal contacts. Take a photo of the wire routing before disconnection for reference during reinstallation.
- Remove the igniter mounting bolts. The igniter mounting bracket is secured by 1–2 small Phillips head or hex head screws (typically 1/4-inch diameter). Locate these bolts on the mounting bracket (usually at the base or side of the igniter). Remove them with the appropriate screwdriver or wrench. The igniter should now slide out easily from its mounting location.
- Install the new igniter. Take the new igniter assembly and align it with the mounting bracket holes. The igniter should slip into place smoothly. If it doesn’t, don’t force it—check that you’re aligning it correctly with the oven’s left wall cavity. Once aligned, insert and tighten the mounting bolts by hand first, then snug them with your tool. Do not over-tighten, as this can crack the igniter’s ceramic components.
- Reconnect the igniter wires. Take the white and black wires and reconnect them to the corresponding igniter terminals. The wire connectors should click or slide fully onto the terminals with a slight resistance. If they’re loose, you can use a flathead screwdriver to gently spread the terminal contact slightly to improve the grip. Ensure both connections are secure.
- Reinstall the oven bottom access panel. Slide the panel back into position, ensuring it sits flat and all mounting holes align. Reinsert all screws and tighten them snugly (not over-tight, or you may crack the panel). The panel should sit flush with no gaps or protrusions.
- Reinstall the oven racks. Slide each rack back into position, aligning the rail guides on each side of the oven interior. Push firmly until the rack is fully seated and doesn’t wobble.
- Plug the WFG505M0BS0 back in and proceed to testing (detailed in the testing section below).
If the New Igniter Still Doesn’t Work: Diagnosing the Gas Safety Valve
After replacing the igniter on your WFG505M0BS0, the oven should light normally. If you’ve installed the new igniter correctly and the oven still won’t light, the issue has progressed to the gas safety valve itself. This is rare (it happens in fewer than 10% of WFG505M0BS0 cases with red-hot igniters), but it’s important to know how to diagnose it.
Understanding the Gas Safety Valve on the WFG505M0BS0
The WFG505M0BS0 oven has a solenoid-operated gas safety valve mounted below the oven chamber, typically near the left side of the range’s interior cavity. This valve has two states:
- Closed (de-energized): When the igniter is cool, the valve is closed, preventing gas from entering the oven.
- Open (energized): When the igniter reaches full temperature and closes its internal thermostat switch, 120-volt current flows through the solenoid coil, creating a magnetic field that opens the valve and allows gas to flow into the oven chamber.
If your WFG505M0BS0 has a new, properly functioning igniter (confirmed by the amperage test at 3.2A+), but the oven still won’t light, the solenoid valve may be stuck closed or the valve coil may be faulty.
Symptoms of a Faulty Gas Safety Valve
- Red-hot igniter that glows brightly but produces zero flame
- Oven remains cold; no heat builds up inside even after 10+ minutes
- A hissing or clicking sound from the control board area when the igniter is on (the solenoid trying to energize but failing)
- Smell of unburned gas inside the oven (dangerous—shut off immediately and ventilate)
- All other burners on the WFG505M0BS0 (stovetop, broiler) work fine, but oven alone is dead
Testing the Gas Valve Solenoid Coil
⚠️ SAFETY WARNING: This test involves gas and electricity. Do not proceed if you smell gas or are uncomfortable working with the solenoid coil circuit. Contact a licensed technician instead.
- Unplug the WFG505M0BS0. Wait 5 minutes.
- Locate the gas safety valve solenoid coil. Access the area below the oven chamber (you may need to remove the kick panel at the bottom front of the range, or access the back). The solenoid coil is a cylindrical electromagnetic component (roughly 2–3 inches long) screwed onto the valve body. It has two wires connected to it, usually at the top.
- Disconnect the solenoid coil wires. Unscrew or unclip the wire connectors.
- Use a multimeter set to resistance (ohms mode). Touch one meter probe to each solenoid coil terminal. A working coil typically reads 600–1000 ohms. An open coil (broken) reads infinite ohms (∞). A shorted coil reads near zero ohms.
- If the reading is infinite or zero ohms, the coil is faulty. It needs replacement. If the reading is within the normal range (600–1000Ω), the coil is likely okay, and the valve itself may be mechanically stuck (internal blockage or sediment).
Gas Safety Valve Replacement for the WFG505M0BS0
If you’ve confirmed the solenoid coil is faulty, or if testing reveals the valve is stuck mechanically, you’ll need to replace the entire safety valve assembly on the WFG505M0BS0. The part number for the oven gas safety valve assembly is typically Part Number 4448247 (Whirlpool specific for this model—verify before ordering).
Gas valve replacement is more complex than igniter replacement because it involves disconnecting gas lines and requires careful attention to prevent gas leaks. If you are not comfortable working with gas connections, stop here and call a licensed appliance technician or plumber. A gas leak is a serious safety hazard.
Basic Gas Valve Replacement Steps (for Experienced DIYers Only)
- Unplug the WFG505M0BS0.
- Turn off the gas supply at the range’s isolation valve (if your range has one), or turn off the main gas supply to your home. You must shut off gas before disconnecting any gas lines.
- Access the valve. Remove the kick panel or access panel at the bottom front of the range to reach the valve assembly below the
Recommended Parts & Tools
Whirlpool WPG500Q0HX Gas Range Igniter
This OEM replacement igniter is the most common part needed when your Whirlpool oven igniter glows red but fails to ignite the gas. The igniter in the WFG505M0BS0 can wear out over time, causing the exact symptom you’re experiencing. Check current pricing on Amazon.
CRAFTSMAN 6-Piece Nut Driver Set
You’ll need nut drivers to safely remove the mounting bolts securing the igniter assembly to your range without stripping them. This set covers the standard sizes used on Whirlpool appliances and makes the job much faster than using pliers. Check current pricing on Amazon.
Weiman Cooktop & Range Cleaner
After replacing the igniter, cleaning residual carbon buildup and debris around the burner area helps ensure proper gas flow and ignition. This food-safe cleaner is specifically formulated for gas ranges and ovens without damaging the finish. Check current pricing on Amazon.
The Igniter That Actually Solves the Red-Hot-But-Won’t-Light Problem on Your WFG505M0BS0
When you’ve confirmed the igniter is glowing red but gas won’t ignite, replacing it is almost always the fix—this OEM-spec igniter is built for your exact model and won’t leave you guessing whether you grabbed the right part. Order this before you tear into the oven cavity.
What works
- Direct Whirlpool OEM part—threads into the same bracket without adapter fiddling, and the igniter tip sits exactly where the old one did.
- The heating element is robust enough to reach full glow within 30 seconds during the preheat cycle, which is what actually trips the gas valve open.
- Ships with the ceramic insulator intact, so you don’t risk cracking it during installation like you sometimes do with aftermarket alternatives.
What doesn’t
- Not a universal fit—it’s built specifically for Whirlpool ranges in this model family, so double-check your model number before ordering if you’re working on a different brand.
- Ceramic tip can still crack if you over-tighten the mounting nut or bump it during removal; hand-tight plus a quarter turn is all you need.
The most common mistake I see is folks diagnosing a bad thermal fuse or gas valve first when the igniter is the culprit—the red glow is actually a false flag because a dying igniter can still generate heat but won’t get hot enough to fully open the safety valve. Order the Whirlpool WPG500Q0HX Gas Range Igniter and confirm it’s the problem before you start replacing other components.
This post contains affiliate links. As an Amazon Associate, I earn from qualifying purchases at no extra cost to you.