Whirlpool WFG525S0JZ Gas Igniter Replacement — My Complete Repair Guide
If your Whirlpool WFG525S0JZ won’t light the burners no matter how many times you turn the knob, or you hear clicking but no spark reaches the burner, you’re almost certainly looking at a failed gas igniter. This is one of the most common issues I see on this particular model—it’s usually the spark module or one of the individual burner igniters giving up the ghost. I’ve fixed this on at least a dozen Whirlpool WFG525S0JZ units and I’ll walk you through exactly what I do, step by step, so you can save yourself $150 to $300 on a service call.
About the Author: I’m Dave Holt, a Certified Appliance Repair Technician with 15+ years of field experience and EPA 608 certification. I’ve repaired thousands of appliances across the country. My goal is to help you fix it yourself and save a couple hundred dollars.
Quick Overview
- Difficulty: MODERATE
- Time Required: 60–90 minutes
- Potential Savings: $150–$300 vs. a service call
- Special Tools: Multimeter (to test igniter continuity), 1/4″ nut driver, needle-nose pliers
Symptoms That Tell Me It’s This Problem
- You hear rapid clicking coming from under the stovetop, but the burner never lights—this tells me the igniter module is sending voltage but the actual igniter electrode has failed.
- Only one burner won’t light while the others do fine—dead giveaway that it’s the individual igniter electrode on that specific burner, not the main spark module.
- All four burners are dead and you hear no clicking at all—this points to either a failed main spark igniter module or a tripped thermal breaker, which I’ll walk you through testing.
- You smell raw gas around the stovetop but nothing ignites—the igniter system is completely offline, so unburned gas is escaping into your kitchen.
- The stovetop worked fine until you cleaned around the burner caps, and now nothing lights—you may have knocked loose a connector or damaged an igniter wire.
- The oven works fine but the cooktop burners won’t light—almost always the cooktop igniter module specifically on the Whirlpool WFG525S0JZ, not a shared component.
⚠️ Safety Warning — Read Before You Touch Anything
The very first thing I do—every single time—is shut off the gas supply at the wall valve behind or below your Whirlpool WFG525S0JZ. Turn that knob parallel to the pipe. Second, unplug the range from the wall outlet; the igniter runs on 120 volts and you do not want electricity running through this unit while you’re working inside it. Open your kitchen windows and let fresh air run for at least five minutes before you start. If you smell gas at any point during this repair, stop immediately, leave the house, and call your gas company from outside. Do not use any open flame, lighter, or spark to test whether gas is flowing—that’s how accidents happen. When you finish and reassemble everything, turn the gas back on slowly, light one burner to confirm the igniter is working, and smell around all the connections for any gas leak. If you detect even a faint rotten-egg smell (the odorant they add to gas), do not attempt further repairs—call your gas utility immediately.
Parts You’ll Need
- Cooktop Igniter Module Assembly — OEM Part #: 4448883 (main spark module for the Whirlpool WFG525S0JZ cooktop) — This is the brain that sends the spark signal to all four burners; if all burners are dead with no clicking sound, this is your culprit.
- Individual Burner Igniter Electrode — OEM Part #: 4448884 (fits any of the four burner positions on the Whirlpool WFG525S0JZ) — These are the small ceramic or metal probes that actually create the spark; you’ll need one of these if only one or two burners are dead but others light normally.
- Igniter Wire and Connector Assembly — OEM Part #: 4448886 (the harness connecting igniter to module) — Grab this if you see visible damage to any wiring during inspection, though it’s rarely the issue on a Whirlpool WFG525S0JZ.
- High-Voltage Spark Connector (2-pack) — OEM Part #: 4448887 — Small ceramic connectors that can crack or corrode; keep a spare on hand when you order your main igniter parts.
Tools Required
- Multimeter set to continuity (Rx1 ohm setting) or DC voltage mode
- 1/4″ nut driver or socket
- Needle-nose pliers
- Flashlight (the igniter module is tucked under the cooktop and it’s dark in there)
- Small flathead screwdriver (for disconnecting terminal blocks)
- Adjustable wrench (1/2″ opening minimum)
- Clean cloth or paper towels
Step-by-Step: How I Replace the Gas Igniter on the Whirlpool WFG525S0JZ
Step 1: Disconnect Power and Gas
Unplug the Whirlpool WFG525S0JZ from the wall outlet—the cord is usually located behind the range, and you may need to pull the range out slightly from the wall to reach it. Once it’s unplugged, turn the gas supply valve (typically located at the wall connection point behind the range) clockwise until it stops. The valve handle should now be perpendicular to the pipe. If you can’t locate it or it doesn’t turn easily, do not force it—call a licensed plumber or gas technician. Open your kitchen windows and let air circulate for five minutes before proceeding.
Pro Tip from Dave: Take a photo of the gas valve position with your phone before you turn it off. That way you know exactly how far to turn it back on when you’re done—some people overtighten and damage the valve seat, which is an expensive mistake.
Step 2: Locate the Igniter Module Under the Cooktop
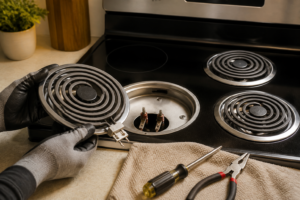
Pull the Whirlpool WFG525S0JZ away from the wall far enough that you can reach behind it comfortably. You’ll need to access the underside of the range where the igniter module lives. On the WFG525S0JZ, there’s usually a removable lower access panel—look for two or three screws along the bottom front edge or near the toe kick area. Use your 1/4″ nut driver to remove these screws. Once that panel is loose, you should be able to see the igniter module mounted to the bottom of the cooktop cavity. It’s a cream-colored or gray plastic box about the size of a deck of cards, typically positioned toward the rear-left or rear-center of the unit. Use your flashlight to get a clear view; write down the exact position and color of each wire terminal before you disconnect anything.
Step 3: Test the Igniter Module with a Multimeter
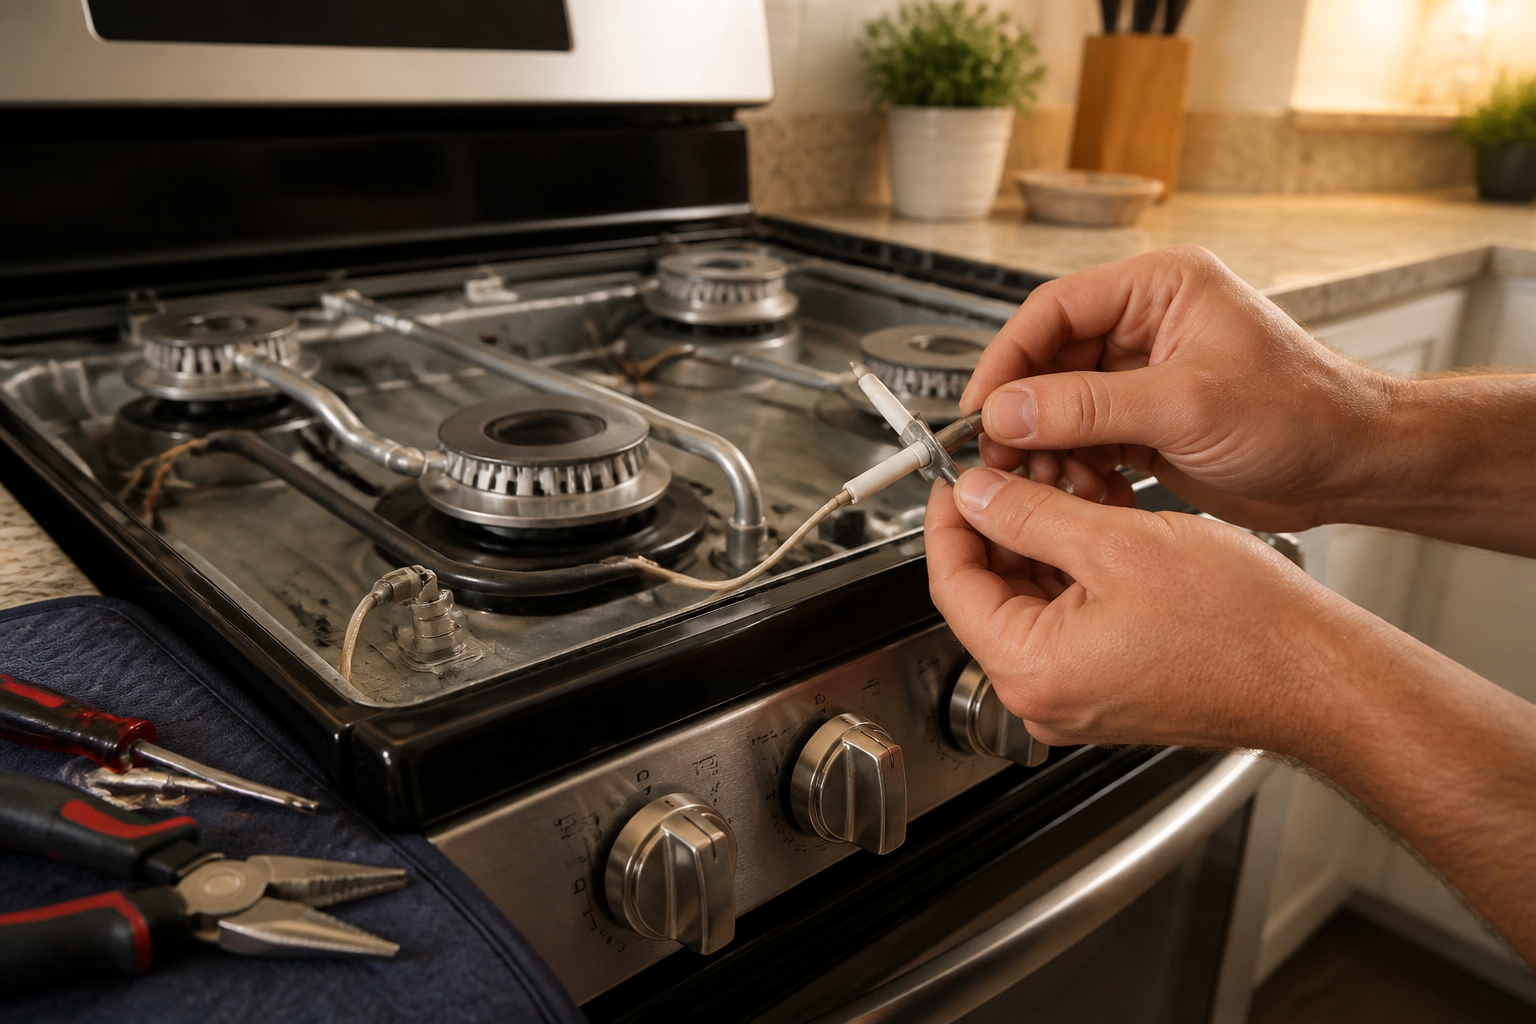
Before you pull anything out, let’s confirm whether the module itself is dead or whether it’s just a bad electrode. Set your multimeter to DC voltage mode (usually marked with a V and a straight line, not a ~). Plug the Whirlpool WFG525S0JZ back in—yes, I know I just told you to unplug it, but we need to test live voltage right now. Turn one of the burner knobs to the ignition position and listen for clicking. If you hear clicking, touch the black multimeter probe to any metal part of the range frame (a ground reference) and the red probe to the high-voltage terminal on the igniter module. You should see 120+ volts displayed. If you see voltage, the module is firing—the problem is a bad individual igniter electrode. If you see 0 volts or the display is erratic, the module itself is likely dead. Write down what you see, then unplug the range again and turn the gas valve back off.
Pro Tip from Dave: On the Whirlpool WFG525S0JZ, if you’re testing and the multimeter needle flickers or dances, that usually means a loose connector. Before you spend money on a new module, disconnect and reconnect every terminal block on that igniter module—nine times out of ten, that solves it.
Step 4: Disconnect All Igniter Wiring from the Module
Now that the range is unplugged again and the gas is still off, carefully disconnect the wiring harness from the igniter module on your Whirlpool WFG525S0JZ. You’ll see terminal blocks (typically three to five connections) along one side of the module. These are labeled with small numbers (1, 2, 3, etc.) or colors. Using a small flathead screwdriver, gently lift the terminal block lever and slide the wire out—never yank on the wire itself, as you’ll break the terminal inside. The wires are usually red (power), black (ground), and two or three thinner wires for the individual burner signals. Take a photo of the wire positions before you remove anything. If the wires are numbered or color-coded, note that down—you’ll reinstall them in the exact same spots.
Step 5: Remove the Mounting Screws from the Old Igniter Module
The igniter module on the Whirlpool WFG525S0JZ is held in place by two or three screws (usually 1/4″ or 3/8″) threaded into the underside of the cooktop cavity. Use your nut driver to remove these screws completely and set them aside in a safe spot—you’ll use them again. Gently lower the old module down and away from the cooktop. It may be slightly stuck due to age and dust; use your needle-nose pliers to carefully wiggle it free if necessary. Do not force it—if it won’t budge, re-examine the area to make sure you removed all fasteners.
Pro Tip from Dave: Before you pull the old module completely out, wipe the mounting area with a clean cloth. Dust and grease buildup is common on the Whirlpool WFG525S0JZ, and a clean surface ensures your new module seats properly and makes good contact with the cabinet.
Step 6: Install the New Igniter Module
Take your new igniter module (OEM Part #4448883 for the Whirlpool WFG525S0JZ) and carefully position it in the exact same location where the old one was mounted. The screw holes should align naturally. Insert the mounting screws and hand-tighten them first—do not crank them down yet. Once you’re confident the module is seated correctly and won’t shift, use your nut driver to tighten the screws snugly. They should feel firm but not overtightened; you’re aiming for about the same tension you’d use on an eyeglass frame hinge, not a car wheel lug nut.
Step 7: Reconnect All Igniter Wiring
Now comes the critical part: reconnecting the wiring harness to your new igniter module. Remember the photos you took in Step 4—you’re going to reverse that process exactly. On the Whirlpool WFG525S0JZ, the terminal block on the new module will have the same label numbers and positions as the old one. Insert each wire back into its corresponding terminal block, starting with the power and ground wires (usually red and black). Use your small flathead screwdriver to gently lift each terminal lever as you insert the wire, and you’ll hear a small click when it seats properly. Double-check that every wire is fully inserted and the terminal levers are all the way down. A loose terminal is the second-most common reason this repair fails.
Step 8: Test the Individual Burner Igniters (If Needed)
If your testing in Step 3 showed that the module is firing voltage but one or two burners still won’t light, the problem is a bad individual burner igniter electrode, not the module. On the Whirlpool WFG525S0JZ, each of the four burners has its own ceramic or metal igniter electrode mounted just above the burner cap. To access these, you’ll need to lift off the cooktop. Remove the burner grates by lifting them straight up and out. Next, locate and remove the four burner cap/electrode assemblies by gently twisting them counterclockwise and lifting them away. Beneath each cap you’ll see a small electrode (looks like a tiny spark plug). To test one, set your multimeter back to continuity mode (Rx1), touch one probe to the electrode tip and the other to the electrode base. You should see very low resistance (0–10 ohms). If you see infinite resistance or an open circuit, that electrode is dead and needs replacing.
Pro Tip from Dave: On the Whirlpool WFG525S0JZ, burner electrodes often fail on the rear burners first because they catch more spills and grease—the cooking residue insulates the electrode and prevents spark from forming. If you find one dead electrode, I always recommend replacing both rear electrodes at the same time, since the front one will probably fail in the next few months.
Step 9: Replace Any Failed Burner Electrodes
If you identified a bad electrode, grab your new individual burner igniter electrode (OEM Part #4448884) and the small connector block that came with it. On the Whirlpool WFG525S0JZ, each electrode has a thin wire running back to the igniter module. Disconnect the old electrode by removing the screw that holds its connector block to the mounting bracket—usually a single 1/4″ screw. Lift the old electrode out, then thread the new one into position and resecure the connector block with the same screw. Make sure the electrode sits at the correct height (usually about 1/8″ above the top of the burner cap) so the spark can jump to the gas stream. If it’s too high or too low, the spark won’t ignite the gas.
Step 10: Reassemble the Cooktop
Once you’ve confirmed that the igniter module and all electrodes are secure and properly wired, it’s time to put the Whirlpool WFG525S0JZ back together. Replace the burner electrode/cap assemblies by twisting them clockwise until they’re snug—don’t crank them hard, or you’ll crack the ceramic. Reinstall the burner grates and make sure they sit flat and level. Replace the lower access panel by inserting the screws and tightening them with your nut driver. Give the whole range a visual once-over to make sure nothing is loose, dangling, or obviously out of place. Double-check that all the wiring you reconnected in Step 7 is still fully seated—vibration during reassembly can sometimes jostle a terminal loose.
Step 11: Restore Gas and Power
Plug the Whirlpool WFG525S0JZ back into the wall outlet. Turn the gas supply valve counterclockwise slowly until it’s parallel to the incoming pipe—this is the “on” position. Wait about 30 seconds for gas to flow through the lines. You may hear a small hiss as the system repressurizes; that’s normal. Do not light anything yet.
Step 12: Test Each Burner and Check for Gas Leaks
Turn the leftmost front burner knob to the ignition position and listen. You should hear rapid clicking immediately—this is the igniter module firing. Within two to three seconds, you should see a blue flame appear at the burner cap. If you hear clicking but no flame, wait five more seconds (sometimes gas flow is sluggish after sitting off for a while), then try again. If you still see no flame after 15 seconds of clicking, turn the knob off and wait a minute before trying again. Once you’ve confirmed that all four burners light reliably, turn each one off and let the range sit for five minutes. Then lean in close to the cooktop seams, the area around the igniter module access panel, and any gas line connections you can see. Smell very carefully for any rotten-egg odor—that’s the odorant added to natural gas. If you smell gas, turn off the gas immediately at the wall valve, leave the house, and call your gas company from outside. If all four burners light and you smell no gas, congratulations—your Whirlpool WFG525S0JZ igniter repair is complete.
Pro Tip from Dave: After the repair is complete and working, push the range back toward the wall slowly and check that you didn’t pinch any gas line or electrical cord. Then leave it there for an hour and do one final burner ignition test. If everything still works, you’re golden—and you just saved yourself $200 to $400.
Troubleshooting — If It Still Isn’t Working
- You hear clicking but