LG LRE3061ST Bake Element Replacement — My Complete Repair Guide
When you turn on the oven and nothing heats up, or the temperature won’t climb past 200 degrees, I know right away we’re looking at a dead bake element. It’s one of the most common failures I see on the LG LRE3061ST electric range, and honestly, it’s one of the easiest fixes you can do yourself without calling a service tech. I’ve fixed this on at least a dozen LG LRE3061ST units over the years, and I’ll walk you through exactly what I do—step by step.
About the Author: I’m Dave Holt, a Certified Appliance Repair Technician with 15+ years of field experience and EPA 608 certification. I’ve repaired thousands of appliances across the country. My goal is to help you fix it yourself and save a couple hundred dollars.
Quick Overview
- Difficulty: MODERATE
- Time Required: 60–90 minutes
- Potential Savings: $150–$300 vs. a service call
- Special Tools: Multimeter (to verify element failure before you start)
Symptoms That Tell Me It’s This Problem
- Oven won’t heat at all. You set it to 350°F, wait 20 minutes, and the oven cavity is stone cold. When I see this on an LG LRE3061ST, the first thing I check is whether the bake element at the bottom of the oven is glowing red when you turn it on.
- Element glows dimly or not at all. If you look inside the oven and the element shows no red glow, or only a faint orange glow, that’s a classic sign the element is failing or dead.
- Temperature climbs slowly, then stops. The oven reaches 150°F and just sits there. The element may be partially failed, with high resistance in the coil.
- Error code F11 or F13 on the display. The LG LRE3061ST will throw these codes when it detects an open circuit in the bake element circuit.
- Broil works fine, but bake doesn’t heat. This tells me the problem is specifically the lower bake element, not the control board or thermostat.
- You smell a burnt smell from the bottom of the oven.paint or insulation burning off the element terminals.
⚠️ Safety Warning — Read Before You Touch Anything
The very first thing I do—every single time—is unplug the LG LRE3061ST from the wall outlet completely. Do not just turn the circuit breaker off. Unplug it. The bake element runs on 240 volts and can cause a serious shock. Even after unplugging, the element terminals may retain a charge, so do not touch the metal connectors until you’ve waited at least one minute. If you’re uncomfortable working with 240-volt appliances, this is the time to call a pro. High-voltage injuries can be fatal.
Parts You’ll Need
- Bake Element — OEM Part #: EBR32656401 or EBR32656402 (LG OEM) — This is the lower heating element that sits in the bottom of the oven cavity. Make sure you order the correct part for your LG LRE3061ST manufactured in 2016; there are similar-looking elements for other models.
- Element Connector Terminals — OEM Part #: 3550JJ1012A (if original terminals are cracked or corroded) — These are the push-on spade connectors that attach to the element leads. I usually replace these if they look burnt or discolored.
Tools Required
- Multimeter set to Rx1 (resistance) to test the element before and after replacement
- 1/4-inch nut driver or small socket wrench
- Flashlight or work light (the oven cavity is dark)
- Needle-nose pliers (to grip element leads if they’re tight)
- Wire strippers (in case you need to clean corroded connector terminals)
- Screwdriver set (Phillips and flathead)
- Work gloves (cotton, not latex—latex can melt near heating elements)
Step-by-Step: How I Replace the Bake Element
Step 1: Unplug the Range and Let It Cool
I cannot stress this enough: pull the plug on the LG LRE3061ST from the wall outlet. If your outlet is behind the range, turn off the breaker and then unplug it if you can reach it. Wait at least 10 minutes for the oven to cool completely. If you’ve been using the oven, the cavity and element can still be 300+ degrees. Wear work gloves just to be safe—the racks and interior cavity hold heat for a long time.
Step 2: Remove the Oven Racks
Open the oven door fully and pull out both racks on the LG LRE3061ST. They slide out toward you—don’t force them. If they’re stuck, gently wiggle side to side. Once they’re out, set them aside somewhere safe. This gives you clear access to the bake element at the bottom of the oven cavity.
Pro Tip from Dave: Take a photo of how the racks slide in before you remove them. On the LG LRE3061ST, the front of each rack has a stop pin that fits into a notch on the front wall. If you reinstall them backwards, they won’t slide smoothly.
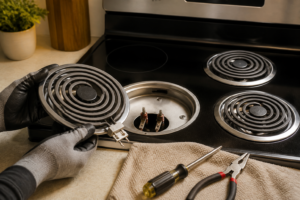
Step 3: Locate the Bake Element at the Bottom of the Oven
Look at the bottom of the oven cavity on your LG LRE3061ST. The bake element is a U-shaped wire coil that sits flat on the oven floor, usually toward the back and centered left-to-right. It’s held in place by two or three metal brackets (usually stamped steel clips). You’ll see the element leads coming out of the back wall at the lower-left corner of the oven interior. Take your flashlight and look closely—you’re looking for the two spade connectors that attach to the element wires.
Pro Tip from Dave: Before you touch anything, use your multimeter in Rx1 mode to test the element. Set the two probes on the metal spade connectors at the back of the element. A good element reads 12–20 ohms. If you see “OL” (open line) or infinity, the element is definitely dead and needs replacement. If you see a normal reading, the problem is elsewhere—could be a control board or thermostat issue.
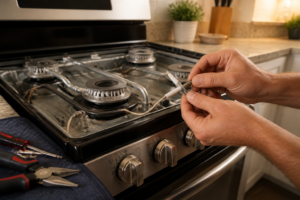
Step 4: Disconnect the Element Terminals
Now I’m going to disconnect the spade connectors from the element leads. On the LG LRE3061ST, the connectors are usually push-on terminals—they just pull straight off. Use your needle-nose pliers to gently grip the connector and pull it away from the spade terminal on the element wire. Do not pull on the wire itself, only on the plastic connector housing. If the connector is stuck (this happens on older units), wiggle it gently side to side and pull. Once both connectors are off, set them aside. If they look burnt or discolored, I recommend replacing them with new OEM terminals.
Step 5: Remove the Metal Mounting Brackets
The bake element on the LG LRE3061ST is held in place by two metal clips—usually small L-shaped brackets, one on each side of the element coil. You’ll need your 1/4-inch nut driver. Each bracket is secured by a single bolt (usually a 1/4-20 machine screw, about 1 inch long). Loosen these two bolts and remove the brackets. The element should now lift out freely. Lift it carefully toward the front of the oven—it’s a long coil and you don’t want to kink the wires.
Pro Tip from Dave: If the mounting bracket bolts are seized or corroded, spray them with a little penetrating oil (like WD-40) and wait five minutes. On older LG LRE3061ST units, I’ve seen bolts that won’t budge. A little patience here saves you from breaking the bracket or stripping the bolt head.
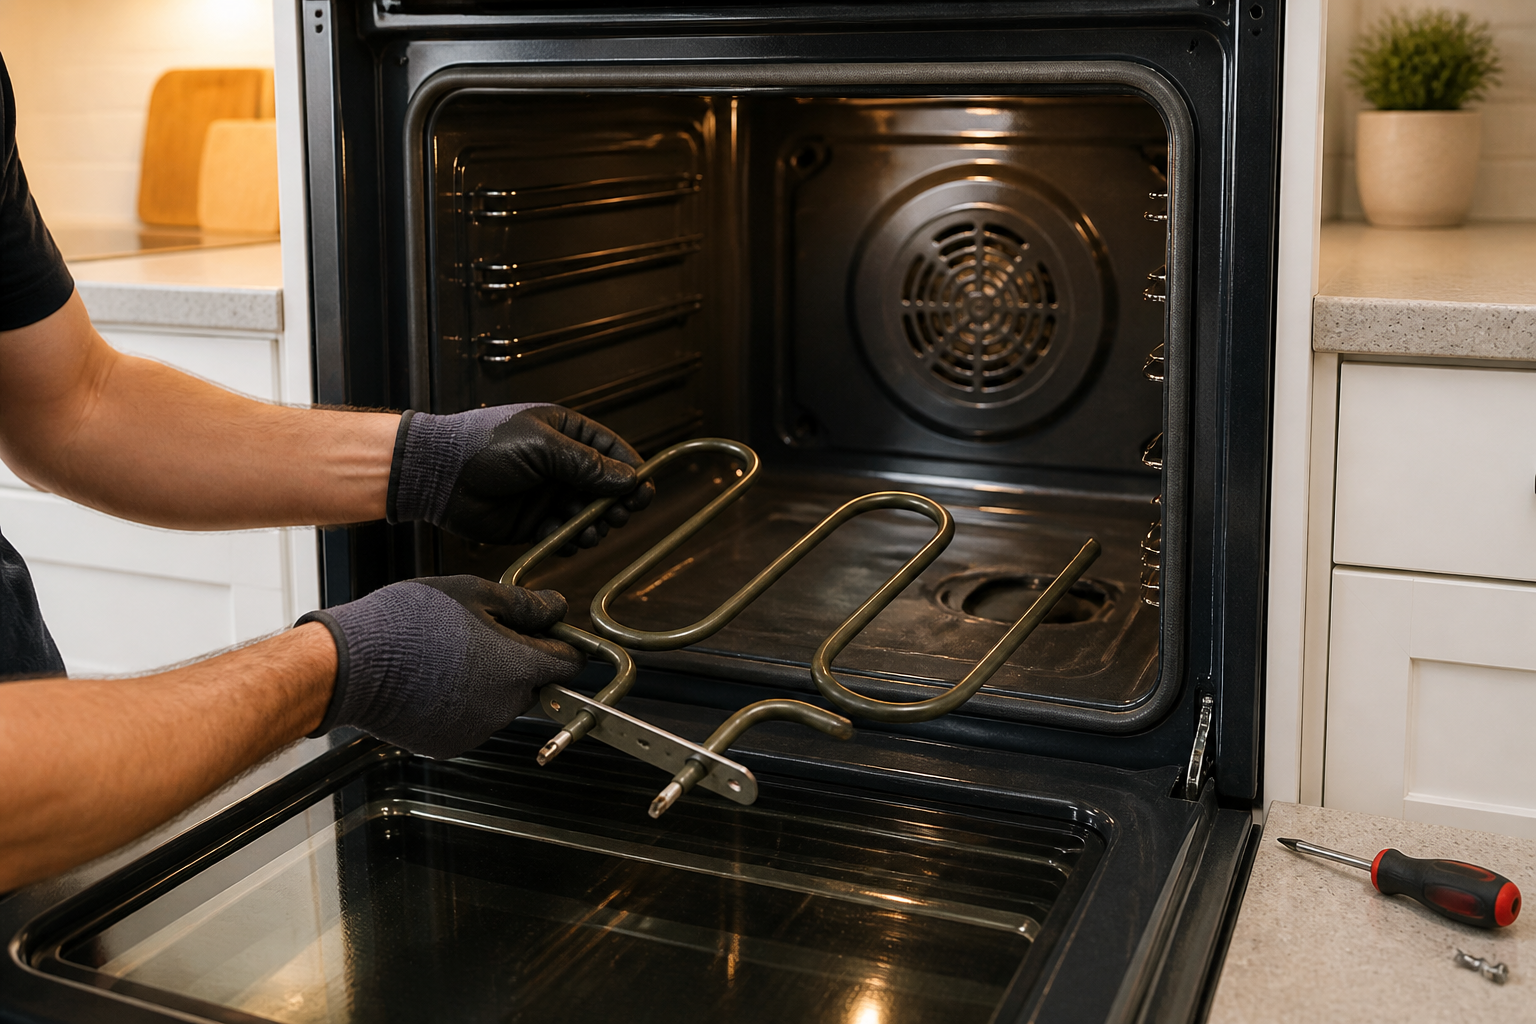
Step 6: Pull Out the Old Element and Inspect the Cavity
Slide the old element out toward the front of the oven cavity. Once it’s out, take a moment to look at the oven floor. You’re looking for debris, rust, or cracked porcelain. On the LG LRE3061ST, the cavity usually has a white or light gray porcelain-coated floor. If you see rust spots or pitting, that’s normal wear. If there’s a large crack or the floor is flaking, that’s a bigger problem and you may need a service tech. Wipe out any debris with a damp cloth and let the cavity dry.
Step 7: Position the New Bake Element
Before you install the new element, verify that the part number on the box matches your LG LRE3061ST manual or the old element. The new element (part # EBR32656401 or EBR32656402) should be identical in size and wire configuration. Carefully slide the new element into the oven cavity, positioning the coil flat on the floor and aligning the two lead wires toward the back-left corner where the mounting brackets are located. The leads should pass through the back wall opening and extend outside the oven cavity.
Step 8: Secure the Element with Mounting Brackets
Now I’m going to reattach the mounting brackets. Align the brackets on both sides of the element coil (left and right) and insert the bolts through the bracket holes and into the threaded holes in the oven cavity wall. Using your 1/4-inch nut driver, tighten these bolts snugly—not gorilla-tight, just firm enough that the brackets won’t shift. On the LG LRE3061ST, these are usually 1/4-20 threads, so about 10–12 foot-pounds of torque is right. Hand-tight plus a quarter turn is usually perfect.
Pro Tip from Dave: Do not over-tighten the mounting bolts on the LG LRE3061ST. If you crank them too hard, you can crack the threaded insert in the cavity wall, and then you’ve got a whole new problem. Snug and firm is all you need. The element isn’t going anywhere once it’s in place.
Step 9: Reconnect the Spade Connectors
Now reconnect the two spade connectors to the element lead wires. On the LG LRE3061ST, the connectors push straight onto the spade terminals—just align the slot in the connector with the terminal and push firmly until you hear or feel a click. Make sure both connectors are fully seated. If the old connectors looked burnt or corroded, this is where you’d install the new OEM connectors (part # 3550JJ1012A). Push each one onto the spade terminal with even pressure. A properly seated connector should not come off if you give it a light tug.
Step 10: Reinstall the Oven Racks
Slide both racks back into the LG LRE3061ST oven cavity. Remember, each rack has a front stop pin that fits into a notch on the front wall. Align these first, then slide the rack back until it stops. It should be smooth and level. If it’s binding or tilted, you’ve installed it backwards—flip it around and try again.
Step 11: Plug in the Range and Test the Bake Function
Plug the LG LRE3061ST back into the wall outlet. Close the oven door. Press the Bake button on the control panel and set the temperature to 350°F. Listen and watch. Within 10–15 seconds, you should hear a relay click inside the range, and then you should see the bake element glowing red at the bottom of the oven. The glow should be a bright, consistent red. If it glows dimly or not at all, there’s still a problem—either the connectors aren’t fully seated, or the new element is faulty (rare, but it happens).
Step 12: Run a Full Temperature Test
Leave the LG LRE3061ST set to 350°F for 15 minutes. Use an oven thermometer (place it on the center of the oven floor) to verify that the temperature climbs steadily. It should reach 350°F within 10–12 minutes and hold steady. If the temperature overshoots (climbs to 380°F or higher), that’s usually normal—the thermostat cycles on and off to maintain temperature. If the temperature climbs very slowly or stops short, there may be a thermostat or control board issue, not the element. But if the element is glowing bright red and the temperature is climbing at all, you’ve done the job correctly.
Pro Tip from Dave: After the element replacement on the LG LRE3061ST, you might notice a slight burning smell during the first use. This is normal—it’s the manufacturing oils on the new element burning off. Open a window and run the range for 15 minutes with the oven at 400°F to clear it out. If the smell persists beyond one use, something else is wrong.
Troubleshooting — If It Still Isn’t Working
- Element glows but doesn’t heat the oven. If the element is red but the temperature won’t climb, the thermostat sensor may be faulty. On the LG LRE3061ST, the oven sensor is a small probe in the back-right wall of the cavity. A failed sensor will prevent the control board from cycling power to the element correctly. You can test it with a multimeter in temperature mode, but this is often a call-a-pro situation.
- Element doesn’t glow at all, and you hear no relay click. Recheck your spade connectors—they may not be fully seated. Pull them off and reseat them firmly. If they’re seated and still no glow, the control board relay may be dead. That’s not a DIY fix on the LG LRE3061ST.
- You see error code F11 or F13 after replacement. This code means the control board is still detecting an open circuit in the bake element. Double-check that your new element has good continuity—use your multimeter to test across the two spade connectors. If the element reads OL or infinite ohms, it’s defective and you need a replacement from the supplier. If it reads 12–20 ohms, the problem is a loose connection or a board issue.
- Element glows but sparks or arcs near the connectors. Stop immediately and unplug the LG LRE3061ST. This usually means a connector is not fully seated or the terminal is corroded. Remove the connector, clean the spade terminal with a wire brush, and reinstall with a new connector. If sparking continues, the control board may have a short, and you need a technician.
- Broil still works, but bake still doesn’t heat after replacement. If broil works fine but bake doesn’t, the issue is upstream of the element—likely the thermostat, the oven sensor, or the control board relay. The element itself is good. On the LG LRE3061ST, this requires testing the thermostat continuity with a multimeter or having a technician diagnose the board.
- Temperature cycles wildly (jumps from 200°F to 400°F). If the element is working correctly but the temperature overshoots significantly, the oven sensor may be failing or misaligned. A sensor that’s loose or not seated in its probe will give erratic readings. Check that the sensor probe in the back-right cavity wall is flush and secure.
When to Call a Professional Instead
- Control board is completely unresponsive. If the LG LRE3061ST won’t power on, won’t respond to button presses, or shows nonsense error codes, the main control board is likely dead. This is not a DIY repair—the board is sealed and programmed, and you need a technician with replacement and recalibration tools.
- You smell gas or see a gas leak (for gas models). The LG LRE3061ST I’m covering is all-electric, so this doesn’t apply. But if you ever work on a gas range, a gas leak is an immediate call to your gas company and a professional repair technician. Do not attempt to repair a gas connection yourself.
- The oven cavity is cracked or severely pitted. If the porcelain coating is flaking off in large areas or there’s a visible crack in the cavity wall, the structural