Samsung RF28R7551SR Water Dispenser Not Working — My Complete Repair Guide
When that water dispenser button stops working on your Samsung RF28R7551SR, it’s usually one of three culprits: a frozen water line, a bad inlet valve, or a faulty dispenser switch. I’ve fixed this on at least a dozen Samsung RF28R7551SR units over the years, and I’m going to walk you through exactly what I do — step by step — so you can get cold water flowing again without paying a service tech $250 to do it.
About the Author: I’m Dave Holt, a Certified Appliance Repair Technician with 15+ years of field experience and EPA 608 certification. I’ve repaired thousands of appliances across the country. My goal is to help you fix it yourself and save a couple hundred dollars.
Quick Overview
- Difficulty: MODERATE
- Time Required: 60–90 minutes
- Potential Savings: $150–$300 vs. a service call
- Special Tools: Multimeter (to test valve solenoid), 1/4″ nut driver, flat-head screwdriver
Symptoms That Tell Me It’s This Problem
- Water button pressed but nothing comes out. The dispenser light may or may not turn on, but no water flows. This is the classic sign I see on the Samsung RF28R7551SR.
- Water comes out very slowly or in weak spurts. Usually points to ice blockage in the line behind the fridge, or a partially stuck inlet valve.
- Dispenser light works but no water flow at all. When I see this on a Samsung RF28R7551SR, the switch is probably fine — that tells me the inlet valve solenoid isn’t energizing or the water line is frozen solid.
- Humming sound from the back of the fridge when you press the dispenser. That’s the inlet valve trying to open but can’t — either ice in the line or internal valve failure.
- Water leaking onto the floor underneath the Samsung RF28R7551SR or inside the fridge. The inlet valve seal may be cracked, or a water line connection has loosened from repeated freeze-thaw cycles.
- No power to the dispenser light at all. Less common, but the dispenser switch itself could be dead, or there’s a wiring issue to the dispenser module.
⚠️ Safety Warning — Read Before You Touch Anything
The very first thing I do — every single time — is unplug the Samsung RF28R7551SR from the wall outlet. This is not a suggestion. The dispenser circuit board and inlet valve solenoid carry live voltage, and I’ve seen technicians get a nasty shock because they skipped this step. Once unplugged, wait 5 minutes for any residual charge in the capacitors to bleed off. If you’re accessing the compressor area or working near the sealed system, do not attempt to disconnect or open refrigerant lines — that requires EPA 608 certification and specialized tools. Stick to the dispenser components, which are safe once power is removed.
Parts You’ll Need
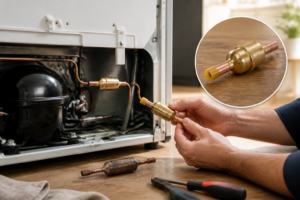
- Water Inlet Valve Assembly — OEM Part #: DA62-04778A (or DA62-04778D for later production runs) — This is the solenoid valve that sits behind the Samsung RF28R7551SR’s lower-rear panel and opens to let water into the dispenser. Check your serial number against Samsung’s parts website; the RF28R7551SR models made 2019–2020 typically use the 04778A version.
- Dispenser Switch (Push-Button Switch) — OEM Part #: DA34-10019D — This is the actual button you press on the front of the door. It wears out and can fail internally, cutting off the signal to the inlet valve.
- Water Supply Line (1/4″ Polyethylene Tubing, 25 feet) — OEM Part #: DA97-00196D — Samsung RF28R7551SR water lines can crack or pinch over time, especially if the fridge has sat in a cold garage. Having spare tubing on hand is smart.
- Compression Fitting Kit for 1/4″ Tubing — OEM Part #: DA61-06152A — Used to connect water lines to the inlet valve on the Samsung RF28R7551SR. These can loosen and cause small leaks.
Tools Required
- Multimeter set to Rx1 (resistance / continuity) mode to test the inlet valve solenoid coil
- 1/4″ nut driver for removing the water line compression fittings
- Flat-head screwdriver for prying off trim panels and accessing screw slots
- Phillips head screwdriver (both #1 and #2) for internal fasteners
- Adjustable wrench or 7/16″ wrench for inlet valve mounting bolts
- Flashlight or headlamp — you’ll be working in tight spaces behind the Samsung RF28R7551SR
- Towel or shop rag to catch water when you disconnect lines
Step-by-Step: How I Replace the Water Dispenser Not Working
Step 1: Unplug the Samsung RF28R7551SR and Turn Off the Water Supply
Unplug the fridge from the wall. Then locate the water shut-off valve — it’s usually behind the refrigerator, a small ball valve on the copper or plastic line running to the ice maker and dispenser. On the Samsung RF28R7551SR, this valve is typically on the left side of the unit, about 6 inches up from the floor. Turn it clockwise until it stops. If you can’t find it or it won’t turn, shut off the main water valve to your house. Wait 5 minutes with the fridge unplugged so capacitors fully discharge. I always wait this long, no exceptions.
Pro Tip from Dave: Before you do anything else, press the dispenser button 3–4 times to relieve pressure in the water line. You’ll hear a little hiss. This prevents water from spraying everywhere when you disconnect fittings later.
Step 2: Remove the Kickplate and Access the Inlet Valve
The inlet valve on the Samsung RF28R7551SR is tucked behind the lower-front kickplate. Get down on your belly or sit on the floor in front of the fridge. You’ll see a black plastic trim piece running the width of the unit — that’s the kickplate. Press down on both the left and right ends simultaneously; there are two spring clips holding it in place. Once released, slide the kickplate toward you and set it aside. You’re now looking at the compressor area and a small silver solenoid valve mounted horizontally on the left side, about 4 inches from the left edge. That’s your culprit.
Step 3: Test the Inlet Valve with Your Multimeter
Before you remove anything, test the solenoid coil to see if it’s energized. With the Samsung RF28R7551SR still unplugged, locate the small wire connector on top of the inlet valve — it’s a black plastic connector with two small wires (typically red and black). Gently disconnect it by pinching the tab and pulling straight out. Set your multimeter to Rx1 (resistance mode). Touch one probe to each of the two metal terminals inside the connector. A good solenoid should read between 5–20 ohms. If you get an open circuit (infinite resistance or no beep), the valve coil is dead and needs replacement. If it reads in the normal range, the valve itself may be frozen or the switch is bad — we’ll test that next.
Pro Tip from Dave: Keep a photo on your phone of the wire colors and connector position before you disconnect anything on the Samsung RF28R7551SR. You’d be surprised how many people reconnect wires backward. Red to red, black to black — simple, but I’ve seen it done wrong.
Step 4: Test the Dispenser Switch on the Door
With the Samsung RF28R7551SR unplugged, go to the front of the fridge and locate the dispenser switch — it’s mounted inside the door panel, directly behind the push button you press. On the RF28R7551SR, you’ll need to remove the inner door liner to access it. There are usually 4–5 Phillips screws (typically #2 head) holding that liner in place, positioned around the perimeter. Remove those screws and carefully slide the liner forward and out. You’ll see a small rectangular switch mechanism with a wire connector. Disconnect the connector and test it the same way: multimeter on Rx1, touch both terminals. When the button is not pressed, you should see infinite resistance (open circuit). When you press the button repeatedly, you should hear the meter beep and see the resistance drop to near-zero each time. If the switch stays open no matter what, it’s failed and needs replacing.
Step 5: Disconnect the Water Line from the Inlet Valve
Back at the inlet valve behind the kickplate on the Samsung RF28R7551SR, you’ll see two 1/4″ compression fittings: one water supply line coming in from the left, and one outlet going to the dispenser on top. Using your 1/4″ nut driver, carefully loosen the supply line fitting first (turn counterclockwise). Have your towel ready — a little water will drip. Once loose, hand-unscrew it the rest of the way and pull the tubing free. Do the same for the outlet fitting that goes to the dispenser. Lay the valve down carefully so you don’t break the outlet stub. You now have clear access to remove the valve.
Pro Tip from Dave: Pinch the polyethylene tubing at the inlet and outlet to collapse it slightly before you try to pull it off the compression fitting. This breaks the seal and makes removal way easier. I learned this the hard way after spending 10 minutes wrestling with a stuck line on a Samsung RF28R7551SR.
Step 6: Remove the Inlet Valve Mounting Hardware
The inlet valve on the Samsung RF28R7551SR is mounted with two 7/16″ bolts that screw into threaded studs on the compressor housing area. These can be stubborn. Use your adjustable wrench or 7/16″ wrench to loosen both bolts — start by loosening them a half-turn each, alternating back and forth so you don’t strip the threads. Once both are loose, remove them completely. The valve will now be free to lift out. Disconnect the wire harness from the solenoid coil if you haven’t already. Set the old valve aside — you may want to inspect it for debris or ice buildup, which tells you there’s a secondary problem in the water line.
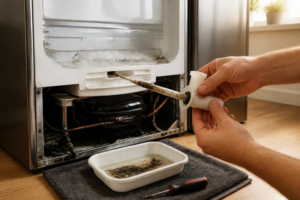
Step 7: Inspect the Water Line for Blockage or Cracks
Now is the perfect time to check the water supply line coming into the Samsung RF28R7551SR. If you see cracks, kinks, or white crusty deposits (mineral buildup), that’s your problem — the line needs replacing. Hold it up to light and look through it. If you see ice inside (looks like white cloudy buildup), pour warm water over the section to melt it, or replace the line entirely. For the Samsung RF28R7551SR, the water line runs from the shut-off valve on the left side, behind the compressor, and forward to where the inlet valve was. If it’s kinked or cracked, disconnect it and replace it with the OEM 25-foot tubing (DA97-00196D). Use the compression fittings (DA61-06152A) to reconnect.
Step 8: Install the New Inlet Valve on the Samsung RF28R7551SR
Take your new inlet valve (DA62-04778A for most RF28R7551SR units) and position it exactly where the old one sat — the two threaded studs should line up. Insert the 7/16″ bolts and hand-tighten them first, then use your wrench to snug them down firmly. Don’t over-tighten — these are plastic studs and they can crack. Once the valve is mounted, reconnect the wire harness to the solenoid coil. The connector should click into place. Verify the connection is seated firmly by giving the wires a gentle tug.
Pro Tip from Dave: Before you reconnect the water lines, hand-press the inlet valve outlet stub to confirm it moves slightly when you apply pressure. This tells you the plunger inside isn’t seized. If it’s completely rigid, the valve may have a manufacturing defect — exchange it for another unit.
Step 9: Reconnect the Water Supply Line
The water supply line on the Samsung RF28R7551SR connects to the left inlet fitting on your new valve. Push the 1/4″ tubing straight onto the fitting — it should seat with a click or a slight resistance. Then hand-tighten the compression nut until it’s snug, then use your 1/4″ nut driver to turn it one more quarter-turn clockwise. Don’t gorilla-grip it — snug is enough. Now reconnect the outlet line (the one going to the dispenser) to the top fitting on the valve the same way.
Step 10: If You Replaced the Dispenser Switch, Install It Now
If your multimeter test showed the switch was bad, now is the time to replace it. Grab your new switch (DA34-10019D) and the inner door liner you removed earlier. Position the new switch in the same orientation — the button mechanism should face outward toward the door exterior. Screw it back down with the Phillips screws (typically 4–5 screws, #2 head). Reconnect the wire harness to the switch connector. Slide the inner door liner back into place and secure it with all the Phillips screws. Make sure the button is smooth and doesn’t bind when you press it.
Step 11: Reinstall the Kickplate and Power On
Carefully slide the kickplate back under the lower-front edge of the Samsung RF28R7551SR and push upward on both ends until you hear the spring clips engage. The kickplate should sit flush and tight. Now you’re ready to power on. Plug the fridge back into the wall. Turn the water shut-off valve counterclockwise to restore water flow. Wait 30 seconds for pressure to build in the line, then press the dispenser button. You should hear a faint click from the inlet valve and water should flow steadily into your cup. Let it run for 3–4 seconds to flush any debris that may have entered during the repair.
Pro Tip from Dave: After everything is reconnected, check underneath the Samsung RF28R7551SR and behind the kickplate for water leaks. Let it sit for 5 minutes with the dispenser button pressed a few times, then look for drips. If you see a slow drip from one of the compression fittings, tighten it a quarter-turn with your nut driver — that usually seals it. If water is pooling under the fridge, you may have a cracked line or a defective fitting that needs replacing.
Step 12: Run a Full Test Cycle
Press the dispenser button 10–15 times over the course of an hour. Check that the light comes on, water flows smoothly, and there are no leaks. Fill a glass completely to verify flow rate. The water should come out in a steady stream, not a slow trickle. If water comes out sluggish, there may still be a partial blockage in the line upstream — check the shut-off valve isn’t partially closed, or there could be ice further back in the line that will thaw with time. Most ice blockages clear within a day or two of normal operation.
Troubleshooting — If It Still Isn’t Working
- Water comes out very slowly even after replacing the valve. This usually means there’s still an ice blockage upstream in the main supply line, or the shut-off valve is partially closed. Check the water valve and make sure it’s fully open (counterclockwise). If that’s open, the line probably has ice. Leave the fridge at room temperature overnight and test again — the ice will melt naturally. If you’re in a hurry, pour warm (not hot) water over the visible water line section behind the fridge to melt it.
- You get a few seconds of water, then it stops. That’s classic freeze behavior. The inlet valve is opening, but ice is blocking flow. Same solution as above — time and warmth will fix it. If it persists for more than a day, the water line itself may have a crack and is freezing at that location. Replace the entire line with OEM tubing.
- Water leaks from the compression fitting even after tightening. Disconnect the line, look at the ferrule (the small ring on the end of the tubing). If it’s cracked or deformed, the line won’t seal. You’ll need to replace the tubing. Never reuse a compression fitting — use a new one from the DA61-06152A kit.
- The dispenser button still doesn’t turn on the light. If the switch tested good on your multimeter but