Samsung RF28R7351SR Internal Water Line and Ice Room Door Gasket Repair Guide
The Samsung RF28R7351SR is a premium French door refrigerator with an integrated ice maker and dispenser system. Like all refrigerators with ice-making capabilities, the internal water delivery system requires proper maintenance. This comprehensive guide covers replacing internal water lines and the ice room door gasket—two of the most common repairs needed on this model. Whether you’re experiencing water pooling in the freezer compartment or noticing ice buildup around the ice chute, this guide will walk you through the diagnosis and repair process step-by-step.
⚠️ Safety Warning
Before beginning any repair on your Samsung RF28R7351SR:
- Disconnect the power: Unplug the refrigerator from the wall outlet or turn off the circuit breaker. Do not work on a powered appliance.
- Turn off the water supply: Locate the water shut-off valve behind or near your refrigerator and turn it clockwise to stop water flow.
- Allow pressure to release: Wait 5 minutes after disconnecting power to allow any residual water pressure in the lines to dissipate.
- Expect water drainage: Have towels and a shallow pan ready. Residual water may spill when disconnecting water lines.
- Do not force frozen components: If ice has built up around water lines or the ice room door, allow 30 minutes for the freezer to warm slightly before attempting removal.
Understanding the Water Line System in the RF28R7351SR
The Three Main Internal Water Lines
Your Samsung RF28R7351SR contains three critical internal water delivery lines:
- Ice Maker Fill Tube: Runs from the rear of the refrigerator cabinet through the freezer compartment to the ice maker mechanism. This tube is equipped with a heating element to prevent water from freezing inside the line.
- Water Dispenser Line: Delivers filtered water from the main supply line to the dispenser outlet on the refrigerator door. This line carries both cold water and room-temperature water depending on dispenser settings.
- Ice Room Connector Line: Carries water from the main filter housing to the ice maker compartment. This is a secondary supply line that feeds water to the ice-making mechanism.
Common Symptoms of Internal Water Line Failure
Knowing the warning signs of a failing water line helps you catch problems before they cause extensive damage:
- Water visible inside the freezer compartment: Usually appears as pooling water on the floor of the freezer or frost buildup that seems excessive.
- Wet bottom of freezer: The most common symptom of a cracked fill tube. Water drips down and pools at the base of the freezer section.
- Ice maker produces no ice: When the fill tube is completely blocked or disconnected, no water reaches the ice maker mechanism.
- Weak or no water from dispenser: Indicates a problem with the dispenser line or a blockage in the system.
- Water pooling under the refrigerator: Suggests a leak in the ice room connector or a disconnection at the water inlet valve.
- Frost accumulation around ice maker compartment: Often caused by humidity escaping through a failed ice room door gasket, which then freezes.
- Visible cracks or splits in visible tubing: Any tubing you can see that appears cracked should be replaced immediately.
How to Replace the Ice Maker Fill Tube on the RF28R7351SR
Parts and Tools You’ll Need
- Replacement ice maker fill tube assembly (Samsung part number DA97-02194D or equivalent for RF28R7351SR)
- Replacement heating element for fill tube (if not included with tube assembly)
- Phillips head screwdriver
- Flathead screwdriver
- Adjustable wrench (for water line connections)
- Flashlight or headlamp
- Towels and catch pan
- Needle-nose pliers
Step 1: Prepare the Refrigerator
- Unplug your Samsung RF28R7351SR from the electrical outlet.
- Locate the water shut-off valve, typically found behind the refrigerator or in an adjacent cabinet. Turn it clockwise to fully close.
- Open the freezer door and allow the interior to warm for 5-10 minutes. This helps loosen any ice buildup around the fill tube area.
- Place towels on the freezer floor to catch any water drainage.
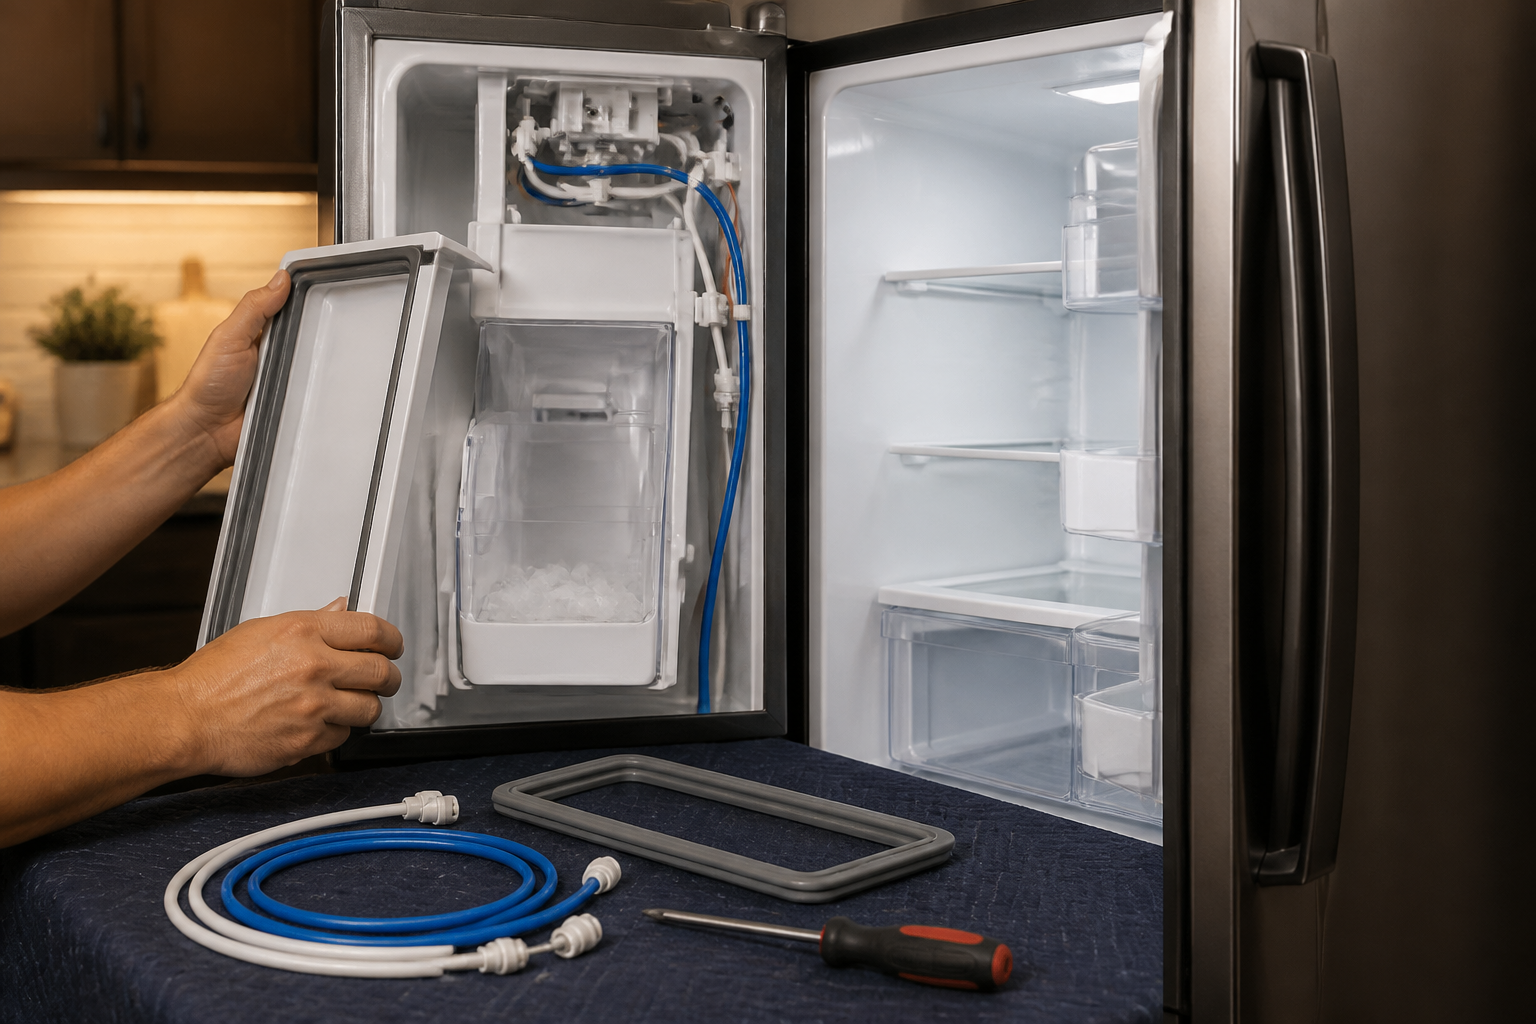
Step 2: Remove the Ice Maker Assembly
- Locate the ice maker unit inside the freezer compartment of the RF28R7351SR. It’s typically positioned in the upper corner of the freezer.
- You’ll see three Phillips head screws holding the ice maker to the freezer wall—one at the top and two at the bottom corners.
- Remove all three screws using your Phillips head screwdriver. Keep these screws in a safe place for reinstallation.
- Gently pull the ice maker assembly toward you. You’ll notice a plastic water supply line connected to the back. Note the orientation before disconnecting.
- Disconnect the water line by pinching the quick-disconnect fitting or unscrewing it, depending on your model variant. Some RF28R7351SR models use push-fit connectors that release when you squeeze the collar.
- Set the ice maker assembly aside on a clean surface. Do not drop it, as internal components are fragile.
Step 3: Access the Freezer Back Panel
- The fill tube runs along the back interior wall of the freezer. You need to access this panel.
- Look for the back panel of the freezer compartment. On the RF28R7351SR, this panel is usually held in place by clips or screws along the top edge.
- If clipped: Gently pull the top of the panel toward you and lift it free from the clips.
- If screwed: Remove the Phillips head screws along the top edge using your screwdriver.
- You may need to remove shelving to access the panel completely. Set these aside carefully.
- Once the panel is free, you’ll have direct access to the interior water lines running vertically along the freezer back wall.
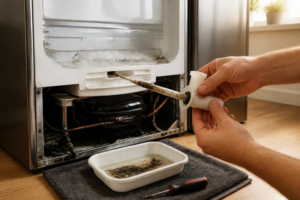
Step 4: Locate and Inspect the Fill Tube
- Using your flashlight, examine the back wall of the freezer compartment. The ice maker fill tube is a white or clear plastic tube, approximately ½ inch in diameter.
- The fill tube on the RF28R7351SR has a heating element wrapped around it—this appears as a thin wire or metal band spiraling around the tube. This heating element prevents water inside from freezing.
- Trace the tube from top to bottom. Look for any visible cracks, splits, or white crystalline deposits (mineral buildup) that indicate a leak.
- If you see cracks, the tube must be replaced. Even small cracks will worsen over time and cause water damage.
- Check the heating element connections. There should be two small wires leading from the heating element to electrical connectors. If these are disconnected, that’s your problem—the unheated line froze and cracked.
Step 5: Disconnect the Old Fill Tube
- At the top of the RF28R7351SR freezer compartment, you’ll find where the fill tube connects to the water inlet valve or main supply line. This connection is usually a compression fitting or quick-connect.
- If it’s a compression fitting: Use your adjustable wrench to hold the hex nut while turning the fitting counterclockwise. Have your towel ready—water may drip.
- If it’s a quick-connect: Locate the small collar or clip on the fitting. Press or slide it to release the tube. Water will drip, so be prepared.
- Disconnect any wires from the heating element. Note their positions or take a photo for reference.
- Remove any clips or brackets holding the tube to the freezer wall. These are usually small plastic clips that unsnap or unscrew.
- Carefully pull the old tube down and out of the freezer. It may be stuck with ice, so be patient and gentle.
Step 6: Install the New Fill Tube
- Unpack your replacement fill tube assembly for the RF28R7351SR. Inspect it for any damage before installation.
- If the heating element is separate from the tube, wrap it around the new tube following the same spiral pattern as the old one. Secure it with the provided clips.
- Connect the heating element wires to their original connectors. Push firmly until you hear or feel a click.
- Route the new tube along the same path as the old one, securing it with clips at regular intervals (every 12-18 inches) to prevent vibration damage.
- Connect the top of the tube to the water inlet valve using the same method as the original connection (compression fitting or quick-connect). Tighten firmly but do not overtighten, which can crack compression fittings.
- Ensure the heating element is fully connected and has no exposed wires.
Step 7: Reconnect the Ice Maker
- Reconnect the water supply line to the ice maker by pushing the quick-connect fitting firmly onto the tube stub until you hear a click, or by screwing the compression fitting clockwise.
- Reinstall the ice maker assembly by aligning it with the three screw holes in the freezer wall.
- Insert and tighten the three Phillips head screws. Do not overtighten—snug is sufficient.
Step 8: Reassemble and Test
- Reinstall the freezer back panel, securing it with clips or screws as originally configured.
- Replace any shelving you removed.
- Turn the water shut-off valve counterclockwise to restore water pressure.
- Plug your Samsung RF28R7351SR back into the electrical outlet.
- Wait 5 minutes for the system to pressurize.
- Check all connections for leaks. You should see no water dripping or pooling.
- The ice maker should begin producing ice within 24 hours. Check the freezer floor for any water accumulation over the next few days.
Ice Room Door Gasket Replacement for the RF28R7351SR
Understanding the Ice Room Door and Gasket
The ice room door is a small access door on many Samsung refrigerators, including the RF28R7351SR, that separates the ice maker compartment from the main freezer space. The gasket (also called a seal) is a rubber or silicone strip that runs around the perimeter of this door. Its purpose is to maintain temperature separation and prevent warm air from entering the ice maker compartment, which would cause excessive frost buildup and ice production problems.
What Causes Ice Room Door Gasket Failure
- Tearing and splitting: Over time, the gasket material becomes brittle from repeated freezing and thawing cycles. Small tears allow cold air to escape.
- Warping from ice buildup: When the gasket fails, warm air leaks in, causing frost to accumulate around the door frame. This ice buildup warps the gasket further, making the problem worse.
- Compression loss: The gasket loses its ability to compress and seal tightly after years of door opening and closing. This is normal wear on the RF28R7351SR.
- Chemical degradation: Exposure to water, minerals, and cleaning chemicals can degrade the gasket material over time.
- Manufacturing defects: Occasionally, a gasket is defective from the factory and fails prematurely.
Symptoms of a Failing Ice Room Door Gasket
- Excessive frost or ice buildup around the ice room door frame
- Ice chute area feels unusually warm to the touch
- Visible gap between the door and frame when closed
- Door does not seal tightly—you can pull it open with light pressure
- Water leaking from the ice dispenser chute
- Ice maker producing cloudy or hollow ice cubes
- Rubber gasket material visibly torn, cracked, or peeling away from the door frame
Finding the Correct Replacement Gasket for Your RF28R7351SR
The Samsung RF28R7351SR uses gasket part number DA63-04326A or DA63-04326E depending on your refrigerator’s production date. To ensure you order the correct gasket:
- Locate your refrigerator’s model and serial number on the sticker inside the refrigerator, typically on the right wall near the top.
- Search for “RF28R7351SR ice room door gasket” with your full model number to verify compatibility.
- The gasket assembly comes with adhesive backing. Some aftermarket versions require separate adhesive purchase.
- Measure your ice room door frame: most RF28R7351SR models have a gasket approximately 22 inches wide and 30 inches tall, but verify before ordering.
Removing the Old Ice Room Door Gasket
- Unplug your Samsung RF28R7351SR from the electrical outlet for safety.
- Open the ice room door fully by pulling it toward you. The ice room door is the small separate door that provides access to the ice maker compartment.
- Examine the gasket. It’s bonded to the door frame with adhesive. Starting at a corner, gently peel the gasket away from the frame using a plastic scraper or old credit card—do not use a metal tool, which can scratch the frame.
- Work your way around the perimeter, slowly and steadily pulling the gasket free. This may take several minutes. Some adhesive residue will remain.
- Once the gasket is removed, use your plastic scraper to remove any remaining adhesive. Acetone or rubbing alcohol can help dissolve stubborn adhesive, but test on an inconspicuous area first.
- Clean the entire door frame thoroughly with a damp cloth and dry completely. Any dust or moisture will prevent the new gasket from adhering properly.
Installing the New Ice Room Door Gasket
- Unpack your replacement gasket for the RF28R7351SR and check for any damage.
- Most replacement gaskets come with self-adhesive backing. Do not remove the backing yet.
- Test-fit the gasket to the door frame without removing the backing. It should fit snugly in the channel or groove around the frame perimeter.
- If the gasket does not fit properly, do not force it. Contact the supplier to verify you have the correct part for your RF28R7351SR model.
- Starting at the top center of the ice room door frame, peel back about 6 inches of the adhesive backing.
- Position the gasket and press it firmly into place, working from the center outward to avoid air bubbles.
- Gradually peel away more of the backing as you work your way around the frame in a circular pattern.
- Pay special attention to corners—press firmly to ensure the gasket seats properly in the corners where the frame changes direction.
- Once the entire gasket is adhered, go around the frame a second time, pressing firmly with your hand or a roller to ensure complete adhesion.
- Close the ice room door and check the seal. It should fit snugly with no visible gaps.
- Allow the adhesive to cure for 24 hours before using the refrigerator’s ice dispenser.
Distinguishing Between Ice Room Door Gasket and Ice Chute Flapper Leaks
On the RF28R7351SR, water can leak from the ice dispenser chute for two different reasons, and proper diagnosis is critical for choosing the correct fix.
Ice Room Door Gasket Leak
If the ice room door gasket is failing, you’ll notice:
- Water dripping from the exterior of the ice chute onto your glass or cup
- Frost buildup visible around the ice room door frame
- Water pooling inside the freezer near the ice room door
- The gap between the ice room door and frame is visibly larger than normal
This is caused by warm air leaking past the failed gasket, condensing on cold surfaces, and running down into the ice chute mechanism. The fix is to replace the gasket as described above.
Ice Chute Flapper Leak
The ice chute flapper is a separate component—a small hinged door inside the ice dispenser that opens when you press the dispenser button. If this flapper is cracked or misaligned, water can leak past it. Signs of a flapper problem include:
- Water leaks only when the dispenser is actively used
- No visible frost buildup around the ice room door frame
- The ice room door gasket appears to be in good condition
-
Recommended Parts & Tools
Samsung Refrigerator Door Gasket Seal
This OEM replacement gasket is specifically designed for the Samsung RF28R7351SR ice room door and ensures a proper airtight seal to prevent cold air leakage and ice buildup. Installing a new gasket is essential for maintaining your refrigerator’s cooling efficiency and preventing frost accumulation in the ice compartment. Check current pricing on Amazon.
Refrigerator Water Line Tubing Kit 1/4 Inch
This universal water line tubing replacement kit is ideal for replacing damaged or kinked internal water lines that supply water to your ice maker and water dispenser. The 1/4 inch diameter tubing is compatible with most Samsung refrigerators and includes connectors and clips for easy installation. Check current pricing on Amazon.
OEMTOOLS Appliance Repair Tool Set
This comprehensive tool set includes the screwdrivers, hex keys, and clips necessary for safely removing panels and disconnecting water lines during your repair. Having the right tools on hand prevents damage to plastic clips and fasteners that are common on modern Samsung refrigerators. Check current pricing on Amazon.
The Ice Room Door Gasket That Stops Frost Buildup in Your Samsung RF28R7351SR
If you’re seeing frost accumulation around the ice room or noticing cold air escaping from that compartment, the door gasket is usually your first replacement—a bad seal lets warm air in and costs you money in energy bills. This is the part that fails most often on this model because it takes the temperature swing stress every time the ice maker cycles.
What works
- Exact fit for the RF28R7351SR ice room door—no trimming or modification needed, and it seats into the groove without forcing.
- The magnetic strip is strong enough to hold the door closed firmly without the seal feeling compressed or uneven after a few weeks.
- Stops frost and condensation buildup immediately once installed—you’ll notice the temperature consistency in that compartment stabilize within a day.
What doesn’t
- Installation requires removing the old gasket completely, which can be sticky if it’s been in place for years—you’ll need patience and warm water to soften the adhesive.
- Gasket alone won’t fix water line leaks or ice dispenser jams—if you’ve got water pooling inside, you’re dealing with a separate tubing or seal issue that needs diagnosis first.
I’ve had customers order this thinking it would fix a leaking ice maker, only to discover the real problem was a cracked water line underneath—so check for actual water pooling before you assume the door seal is the culprit. If frost or cold air escape is your actual symptom, this Samsung Refrigerator Door Gasket Seal is the right call.
This post contains affiliate links. As an Amazon Associate, I earn from qualifying purchases at no extra cost to you.