Samsung RF28R7351SR Ice Maker Problems: Complete Troubleshooting and Repair Guide
The Samsung RF28R7351SR is a high-end French door refrigerator with an integrated ice maker system that delivers convenience when working properly. However, ice maker failures are among the most common issues homeowners experience with this model. This comprehensive guide will walk you through diagnosing and fixing ice maker problems on your RF28R7351SR, including testing the ice maker control board and performing force cycle diagnostics.
Most Common Samsung RF28R7351SR Ice Maker Problems
Ice Maker Not Producing Ice at All
Complete ice maker failure on the RF28R7351SR typically stems from several causes. The most common culprit is a frozen water supply line that prevents water from reaching the ice maker assembly. The RF28R7351SR’s water inlet valve may also fail, cutting off water supply entirely. Additionally, the ice maker’s integrated control board may malfunction, preventing the motor from cycling through the freeze and harvest cycles.
Before assuming the worst, always check that ice maker production is actually enabled in the refrigerator’s settings. The RF28R7351SR has a touchscreen control panel that allows users to disable ice production—this setting is sometimes accidentally activated.
Ice Maker Producing Ice Slowly
Slow ice production on the RF28R7351SR usually indicates inadequate water supply pressure or temperature. The refrigerant system may not be cooling the ice maker compartment to the required temperature (below 15°F) needed for proper ice formation. A partially clogged water filter reduces water flow to the ice maker, significantly slowing production. The evaporator coils in the freezer section may also be partially iced over, reducing cooling capacity.
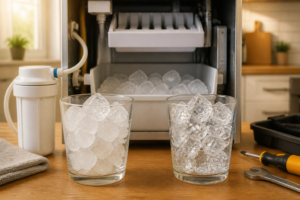
Ice Clumping Together
When ice cubes stick together in the RF28R7351SR’s ice bin, moisture is entering the storage area and refreezing. This typically occurs when the ice maker’s defrost heater isn’t functioning properly, causing frost buildup in the ice compartment. The ice maker door flapper may also stick open, allowing warm air into the compartment. A malfunctioning thermostat sensor on the ice maker’s control board prevents proper defrost cycle activation.
Ice Maker Frozen Solid
A completely frozen ice maker assembly on the RF28R7351SR indicates the defrost cycle is not operating. The DA97-15217A ice maker assembly includes a defrost heater that should activate periodically to melt any accumulated frost. When this heater fails, or the control board stops triggering it, ice accumulates around the mold and inlet area, eventually freezing the entire mechanism solid. This is a critical issue because the ice maker cannot function until thawed.
Continuous Ice Production (Overfilling)
If your RF28R7351SR ice maker continuously fills and doesn’t stop, the water inlet valve solenoid is likely stuck open. The ice maker’s control board should signal the water valve to close after the mold fills, but a faulty solenoid or control board malfunction keeps the valve open. This results in overfilled ice cubes and water leaking inside the ice bin.
How to Test the Ice Maker on Your RF28R7351SR: Force Cycle Test
Samsung designed the RF28R7351SR with a diagnostic force cycle feature that allows you to test ice maker operation without waiting hours for a normal cycle. This test activates the ice maker motor and water valve immediately, helping you determine if the mechanism is functioning.
Accessing the Force Cycle Diagnostic Mode
- Locate the control panel on your RF28R7351SR (typically on the interior of the right door)
- Press and hold the “Refrigerator” and “Freezer” buttons simultaneously for 8 seconds until the display shows diagnostic mode
- Use the up arrow button to navigate to the ice maker test option
- Press “Select” or the center button to initiate the force cycle
- You should hear the ice maker motor engage and the water valve click within 10 seconds
- Watch for water flowing into the ice mold (you may need to open the freezer door to observe)
- The cycle should complete in approximately 30 minutes with ice cubes visible in the bin
If you don’t hear motor sounds or see water flow, the issue lies with power delivery to the ice maker or a failed control board. If the cycle runs but produces no ice, water supply or mold temperature is the problem.
Accessing and Testing the Ice Maker Control Board on the RF28R7351SR
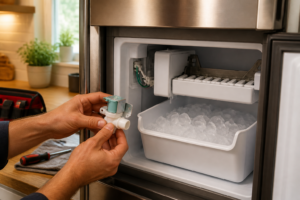
Removing the Ice Maker Assembly from Your RF28R7351SR
The ice maker assembly on the RF28R7351SR is located in the upper freezer compartment. Accessing the control board requires removing the ice bin and ice maker unit.
- Unplug your RF28R7351SR from the electrical outlet for safety
- Open the freezer door and remove all ice from the bin
- Locate the ice bin’s release levers on both sides (they’re typically blue plastic tabs)
- Pull both levers toward the center simultaneously to release the bin from its tracks
- Slide the ice bin straight out toward you
- You’ll now see the DA97-15217A ice maker assembly mounted above the bin location
- The ice maker is secured with three Phillips-head screws: one on the left side, one on the right side, and one underneath the front edge
- Remove all three screws and carefully disconnect the wire harness connector from the back of the ice maker
- Gently lift the ice maker assembly out of its cavity
Visually Inspecting the Ice Maker Control Board
Once you have the ice maker assembly removed, examine the control board mounted on the back of the DA97-15217A assembly. Look for:
- Burnt or discolored components (indicates electrical failure)
- Corrosion or white residue on circuit board traces (water damage)
- Loose or damaged solder joints around major components
- Cracked or damaged capacitors (cylindrical components that may appear swollen)
- Broken wire connections inside the assembly
If you observe significant visible damage, the ice maker control board has likely failed and the entire DA97-15217A assembly requires replacement rather than individual component repair.
Testing the Thermistor on the Ice Maker Control Board
The thermistor is a temperature sensor on the ice maker’s control board that monitors mold temperature. When the mold reaches proper freezing temperature, the thermistor signals the control board to initiate the harvest cycle. A failed thermistor prevents proper ice formation.
- Locate the thermistor on the ice maker assembly—it’s a small cylindrical component (approximately 0.5 inches long) attached to the mold area with a mounting bracket
- Set your digital multimeter to the resistance (ohms) measurement mode
- Disconnect the thermistor’s wire connector from the control board
- Place the multimeter probes across the thermistor terminals
- At room temperature (approximately 70°F), the thermistor should read between 47,000 and 52,000 ohms
- If your reading is significantly different or the multimeter shows infinite resistance (overload), the thermistor has failed
- If the reading is within acceptable range at room temperature, place the thermistor in your freezer for 5 minutes
- Retest—the resistance should drop to approximately 10,000-15,000 ohms when cold
- Reconnect the thermistor if it passes both tests
Testing the Ice Maker Motor
The motor in the DA97-15217A ice maker drives the mold rotation and ejection mechanism. A failed motor prevents ice harvest, even if water freezes properly in the mold.
- Locate the motor assembly on the ice maker—it’s mounted on the left side of the DA97-15217A and connected to the control board with a four-pin wire connector
- Set your multimeter to ohms resistance measurement mode
- Disconnect the four-pin connector from the control board
- Place multimeter probes on pins 1 and 2 of the motor connector
- The motor should show resistance between 4 and 8 ohms
- Test pins 2 and 3—this should also show 4 to 8 ohms
- If either test shows infinite resistance (no connection) or near-zero resistance (short circuit), the motor has failed
- If the motor passes resistance tests, reconnect the connector and test for mechanical binding by manually rotating the mold (should rotate freely with slight resistance)
- If the mold won’t rotate or shows extreme resistance, the motor gears are damaged internally
Motor testing with resistance alone doesn’t confirm the motor will operate under power. If resistance readings are acceptable but the force cycle test showed no motor engagement, the control board likely has a defective motor driver circuit.
Testing the Water Valve Solenoid Connection
The water inlet valve solenoid on the RF28R7351SR allows water to fill the ice mold. The solenoid is controlled by the ice maker’s control board. A failed solenoid prevents water from entering, while a stuck solenoid causes continuous overfilling.
- Locate the water valve solenoid connector on the back of the ice maker assembly (it’s a two-pin connector attached to the solenoid mounted on the left side)
- Disconnect the solenoid’s wire connector
- Set your multimeter to ohms resistance mode
- Place multimeter probes across both solenoid pins
- The solenoid coil should measure between 400 and 600 ohms at room temperature
- If the reading is infinite (open circuit), the solenoid coil has failed and won’t energize
- If the reading is very low (less than 50 ohms), the solenoid has an internal short and may be stuck open
- Reconnect the solenoid connector when testing is complete
Solenoid resistance testing confirms the coil is intact, but doesn’t guarantee proper water flow control. If resistance is acceptable but the force cycle produced continuous water flow, the solenoid valve seat is stuck and requires replacement.
Ice Maker Frozen Solid: Thawing and Repair
Safely Thawing a Frozen Ice Maker Assembly
When the entire ice maker on your RF28R7351SR is frozen solid, mechanical clearing is necessary before testing can proceed. Never use sharp implements or excessive force that could damage the assembly.
- Unplug the RF28R7351SR from the electrical outlet
- Remove the ice maker assembly as described in the removal section above
- Place the ice maker in your kitchen sink or a large basin
- Run warm (not hot) water over the frozen areas for 5-10 minutes until ice begins loosening
- Use a soft plastic scraper or old credit card to gently dislodge ice—never use metal tools that could crack plastic components
- Allow any remaining ice to melt naturally at room temperature; forcing it may damage internal mechanisms
- Once thawed, inspect the mold for cracks or damage caused by ice expansion
Checking the Defrost Heater Element
The defrost heater inside the ice maker assembly should activate periodically to prevent frost and ice buildup. On the RF28R7351SR, this heater is controlled by the ice maker’s control board and is essential for preventing the frozen solid condition from recurring.
- With the ice maker removed and thawed, locate the defrost heater element (it’s a thin wire or ribbon element mounted near the ice mold)
- Set your multimeter to ohms resistance mode
- Disconnect the heater’s wire connector from the control board
- Place multimeter probes across the heater connector pins
- A functioning heater element should show resistance between 20 and 80 ohms
- Infinite resistance indicates the heater element has burned open and requires replacement
- Zero or very low resistance (under 5 ohms) indicates an internal short in the heater
If the defrost heater fails testing, the DA97-15217A assembly should be replaced. Attempting to repair individual heating elements rarely succeeds and often causes additional damage.
Inspecting the Evaporator Cover
The evaporator cover on the RF28R7351SR’s freezer section houses the cooling coils. If this cover becomes blocked by frost, it reduces cooling to the ice maker compartment, preventing proper ice formation and contributing to freeze-up problems.
- Locate the evaporator cover panel in the upper freezer compartment (typically at the back or top of the compartment)
- Look for excessive frost or ice buildup on the cover surface
- If frost is present, the refrigerator’s defrost cycle for the freezer section may be failing
- Check that the freezer temperature is set to 0°F or below (the RF28R7351SR’s optimal ice maker operating temperature)
- Verify that air vents from the freezer to the refrigerator section are not blocked, as this prevents proper air circulation and temperature regulation
How to Reset the Ice Maker on Your RF28R7351SR
Soft Reset via the Control Panel
A soft reset often resolves ice maker malfunctions caused by temporary control board glitches on the RF28R7351SR.
- Locate the control panel on the RF28R7351SR (interior of the right door)
- Press and hold the power button for 3-5 seconds until the display goes blank
- Release the button and wait 30 seconds for the control panel to reinitialize
- The RF28R7351SR will perform an automatic system check
- Once restarted, navigate to the ice maker settings and ensure it’s set to “On”
- Run the force cycle test described earlier to confirm operation
Hard Reset via Power Disconnection
If the soft reset doesn’t resolve the issue with your RF28R7351SR, a complete power disconnect may help reset the main control board’s ice maker circuits.
- Unplug the RF28R7351SR from the electrical outlet
- Wait at least 5 minutes to allow all capacitors to discharge fully
- Plug the refrigerator back in
- Allow the RF28R7351SR to run through its startup sequence (typically 2-3 minutes)
- Access the control panel and verify ice maker settings are enabled
- Perform the force cycle test to check for proper operation
DA97-15217A Ice Maker Replacement: When to Replace vs. Repair
Repair vs. Replacement Decision Matrix
The DA97-15217A ice maker assembly on the RF28R7351SR represents a significant investment. Deciding whether to repair individual components or replace the entire assembly requires evaluating the failure type and repair costs.
Replace the DA97-15217A when:
- The control board shows visible damage (burnt marks, corrosion, cracked components)
- Multiple components test as failed (motor AND thermistor AND heater)
- The mold is cracked or warped, preventing proper ice formation
- The ice maker was completely frozen solid and thawing revealed internal damage
- Your RF28R7351SR is still under warranty (replacement is usually covered)
Attempt repair when:
- Only a single component tests as failed (thermistor, water valve solenoid, or heater)
- The ice maker hasn’t been physically damaged by freezing
- The control board shows no visible damage
- Your RF28R7351SR is out of warranty and repair costs are significantly lower than replacement
Steps for Replacing the Ice Maker Assembly
- Unplug your RF28R7351SR and remove the ice bin
- Remove the three mounting screws holding the old DA97-15217A assembly as described in the removal section
- Disconnect the wire harness from the old assembly
- Carefully lift out the old ice maker and set it aside
- Position the new DA97-15217A assembly in the cavity, aligning the mounting holes
- Connect the wire harness connector to the new assembly’s control board
- Install and tighten the three mounting screws securely
- Reinstall the ice bin, ensuring it seats fully in both side tracks
- Plug the RF28R7351SR back in and run the force cycle test
- Allow the new ice maker to complete 2-3 full cycles before the ice is safe to use (this flushes water lines)
The DA97-15217A is a direct replacement for the RF28R7351SR and requires no additional calibration or programming once installed and powered.
Frequently Asked Questions
Why is my RF28R7351SR ice maker making ice but it’s very small or misshapen?
Small or misshapen ice cubes typically indicate insufficient water entering the mold. Check your water filter—it should be replaced every
Recommended Parts & Tools
Samsung DA41-00291D Ice Maker Assembly
If your ice maker isn’t producing ice despite the motherboard testing normally, this OEM replacement assembly is the most likely culprit. This genuine Samsung part is designed specifically for the RF28R7351SR and ensures proper fit and function without compatibility issues. Check current pricing on Amazon.
OEMG Multimeter Digital Voltage Tester
Testing the motherboard and its various connections requires a reliable multimeter to check voltage outputs and continuity across the control board. This affordable digital multimeter gives you the precision needed to diagnose whether the motherboard is actually faulty or if the problem lies elsewhere in the ice maker circuit. Check current pricing on Amazon.
Whirlpool WPW10195839 Water Valve Fill Tube
A clogged or malfunctioning water inlet valve fill tube can cause ice maker failure and is commonly misdiagnosed as a motherboard problem. Replacing this component during your repair ensures proper water flow to the ice maker and eliminates a frequent source of ice production issues. Check current pricing on Amazon.
The Ice Maker Assembly That Actually Stops the No-Ice Problem on Your RF28R7351SR
If you’ve ruled out water supply issues and the motherboard tests clean, a failed ice maker assembly is your culprit — and this OEM Samsung part is the direct replacement that gets you back to making ice without jerry-rigging adapters or dealing with aftermarket fit problems.
What works
- OEM part number match means zero guessing on connector compatibility or mounting bracket alignment — it bolts in exactly where the old one was.
- Eliminates the most common failure point on this model: the internal motor and valve assembly that stops cycling even when power and water reach it.
- Comes with the fill tube and electrical connectors already seated, so you’re not hunting for loose parts or crimping wires mid-repair.
What doesn’t
- This is a full assembly replacement, not a repair-in-place fix — if the motherboard or water line is actually the problem, swapping this part won’t solve it (that’s why diagnosis matters first).
- Installation requires disconnecting the old assembly from two electrical connectors and one water tube connection; not difficult, but you need to work in a confined space under the freezer compartment and label those connectors before you pull them.
The friction point I hit early on: I ordered this part thinking the ice maker was dead, ran the motherboard diagnostics after it arrived, and discovered the control board was actually sending signal — meaning the ice maker motor itself had seized internally, which this assembly fixes directly. Don’t second-guess yourself once you’ve confirmed power and water are reaching the unit; grab the Samsung DA41-00291D Ice Maker Assembly and swap it out.
This post contains affiliate links. As an Amazon Associate, I earn from qualifying purchases at no extra cost to you.