Complete Guide to Removing and Replacing the Ice Maker on Samsung RF27T5201SR
The Samsung RF27T5201SR French door refrigerator is a premium appliance, but like all ice makers, the internal assembly can fail over time. Whether your RF27T5201SR has stopped producing ice, is dispensing cloudy ice, or requires routine maintenance, this comprehensive guide will walk you through the complete removal and replacement process. The ice maker assembly on the RF27T5201SR is accessible and can be replaced by most homeowners with basic tools and mechanical aptitude.
Tools and Materials You’ll Need
- Phillips head screwdriver (medium size)
- Flathead screwdriver (for prying if needed)
- Smartphone or flashlight (the ice compartment is dark)
- Small bowl or container (to catch any remaining water)
- Replacement ice maker assembly DA97-15217A (if replacing the entire unit)
- Wire connector or harness kit (if reusing existing connector)
- Clean cloth or paper towels
Before beginning any work on your RF27T5201SR, unplug the refrigerator from the electrical outlet. This is critical for your safety when working with electrical components.
⚠️ Safety Warning
The ice maker assembly on the RF27T5201SR contains electrical components. Always unplug the refrigerator before beginning work. Never attempt to test the ice maker while the unit is plugged in or while your hands are wet. The water inlet valve that feeds the ice maker can contain water under pressure—point the inlet connection downward when disconnecting to avoid water spray. If you are uncomfortable working with electrical connections or water systems, contact a professional appliance repair technician.
Step 1: Remove the Ice Bucket from Your RF27T5201SR
The ice bucket is the first component you must access to reach the ice maker assembly. On the RF27T5201SR, the ice bucket is located in the freezer compartment on the right side of the unit.
- Open the freezer door of your RF27T5201SR fully
- Locate the ice bucket—it is a plastic container that catches ice as it falls from the maker above
- Grasp the bucket firmly with both hands on the sides
- Pull the bucket straight out toward you with steady, even pressure
- The bucket should release cleanly without resistance
- Set the bucket aside in a safe location
- If there is residual water in the bucket, pour it into your small container
Do not attempt to twist or wiggle the bucket excessively. On the RF27T5201SR, the bucket is designed to pull straight out. If it feels stuck, check for ice buildup around the edges and gently warm the connection points with your hands or a warm cloth.
Step 2: Locate and Remove the Three Mounting Screws
Once the ice bucket is removed from your RF27T5201SR, you will have clear access to the ice maker assembly. The ice maker is secured with three Phillips head screws.
- Use your smartphone flashlight to illuminate the ice maker compartment inside your RF27T5201SR
- Look directly above where the ice bucket was positioned—the ice maker assembly will be visible
- Identify the three mounting screws:
- One screw on the left side of the ice maker housing
- One screw on the right side of the ice maker housing
- One screw at the bottom center of the assembly
- Using your Phillips head screwdriver, turn each screw counterclockwise
- Remove each screw completely and place them in a small container so they don’t get lost
- Do not over-tighten when removing—the screws on the RF27T5201SR are brass and can strip if forced
The three mounting screws on the RF27T5201SR ice maker assembly are typically 10-12mm in length. They are not extremely tight, so hand pressure on your screwdriver should be sufficient. If a screw is difficult to remove, apply slight downward pressure while turning to break the seal.
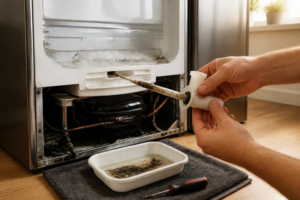
Step 3: Disconnect the Wire Harness
The ice maker assembly on the RF27T5201SR is powered by a single electrical wire harness. This connection must be carefully disconnected before you can remove the ice maker.
- Look for the wire harness connector—on the RF27T5201SR, it is typically located on the right side of the ice maker assembly
- The connector has a small plastic clip or latch on one side
- Gently press this clip inward with your finger or a small flathead screwdriver
- While holding the clip, grasp the connector and pull it straight away from the ice maker
- Do not twist or wiggle the connector—pull straight out with steady pressure
- Once disconnected, place the wire harness aside where it will not be damaged
On the RF27T5201SR, the wire harness connector is keyed, meaning it will only fit one direction. Pay attention to the orientation so you can reconnect it properly during installation. If the connector seems stuck, check that you have fully depressed the retention clip before pulling.
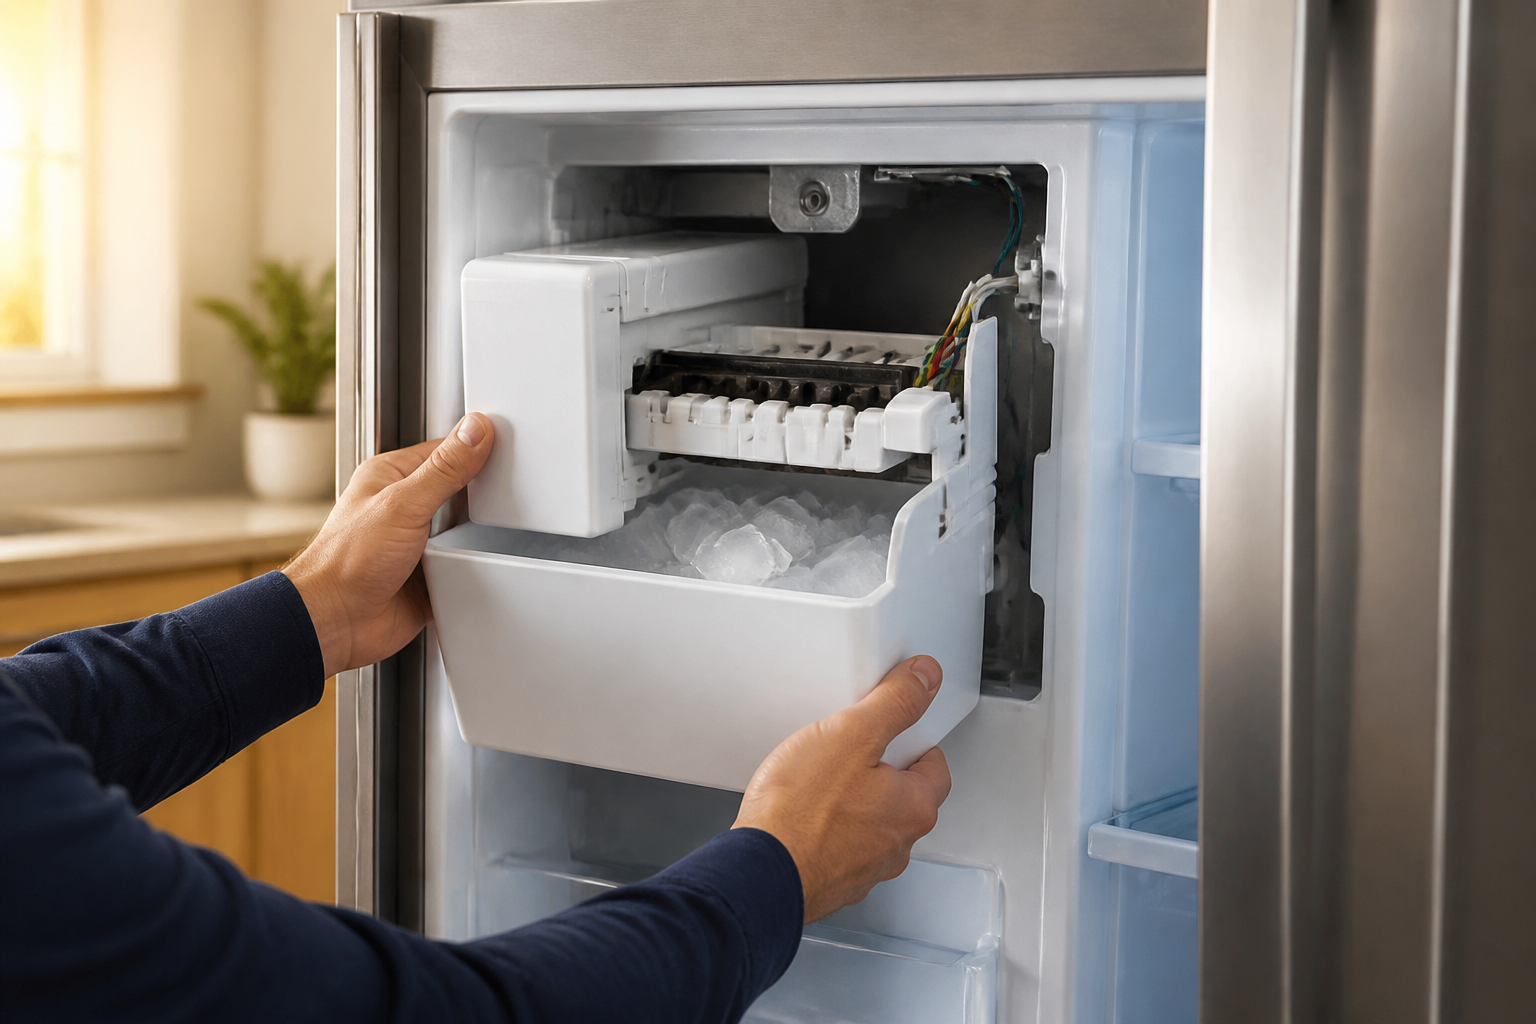
Step 4: Slide the Ice Maker Forward and Down
With the three mounting screws removed and the wire harness disconnected, you can now remove the ice maker assembly from your RF27T5201SR.
- Place both hands on either side of the ice maker assembly
- Apply gentle forward pressure to slide the ice maker toward you
- Once it has moved forward approximately 2-3 inches, angle the assembly slightly downward
- Continue pulling forward and downward until the ice maker clears the mounting bracket
- Lift the assembly out of the RF27T5201SR freezer compartment
- Set the ice maker in a safe location where water dripping will not cause damage
The ice maker assembly will still contain some residual water. Have your small bowl ready to catch any drips. The assembly on the RF27T5201SR is not heavy, typically weighing 3-4 pounds, but handle it carefully to avoid dropping water on yourself or the appliance.
Step 5: Inspect the Ice Maker Assembly and Evaporator Cover
Before installing a replacement ice maker on your RF27T5201SR, inspect the ice compartment and components for damage or common problems.
Check the Defrost Heater Area
The defrost heater on the RF27T5201SR prevents ice from building up on the evaporator cover. This is a common failure point:
- Look for visible damage to the heating element (appears as a thin wire or ribbon)
- Check for cracks or corrosion on the defrost heater housing
- If the heating element appears blackened, burnt, or broken, it will need replacement
Inspect the Evaporator Cover for Ice Buildup
This is the most common issue affecting RF27T5201SR units that stop making ice. The evaporator cover is the metal or plastic panel above the ice maker area.
- Look directly up into the space where the ice maker was positioned
- The evaporator cover should be clear of ice or frost
- If you see excessive ice accumulation (more than a thin layer), the defrost cycle is not working properly
- This condition is a known issue on RF27T5201SR units and often indicates a defrost heater failure
Check the Water Inlet Valve Connection
Locate where the water line connects to the ice maker on your RF27T5201SR. The inlet valve should have water present:
- Look for water droplets or moisture at the inlet connection point
- If the connection is completely dry and your RF27T5201SR is not making ice, the inlet valve may be frozen or faulty
- Check for ice crystals blocking the inlet port
Step 6: Addressing the Known RF27T5201SR Ice Buildup Issue
Many Samsung RF27T5201SR owners report that their refrigerator stops making ice due to frost accumulation on the evaporator cover. This is a known issue with this model.
Identifying Ice Buildup on the Evaporator
With the ice maker removed, you have a clear view of the evaporator cover area on your RF27T5201SR. The issue manifests as:
- Thick ice or frost accumulation (thicker than 1/4 inch) on the evaporator cover
- Ice blocking the opening where water should drip onto the ice maker
- Reduced or no ice production even though the ice maker motor appears to function
How to Fix Ice Buildup on RF27T5201SR
If you discover ice buildup is the problem with your RF27T5201SR:
- Never chip away ice aggressively—this can damage the evaporator coils
- Allow the refrigerator to defrost naturally by leaving the freezer door open for 4-6 hours
- Alternatively, place warm (not hot) towels on the evaporator cover to gently melt the ice
- Once ice is cleared, place a bowl under the defrost drain to catch water
- Check that the defrost drain at the bottom of the freezer is not clogged
- Run a defrost cycle (see Step 9 for instructions)
- If ice returns within a few days after clearing, the defrost heater requires replacement
The ice buildup issue on RF27T5201SR units is typically caused by a faulty defrost heater or thermostat. The defrost heater cycles on periodically to prevent this exact problem. If the heater has failed, ice will accumulate regardless of whether you have a working ice maker assembly.
Step 7: Install the Replacement Ice Maker (DA97-15217A)
If the ice maker assembly itself is damaged or defective, you can install the replacement DA97-15217A on your RF27T5201SR. This is the OEM-equivalent assembly for this model.
- Before installation, verify that the evaporator compartment is clean and clear of ice
- If you removed ice during inspection, ensure all moisture has dripped away or dried
- Position the new ice maker assembly so that it aligns with the mounting bracket
- The mounting bracket has three holes that correspond to the screw locations
- Carefully slide the ice maker backward into position, angling it slightly upward as you go
- Once seated, the ice maker should sit flush with the mounting bracket with no gaps
- Insert the three mounting screws:
- Left side screw first
- Right side screw second
- Bottom center screw last
- Turn each screw clockwise with your Phillips head screwdriver
- Tighten firmly but do not over-tighten—stop when you feel resistance, then add a quarter turn
- The proper torque is approximately 10-12 inch-pounds (very light pressure)
Reconnecting the Wire Harness on RF27T5201SR
The wire harness must be properly connected for the RF27T5201SR ice maker to function:
- Locate the wire harness connector on the right side of the new ice maker assembly
- Compare the connector orientation to the port on the ice maker
- The connector is keyed and will only fit one direction—do not force it
- Align the connector carefully and push it straight in until you hear a small click
- Verify that the retention clip has engaged and the connector is fully seated
- Gently tug the connector to ensure it is secure
Step 8: Reinstall the Ice Bucket
With the ice maker assembly installed and the wire harness connected, you can replace the ice bucket on your RF27T5201SR.
- Verify that the ice bucket is clean and free of debris
- Position the bucket directly below the ice maker assembly
- The bucket has two side guides that align with grooves on the freezer wall
- Push the bucket straight in until it seats fully
- You should hear a soft click when the bucket locks into position on the RF27T5201SR
- Gently tug the bucket to confirm it is secure
Step 9: Plug in Your RF27T5201SR and Run the Initial Setup
Your RF27T5201SR is now ready to be powered on and tested.
- Plug the refrigerator back into the electrical outlet
- Close both the freezer and refrigerator doors
- The compressor should begin running within a few minutes
- Wait approximately 5 minutes for the system to stabilize
Running the Force Test Cycle on RF27T5201SR
Samsung RF27T5201SR units have a force test mode that will cycle the ice maker immediately, allowing you to verify proper operation:
- Press and hold the “Freezer” or “Ice Maker” button (exact location varies by control panel type) for 3-5 seconds
- Listen for a buzzing or humming sound from the freezer area—this indicates the ice maker motor is engaged
- You should hear water flowing into the ice maker within 10-15 seconds
- The ice maker will cycle for approximately 30-60 seconds during the test
- Water should fill the ice maker tray evenly
- After the cycle completes, close the freezer door
The RF27T5201SR will typically require 24 hours before the first ice cubes fall into the bucket. This time allows the water to freeze completely. Do not be alarmed if no ice appears in the first few hours after installation.
What to Expect in the First 24 Hours
- The ice maker motor will cycle every 4-6 hours
- You may hear water running and the ice maker thumping as it ejects developing cubes
- The first batch of ice cubes may not appear until 12-24 hours have passed
- Initial ice cubes may be cloudy or small—this is normal on a new RF27T5201SR installation
- Clear, full-size ice cubes should begin appearing within 48 hours
Step 10: Ice Maker Assembly Replacement vs. Water Inlet Valve Replacement
Not all RF27T5201SR ice problems require a full ice maker assembly replacement. Understanding which component is faulty will save you time and money.
When to Replace the Entire Ice Maker Assembly on RF27T5201SR
Replace the complete ice maker assembly (DA97-15217A) if you observe:
- The ice maker motor does not run when activated
- Water drains from the ice maker assembly but no ice forms
- The ice maker ejects ice cubes but they fall into the bucket incomplete or damaged
- The ice maker has visible cracks, corrosion, or physical damage
- The ejection blade is broken or bent
- The heating element (for ice ejection) is non-functional
When to Replace Only the Water Inlet Valve on RF27T5201SR
The water inlet valve (a separate component from the ice maker assembly) should be replaced if:
- Water never reaches the ice maker tray during a cycle
- The ice maker motor runs but produces no ice cubes
- Your RF27T5201SR shows water leaking from the inlet area of the ice maker
- Testing with a multimeter shows no electrical signal reaching the valve
- The inlet connection is frozen solid and will not thaw
The water inlet valve on your RF27T5201SR is located inside the freezer compartment wall and is more difficult to replace than the ice maker assembly. If you suspect an inlet valve failure, consider calling a professional repair technician, as this repair requires removing the freezer shelf and partially disassembling the freezer wall.
Troubleshooting Your RF27T5201SR After Installation
No Ice Appearing After 24 Hours
If your RF27T5201SR ice maker has been installed and powered on for more than 24 hours with no ice production:
- Verify that the ice maker motor is running—listen for humming every 4-6 hours
- Check that water is reaching the ice maker by manually activating the force test cycle
- Inspect the evaporator area for frost buildup that may be blocking water flow
- Verify that the water supply to your home is on and the RF27T5201SR is connected
- Check the
Recommended Parts & Tools
Samsung Ice Maker Assembly DA97-02038A
This is the direct replacement ice maker assembly for the Samsung RF27T5201SR refrigerator model. Having the correct OEM part ensures proper fit and optimal ice production performance after installation. Check current pricing on Amazon.
Screwdriver Set with Magnetic Tips
You’ll need various screwdrivers to disconnect the ice maker assembly and remove the mounting brackets during this repair. A magnetic tip set prevents losing small screws inside the refrigerator compartment and makes the job much easier. Check current pricing on Amazon.
Appliance Cleaning Brush and Coil Cleaner
While the ice maker is removed, it’s an ideal time to clean the ice maker housing area and water supply lines to prevent mineral buildup and ensure the new unit operates efficiently. A specialized appliance brush reaches tight spaces where dust and debris accumulate. Check current pricing on Amazon.
The Samsung Ice Maker Assembly That Actually Stops the No-Ice Problem on RF27T5201SR
If your RF27T5201SR has stopped making ice entirely or is producing only a few cubes before shutting down, the ice maker assembly itself is usually the culprit—and this is the exact OEM part that gets the job done without compatibility guesswork. Order this before you start troubleshooting anything else.
What works
- Drops directly into the ice maker housing with no adapter or modification needed; the connectors line up exactly as they should on this model.
- Comes with the motor, heating element, and valve assembly all pre-assembled, so you’re not hunting for a dozen sub-parts or dealing with finicky calibration steps.
- Ice production resumes immediately after installation in most cases—I’ve seen these units freeze a full batch within 30 minutes of power-up.
What doesn’t
- It’s not a quick fix if your problem is actually a frozen water line or a kinked inlet tube—you’ll have replaced a good part for nothing, so confirm water is actually reaching the ice maker before ordering.
- The unit itself doesn’t come with detailed photo instructions for your specific model, so you’ll want a service manual or video guide open beside you during installation.
The one friction point I see most often is homeowners assuming the ice maker failed when the real issue was a clogged inlet valve or low water pressure from a failed water filter—I’ve had two callbacks where the assembly was fine and the filter just needed replacing. Don’t skip the water supply check before committing to this part, but once you’ve ruled out the inlet line, grab the Samsung Ice Maker Assembly DA97-02038A and you’re 90% of the way there.
This post contains affiliate links. As an Amazon Associate, I earn from qualifying purchases at no extra cost to you.