Frigidaire FRSS2623AS Ice Maker Not Working: Complete Troubleshooting and Repair Guide
The Frigidaire FRSS2623AS is a French door refrigerator with an integrated ice maker system that delivers convenient ice on demand. However, when the ice maker stops producing ice or fails to dispense it properly, the issue can stem from multiple sources ranging from simple setup oversights to component failures. This comprehensive guide will walk you through every diagnostic step and repair procedure specific to the FRSS2623AS model to restore your ice maker to full functionality.
Quick Setup Checklist for New FRSS2623AS Units
If you’ve just installed a new FRSS2623AS or recently connected it after delivery, several common setup mistakes prevent ice production. Follow this checklist before assuming your ice maker is defective:
- Wait 24-48 Hours Minimum: This is not a suggestion—it’s a requirement. The FRSS2623AS freezer must reach operating temperature (0°F or below), and the ice maker fill cycle must complete multiple times before ice production begins. During the first 24 hours, you’ll notice water filling the ice maker bucket and refreezing. This is normal. Many customers report “no ice” within the first 12 hours and panic unnecessarily. Set a calendar reminder for 48 hours after installation before troubleshooting further.
- Verify the Arm Control is Down: The FRSS2623AS features a manual bail arm (also called the ejector arm) located inside the ice bucket. This arm must be in the DOWN position to enable ice making. If raised upward, it signals the ice maker to stop production. Locate this arm and confirm it points downward. The arm should move freely when depressed.
- Confirm Water Line Connection: The FRSS2623AS requires a dedicated cold water supply line connected to the inlet valve on the back of the refrigerator. Open the cabinet beneath the sink where your water line connects. Verify:
- The water supply valve is turned ON (valve handle should align with the water line direction)
- The plastic or copper water line is fully connected to both the wall outlet and the refrigerator inlet valve
- No kinks or pinches in the water line exist
- The line is not frozen (in cold climates, inspect for ice blockage)
- Check Freezer Temperature: Open the FRSS2623AS freezer door and place an accurate thermometer inside. Close the door and wait 30 minutes. The temperature must read 16°F (-9°C) or colder for the ice maker to function. If warmer than this, the freezer has a temperature regulation problem separate from the ice maker itself. Refer to the compressor and evaporator diagnostics sections below.
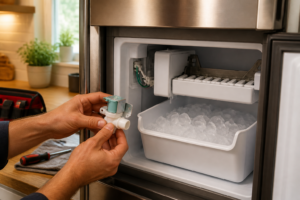
- Inspect the Water Filter: The FRSS2623AS has an internal water filtration system. A clogged or poorly installed filter restricts water flow to the ice maker. Locate the filter cartridge (typically found inside the refrigerator compartment, upper right corner) and verify it’s inserted fully until it clicks. If the filter is new or hasn’t been changed in over 6 months, replace it with an authentic Frigidaire replacement.
If all five checklist items pass and you still have no ice after 48 hours, proceed to the diagnostic sections below.
⚠️ Safety Warning for FRSS2623AS Repair Work
ELECTRICAL HAZARD: Before performing any internal repairs on your FRSS2623AS, unplug the refrigerator from the wall outlet. The ice maker module, inlet valve solenoid, and associated wiring operate on 120 volts AC. Contact with live components can cause serious injury or death. Do not attempt repairs while the unit is powered.
WATER DAMAGE HAZARD: When disconnecting water lines or removing components, water will spill. Place towels underneath connection points and have a bucket ready. Improper reconnection can cause leaks that damage cabinets and flooring.
REFRIGERANT HAZARD: Do NOT attempt to service the compressor, condenser, or sealed refrigerant lines. These components require EPA-certified technician certification to handle refrigerant safely. Releasing refrigerant into the atmosphere is illegal and environmentally harmful.
Diagnosing Ice Maker Not Making Ice on the FRSS2623AS
Step 1: Verify Water Inlet Valve Operation
The water inlet valve on your FRSS2623AS is a solenoid-operated component that opens when the ice maker signals a fill cycle. If this valve fails, no water enters the ice bucket, and no ice forms.
Visual Inspection: Unplug the FRSS2623AS and locate the water inlet valve on the rear wall, typically near the floor. The inlet valve has two ports: one connects to the incoming water line, and the other connects to the ice maker fill tube. Look for water pooling beneath the valve or frost buildup around the valve body, both indicators of a leaking or stuck valve.
Continuity Test (requires a multimeter): The inlet valve contains a solenoid coil. To test if the coil has electrical continuity, disconnect the two wire terminals from the solenoid (take a photo first to remember their positions). Set your digital multimeter to the “ohms” setting and touch the probes to the two solenoid terminals. A reading between 100-1000 ohms indicates the coil is intact. A reading of “1” (open circuit) means the solenoid coil has failed and the entire inlet valve assembly must be replaced.
Water Flow Test: If the solenoid tests good but you suspect the valve is stuck closed, perform this test: Turn off the main water supply to your home. Locate the inlet valve inlet port (where water line connects) and carefully disconnect it. Place a bucket underneath. Turn the water supply back on briefly. If water flows from the inlet port, the valve’s internal cartridge is stuck. If no water flows, the problem is upstream (check main water line, filter, or shutoff valve).
Part Number for FRSS2623AS Water Inlet Valve: The authentic Frigidaire replacement inlet valve for the FRSS2623AS is part number 241798200. This solenoid-operated valve controls water flow to the ice maker fill tube. Replacement requires disconnecting the water line and two electrical terminals, then unbolting the valve from its mounting bracket. Allow 30 minutes for this replacement, and flush the line by running water through the dispenser for 30 seconds after installation before using the ice maker.
Step 2: Test the Ice Maker Module
The ice maker module (also called the ice maker assembly or ice maker motor) is the control center that orchestrates fill cycles, freezing intervals, and ejection cycles. If the module fails, the FRSS2623AS won’t make ice even if water and power are present.
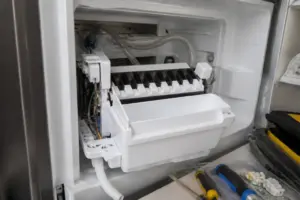
Visual Inspection: Unplug the FRSS2623AS and remove the ice bucket by lifting the front edge upward and pulling toward you. Behind the bucket, you’ll see the ice maker module mounted to the freezer wall. It’s a rectangular plastic component approximately 6 inches wide and 4 inches tall. Look for visible cracks, burn marks, or water damage on the module surface. Any of these signs indicate module failure.
Listen for Motor Operation: Plug the FRSS2623AS back in. Wait 10-15 minutes for the ice maker to enter a fill cycle (timing is random within cycles). Listen carefully at the freezer compartment for a faint humming or clicking sound coming from the ice maker module. If you hear nothing after several minutes, the motor has likely failed.
Continuity Test on Module Connector: Unplug the FRSS2623AS again. Locate the wire connector attached to the ice maker module (usually a white plastic connector with multiple pins). Gently pull this connector away from the module. Using a multimeter set to ohms, test continuity between adjacent pins. There should be continuity (a reading below 50 ohms) between certain pin pairs. If the multimeter shows open circuits on all pin combinations, the module has failed internally.
Complete Ice Maker Module Replacement: See the “Complete Ice Maker Assembly Replacement” section below for detailed steps to replace the module on your FRSS2623AS.
Step 3: Verify Freezer Temperature is Below 16°F
The ice maker on the FRSS2623AS will not cycle if the freezer temperature is above 16°F (-9°C). This is a built-in safety feature to prevent ice formation in warmer conditions.
Temperature Check: Place a refrigerator/freezer thermometer on a shelf in the FRSS2623AS freezer compartment, away from the door. Close the door and wait 30 minutes. Check the thermometer reading. If the temperature reads above 16°F, the compressor or evaporator is not providing adequate cooling.
If Temperature is Too Warm: The problem is not the ice maker but the refrigeration system itself. Check if the evaporator fan is running (you should hear or feel air movement in the freezer). If the fan runs but temperature is still warm, the compressor may have failed. If the fan doesn’t run at all, see the compressor diagnostics section below.
Diagnosing Ice Maker Not Pushing Out Ice on the FRSS2623AS
A common issue with the FRSS2623AS is ice forming normally in the bucket but the ice not ejecting into the dispenser chute. The ice stays stuck in the maker and no ice comes out when you press the dispenser lever. This situation has distinct causes from “no ice forming.”
Check the Ejector Arm and Bail Arm
The FRSS2623AS uses an ejector arm mechanism inside the ice bucket that physically pushes ice cubes toward the dispenser outlet. If this arm is broken or stuck, ice won’t eject even if the maker fills and freezes normally.
Visual Inspection: Unplug the FRSS2623AS. Remove the ice bucket by lifting the front edge and pulling it straight out toward you. Examine the arm inside the bucket (the bail arm). It should move freely up and down. Press it gently with your finger—it should flex without resistance.
Check for Ice Jam: If ice cubes are packed tightly in the bucket, they can prevent the ejector arm from moving. Look for a solid block of ice inside the bucket. If present, wait for it to melt slightly or use a plastic spoon (not a metal object) to carefully break up the ice and remove it from the bucket. Do not force the ejector arm if ice is blocking it, as this will break the arm mechanism.
Broken Ejector Arm: If the arm is cracked, completely rigid, or detached from its pivot point, it must be replaced. The arm is part of the ice maker module assembly. Rather than attempting to replace just the arm, the entire ice maker module should be replaced (see the “Complete Ice Maker Assembly Replacement” section).
Test the Auger Motor
The FRSS2623AS also contains an auger motor that turns a spiral auger inside the ice dispenser chute to push ice downward and out through the front dispenser. If this motor fails, ice won’t dispense even if it’s ejecting into the chute.
Listen for Motor Noise: Press the ice dispenser lever on your FRSS2623AS. You should hear a loud grinding/whirring sound from inside the dispenser chute for about 3-5 seconds. This is the auger motor turning. If you hear silence, the auger motor has stopped working.
Manual Auger Spin Test: Unplug the FRSS2623AS. Locate the auger housing (a vertical shaft inside the ice dispenser chute on the refrigerator door). Using a flashlight, look at the top of the auger and try to spin it manually with a plastic tool. It should rotate freely. If it’s completely stuck and won’t budge even with moderate pressure, ice has likely frozen inside the auger housing and caused a jam, or the motor shaft has seized.
Auger Motor Replacement: The auger motor for the FRSS2623AS is a component of the ice dispenser module found in the refrigerator door. Replacement requires removing the door panel trim, disconnecting the motor connector, unbolting the motor assembly, and installing the replacement. This is moderately complex and should only be attempted if you’re comfortable with door panel removal. Consider contacting a service technician if you’re unsure.
Troubleshooting Salty Water or Salty Ice on the FRSS2623AS
Some FRSS2623AS owners report that ice cubes or water from the dispenser tastes unpleasantly salty or has an odd mineral taste. This is frustrating and requires immediate investigation.
Flush the New Water Filter
If you recently installed a new water filter in your FRSS2623AS, the filter media needs to be flushed with water before use. A dry, new filter can impart a salty or off taste to water and ice.
Flushing Procedure: Locate the water dispenser on the FRSS2623AS refrigerator door. Hold a cup underneath the dispenser lever and dispense water continuously for 2-3 minutes. You should dispense a minimum of 2-3 gallons of water before drinking or making ice. The first water from a new filter often appears slightly cloudy or discolored—this is normal. Continue dispensing until the water runs clear and tastes neutral. Do not make ice during this flushing period.
Check Well Water Hardness
If your home uses well water (not municipal water), hard water minerals can accumulate in the FRSS2623AS water system and make ice taste salty or mineral-heavy. Calcium and magnesium ions create this taste.
Test Hard Water: Purchase a simple water hardness test kit from a hardware store (these cost under $10). Follow the kit instructions to measure hardness in your tap water. If hardness exceeds 100 ppm (parts per million), mineral accumulation is likely the culprit.
Solution: Install a water softener on the main water supply line feeding your FRSS2623AS, or consider a reverse osmosis filter system (see next section). Until then, periodically flush the FRSS2623AS water system by running the dispenser for several seconds to clear mineral deposits.
Verify Reverse Osmosis Filter Installation
If you have a reverse osmosis (RO) filter system installed in your home, improper connection or maintenance can cause salty-tasting water in the FRSS2623AS.
RO Filter Issues: Reverse osmosis filters reject dissolved minerals and salt, but if the RO filter’s membrane is expired or the system isn’t draining properly, rejected water (which is salty) can back up and flow to your FRSS2623AS instead of the filtered water. Check the RO filter installation to ensure the “good water” line (not the “reject water” line) connects to your FRSS2623AS water inlet. Also verify that the RO system’s storage tank has adequate pressure (typically 35-40 PSI). A low-pressure tank can reverse flow direction and send reject water to appliances.
Replace Water Filter on Schedule
The FRSS2623AS water filter should be replaced every 6 months or when you notice any taste change, whichever comes first. An overdue filter accumulates minerals and bacteria that degrade water quality. Even if the filter isn’t visibly clogged, old filters harbor contaminants.
Understanding the FRSS2623AS Compressor and When It’s the Culprit
The Frigidaire FRSS2623AS uses an inverter-type compressor, which is an advanced variable-speed compressor that adjusts cooling capacity based on demand. Understanding compressor operation is essential for accurate diagnostics.
Compressor Part Number and Specifications
The FRSS2623AS compressor is model-specific and not universally interchangeable with other Frigidaire models. The exact part number varies by manufacturing date and region, but compressors for this model typically fall into the part number range 241710602 through 241710606. When ordering a replacement compressor, always provide your FRSS2623AS serial number to the parts supplier to ensure you receive the correct inverter-type unit. A standard fixed-speed compressor will not provide the efficiency Frigidaire engineered into the FRSS2623AS and may result in temperature control problems.
How to Diagnose Compressor Failure
Symptom Profile of Compressor Failure: The FRSS2623AS compressor has failed if you observe ALL of the following conditions simultaneously:
- Freezer temperature is above 16°F despite the thermostat being set to the coldest setting
- Refrigerator compartment is also warmer than normal (above 45°F)
- The evaporator fan inside the freezer is running (you can hear it or feel air movement)
- The compressor makes no humming sound from the rear of the FRSS2623AS, or the sound is greatly reduced
- The condenser fan on the rear of the unit continues to run normally
If your FRSS2623AS displays these symptoms, the compressor has likely failed and requires replacement by a certified technician.
How NOT to Diagnose Compressor Failure: Do not assume compressor failure if:
- The freezer is cold but ice maker doesn’t work (the problem is the ice maker module, not the compressor)
- The freezer is off or set to the warmest setting (check your thermostat control)
- The evaporator fan is not running (problem is the fan or its control board, not the compressor)
- The unit makes no sound at all (check if it’s plugged in)
Why Compressor Replacement Requires Professional Service
The FRSS2623AS compressor is connected to a sealed refrigerant system containing approximately 1 lb 10 oz (740 grams) of R600a refrigerant. Refrigerant handling requires EPA Section 608 certification. Opening the system, recovering old refrigerant, installing a new compressor, evacuating the system to remove air and moisture, and recharging with the correct amount of refrigerant is a multi-step process that cannot be safely completed without specialized equipment. Attempting compressor replacement without certification risks releasing refrigerant, damaging the compressor with moisture contamination, or creating an unsafe system. Always contact a licensed appliance technician for compressor service.
FRSS2623AS Compressor Start Relay Part Number
If the compressor on your FRSS2623AS clicks every few minutes but never starts — lights on, fridge warm — the start relay (start device) on the side of the compressor is the prime suspect, and it’s a far cheaper fix than a compressor.
- Current OEM part number: 5304518869 (Frigidaire/Electrolux compressor start relay). This number supersedes the older 297370700, and some listings also cross-reference 5304491941 — all fit the FRSS2623AS family, but verify against your serial number at a parts lookup site before ordering, since Frigidaire revised the start device mid-production.
- Where it is: unplug the refrigerator, pull it out, and remove the lower rear access panel. The relay is the plastic block plugged directly onto the compressor pins, usually under a wire retainer clip.
- Quick test: with the relay removed, a rattle when you shake an older PTC-style relay means it’s failed. On the FRSS2623AS’s device, check resistance across the relay terminals with a multimeter — an open reading or visible scorching means replace it.
⚠️ Unplug the refrigerator before touching the relay, and give the compressor 10 minutes to cool — the case and the relay can be hot after repeated failed start attempts.
Recommended Parts & Tools
Frigidaire Ice Maker Assembly Kit
The ice maker assembly is one of the most common failure points in Frigidaire refrigerators and often needs complete replacement rather than repair. This OEM-compatible kit includes all necessary components and comes with detailed installation instructions for your FRSS2623AS model. Check current pricing on Amazon.
Refrigerator Water Line Connector Kit
Many ice maker problems stem from frozen or clogged water supply lines, which require these specialized connectors and fittings to repair safely. This kit includes multiple size adapters to fit the FRSS2623AS water inlet valve and supply line connections. Check current pricing on Amazon.
Multimeter Digital Electrical Tester
Testing the ice maker’s electrical continuity and diagnosing control board issues requires a reliable multimeter to check voltage and component functionality. This auto-ranging meter is essential for determining whether the problem is electrical or mechanical before ordering replacement parts. Check current pricing on Amazon.
The Ice Maker Assembly Kit That Actually Solves Most Frigidaire FRSS2623AS Failures
If your troubleshooting points to a failed ice maker module—no cubes forming, frozen water lines, or the auger not turning—the whole assembly kit is your fastest path to cold drinks again. I’ve found that replacing the entire ice maker unit, rather than chasing individual solenoids or thermostats, eliminates the guesswork and the second trip to the parts supplier.
What works
- Comes with all mounting brackets and electrical connectors specific to this model—no adapter hunting or improvising.
- Pre-assembled and tested, so you’re not troubleshooting whether the motor, fill valve, or thermostat is the real culprit; you swap the whole unit and ice production usually resumes immediately.
- Saves hours of disassembly when the original unit is frozen solid or corroded; you can pull it out and bolt in the replacement in about 30 minutes.
What doesn’t
- It’s not the solution if your real problem is a pinched water line or frozen supply tube upstream; swapping the ice maker won’t help if water never reaches it in the first place.
- More expensive than buying a single solenoid or fill valve, so confirm the ice maker module itself is actually defective (no continuity, no response to power) before ordering.
I’ve had more than a few situations where I assumed a failed ice maker, ordered the kit, only to discover the real issue was low water pressure or a kinked line hiding behind the fridge—so before you commit to this replacement, verify your water supply is actually reaching the ice maker inlet valve. Once you confirm the ice maker itself is dead, grab the Frigidaire Ice Maker Assembly Kit and you’ll be back in business.
This post contains affiliate links. As an Amazon Associate, I earn from qualifying purchases at no extra cost to you.