Euhomy Ice Maker Water Intake Leak: Complete Troubleshooting and Repair Guide
Water leaks in the intake system of an Euhomy countertop ice maker are one of the most common problems homeowners encounter. A leak in the water reservoir, pump connections, or drainage system can damage your countertop, waste water, and prevent the ice maker from functioning properly. This guide walks you through identifying exactly where your Euhomy is leaking and how to fix it yourself.
⚠️ Safety Warning
Before beginning any repair work on your Euhomy ice maker:
- Unplug the unit completely from the electrical outlet. Do not rely on the power button alone.
- Wait 5-10 minutes for any residual electrical charge to dissipate.
- Empty the water reservoir completely before opening the case or working with water connections.
- Place towels or a drip pan underneath the unit to catch water spillage.
- Do not operate the unit while disassembled or with the case open.
- Do not submerge electrical components in water during cleaning.
Identifying the Leak Source: Initial Diagnosis
Your first step is determining where water is actually escaping. Different leak locations require different solutions. Follow these diagnostic steps:
Step 1: Observe Where Water Appears
Watch your ice maker during operation (or fill it and let it sit) and note:
- Water pooling inside the unit beneath the reservoir suggests a crack in the tank or loose pump connection
- Water dripping from the bottom of the case indicates a loose drain plug or cracked tank
- Water around the pump area points to a disconnected intake hose or loose fitting
- Water streaming from the side or back could be the overflow tube operating normally (see section below)
- Wet external walls suggest internal condensation or a serious tank breach
Step 2: Check for Obvious Overflow Tube Discharge
Locate the small overflow tube (typically 1/4-inch diameter clear or white plastic) running from the water reservoir area toward the back or side of the unit. The overflow tube is a safety mechanism that drains excess water when the reservoir is overfilled. This is normal operation and not a leak. Water flowing from this tube during or immediately after filling is expected. If water only appears from this tube, no repair is needed.
Step 3: Drain and Inspect the Interior
Empty any remaining water from the reservoir by tilting the unit slightly or using a siphon. Use a flashlight to peer inside through the water inlet opening. Look for:
- Visible cracks in the plastic reservoir walls
- Moisture collecting in the base of the unit
- Disconnected tubing or loose fittings
- The drain plug position at the lowest point
Water Reservoir Cracks and Damage
The water reservoir is a plastic tank that stores your fill water. Cracks can develop from freezing damage, impact, or age-related brittleness.
Identifying a Cracked Reservoir
A cracked tank will leak water continuously or whenever filled, regardless of whether the unit is running. The leak typically appears inside the case, pooling near the base. Small hairline cracks may only leak slowly when the tank is completely full.
Temporary Repair: Waterproof Epoxy or Sealant
For small cracks (less than 1/4 inch), a temporary repair is possible:
- Unplug the unit and remove the water reservoir completely (see case opening procedure below).
- Drain all water from the tank into a sink.
- Dry the area thoroughly with paper towels. Moisture prevents sealant from adhering.
- Inspect the crack on both the interior and exterior surfaces of the tank.
- Use two-part epoxy putty (such as J-B Weld Plastic Bonder or equivalent) rated for food-contact surfaces and waterproofing. Knead the putty until uniformly colored.
- Press the putty firmly into the crack, covering slightly beyond the damaged area on both sides if accessible.
- Smooth with a wet finger for better adhesion.
- Allow to cure completely per product instructions (typically 24 hours before water contact).
- Test the repair by filling the tank and letting it sit for 30 minutes over a towel before reinstalling.
Important: This repair is temporary. Epoxy seals may fail under repeated thermal stress from freezing cycles. Plan to replace the reservoir or unit if the crack recurs.
Permanent Solution: Reservoir Replacement
Most Euhomy models allow you to replace the water reservoir as a separate component. To replace the reservoir:
- Unplug the ice maker completely.
- Open the case following the procedure below (typically requires removing 4-6 screws from the bottom).
- Disconnect the intake hose from the bottom of the reservoir. This is usually a push-fit connector—gently wiggle and pull straight out.
- Note the reservoir position and any mounting brackets or clips.
- Remove the old reservoir by gently maneuvering it out of the case.
- Position the new reservoir in the same location, ensuring it sits level.
- Reconnect the intake hose by pushing it firmly onto the reservoir connection until you hear or feel a click. The hose should not slide off with gentle tugging.
- Close the case and reinstall all screws securely.
- Test for leaks by filling the reservoir and running a short cycle while monitoring for water.
Replacement reservoirs for Euhomy units typically cost $25-$45. Check your specific model number on the bottom or back of your unit to order the correct part.
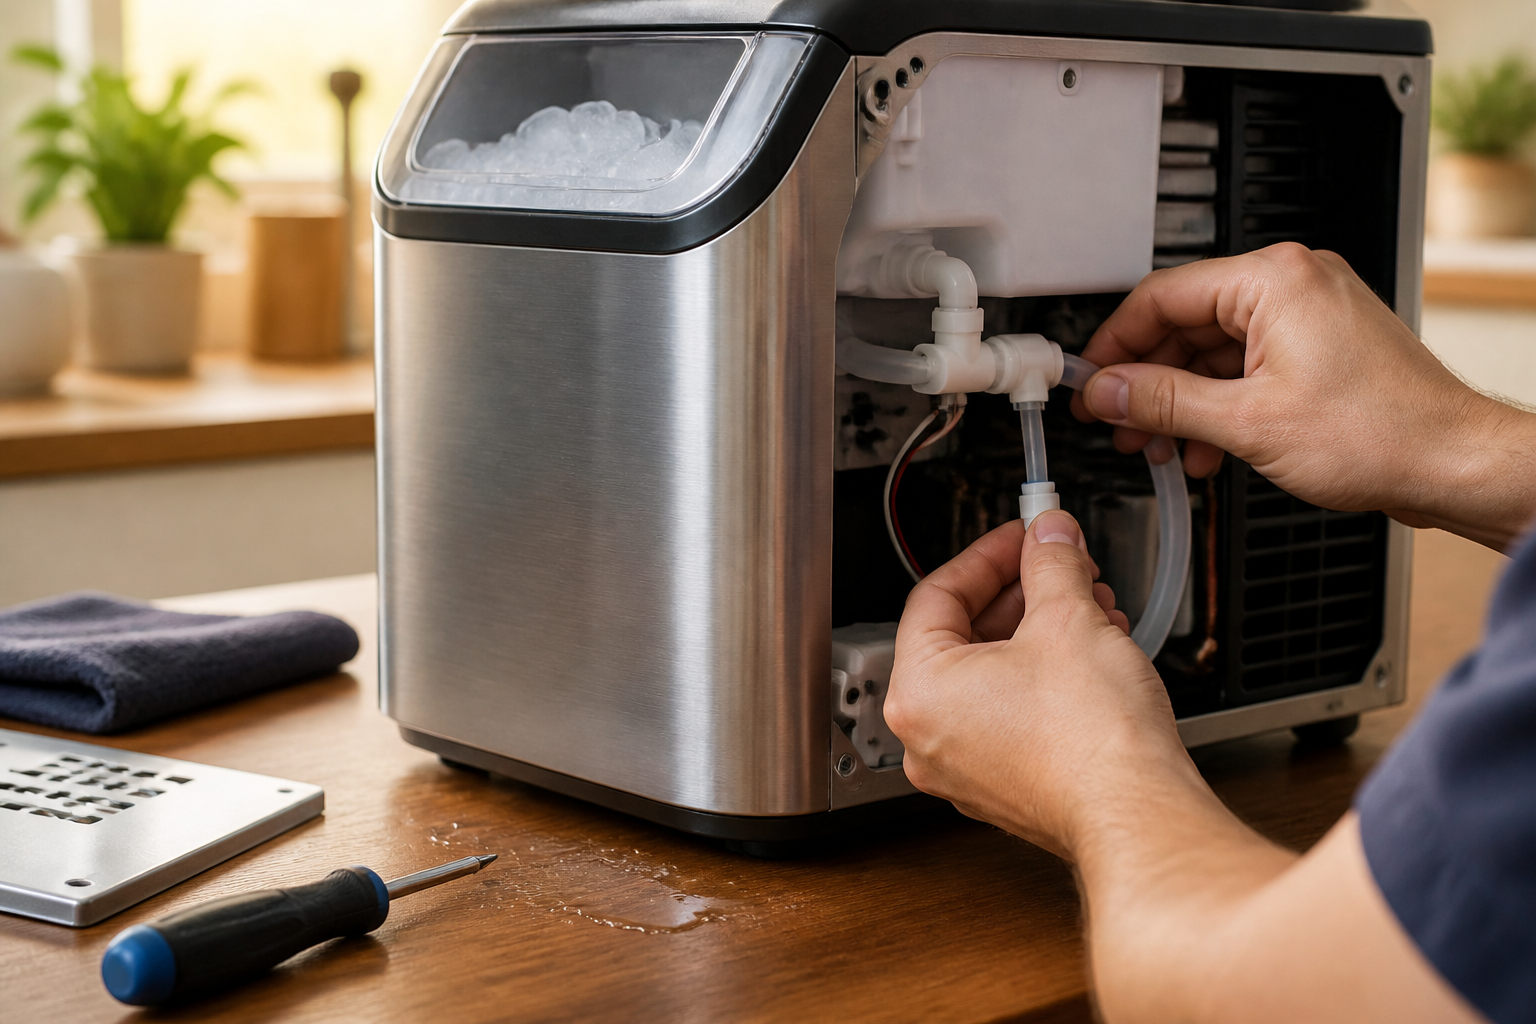
Water Pump Intake Connection: Loose Fittings
The intake hose connects the water reservoir to the pump. This hose has two connection points: one at the reservoir outlet and one at the pump inlet. Both use push-fit connectors that can loosen over time.
Locating the Pump and Intake Connection
After opening the case (see below), you’ll see the water pump mounted in the lower section of the unit. It’s typically a small rectangular device with electrical connections and tubing. The intake hose (usually clear plastic, 1/4-inch diameter) runs from the reservoir downward to the pump’s inlet port.
Reseating a Loose Intake Hose
If you notice moisture around the pump area but no visible cracks in the reservoir:
- Unplug the unit completely.
- Open the case by removing the screws from the bottom (see detailed procedure below).
- Locate the intake hose connection at both the reservoir outlet and the pump inlet.
- Gently wiggle the hose where it connects to the pump inlet. If it moves freely, it’s loose.
- Pull the hose straight out from the pump inlet with a gentle, steady motion.
- Inspect the hose end for cracks, splits, or deformation. If damaged, the hose should be replaced (see section below).
- Inspect the pump inlet port for cracks or rough edges that might prevent a tight seal.
- Push the hose firmly back onto the pump inlet in a straight line. You should feel resistance and hear a subtle click as it seats fully. The hose should not slide off with moderate hand pressure.
- Check the reservoir end connection the same way. Pull gently, inspect, and reseat firmly.
- Close the case and test by filling the reservoir and monitoring for leaks during a cycle.
Replacing a Cracked or Kinked Intake Hose
If the hose is visibly cracked, split, or permanently kinked, replacement is necessary:
- Unplug and open the case.
- Disconnect both ends of the intake hose from the reservoir and pump.
- Note the hose length and diameter (typically 1/4-inch OD, 12-18 inches long for Euhomy models).
- Measure the hose or remove it completely and take it with you to verify specifications.
- Order a replacement hose with the same inner diameter (ID) and outer diameter (OD). Food-grade silicone tubing rated for temperatures up to 140°F is ideal.
- Install the new hose by pushing it firmly onto both connection points until fully seated.
- Ensure no kinks exist in the hose, as these restrict water flow and can cause pump cavitation (air entering the pump).
- Close the case, fill, and test.
Pump Outlet Hose and Evaporator Connection
Water flows from the pump through a discharge hose to the evaporator (freezing plate) where ice forms. Although this hose is part of the water system, leaks here appear differently than intake leaks—water will drip from the inside of the unit during ice-making cycles, not from the reservoir area.
Identifying Pump Outlet Leaks
A cracked pump outlet hose (typically 1/4-inch clear plastic running from the pump upward into the case) produces water inside the ice-making chamber or dripping into the interior case. This is distinct from water pooling in the base near the reservoir.
Inspecting and Replacing the Outlet Hose
- Unplug the unit and open the case.
- Follow the hose from the pump outlet upward into the evaporator area.
- Look for visible cracks, splits, or cloudy discoloration indicating age-related brittleness.
- Disconnect both ends of the hose from the pump outlet and evaporator inlet.
- Replace with a food-grade silicone hose of the same diameter and length.
- Ensure the hose routing doesn’t kink or pinch when the case is closed.
- Test by running an ice-making cycle and checking for water inside the case or dripping into the bin.
Overflow Tube: Normal Operation vs. Actual Leaks
Many Euhomy users mistake the overflow tube for a leak. Understanding this component prevents unnecessary repairs.
What the Overflow Tube Does
The overflow tube is a small-diameter (typically 1/8 to 1/4 inch) plastic tube extending from the water reservoir area to the exterior or interior drain. When you fill the reservoir past a certain level, or if water enters the tank faster than the pump can dispense it, excess water flows through this tube to prevent overfilling and damage to the pump.
When Overflow Tube Discharge Is Normal
- During or immediately after filling the reservoir with water. If you fill past the maximum line (usually marked inside the tank), water will flow from the overflow tube.
- When the float valve (if equipped) is stuck in the open position, allowing continuous water entry. This is a separate issue from overflow tube function.
- Water should stop flowing from the overflow tube within 1-2 minutes after filling stops.
Troubleshooting Continuous Overflow Tube Flow
If water continuously drains from the overflow tube even when the reservoir is not being filled:
- Check the float valve inside the reservoir. Some Euhomy models have a small float that rises as water level increases, closing an inlet valve when full. A stuck float allows continuous water entry.
- Gently move the float by hand (if accessible without major disassembly) to see if it moves freely. If stuck, it may need cleaning or replacement.
- Ensure the reservoir is not overfilled. Fill only to the marked “MAX” line.
- Verify the overflow tube is not kinked or blocked, which could cause water to back up into the case interior instead of draining out.
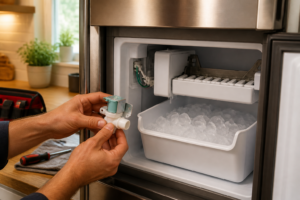
Drain Plug: The Bottom Leak Point
At the lowest point of the Euhomy case (usually the bottom center), a drain plug allows you to empty the system for cleaning or storage. This plug is a common leak source when not fully seated.
Locating and Inspecting the Drain Plug
Flip the unit upside down (carefully, after emptying all water) and look for a small rubber or plastic plug with a threaded insert or push-fit design. This is typically 3/8 to 1/2 inch in diameter.
Reseating a Loose Drain Plug
- Unplug the unit and empty all water from the reservoir and internal passages.
- Locate the drain plug on the bottom of the case.
- If the plug is a screw-in type, turn it clockwise by hand until it stops. Do not overtighten, as this can crack the plastic threads.
- If the plug is a push-fit rubber stopper, ensure it is pushed completely into the opening until flush with the case bottom.
- Wipe the area dry and place the unit on a clean, dry surface.
- Fill the reservoir and let the unit sit for 30 minutes while watching underneath for drips.
Replacing a Damaged Drain Plug
If the plug is cracked, missing threads, or doesn’t seal when fully seated:
- Remove the old plug by unthreading it or pulling it out, depending on the design.
- Note the size and type of the plug.
- Obtain a replacement drain plug from the manufacturer or a compatible universal equivalent. Euhomy drain plugs are typically plastic screw-in plugs with 3/8-inch or 1/2-inch threads.
- Install the new plug by carefully threading it (if applicable) until snug, or pushing it in fully.
- Test for leaks as described above.
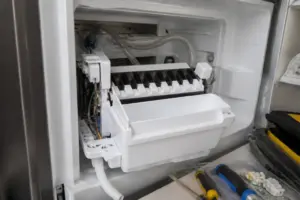
Case Opening Procedure for Euhomy Ice Makers
Most water intake issues require opening the case to access internal components. This procedure is consistent across standard Euhomy countertop models.
Tools and Materials Needed
- Screwdriver set (Phillips and possibly flathead, depending on screw types)
- Towels or drip pan
- Flashlight for internal inspection
- Container for removed screws and small parts
Step-by-Step Case Opening
- Unplug the ice maker completely from the electrical outlet.
- Empty the water reservoir by draining through the access point or tilting the unit.
- Place towels underneath and around the unit to catch any water spillage.
- Flip the unit upside down or access the bottom panel. Most Euhomy models have the case screws on the underside (typically 4-6 screws).
- Locate and remove all screws holding the bottom or rear panel. Use the correctly sized screwdriver to avoid stripping the screw head.
- Carefully lift the case panel away from the unit. Be gentle—internal tubing and electrical connections may still be partially attached.
- Support the panel with your other hand as you lift to prevent stressing any connected components.
- Once fully separated, set the panel aside on a clean surface where you can view the internal layout.
- Document the internal arrangement with a photo using your phone before making any changes. This helps during reassembly.
- Locate the water reservoir, pump, intake hose, and drain plug as described in relevant sections above.
- Perform your repairs (hose reseating, epoxy application, etc.).
- Reassemble by carefully aligning the case panel with the unit body.
- Reinstall all screws in their original positions, tightening evenly in a cross pattern to ensure even seating.
- Plug the unit back in
Recommended Parts & Tools
Euhomy Ice Maker Water Inlet Valve Replacement Kit
A faulty water inlet valve is the most common cause of water leaks in Euhomy ice makers. This replacement kit includes the valve and necessary fittings to restore proper water flow control and eliminate leaks at the intake connection. Check current pricing on Amazon.
Teflon PTFE Plumber’s Tape (Thread Seal Tape)
When reattaching water lines during this repair, thread seal tape prevents leaks at connection points by creating a watertight seal on threaded fittings. This is an essential consumable for any ice maker water intake repair to ensure connections remain leak-free. Check current pricing on Amazon.
Adjustable Wrench Set with Slip Joint Pliers
These tools are necessary for disconnecting and reconnecting water supply lines and tightening fittings during the water inlet valve replacement. Having the right grip tools prevents stripped fittings and ensures secure connections that won’t leak. Check current pricing on Amazon.
The Inlet Valve Replacement Kit That Actually Stops Euhomy Water Leaks at the Source
If you’ve traced the leak to the water inlet valve or its connection point, this kit is what you’ll reach for first—it includes the valve itself plus all the fittings and seals you need to replace the entire intake assembly without hunting down mismatched parts.
What works
- The valve itself is a direct OEM-spec replacement that fits the Euhomy mounting bracket without modification or forcing.
- All rubber seals and washers are included, so you’re not reusing worn gaskets that caused the leak in the first place.
- The kit comes with the correct barbed fittings for both the input water line and the solenoid connections, eliminating mismatches between aftermarket parts.
What doesn’t
- You’ll still need to disconnect the water supply line and drain the reservoir before installation—the kit doesn’t do the disassembly work for you.
- If your leak is actually in the pump outlet or drainage tube rather than the intake valve, this kit won’t fix it and you’ll need to diagnose further before ordering.
I’ve seen plenty of homeowners buy generic plumbing connectors first, only to find they don’t seat properly on the Euhomy’s barbed ports and create an even worse leak. This kit eliminates that guesswork. Euhomy Ice Maker Water Inlet Valve Replacement Kit
This post contains affiliate links. As an Amazon Associate, I earn from qualifying purchases at no extra cost to you.