Bottom Freezer Leaking Water & Ice Sheet Under Basket: Frozen Defrost Drain Repair Guide
A sheet of ice coating the freezer floor and water pooling on your kitchen floor is one of the most common and fixable refrigerator problems. In over 90% of cases, the culprit is a frozen or clogged defrost drain. The defrost system produces gallons of meltwater every day, and when that water can’t escape through the drain, it pools on the freezer floor, refreezes into a thick ice sheet, and eventually overflows out the door and onto your kitchen floor.
This guide walks you through diagnosing a frozen defrost drain, melting the ice, clearing the blockage, and—most importantly—preventing it from happening again by repositioning or installing a drain strap that keeps the drain warm during the defrost cycle.
How Your Refrigerator’s Defrost System Works
Understanding the defrost cycle is essential for fixing this problem yourself. Unlike older manual-defrost freezers, modern refrigerators use an automatic defrost system that works around the clock.
Every 8 to 12 hours, the defrost heater (a heating element wrapped around or near the evaporator coil) turns on and melts the frost that has accumulated on the coil. That frost layer is unavoidable—it forms because humid air inside the fridge condenses and freezes on the cold evaporator. The melted water (defrost water) drains through a small opening at the back or bottom of the freezer compartment, flows down through a plastic drain tube or channel, and exits into an evaporation pan located underneath the refrigerator near the compressor.
In the evaporation pan, warm air from the compressor fan evaporates the water, which is then expelled outside the fridge. This is why a running refrigerator normally produces very little visible water—it all evaporates.
When the defrost drain freezes or clogs, defrost water backs up and pools on the freezer floor instead of draining away. Over hours or days, this water refreezes into a thick, hard sheet of ice. As more defrost cycles occur and more water accumulates, the ice sheet grows, and eventually water overflows past the door gasket onto your kitchen floor.
Quick Diagnosis: Confirming It’s a Frozen Defrost Drain
Before you start any repair, verify the problem:
- Unplug the refrigerator at the wall outlet for safety.
- Open the freezer door and remove all baskets, shelves, and food. Look at the floor of the freezer compartment. If you see a thick sheet of ice covering most or all of the floor, this is a strong indicator of a frozen drain.
- Locate the drain hole. Depending on your brand and model, the drain opening is typically in one of two locations:
- Center rear floor: Many Whirlpool, Maytag, GE, and Frigidaire models have the drain hole in the center of the freezer floor, at the very back. It’s a small hole (roughly ¼ inch diameter) that may be partially hidden under the ice sheet.
- Behind the rear interior panel: Some Samsung and LG bottom-freezers require you to remove the rear plastic panel to access the drain hole. Look for a small duct or channel that leads downward.
- Check for standing water. If you see water pooling anywhere on the freezer floor or if the ice sheet is very thick and hard, a frozen drain is almost certainly the cause.
Step-by-Step Repair: Thawing and Clearing the Drain
Materials You’ll Need
- Towels and a shop towel or old cotton rags
- Hot water (from your tap, not boiling—120–130°F is ideal)
- A turkey baster or spray bottle filled with hot water
- A flexible plastic tube or pipe cleaner (optional, for stubborn clogs)
- A small flashlight or headlamp
- A bucket to catch water runoff
- Multimeter (optional, for testing the defrost heater if ice returns)
Step 1: Thaw the Ice Sheet on the Freezer Floor
- Make sure the refrigerator is unplugged. This is critical—you’ll be working with water near electrical components.
- Lay several layers of towels on the kitchen floor in front of the freezer to catch water runoff.
- Place towels inside the freezer as well, around the perimeter, to channel melting water toward the drain hole.
- Fill a turkey baster or spray bottle with hot (not boiling) tap water. If you don’t have a baster, you can pour hot water from a cup very slowly.
- Pour or spray hot water directly onto the ice sheet, starting at the edges. The ice will begin to crack and melt. Repeat several times, allowing the ice to soften. Do not use a sharp tool or chisel to break the ice—you risk puncturing the freezer lining or damaging the drain tube.
- As the ice softens, gently pry or push broken chunks toward the drain hole using a wooden spoon or your hand. Remove large chunks and place them in a bucket.
- Continue pouring hot water until the ice sheet is completely gone and the freezer floor is clear.
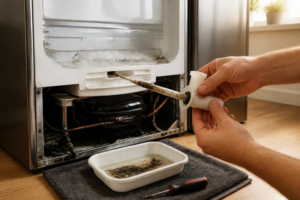
Step 2: Locate and Clear the Drain Hole
- Once the ice is melted, locate the drain hole at the rear center of the freezer floor. Use a small flashlight to peer inside the opening and check for visible debris, ice, or blockages.
- If you see debris or slime buildup (common in older refrigerators), use a thin plastic pipe cleaner, a straightened wire coat hanger, or a small flexible brush to gently probe and scrape the inside of the drain opening. Work slowly and carefully—the drain tube is fragile.
- Fill the turkey baster with hot water and insert the tip directly into the drain hole. Gently squeeze the hot water down the drain in several bursts. You should hear or feel water flowing through the tube.
- If water backs up and pools around the drain hole, the blockage is further down the drain tube or at the drain pan. Continue flushing with hot water, pausing between bursts to allow the water to flow.
- Once water flows freely through the drain hole and you can hear it trickling down, the drain is clear. Place a bucket under the refrigerator (where the drain pan is located) to catch any remaining water flowing from the tube.
Step 3: Inspect and Clean the Drain Hole and Surrounding Area
- Use a damp cloth to wipe away any remaining debris, mold, or slime from the drain hole and the freezer floor around it.
- Pour one final shot of hot water down the drain to ensure it’s clear.
- Dry the freezer floor thoroughly with towels.
If the drain remains clogged after multiple flushing attempts, the blockage may be in the drain tube or drain pan itself, which is located outside the freezer compartment. See the section “When It’s NOT Just the Drain” below for guidance on accessing and clearing the tube further down the line.
Why the Drain Refreezes: The Drain Strap Solution
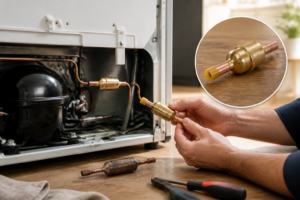
This is the critical part many DIYers miss. After you clear the drain, it may freeze again within a few days or weeks—especially if the drain is not insulated or heated. The reason: the defrost drain is exposed to freezing temperatures inside the freezer compartment. Between defrost cycles, the water remaining in the drain refreezes, slowly clogging the tube again.
Most major appliance manufacturers—including Whirlpool, Maytag, GE, Samsung, and Frigidaire—designed their refrigerators with a small heating element or thermal strap clipped to the defrost heater that extends into or near the drain opening. This strap warms the drain tube during the defrost cycle to prevent water from refreezing inside the tube.
Checking if Your Drain Strap Is Missing or Mispositioned
- Unplug the refrigerator.
- Remove all baskets from the freezer.
- Locate the defrost heater element. On most models, it’s a U-shaped heating element located near the rear of the freezer, below the evaporator coil. It may be covered by a plastic shield or bracket.
- Look for a small metal or plastic clip attached to the heater element with a thin rod or strap extending from it. This strap should run into or very close to the drain hole opening. If the strap is visibly bent, disconnected from the heater, or not positioned near the drain hole, it’s not functioning.
- On some Samsung and LG models, the drain strap may be clipped to a thermal probe that sits directly in the drain opening. If this probe is missing or loose, the drain will refreeze.
Repositioning or Replacing the Drain Strap
If the strap is present but mispositioned:
- Gently unclip the strap from its current position.
- Bend or position it so that it runs directly into the drain hole or sits as close as possible to the drain opening. The goal is for the strap to heat the drain area during defrost cycles.
- Reclip it in place or secure it with a small zip tie if the original clip is broken.
If the strap is missing entirely, you have two options:
- Aftermarket drain heater kit: Third-party manufacturers sell universal or model-specific drain heater kits designed to warm the defrost drain. These kits include a heating element and instructions for installation. Verify the kit is compatible with your refrigerator model before ordering.
- OEM drain strap: Contact your refrigerator manufacturer (or check a parts site) to order the correct drain strap or thermal probe for your model. OEM parts ensure a proper fit, but they may be more expensive than aftermarket alternatives.
In the short term, if you don’t install a drain strap immediately, you may need to flush the drain with hot water every week or two to prevent refreezing.
Brand-Specific Issues and Notes
Samsung Bottom-Freezers and Side-by-Sides
Samsung refrigerators—particularly bottom-freezer and side-by-side models—are notorious for frozen defrost drains. Samsung’s design includes a small thermal probe or “drain clip” that is supposed to stay in the drain opening and conduct heat from the defrost heater into the drain tube. Over time, this clip can become loose, fall out, or be accidentally removed during cleaning. If you own a Samsung and experience repeated frozen drains, check that the drain probe is firmly seated in the drain hole. Samsung also issued service bulletins for certain model years regarding drain clogging; if your model is affected, contact Samsung support for a potential warranty repair or for our detailed guide on clearing a clogged defrost drain on the Samsung RS27T5200SR side-by-side.
Whirlpool and Maytag
Whirlpool and Maytag refrigerators often route defrost water through a plastic P-trap located at the bottom of the freezer compartment or just outside it. This P-trap is notorious for clogging with food debris, lint, and mineral deposits. When clearing the drain, also check the P-trap (usually accessible by removing the rear panel or bottom baskets). Run hot water through the entire length of the drain tube to clear the trap. Some technicians recommend periodically flushing the P-trap with a mixture of hot water and white vinegar (50/50) to dissolve mineral buildup.
Frigidaire
Frigidaire models, such as the FFHT1821TS, frequently develop frozen drains because the drain tube routing is more prone to kinking when food is stored too close to the rear wall or when the fridge is positioned at a slight angle. After clearing the drain, inspect the entire length of the drain tube for kinks or pinches. If you find a kinked section, gently straighten it. Also check that the rear freezer panel (if present) is fully seated, as a loose panel can alter the tube’s path. For detailed guidance specific to Frigidaire models, see our guide on Frigidaire FFHT1821TS drainage problems.
Preventing Frozen and Clogged Drains: Maintenance Tips
Don’t Block the Drain Hole
The number one reason drains clog is that food items, ice accumulation, or packaging materials block the drain opening. Make it a habit to check the freezer floor monthly and ensure nothing is sitting directly over the drain hole. On bottom-freezer models, avoid storing heavy or bulky items against the rear wall.
Occasional Drain Flushing
Every 3–6 months, unplug the refrigerator and flush the drain with a turkey baster of hot water. This keeps mineral deposits and slime from building up inside the tube. If you live in a high-humidity area or use your refrigerator heavily, flush more frequently.
Check and Clean the Door Gasket
A damaged or dirty door gasket allows humid outside air to enter the fridge, increasing frost buildup on the evaporator and therefore increasing the volume of defrost water. Inspect the rubber gasket monthly for cracks, tears, or mold. Clean it with a damp cloth and mild soap, and replace it if it no longer seals tightly. A failing gasket is often the root cause of chronic frozen drain problems.
Ensure the Drain Pan Is Clean
The evaporation pan under the refrigerator can become clogged or moldy, which can back up water and cause it to drip onto the floor even if the freezer drain is clear. Once a year, pull the refrigerator away from the wall, locate the drain pan (usually a small plastic tray below the compressor), and rinse it with hot water. Add a small amount of bleach if you see mold or algae growth.
Position Your Refrigerator Correctly
Refrigerators are designed with a slight forward tilt (typically ¼ inch per foot) so that water naturally flows toward the drain. If your fridge is tilted backward or sitting level, water may pool instead of draining. Check the refrigerator’s level using a bubble level, and adjust the front feet if necessary.
When It’s NOT the Frozen Defrost Drain
While a frozen defrost drain accounts for most freezer floor ice and water leaks, other problems can mimic the same symptoms.
Water Inlet Valve Leaks
If you also have an ice maker or water dispenser, the water inlet valve supplying those features can develop a small drip. This valve is located at the back of the refrigerator, outside the freezer compartment. Water leaking from this valve would pool under the fridge, not inside the freezer. Inspect the water line connections for signs of dripping or moisture.
Cracked or Broken Drain Pan
If the drain pan under the refrigerator is cracked or has a hole, water that drains correctly from the freezer will still end up on your kitchen floor. Pull the refrigerator away from the wall and inspect the pan. If cracked, it must be replaced.
Door Left Ajar
If the freezer door is left open for extended periods, warm, humid air enters the compartment. This air will condense and freeze on the evaporator, triggering an extended or extra defrost cycle. If the drain is marginal (partially clogged or very slow), the extra water from this extended cycle can overflow onto the floor. Always ensure the door closes fully and the gasket seals tightly.
⚠️ Safety Warning
⚠️ Always unplug your refrigerator before attempting any repair. Even though defrost drains involve mostly water, you will be working near the defrost heater element, which is powered by high voltage. Unplugging the unit eliminates the risk of accidental electrical shock.
⚠️ Do not use boiling water. Extremely hot water can crack or warp plastic components inside the freezer. Use hot tap water (120–130°F) instead.
⚠️ Do not use sharp tools to break ice. Puncturing the freezer lining or evaporator tube can cause refrigerant leaks and permanent damage to the appliance.
⚠️ Allow adequate drying time before plugging in. After flushing the drain and wiping up water, wait at least 30 minutes before plugging the refrigerator back in to ensure no moisture is near electrical components.
⚠️ If you smell refrigerant or suspect a leak, do not attempt further repairs. Refrigerant leaks require a certified technician. Unplug the unit and call a professional.
Frequently Asked Questions
Why does a sheet of ice keep forming in the bottom of my freezer?
The most common cause is a frozen or clogged defrost drain. Every 8–12 hours, your refrigerator’s defrost heater melts frost from the evaporator coil, and that water should flow down and out through a small drain hole at the rear of the freezer. If the drain is frozen or blocked, water pools on the freezer floor and refreezes into a sheet of ice. To fix it, thaw the ice with hot water, clear the drain hole, and—critically—ensure the drain strap or thermal probe is in place and positioned correctly so the drain doesn’t refreeze between defrost cycles. If the drain strap is missing, install an aftermarket drain heater kit or order an OEM replacement.
Where is the freezer defrost drain located
Recommended Tools
Digital Multimeter
Nearly every diagnosis in this guide comes down to a continuity or voltage reading, and a basic digital multimeter handles all of them. Check current pricing on Amazon.
Appliance Repair Tool Set
A dedicated appliance tool set with nut drivers, Torx bits, and panel spudgers makes the disassembly steps in this guide far easier and prevents scratched panels and stripped screws. Check current pricing on Amazon.