LG LRG4115ST Gas Range Burners Won’t Ignite: Complete Troubleshooting Guide
The LG LRG4115ST is a professional-style gas range with four sealed burners on the cooktop and a convection oven below. When the ignition system fails, you lose the spark-ignition convenience and must resort to lighting burners manually—or worse, you can’t ignite the oven at all. This comprehensive guide walks you through diagnosing and fixing ignition failures on the LRG4115ST, whether it’s one burner, all burners, or the oven.
The LRG4115ST uses two different ignition systems: spark igniters for the surface burners and a glow-bar igniter for the oven. Understanding which system is failing is your first diagnostic step.
Safety Warning
⚠️ ELECTRICAL HAZARD: The spark electrode system on the LRG4115ST operates at high voltage (approximately 3,500-4,000 volts). Do not touch spark modules, electrodes, or wiring while the range is plugged in. Unplug the range from the electrical outlet before beginning any repair work.
⚠️ GAS HAZARD: If you smell gas during testing, stop immediately, turn off the gas at the control knob, and ventilate the area. Do not attempt repairs if gas is leaking. Call your gas utility.
⚠️ BURN HAZARD: Allow the cooktop and oven to cool completely before working on ignition components. The LRG4115ST retains heat for 30+ minutes after use.
Step 1: Identify Which Burners Are Not Igniting
Before you start disassembling the LRG4115ST, determine the scope of the problem. This tells you whether the issue is localized to one burner or a system-wide failure.
One Surface Burner Won’t Ignite
If only one of the four surface burners on your LRG4115ST fails to spark while the others work normally, the problem is almost certainly the spark electrode for that burner, the burner cap, or the burner base. This is a localized issue and the easiest to fix.
All Four Surface Burners Won’t Ignite
When all four burners on the LRG4115ST refuse to spark, suspect the spark module (igniter control board), the main fuse, a broken ground wire, or a damaged spark distribution harness. This indicates a system-wide electrical failure rather than individual burner problems.
Only the Oven Won’t Ignite
The LRG4115ST oven uses a completely different ignition system—a glow-bar igniter, not spark electrodes. If surface burners light but the oven won’t ignite, focus on the glow-bar igniter and its control circuit, not the spark module.
Clicking Continuously but No Ignition
When the LRG4115ST makes rapid clicking sounds at the burner but no spark appears, the spark module is trying to ignite but the electrode isn’t firing. This suggests a wet or debris-covered electrode, a cracked electrode, or a misaligned burner cap preventing proper spark gap.
Surface Burner Ignition Failure on the LRG4115ST
Step 1: Clean the Spark Electrode (Most Common Fix)
Food debris, grease, and mineral deposits are the #1 cause of burner ignition failure on the LRG4115ST. The spark electrode is a thin, exposed metal pin located at the base of each burner well. Even small amounts of buildup prevent spark from jumping to the burner head.
- Unplug the LRG4115ST from the electrical outlet.
- Allow the cooktop to cool for at least 30 minutes.
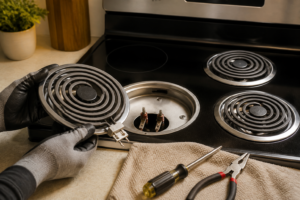
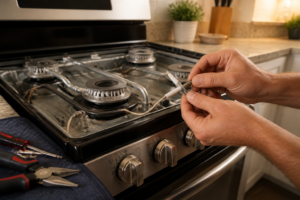
- Lift the burner cap straight up and remove it. The burner cap is the round, metal piece with gas ports that sits on top of the burner base.
- Locate the spark electrode at the bottom of the burner well. It’s a small, metallic pin approximately 1/8 inch in diameter, usually positioned to the side of the burner opening.
- Examine the electrode for visible corrosion, food buildup, or a white crusty coating (mineral deposits from hard water or boiling over).
- Use a soft brass brush or old toothbrush to gently scrub the electrode. Do not use steel wool or abrasive scrubbers, which can damage the electrode’s ceramic insulator.
- For stubborn mineral deposits, dampen a cloth with white vinegar and wipe the electrode repeatedly. Allow vinegar to soak for 5-10 minutes if heavily encrusted.
- Dry the electrode completely with a clean cloth.
- Reinstall the burner cap, ensuring it sits flat and centered.
- Plug in the LRG4115ST and test ignition by turning the burner knob to “Ignite” and listening for clicking. You should hear rapid spark clicks and see a small spark at the electrode.
Success Rate: Cleaning the electrode resolves approximately 70% of single-burner ignition failures on the LRG4115ST.
Step 2: Check Burner Cap Alignment
The LRG4115ST burner caps are precision-fitted. If the cap is misaligned, rotated, or sitting at an angle, it changes the spark gap distance and prevents ignition even if the electrode is clean.
- Remove the burner cap as described above.
- Inspect the underside of the cap for the small metal electrode receptacle—a tiny socket or contact point where the spark electrode engages.
- Examine the burner base to locate the electrode pin. On the LRG4115ST, the electrode protrudes slightly from the base casting.
- Align the cap’s electrode receptacle directly over the electrode pin. The receptacle should face downward into the spark gap area.
- Press the cap straight down firmly until it seats completely. You should feel a slight click or resistance as it bottoms out.
- Rotate the cap slightly to ensure the gas ports are not blocked and the cap is fully seated.
- The spark gap on the LRG4115ST should be approximately 0.08-0.15 inches (2-4 mm) from the electrode to the gas burner opening. If this gap appears too wide (> 0.25 inches) or too narrow (< 0.05 inches), the cap may be defective.
Step 3: Test the Spark Igniter Module
If cleaning and realignment don’t work, test whether the spark module is sending voltage to the problematic electrode. You’ll need a multimeter set to AC voltage.
- Unplug the LRG4115ST.
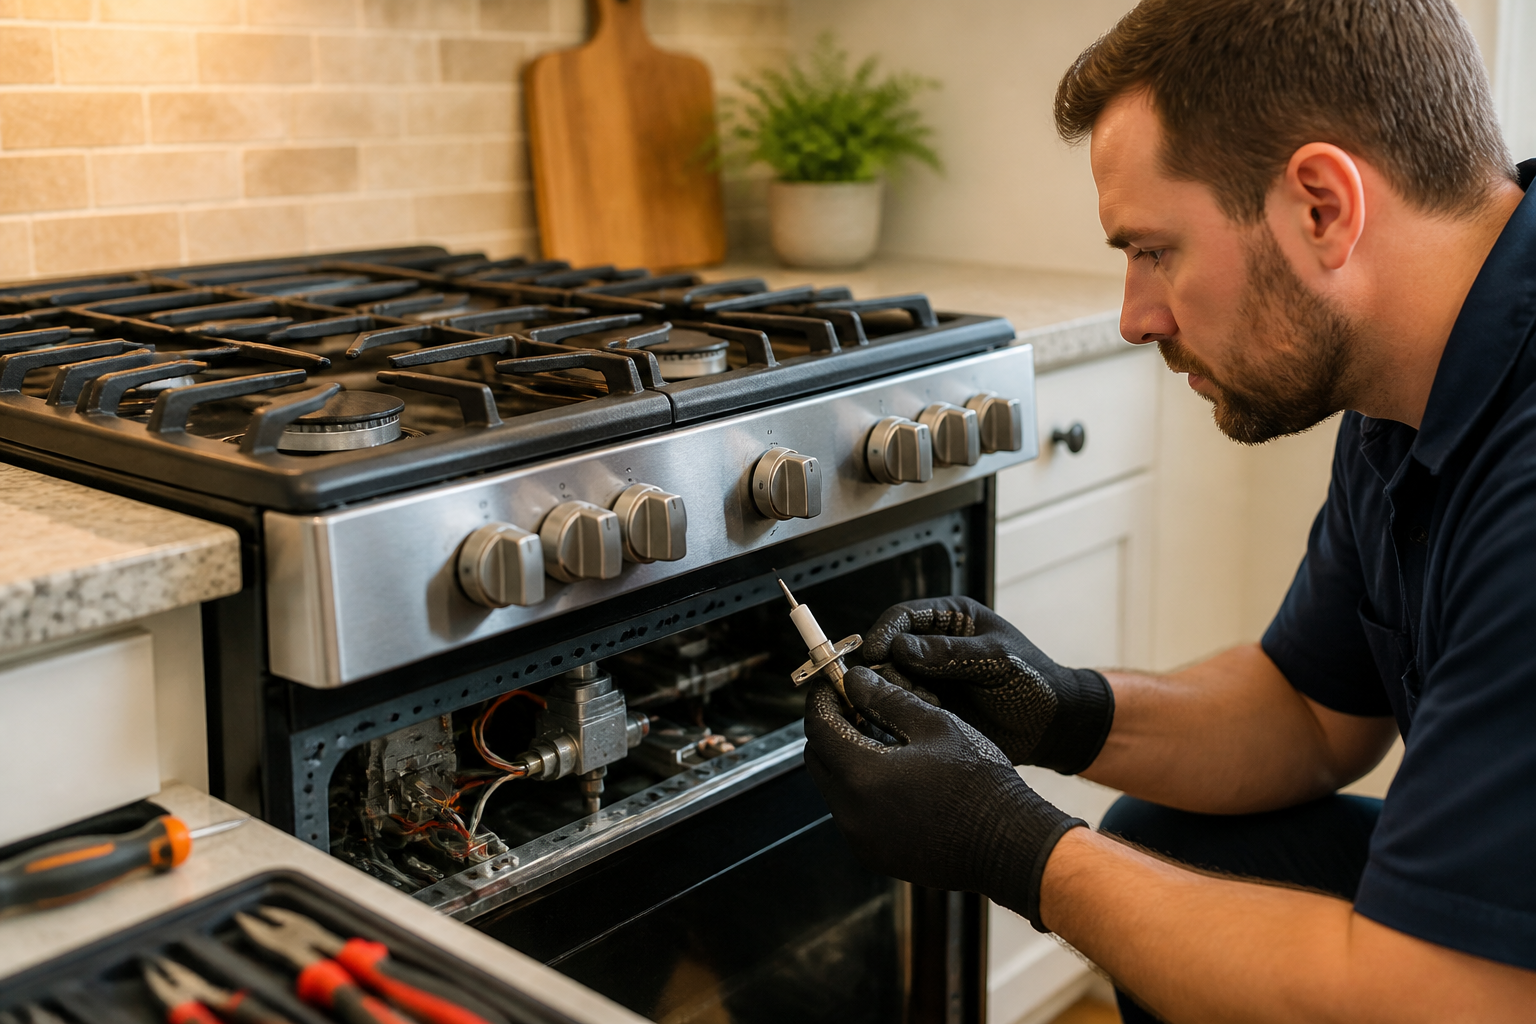
- Locate the spark module (igniter control board) behind the cooktop. On the LRG4115ST, this is typically mounted to the left side of the burner assembly, accessible by removing the cooktop (see your manual for cooktop removal if needed).
- Identify the wiring harness that connects to your problematic burner’s electrode. The LRG4115ST uses a color-coded harness; each burner has a dedicated wire pair.
- Plug the LRG4115ST back in and turn the knob for the affected burner to “Ignite.”
- Set your multimeter to AC voltage (ACV) in the 1,000V or higher range.
- Touch the multimeter’s red probe to the electrode wire terminal and the black probe to a ground point (metal frame of the range).
- You should see approximately 3,500 volts AC during the clicking ignition attempt. If the voltage is zero or below 1,000 volts, the spark module is not supplying power to that burner circuit.
- If voltage is present but the electrode still won’t spark, the electrode itself is likely cracked or the gap is excessive.
Step 4: Replace Individual Spark Electrodes
If cleaning, realignment, and voltage testing confirm the electrode is faulty, replacement is necessary. Each burner on the LRG4115ST has its own electrode.
Part Identification: The spark electrode assembly for the LRG4115ST is not typically sold individually. Instead, you’ll need the entire spark electrode cartridge or burner base assembly, which includes the electrode. The OEM part number for the spark electrode cartridge on the LRG4115ST is approximately EBZ37440403 or the burner base unit (part number EBZ34899903 for select burners). Verify your specific burner position (front left, front right, rear left, rear right) before ordering, as each position may have different part numbers.
- Unplug the LRG4115ST from the electrical outlet.
- Remove the burner cap and burner base by lifting straight up. On the LRG4115ST, the burner base is held in place by the weight of the burner cap and the spark electrode connector below.
- Disconnect the spark electrode connector from the wiring harness. You’ll see a small pin-connector beneath the burner base on the LRG4115ST.
- If your replacement is just the electrode cartridge, unscrew the electrode from the base (usually a reverse-threaded connection). If replacing the entire base, set the old base aside.
- Thread the new electrode into the base hand-tight, then snug with a wrench (typically 1/4-inch or 5/16-inch depending on the part). Do not overtighten; approximately 3-5 foot-pounds of torque is correct.
- Reconnect the electrode connector to the harness.
- Reinstall the burner base and cap, ensuring the cap is fully seated.
- Plug in the LRG4115ST and test ignition.
All Burners Not Igniting on the LRG4115ST
When none of the four surface burners on your LRG4115ST spark, investigate system-wide issues rather than individual burner problems.
Check the Spark Module (Igniter Control Board)
The spark module on the LRG4115ST distributes high-voltage spark energy to all four burners. If it fails, all burners lose spark simultaneously.
Part Number: The spark igniter module for the LRG4115ST is typically LG part number EBZ37440301 or EBZ34099003, depending on your specific model year. Consult your range’s parts diagram or contact LG with your serial number to confirm the exact module for your LRG4115ST.
- Unplug the LRG4115ST from the electrical outlet and wait 5 minutes to discharge capacitors in the spark module.
- Access the spark module behind the cooktop (removal varies by model; consult your manual).
- Visually inspect the module for obvious damage: burnt components, cracked circuit board, or corrosion.
- Check all electrical connectors for tightness. A loose connector can prevent spark on all burners.
- If connectors are tight and the module appears intact, the module likely has internal failure and requires replacement.
- Disconnect the main wiring harness and any ground wires from the spark module.
- Remove the spark module mounting screws (typically two) and lift the module out.
- Install the new spark module in reverse order, ensuring all connectors are fully seated.
- Plug the LRG4115ST in and test all four burners for spark.
Check the Main Fuse
The LRG4115ST has a fuse protecting the spark ignition circuit. A blown fuse cuts power to the entire spark system.
- Unplug the LRG4115ST.
- Locate the fuse holder, typically mounted on the control board or electrical junction box inside the range (consult your manual for exact location on your LRG4115ST model).
- Remove the fuse by twisting it counterclockwise (or pulling straight out if it’s a blade-type fuse).
- Hold the fuse up to a light source and look through the glass cylinder. If the metal filament inside is broken, the fuse is blown.
- The fuse for spark ignition on the LRG4115ST is typically rated 15 amps at 250 volts (marked on the fuse casing).
- Replace with an identical rated fuse. Do not substitute a higher amperage fuse; this indicates a short circuit elsewhere.
- Plug in the LRG4115ST and test ignition on all burners.
- If the new fuse blows immediately when you attempt ignition, there is a short circuit in the spark module or wiring. Do not continue testing; the module likely needs replacement.
Check Ground Wires and Connections
A broken or disconnected ground wire prevents the spark module from completing the ignition circuit. The LRG4115ST requires proper grounding for spark generation.
- Unplug the LRG4115ST.
- Visually trace the ground wires from the spark module and control board to the range frame. These are typically black wires or green/yellow wires (ground color-coded).
- Check each connection point for corrosion, looseness, or visible breaks.
- Tighten any loose ground screws with the appropriate wrench or screwdriver.
- If a ground wire is corroded, clean the connection point with a wire brush until bare metal is visible, then retighten.
- If a ground wire is broken, it must be replaced. Note the wire gauge (typically 14 or 12 AWG on the LRG4115ST) and replace with identical gauge.
- Plug the LRG4115ST in and test ignition on all burners.
Oven Won’t Ignite on the LRG4115ST
The LRG4115ST oven uses a glow-bar igniter, which is electrically heated to a high temperature and then ignites the oven gas. This is different from the spark system used for surface burners. A faulty glow-bar igniter is the most common cause of oven ignition failure.
Understand the Oven Ignition System
When you turn the LRG4115ST oven to bake or broil, the control board energizes the glow-bar igniter for approximately 30 seconds. As it heats (glowing orange-red inside the oven), gas begins to flow to the burner. The hot igniter ignites the gas. Once the oven reaches temperature, a thermostat cycles the igniter on and off to maintain temperature.
If the igniter fails, gas flows but never ignites—the oven will not preheat, and you’ll smell unburnt gas.
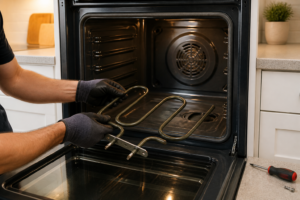
Inspect the Glow-Bar Igniter
- Unplug the LRG4115ST from the electrical outlet.
- Open the oven door and look inside. The glow-bar igniter on the LRG4115ST is located inside the oven, typically on the left side or bottom, near the oven burner opening. It’s a thin, rod-shaped element (approximately 1/4 inch diameter and 6-8 inches long).
- Turn on the oven to 350°F and observe the igniter for 30-45 seconds. Plug the range back in temporarily to test.
- If the igniter glows a dull orange-red, it is functioning. If it remains dark or only glows faintly at the tip, it is weak or failing.
- Allow the oven to run for the full preheat cycle (usually 10-15 minutes). If the oven eventually ignites and heats, the igniter is weak but functional. If the oven never ignites, the igniter has failed.
Test Oven Igniter Voltage
To confirm whether the LRG4115ST control board is sending power to the igniter, use a multimeter.
- Unplug the LRG4115ST.
- Locate the glow-bar igniter connector inside the oven or accessible from the oven’s rear. On the LRG4115ST, this is a two-pin connector.
- Plug the range back in and turn the oven on to bake at any temperature.
- Set your multimeter to AC voltage (ACV) mode.
- Touch the multimeter probes to the two igniter connector pins (do not touch the connector itself; just probe the pins).
- You should read approximately 115-120 volts AC while the oven cycles. If voltage is zero or very low (below 50V), the control board or thermal fuse is not supplying power.
- If voltage is present but the igniter doesn’t glow, the igniter element has failed internally and requires replacement.
Replace the Glow-Bar Igniter
Part Number: The glow-bar igniter for the LRG4115ST is OEM part number EBZ37440410 (or similar, verify for your specific model year). This is a genuine LG replacement igniter assembly.
- Unplug the LRG4115ST from the electrical outlet and allow it to cool completely (at least 1 hour if recently used).
- Open the oven door and locate the igniter rod inside the oven. On the LRG4115ST, it is mounted to a bracket on the left interior oven wall.
- Disconnect the two-pin electrical connector at the base of the igniter.
- Note the mounting bracket: the igniter is typically held by a single screw or push-pin. Remove the fastener and slide the igniter out of the bracket.
- Install the new igniter by reversing these steps: slide it into
Recommended Parts & Tools
LG Range Igniter Assembly Replacement Part
The igniter is the most common cause of ignition failure on the LRG4115ST model. This OEM replacement igniter restores the spark needed to light your burners and oven. Check current pricing on Amazon.
Multimeter Digital Voltage Tester
A multimeter is essential for diagnosing whether your igniter is receiving the proper electrical signal before you replace it. This helps confirm the igniter is actually faulty and not a wiring or control board issue. Check current pricing on Amazon.
Professional Appliance Cleaning Brush Set
Cleaning the igniter and burner ports of carbon buildup is often necessary to restore proper ignition function on gas ranges. These specialized brushes safely remove debris without damaging delicate igniter components. Check current pricing on Amazon.
The Igniter Assembly That Actually Restores Spark to Your LG LRG4115ST
If you’ve confirmed the igniter is firing no spark—either on the cooktop burners or the oven—replacing the igniter assembly is almost always the fix. This is the part that generates the high-voltage spark, and it fails more often than any other ignition component on this model.
What works
- Drop-in replacement on the LRG4115ST—no rewiring or adapter fiddling required, and the connector matches perfectly.
- Restores spark to both cooktop and oven ignition in one swap, since the igniter assembly controls the entire ignition circuit.
- Installation takes about 15 minutes once you remove the cooktop; no special tools needed beyond a screwdriver.
What doesn’t
- Won’t fix ignition problems caused by a faulty control board or wiring harness—you need to confirm the igniter itself is actually dead before ordering.
- The cooktop has to come out to access it, which means moving the range away from the wall and removing the grates and burner caps first.
The trickiest moment is realizing halfway through that you should have tested the igniter’s high-voltage output with a multimeter before assuming it was bad—I’ve seen people swap this when a tripped thermal breaker was actually the culprit. Test first, order second. Once you’re confident the igniter is the problem, grab the LG Range Igniter Assembly Replacement Part and you’ll have your spark back.
This post contains affiliate links. As an Amazon Associate, I earn from qualifying purchases at no extra cost to you.