Samsung NE58F9500SS Electric Range Repair Guide: Control Panel & Glass Cooktop Replacement
The Samsung NE58F9500SS is a premium electric range featuring a radiant glass-ceramic cooktop and digital control panel. While these ranges are built to last, homeowners may encounter control panel issues or need to replace the glass cooktop surface due to damage or wear. This comprehensive guide walks you through diagnosing and repairing the most common problems with your NE58F9500SS, including unresponsive touch panels, error codes, and complete glass cooktop replacement.
⚠️ Safety Warning
Before beginning any repair on your NE58F9500SS, disconnect the range from electrical power by switching off the breaker controlling the appliance. This range operates on 240 volts and poses serious electrical hazard. Do not attempt repairs while the appliance is plugged in or powered on. Allow the cooktop and oven to cool completely before handling. Glass cooktop surfaces remain extremely hot for extended periods after use and can cause severe burns. If you are uncomfortable working with electrical connections or high-voltage components, contact a licensed technician.
Understanding Your Samsung NE58F9500SS: Radiant vs. Induction Cooktops
Before discussing repairs, it’s important to understand that the NE58F9500SS features a radiant cooktop, not an induction cooktop. Many homeowners confuse these technologies, which affects how repairs are performed. The NE58F9500SS uses electric resistance heating elements positioned directly beneath the glass-ceramic cooking surface. When you turn on a burner, electrical current flows through coiled metal heating elements, causing them to glow red and transfer heat upward through the glass to your cookware.
In contrast, induction cooktops use electromagnets to generate heat directly in the cookware itself, leaving the glass surface relatively cool. The NE58F9500SS radiant system means that the entire glass surface area above a heating element becomes hot when activated. This is a critical distinction because it affects how you approach repairs. Unlike induction models, you cannot simply replace individual burner coils on the NE58F9500SS—the heating elements are permanently integrated under the glass surface, and if they fail, the entire glass-ceramic cooktop must be replaced as an assembly.
Control Panel Issues on the Samsung NE58F9500SS
Diagnosing Control Panel Problems
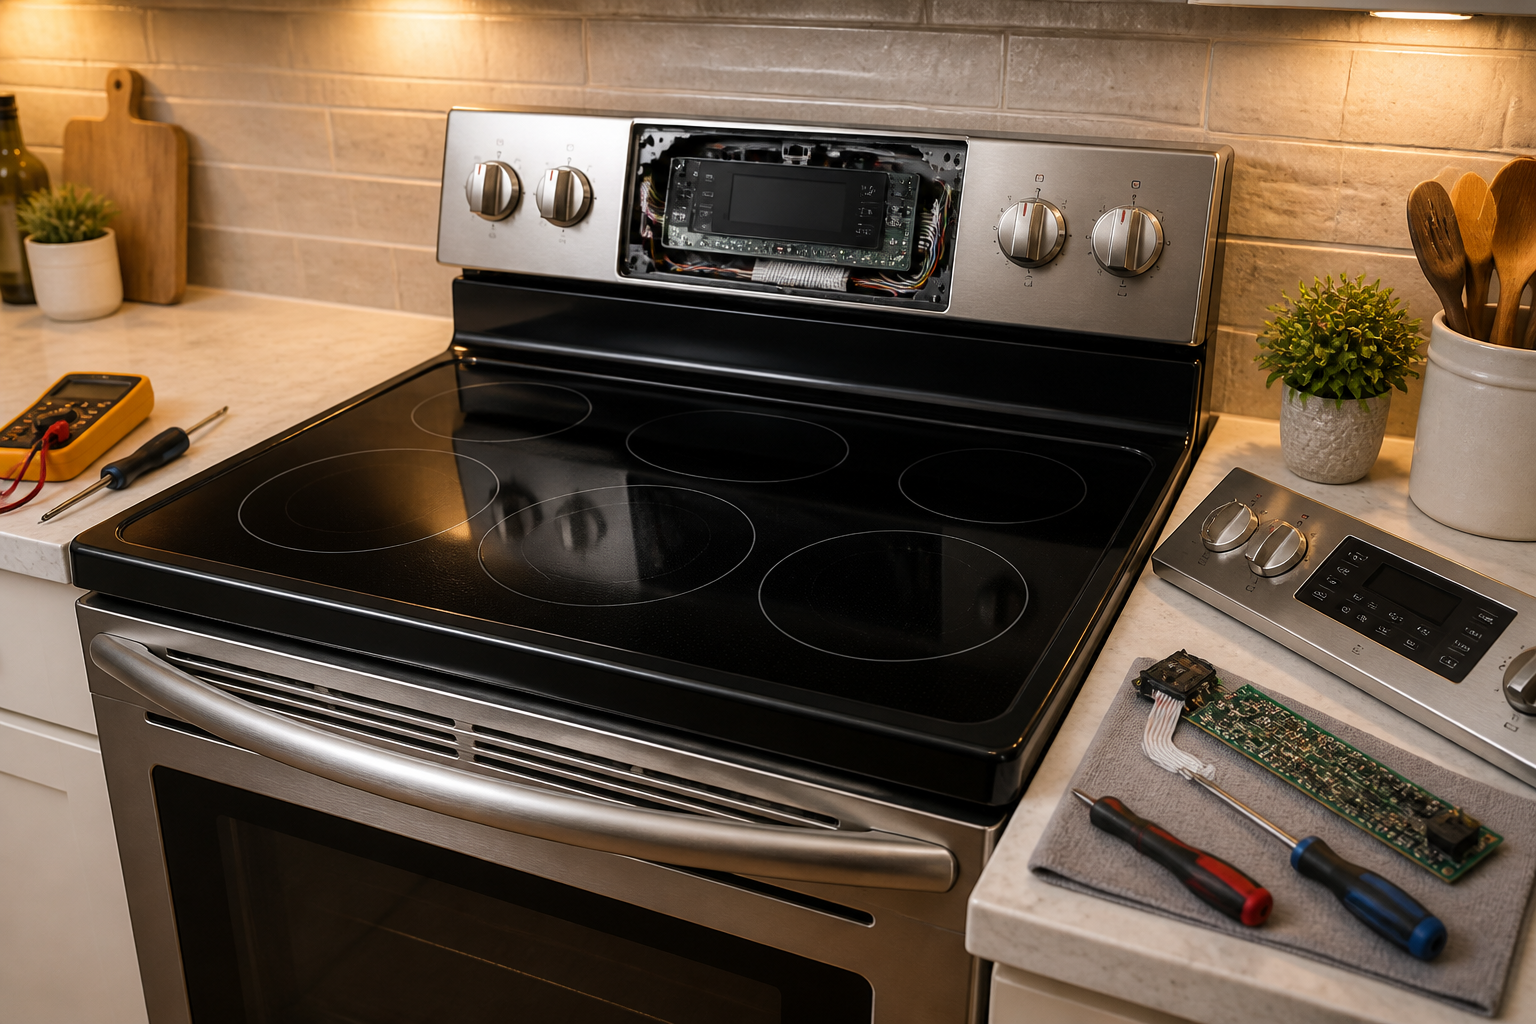
The touch control panel on your NE58F9500SS manages all cooktop and oven functions. When problems develop, they typically fall into several categories: unresponsive touch buttons, error codes displayed on the screen, or buttons that appear to be stuck or constantly activated. The NE58F9500SS control panel communicates with the main control board through ribbon cable connectors located behind the panel.
Start by identifying which buttons are not responding. Is the entire panel unresponsive, or only specific buttons? Try pressing different buttons to see if any function works. Check the display screen—does it show an error code? Write down any error codes you see, as these provide valuable diagnostic information. Common error codes on the NE58F9500SS include:
- SE Error: Indicates a sensor error in the oven temperature circuit. This is typically not a control panel issue but rather a problem with the oven temperature sensor or its wiring.
- C-10 Error: Suggests a communication problem between the control panel and the main control board. This often points to loose or damaged ribbon cables.
- E-0C Error: Usually indicates a stuck key or button sensor. This requires control panel replacement or careful cleaning of the button contacts.
If your NE58F9500SS displays no error codes but the panel is completely unresponsive, the issue may be a power supply problem to the control panel rather than the panel itself. Check that all ribbon cables are securely connected and that the panel is receiving power.
Unresponsive Touch Panel on the NE58F9500SS
When the touch panel of your NE58F9500SS stops responding to input, the first step is determining whether the problem is the panel itself or its electrical connections. Begin by disconnecting power to the range. Wait 30 seconds, then restore power. This resets the control board and occasionally clears temporary faults. If the panel remains unresponsive, proceed with inspection.
The NE58F9500SS control panel connects to the main control board through two ribbon cable connectors. These are located directly behind the panel, accessible after removing the oven door. Check that both ribbon cables are fully seated in their connectors. A partially disconnected cable frequently causes complete panel failure. Gently push each connector all the way in until you hear or feel a click.
If reseating the cables doesn’t restore function, you’ll need to test the control panel with a multimeter. Set your multimeter to continuity mode. Test the button contacts on the back of the panel by pressing a button while checking for continuity. If continuity doesn’t change when you press a button, the button’s switch mechanism has failed and the entire panel must be replaced.
Stuck Keys and Constant Activation
Occasionally, buttons on the NE58F9500SS control panel become stuck in the pressed position, causing error codes or preventing normal operation. This usually results from spilled liquid seeping into the panel or dust accumulation under the buttons. If a single button is stuck, you can sometimes resolve the issue by gently pressing and releasing the button repeatedly, or by using a damp cloth to clean around the button edges.
For more persistent stuck buttons, you may need to carefully disassemble the panel. However, this is delicate work. The NE58F9500SS control panel has a protective membrane layer under the buttons. If you attempt to disassemble it and damage this membrane, the entire panel becomes unusable. Given the cost of control panel replacement and the risk of further damage, it’s often more practical to simply replace the panel if gentle cleaning doesn’t resolve stuck button issues.
Control Panel Replacement on the Samsung NE58F9500SS
Parts and Tools You’ll Need
To replace the control panel on your NE58F9500SS, you’ll need the following:
- Replacement Control Panel: Part number DA82-01644A for the NE58F9500SS
- Phillips head screwdriver
- Needle-nose pliers (helpful for ribbon cable manipulation)
- Multimeter (optional, for testing before replacement)
- A work surface protected with a towel to prevent scratching
Before ordering, verify that DA82-01644A is the correct part number for your specific NE58F9500SS model. Check your serial number plate or contact Samsung support if you’re uncertain. Installing an incorrect panel can render your range inoperable.
Step-by-Step Control Panel Removal for the NE58F9500SS
Step 1: Disconnect Power Switch off the breaker controlling your NE58F9500SS. Verify that power is disconnected by attempting to activate the burners—nothing should respond. If the range is still warm from recent use, allow it to cool for at least one hour before proceeding.
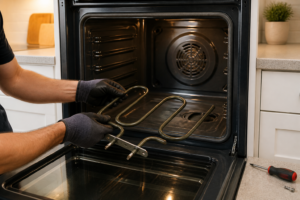
Step 2: Remove the Oven Door The oven door on the NE58F9500SS must be removed to access the control panel. Open the door fully and locate the hinge bolts on each side. Two bolts are visible on the inside edge of each hinge. Using a Phillips head screwdriver, remove all six bolts—three per hinge side. Carefully lift the door upward and away from the range. The door is heavy and contains glass, so have someone assist you or support it carefully. Set the door flat on a padded surface where it won’t be damaged.
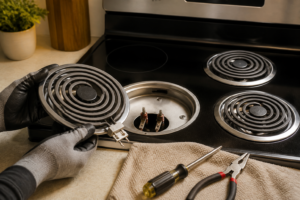
Step 3: Disconnect the Cooktop To access the control panel more easily on the NE58F9500SS, you’ll need to remove or at least loosen the glass cooktop. The cooktop sits in a metal frame and is secured with screws along its front edge beneath a trim ring. Lift the cooktop from the rear edge gently—do not force it, as ribbon cables still connect it to the control board. You only need to raise it enough to create working room. Disconnect any ribbon cables attached to the glass cooktop (typically one or two connectors on the left side). You don’t need to fully remove the cooktop to access the control panel, just prop it open.
Step 4: Locate and Remove Ribbon Cables With the cooktop raised, you now have clear access to the control panel from behind. Locate the two ribbon cable connectors where they meet the control panel. These connectors are typically brown or black plastic clips that hold the ribbon cables in place. Gently flip or slide the locking tab on each connector to release the ribbon cables. Do this carefully—the locking tabs are plastic and can break. Take a photo of the cable positions before disconnecting them so you can reconnect them correctly to the new panel.
Step 5: Remove Control Panel Mounting Screws The control panel on the NE58F9500SS is held in place by screws along its outer edges. These screws are typically located along the top and sides of the panel. Look for two to four screws securing the panel to the range body. Using your Phillips head screwdriver, remove all panel mounting screws. Keep these screws in a safe location—you’ll reinstall them with the new panel.
Step 6: Remove the Old Panel Gently pull the control panel forward and away from the range. It should slide out smoothly once all screws are removed and ribbon cables are disconnected. If it resists, check that you’ve removed all screws and fully disconnected both ribbon cables.
Installing the New Control Panel on the NE58F9500SS
Step 1: Prepare the New Panel Remove the new DA82-01644A control panel from its packaging. Inspect it for any damage in transit. Check that the panel looks identical to the old one and that all button positions match your NE58F9500SS model.
Step 2: Connect Ribbon Cables This is the most critical step. Using your photo as a reference, connect the two ribbon cables to the new panel in the exact same positions where they were connected to the old panel. The ribbon cables should slide into the brown or black connectors on the back of the new panel. Push each cable straight in until the locking tab clicks or closes, securing the cable. If you connect the cables incorrectly or in the wrong positions, the panel will not function.
Step 3: Install Panel Mounting Screws Position the new control panel against the range body in the same orientation as the old panel. Install all mounting screws that you removed from the old panel. Tighten these screws firmly but do not over-tighten—the panel is plastic and excessive force can crack it.
Step 4: Reconnect the Cooktop If you disconnected ribbon cables from the glass cooktop, reconnect them now. Lower the cooktop back into its normal position. Reinstall any screws you removed to access it.
Step 5: Reinstall the Oven Door Replace the oven door by aligning it with the hinges and reinstalling all six hinge bolts. Ensure the door closes smoothly and aligns properly with the range body.
Step 6: Restore Power and Test Switch the circuit breaker back on to restore power to your NE58F9500SS. Press buttons on the new control panel to verify that it responds. Test both cooktop and oven controls. The panel should function immediately without any error codes or unresponsiveness.
Glass Cooktop Replacement on the Samsung NE58F9500SS
Understanding Your Radiant Cooktop
The glass-ceramic cooking surface on your NE58F9500SS is not simply a covering over separate burner elements—it is an integral part of the radiant heating system. Beneath the glass surface sit electric heating coils that warm the glass from below. When you use the cooktop, heat radiates upward through the glass to your cookware. If the glass cracks, chips, or becomes discolored beyond use, the entire glass assembly must be replaced.
Unlike traditional coil burners that can be removed individually, the radiant heating elements in the NE58F9500SS cannot be replaced separately. They are permanently bonded to the underside of the glass surface. Attempting to repair or patch a cracked glass cooktop is not recommended—cracks spread quickly, especially when the glass heats and cools, and a cracked surface poses a safety hazard. Complete replacement is the proper solution.
Identifying Your Exact Glass Cooktop Part
Before ordering a replacement glass cooktop, confirm the exact part number for your NE58F9500SS. The part number is critical because glass cooktops vary slightly between model years and configurations. For the standard NE58F9500SS, the glass cooktop assembly part number is typically DG94-00420A. However, always verify this part number by:
- Checking your product manual
- Contacting Samsung customer service with your serial number
- Checking the Samsung parts website with your model number
Ordering the wrong part can result in a cooktop that doesn’t fit properly or lacks the correct heating element configuration for your NE58F9500SS model.
Tools and Materials for Cooktop Replacement
Replacing the glass cooktop on your NE58F9500SS requires:
- Replacement glass cooktop (DG94-00420A or the correct part for your NE58F9500SS)
- Phillips head screwdriver
- Needle-nose pliers
- Towels or padding to protect the work area and new glass
- Assistant (the glass cooktop is heavy and awkward)
- Thermal gloves or oven mitts
- Degreaser and cloth for cleaning
Removing the Glass Cooktop from the NE58F9500SS
Step 1: Cool and Disconnect Power If you’ve been using the NE58F9500SS recently, allow the cooktop to cool completely. This may take 1-2 hours depending on how hot it became. Once cool to the touch, switch off the circuit breaker controlling the range. Verify power is disconnected by attempting to activate a burner.
Step 2: Remove the Oven Door (Optional but Recommended) While not strictly necessary, removing the oven door as described previously gives you better access to the cooktop mounting area. If you feel comfortable working with the door in place, you can skip this step.
Step 3: Access the Cooktop Screws Locate the metal trim ring that runs along the front edge of the cooktop where it meets the range body. This trim ring conceals the mounting screws that hold the glass cooktop to the frame of your NE58F9500SS. You’ll need to lift this trim ring to access the screws underneath.
Gently lift the front edge of the trim ring. It’s typically held in place by friction or small tabs and should pop up relatively easily. If it resists, try lifting from different points along its length rather than pulling straight up from the center. Set the trim ring aside on a safe surface where it won’t be bent or damaged.
Step 4: Remove Cooktop Mounting Screws With the trim ring removed, you’ll see the mounting screws along the front edge of the cooktop on the NE58F9500SS. Typically, there are 4-6 screws spaced evenly across the front. Using your Phillips head screwdriver, remove all visible screws. Keep them organized—you may need some of them for the new cooktop.
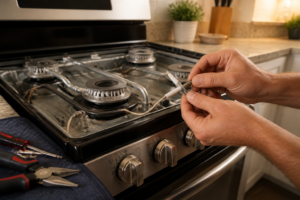
Step 5: Locate and Disconnect Ribbon Cables On the underside of the cooktop, ribbon cables connect the glass surface to the control board. Before attempting to lift the cooktop, identify these cables. You’ll see one or two ribbon cable connectors on the left side, beneath the cooktop surface where it meets the range body. Gently flip the locking tab on each connector to release the ribbon cables. Note their positions for reconnection with the new cooktop.
Step 6: Lift the Old Cooktop Away With screws removed and ribbon cables disconnected, carefully lift the glass cooktop upward from the front and rear edges simultaneously. The glass is heavy and has no handles, so grip it firmly from the edges. Lift it straight up and away from the range body. Do not tilt or angle it—straight vertical lift is safest. Have your assistant support the back edge as you lift. Avoid touching the underside where the heating element coils are located.
Set the old cooktop on a towel-covered work surface. If the glass is cracked, handle it carefully to avoid cuts from sharp edges. Do not attempt to clean or salvage the old cooktop—you’ll be disposing of it.
Installing the New Glass Cooktop on the NE58F9500SS
Step 1: Inspect the New Cooktop Remove the new glass cooktop (DG94-00420A or appropriate part number for your NE58F9500SS) from its packaging. Inspect it for any cracks or damage that may have occurred during shipping. Check the underside for the heating element coils and ribbon cable connectors. The new cooktop should look identical to the one you removed, with the same heating element pattern.
Step 2: Clean the Range Frame Before installing the new cooktop, clean the range frame where the cooktop will sit. Use a degreaser and cloth to remove any residue, spilled food, or grease from the previous cooktop. A clean surface ensures proper seating of the new cooktop and helps prevent future damage. Pay special attention to the areas where the mounting screws will be installed.
Step 3: Position the New Cooktop With assistance, carefully lower the new cooktop into position on the NE58F9500SS. Align the mounting holes with the screw positions. The cooktop should sit flat and level on the range frame. If it doesn’t sit flush, lift it again and check for obstacles or debris that might be preventing proper seating. Do not force the cooktop down if it seems misaligned—this can crack the glass.
Step 4: Reinstall Mounting Screws Once the cooktop is positioned correctly, reinstall all mounting screws through the holes into the range frame. Tighten these screws firmly but do not over-tighten—you can crack the glass with excessive force. Tighten in a cross pattern (alternate between opposite sides) to ensure even pressure across the cooktop surface.
Step 5: Reconnect Ribbon Cables Connect the ribbon cables from the heating elements to their connectors on the control board. These are the same connectors you disconnected earlier. Slide each ribbon cable straight into its connector until the locking tab clicks or closes. Proper connection is critical—if these cables are loose or incorrectly positioned, the cooktop won’t function and error codes may appear.
Recommended Parts & Tools
Cooktop Glass Cleaner & Scraper Set
Before attempting any repairs on your Samsung cooktop, you’ll need to thoroughly clean the glass surface to inspect for cracks or damage. This specialized cooktop cleaner and scraper set safely removes burnt-on food, grease, and debris without scratching the glass surface, giving you a clear view of the damage area. Check current pricing on Amazon.
Samsung Range Control Panel Overlay
If your control panel buttons are damaged, worn, or unresponsive, this genuine Samsung replacement control panel overlay is essential for restoring full functionality to your NE58F9500SS range. This direct replacement part ensures compatibility and maintains your range’s original appearance and operation. Check current pricing on Amazon.
Professional Appliance Repair Tool Kit
This comprehensive toolkit includes torx screwdrivers, nut drivers, and other essential tools needed to safely disassemble your cooktop and access the control panel components. Having the proper tools prevents stripped fasteners and ensures you can complete the repair without damaging surrounding parts. Check current pricing on Amazon.
The Right Scraper Prevents Permanent Damage to Your NE58F9500SS Glass Cooktop
Before you replace that glass cooktop, you need to know what you’re actually dealing with — and a proper glass scraper is the only safe way to assess damage without making it worse. I’ve seen too many DIYers scratch a repairable cooktop while trying to clean off burnt spots with the wrong tool, turning a $50 fix into a $300+ replacement.
What works
- The angled ceramic blade actually glides under burnt-on food and mineral deposits without digging into the glass surface — you can tell immediately whether marks are surface-level or actual etching that needs cooktop replacement.
- The cleaner solution cuts through the stubborn staining that makes damage look worse than it is, so you can do a real diagnostic before ordering parts.
- Having the right tool makes the difference between a five-minute cleanup and twenty minutes of frustration with a plastic scraper that either slips or gouges.
What doesn’t
- This won’t fix actual structural damage — thermal shock cracks or deep gouges still require full cooktop replacement, but you’ll know that before you order.
- You still need a cooktop thermometer or multimeter to diagnose control panel issues; this only helps with the visual inspection side of the repair.
I once rushed to order a replacement cooktop for a customer, only to discover the real problem was burnt sugar that cleaned away in two minutes — lesson learned the hard way. Get your cooktop properly cleaned and assessed first with a Cooktop Glass Cleaner & Scraper Set, and you’ll know exactly what repair you actually need.
This post contains affiliate links. As an Amazon Associate, I earn from qualifying purchases at no extra cost to you.