
Light Bulb and Socket Replacement on Whirlpool WMH31017HZ Over-the-Range Microwave
The interior light and cooktop light bulbs in your Whirlpool WMH31017HZ over-the-range microwave are essential for visibility during cooking and food preparation. Over time, these bulbs burn out due to normal usage, heat exposure, and electrical wear. Additionally, the sockets themselves can become corroded or damaged, preventing proper electrical contact even with new bulbs. This repair involves replacing both the bulbs and potentially the sockets if they show signs of damage or poor connectivity. The difficulty level for this repair is EASY to MODERATE, depending on whether socket replacement is necessary. Most homeowners can complete bulb replacement in 15-20 minutes, while socket replacement may require 45-60 minutes and basic electrical skills.
Symptoms
- Interior cavity light fails to illuminate when microwave door is opened or light button is pressed
- Cooktop light beneath the Whirlpool WMH31017HZ does not turn on when light switch is activated
- Bulbs flicker intermittently during operation, indicating loose socket connections
- Light appears significantly dimmer than normal, suggesting bulb degradation or poor socket contact
- Visible darkening or blackening of the bulb filament when inspecting through the glass
- Burning smell or visible corrosion around the light socket areas when accessing the bulb compartments
⚠️ Safety Warning
CRITICAL SAFETY NOTICE: Before beginning any work on your Whirlpool WMH31017HZ, disconnect power at the circuit breaker for at least 10 minutes. Microwave ovens contain high-voltage capacitors that can retain lethal electrical charges (up to 5,000 volts) even when unplugged. Never attempt to service internal electrical components beyond the light assemblies described in this guide. The magnetron and high-voltage transformer pose serious electrocution risks. Always use a non-contact voltage tester to verify power is off before touching any electrical connections. Allow bulbs to cool completely before handling, as they can reach temperatures exceeding 200°F during operation. Wear safety glasses when removing old bulbs to protect against glass breakage.
Parts Needed
- Interior cavity light bulb: Whirlpool part number W10208564 (40-watt, 130-volt appliance bulb with intermediate E17 base)
- Cooktop light bulb: Part number W10440736 (30-watt, 120-volt halogen bulb with T4 bi-pin base)
- Interior light socket assembly: Part number W10210875 (if replacement needed due to corrosion or damage)
- Cooktop light socket assembly: Part number W10269458 (ceramic socket with wire leads for halogen bulb)
- Wire nuts (22-14 AWG capacity) for electrical connections if socket replacement is required
- Electrical tape for securing wire connections and preventing moisture intrusion
Tools Required
- Phillips head screwdriver (for removing access panels and mounting screws)
- Flathead screwdriver (for prying plastic tabs and removing wire connectors)
- Needle-nose pliers (for handling small wire connections and positioning components)
- Non-contact voltage tester (essential for verifying power disconnection)
- Flashlight or headlamp (for illuminating work areas inside the microwave)
- Digital multimeter (for testing socket continuity and verifying proper electrical connections)
- Work gloves (for protection against sharp edges and hot surfaces)
Step-by-Step Instructions
Step 1: Power Disconnection and Safety Verification
🔨 Pro Tip from Dave
On the WMH31017HZ, the cooktop light socket terminals have a known tendency to develop a thin layer of oxidation that looks perfectly fine to the naked eye but creates just enough resistance to cause intermittent flickering or premature bulb failure — before you seat the new bulb, hit those terminals lightly with a small piece of fine emery cloth and you’ll save yourself a callback. Skipping that step is the number one reason I see DIYers end up replacing the same bulb twice within a few months.
Turn off the circuit breaker supplying power to your Whirlpool WMH31017HZ and wait 10 minutes for capacitors to discharge. Use your non-contact voltage tester to verify no electrical current is present at the unit. Remove the turntable and glass tray from inside the microwave cavity to provide clear access to the interior light assembly located on the right side wall of the cooking chamber.
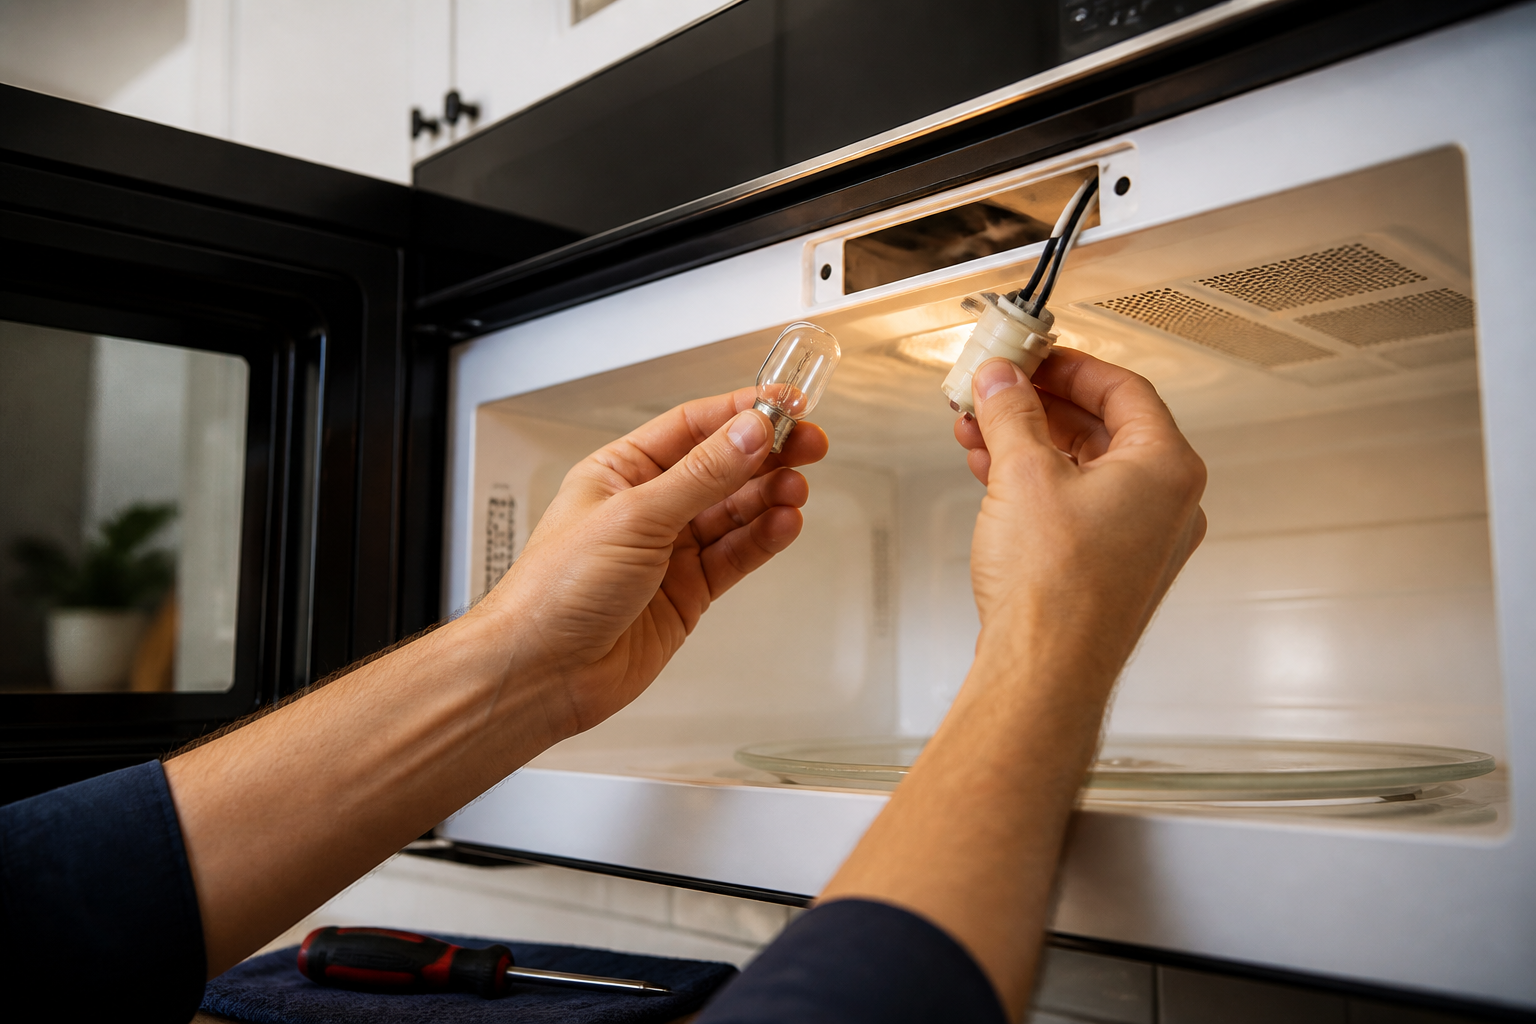
Step 2: Access Interior Light Assembly
Locate the interior light cover on the right wall of the microwave cavity, approximately 8 inches from the bottom. The rectangular plastic cover measures 3 inches wide by 1.5 inches tall. Grasp the bottom edge of the cover and pull down firmly while sliding it toward the rear of the cavity. The cover uses a spring-loaded tab mechanism that requires approximately 2-3 pounds of downward pressure to disengage.
Step 3: Remove Interior Light Bulb
With the cover removed, you’ll see the 40-watt appliance bulb with its E17 intermediate base. Allow the bulb to cool completely if recently used. Grasp the bulb firmly and rotate counterclockwise approximately one full turn until it releases from the socket. Inspect the bulb for blackened filaments or cracks in the glass envelope that indicate failure.
Step 4: Inspect and Test Interior Socket
Examine the socket threads for corrosion, burn marks, or debris accumulation. Set your multimeter to continuity mode and test across the socket terminals. You should measure infinite resistance when the socket is empty. If the socket shows damage or fails continuity testing, proceed with socket replacement. Clean minor corrosion with fine sandpaper if the socket is otherwise functional.
Step 5: Access Cooktop Light Assembly
Remove the two Phillips screws located on the underside of the Whirlpool WMH31017HZ, positioned 6 inches from each end of the front edge. These screws secure the bottom panel that houses the cooktop light assembly. Lower the hinged panel approximately 90 degrees to reveal the halogen bulb socket and lens assembly mounted in the center of the panel.
Step 6: Replace Cooktop Light Bulb
The cooktop uses a 30-watt T4 halogen bulb with bi-pin base. Carefully disconnect the bulb by grasping the ceramic base (never touch halogen bulbs with bare skin as oils cause premature failure) and pulling straight down with gentle rocking motion. The bi-pin connectors require approximately 1/8 inch of travel to disengage from the socket. Install the new bulb by aligning the pins and pressing firmly until seated.
Step 7: Socket Replacement (If Required)
If socket replacement is necessary, disconnect the wire harness connectors located behind each socket assembly. The interior light socket has a 2-wire connector with white and black leads, while the cooktop socket uses a similar configuration. Remove the mounting screws (typically two per socket) and carefully extract the failed socket. Install the replacement socket using the existing mounting holes and reconnect the wire harness ensuring proper polarity.
Step 8: Install New Interior Bulb
Thread the new 40-watt appliance bulb (part number W10208564) into the interior socket by rotating clockwise until snug. Do not overtighten as this can damage the socket threads. The bulb should seat completely with the base flush against the socket rim. Replace the plastic light cover by sliding it forward and pressing up until the spring tabs engage with an audible click.
Step 9: Electrical Testing and Verification
Restore power to the Whirlpool WMH31017HZ at the circuit breaker. Test the interior light by opening the microwave door – the light should illuminate immediately and remain steady without flickering. Test the cooktop light using the dedicated light switch on the control panel. Both lights should operate smoothly without buzzing, flickering, or delayed illumination.
Step 10: Final Assembly and Function Check
Secure the bottom access panel by raising it to the closed position and reinstalling the two Phillips screws on the underside. Ensure the panel sits flush against the unit housing without gaps. Replace the turntable and glass tray in the cooking cavity. Perform a final operational test of both lighting circuits to confirm proper installation and function.
Troubleshooting
- If new bulbs fail immediately upon installation, check for correct voltage ratings and verify socket wiring connections are secure and properly polarized
- Flickering lights after bulb replacement typically indicates loose socket connections or damaged wiring harnesses requiring professional attention
- If neither light functions after replacement, test the control board connections and verify proper voltage supply to the lighting circuits using your multimeter
- Bulbs that burn out frequently may indicate voltage irregularities or excessive heat buildup due to inadequate ventilation around the Whirlpool WMH31017HZ
- Dim light output with new bulbs suggests voltage drop issues or corroded connections within the electrical supply circuit
- If you smell burning odors or observe sparking around socket areas, immediately disconnect power and discontinue use until professional service can be obtained
When to Call a Professional
- Multiple electrical components fail simultaneously, suggesting control board or power supply problems beyond simple bulb replacement
- You discover damaged wiring, burn marks, or melted connectors during the bulb replacement process
- The microwave displays error codes or fails to operate normally after completing the light bulb replacement procedure
- You lack experience with electrical repairs or feel uncomfortable working with the electrical connections required for socket replacement
When to Call a Professional
Most of the repairs in this guide are within reach for a careful DIYer with basic tools. In my experience, if you’ve installed a known-good replacement bulb and cleaned the socket terminals but the light still won’t illuminate — or if you’re seeing scorch marks, melted plastic around the socket, or the microwave is tripping your breaker — that’s the point where the fault has moved upstream into the wiring harness or control board, and that repair needs a certified technician with a multimeter and proper service documentation before anyone goes further. When in doubt, a diagnostic service call typically costs $80–$120 and can save you from a misdiagnosis that costs more in parts.
Recommended Parts & Tools
Whirlpool W10208564 Microwave Light Bulb Assembly
This genuine Whirlpool replacement light bulb assembly is specifically designed for over-the-range microwaves including the WMH31017HZ model. The assembly includes both the 40-watt halogen bulb and socket components, making it perfect for complete light replacement repairs. Check current pricing on Amazon.
CRAFTSMAN 8-in-1 Multi-Bit Screwdriver Set
This versatile screwdriver set includes Phillips and flathead bits in multiple sizes, essential for accessing the light bulb compartment and removing housing screws on the Whirlpool WMH31017HZ. The magnetic bit holder and comfortable grip make microwave panel removal much easier during bulb and socket replacement. Check current pricing on Amazon.


