Whirlpool WRF535SWHZ04 Water Dispenser Not Working: Complete Troubleshooting and Repair Guide
The Whirlpool WRF535SWHZ04 French door refrigerator is a reliable appliance, but like all water dispensers, it can develop issues that prevent it from functioning properly. If your water dispenser isn’t working, the problem could be as simple as a closed shut-off valve or as complex as a faulty dispenser control board. This comprehensive guide walks you through every diagnostic step and repair procedure to get your water dispenser working again.
Safety Warning
⚠️ Electrical Hazard: Before performing any work on your WRF535SWHZ04, unplug the refrigerator from the electrical outlet. When testing the dispenser micro switch, water inlet valve, and control board circuits with a multimeter, ensure the unit is disconnected from power. Never work on electrical components while the refrigerator is plugged in.
⚠️ Water Damage: When disconnecting water lines or testing the water inlet valve, place towels beneath the connection points. Have a bucket ready to catch any residual water in the lines. Water damage to flooring or cabinets can result from improper handling.
Step 1: Quick Checks Before Troubleshooting
Start with these simple checks before diving into component testing. Most water dispenser failures on the WRF535SWHZ04 are resolved at this stage.
Check the Water Supply Line Connection
The water supply line to your WRF535SWHZ04 must be properly connected and the shut-off valve must be open. Locate the shut-off valve behind your refrigerator, typically found where the copper or plastic water line enters the unit. Turn the valve counterclockwise one full rotation. If it was closed or partially closed, this is your problem.
Inspect the water line itself for kinks, pinches, or damage. Push the refrigerator back into place carefully and check that the line isn’t being compressed between the unit and the wall or cabinet. A kinked line will restrict water flow just as effectively as a closed valve.
Verify Child Lock Is Off
The WRF535SWHZ04 includes a child lock feature that disables the water dispenser. Press and hold the lock button (typically located on the control panel) for 3 seconds until the lock indicator light turns off. Consult your user manual for the exact location on your model’s display panel, as the placement varies slightly by production year.
Check for Air Lock After Filter Installation
If you recently replaced the water filter on your WRF535SWHZ04, an air lock is likely the culprit. New filters contain air pockets that must be flushed out before water flows normally. Dispense water for 3-4 gallons continuously (run the dispenser for several minutes without stopping). You may see sputtering or air bubbles initially—this is normal. After 3-4 gallons, water should flow steadily.
If water still doesn’t flow after flushing, the filter itself may be defective or installed incorrectly. Remove the filter, check that the O-rings are properly seated, and reinstall it firmly until you hear a click.
Step 2: Water Filter Issues
A clogged or improperly installed water filter is responsible for approximately 40% of water dispenser failures on the WRF535SWHZ04.
Identify Your Filter Type
The WRF535SWHZ04 uses a cartridge-style water filter located inside the refrigerator, typically in the upper left corner near the ceiling. The filter housing is a white or gray plastic cylinder with a blue cap. To access it, remove any items stored near the top shelf.
Test Filter Flow Rate
Turn off the water supply at the shut-off valve. Locate the filter release button on the housing and press it to remove the filter cartridge. Look inside the filter housing for any visible debris, mineral buildup, or blockages. If you see white or brown deposits, the filter is clogged.
A new filter for the WRF535SWHZ04 typically has a rated flow of 0.5 gallons per minute (GPM). After 6 months of use, this rate may drop to 0.3 GPM or lower, restricting water from reaching the dispenser paddle. Most manufacturers recommend replacing the filter every 6 months or after 300 gallons of use, whichever comes first.
Replace the Water Filter
- Turn off the water supply valve completely.
- Press the release button on the filter housing and twist the old filter counterclockwise to remove it.
- Remove the new filter from its packaging and inspect the rubber O-rings on both ends. They should be intact and free from cracks.
- Insert the new filter into the housing, aligning the notch on the filter with the corresponding post inside the housing.
- Twist the filter clockwise until it stops (do not over-tighten—a quarter turn past snug is sufficient).
- Turn the water supply valve back on.
- Flush 3-4 gallons of water through the dispenser to clear air from the new filter.
Step 3: Dispenser Actuator and Paddle Test
The dispenser paddle on the WRF535SWHZ04 must physically depress a micro switch inside the dispenser housing to trigger water flow. If the paddle is stuck, cracked, or misaligned, water won’t dispense even if all other components function properly.
Inspect the Paddle Assembly
Open your refrigerator door and locate the water dispenser paddle at the bottom of the door. It’s typically a gray or black plastic lever about 2 inches wide. Press it gently with your finger. You should feel a distinct click or resistance. If the paddle moves too freely without resistance, the micro switch beneath it may be faulty or disconnected.
Check for visible damage: cracks, chips, or warping. If the paddle is damaged, it must be replaced as part of the dispenser housing assembly.
Verify Paddle-to-Switch Alignment
Unplug the WRF535SWHZ04 from the electrical outlet. Remove the inner door panel by unclipping the fasteners along the edges (typically 4-6 clips). Locate the small micro switch mounted directly behind where the paddle connects. The switch should have a plunger that protrudes about 1/4 inch.
Manually press the paddle with your finger while observing the micro switch plunger. It should compress fully and then spring back when you release the paddle. If the plunger doesn’t move or moves only partially, the switch may be stuck or disconnected.
Step 4: Dispenser Micro Switch Testing
The dispenser micro switch on the WRF535SWHZ04 is a normally-open (NO) switch that closes when the paddle is pressed, completing the circuit that signals the control board to open the water inlet valve.
Locate the Micro Switch
With the WRF535SWHZ04 unplugged and the inner door panel removed, identify the micro switch. It’s a small white or black plastic component about 1 inch long, mounted on a bracket behind the dispenser housing. It typically has two or three terminal connectors on its side.
Test Continuity
Set your digital multimeter to the continuity or resistance setting (Ohms). Locate the two terminals on the micro switch that are active when the paddle is depressed. Disconnect the wire connectors from these terminals. Place one multimeter probe on each terminal.
With the paddle in the unpressed (resting) position, the multimeter should show infinite resistance or no continuity (no audible beep). Press the paddle fully and hold it. The resistance should drop to nearly 0 Ohms and the multimeter should beep continuously, indicating the switch contacts are closed.
If the switch shows continuity in both positions or in neither position, it is faulty and must be replaced. Micro switches for the WRF535SWHZ04 are available as individual parts or as part of the dispenser housing assembly.
Replace a Faulty Micro Switch
- Unplug the refrigerator.
- Remove the inner door panel.
- Disconnect the wire connectors from the faulty micro switch by gently pulling them straight away from the terminals.
- Remove the mounting bracket screws holding the micro switch in place (typically two #6 Phillips-head screws).
- Install the new micro switch, aligning the plunger with the paddle actuator pin.
- Reconnect the wire connectors firmly until they click into place.
- Reinstall the door panel and plug in the refrigerator.
Step 5: Water Inlet Valve Testing
The water inlet valve is a solenoid-operated valve that opens when the micro switch sends a signal, allowing water to flow through the dispenser. The WRF535SWHZ04 uses a dual inlet valve (one for ice and one for water dispense), and the dispenser side can fail independently.
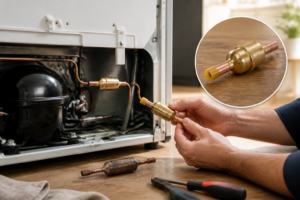
Locate the Water Inlet Valve
The water inlet valve is mounted on the back wall of the refrigerator, where the main water line enters the unit. It’s a brass or plastic component about 3 inches long with a solenoid coil wrapped around the center portion and 1/2-inch hose barb connectors on either end.
Test Valve Resistance
Unplug the WRF535SWHZ04 and locate the solenoid coil connectors on the dispenser inlet valve (not the ice maker inlet). You’ll see two terminal connectors—typically red and black wires. Gently disconnect them.
Set your digital multimeter to the Ohms (resistance) setting. Place one probe on each terminal. The resistance reading should be between 300-1000 Ohms for the dispenser solenoid coil. If the reading is 0 Ohms, the coil is shorted and the valve must be replaced. If the reading is infinite (no continuity), the coil is open and has failed—replacement is required.
Test Valve Operation (Manual Method)
If the resistance reading is within specification, the coil may be functional but the valve plunger could be stuck. With the water supply shut off and towels placed beneath the valve, gently tap the solenoid coil with a plastic hammer or mallet. Sometimes a stuck plunger will free up with gentle percussion.
Turn the water supply back on and listen for a clicking sound when the dispenser paddle is pressed. A click indicates the solenoid is energizing. If you hear a click but water still doesn’t flow, the valve plunger may be stuck open or closed internally, and the valve must be replaced.
Replace the Water Inlet Valve
- Turn off the water supply at the shut-off valve.
- Unplug the WRF535SWHZ04.
- Place towels or a bucket beneath the valve to catch residual water.
- Disconnect the inlet water line from the valve by turning the compression fitting counterclockwise (usually a 7/16-inch fitting).
- Disconnect the outlet lines (to the ice maker and water dispenser) by turning their fittings counterclockwise.
- Disconnect the solenoid coil connector.
- Remove the mounting bracket screw (typically one or two Phillips-head screws).
- Install the new dual inlet valve, ensuring the inlet port (where water enters) is oriented correctly.
- Reconnect all water line fittings firmly—hand-tight plus a 1/4 turn with a wrench.
- Reconnect the solenoid coil connector.
- Turn the water supply back on and check for leaks.
- Plug in the refrigerator.
Step 6: Door Switch Diagnosis
The door switch on the WRF535SWHZ04 is a safety device that disables the water dispenser when the refrigerator door is open. If the door switch is faulty or misaligned, the unit may think the door is always open, preventing the dispenser from working even when the door is closed.
Locate the Door Switch
The door switch on the WRF535SWHZ04 is mounted in the top corner of the refrigerator cabinet, where the door latch engages. It’s a small rectangular component about 1 inch long, typically white or black plastic with a movable plunger on one end.
Test Door Switch Continuity
Unplug the refrigerator. Locate the wire connectors on the door switch. Disconnect them gently. Set your multimeter to the continuity or resistance (Ohms) setting. Place one probe on each terminal.
With the door closed, the switch should show continuity (near 0 Ohms or an audible beep). Press the plunger on the switch to simulate the door opening—continuity should be lost (infinite resistance, no beep).
If the switch shows continuity in both positions or neither, it is faulty. If it shows correct continuity but the dispenser still doesn’t work, the door switch connector may be loose or the latch may not be fully engaging the plunger when the door closes.
Verify Door Latch Alignment
Close the refrigerator door slowly and observe where the door latch meets the door switch plunger. The latch should compress the plunger fully. If there’s a gap between the latch and plunger, the door switch will think the door is open. Loosen the door switch mounting screw and reposition it slightly toward the latch, then tighten and test.
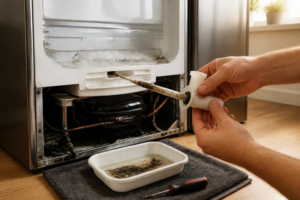
Step 7: Frozen Water Line in the Freezer Door
This is a common issue on French door refrigerators like the WRF535SWHZ04. Water lines that run through the freezer compartment can freeze if the temperature is set too cold or if there’s inadequate insulation around the line. Ice blockages prevent water from reaching the dispenser paddle.
Identify a Frozen Line
Open the freezer compartment on your WRF535SWHZ04 and look for a plastic water line (typically 1/4-inch outer diameter) running along the interior wall or inside the door frame. If it appears white or cloudy (frosted) or if you can see ice crystals on its surface, the line is frozen.
Thaw the Frozen Line
Do not attempt to thaw the line with direct heat sources like a hair dryer or heat gun, as this can damage the plastic tubing. Instead:
- Unplug the WRF535SWHZ04 and leave the freezer door open for 8-12 hours. The ambient room temperature will gradually thaw the ice inside the line.
- After the initial thaw, set the refrigerator to a warmer temperature (37-38°F instead of 33-35°F) for a few days to prevent refreezing.
- Ensure the freezer door is not being sealed too tightly against the water line. Check that the rubber gasket is not compressing the line.
- If freezing recurs frequently, check the humidity level in your home. High humidity can cause water to accumulate on the line, which then freezes. Running a dehumidifier or increasing ventilation can help prevent future ice buildup.
Prevent Future Freezing
Many owners of the WRF535SWHZ04 avoid this issue by wrapping the water line with foam pipe insulation (available at hardware stores). This inexpensive solution (typically under $10) dramatically reduces the risk of freezing. Cut the insulation to length and wrap it around the visible portions of the water line inside the freezer.
Step 8: Control Board and Dispenser Control Interface
The dispenser control board on the WRF535SWHZ04 is a circuit board that interprets the micro switch signal and sends power to the water inlet valve solenoid. If the control board is faulty, the dispenser won’t work even if all other components are functioning.
Locate the Control Board
The main control board on the WRF535SWHZ04 is typically mounted behind the refrigerator’s upper back panel or inside the refrigerator compartment behind the top-middle area. Consult your unit’s wiring diagram (found inside the user manual or on the interior wall of the refrigerator) to identify the exact location.
Inspect for Visible Damage
Unplug the refrigerator and remove the control board (typically held with 2-4 Phillips-head screws and several wire connectors). Examine the board for:
- Burnt or discolored components
- Cracked solder joints (tiny lines on the circuit board connections)
- Swollen or leaking capacitors (small cylindrical components)
- Water damage or corrosion
If you see any of these issues, the control board must be replaced. Repair of individual circuit board components requires specialized equipment and expertise beyond typical DIY capability.
Test Control Board Output
If the control board appears undamaged, you can perform a continuity test on the dispenser output circuit. Before attempting this, consult your user manual for the exact pin numbers on the control board connector that correspond to the water valve solenoid.
With the board disconnected and your multimeter set to resistance (Ohms), place one probe on the ground (common) pin and the other on the solenoid output pin. You should see a resistance reading in the range of 100-500 Ohms, indicating a complete circuit. If the reading is infinite (no continuity) or 0 Ohms (sh
Recommended Parts & Tools
Whirlpool Water Dispenser Valve Replacement Kit
The water dispenser valve is the most common culprit when a Whirlpool refrigerator’s water dispenser stops working. This replacement kit is specifically designed for the WRF535SWHZ04 model and includes all necessary components for a proper fix. Check current pricing on Amazon.
Whirlpool Refrigerator Water Filter Replacement
A clogged water filter can restrict water flow and prevent the dispenser from functioning properly. Replacing the filter is often the first and easiest troubleshooting step, especially if your refrigerator is overdue for a filter change. Check current pricing on Amazon.
Multi-Tool Appliance Repair Kit with Hex Keys and Screwdrivers
Accessing the water dispenser assembly requires removing panels and fasteners, making a comprehensive tool kit essential for this repair. This kit includes all the hex keys and screwdrivers needed to safely disassemble and reassemble your refrigerator components. Check current pricing on Amazon.
The Valve Replacement That Actually Restores Water Flow on the WRF535SWHZ04
If your dispenser isn’t flowing water but the filter is clean and the line isn’t frozen, the solenoid valve is your most likely culprit. This is the first part I grab when a customer reports weak or no water from the dispenser—it fails far more often than people think, and it’s the fastest fix to try before spending time on electrical diagnostics.
What works
- Comes with the exact gaskets and seals needed—no hunting for mismatched O-rings that leak water all over your floor.
- Direct replacement means no adapter fittings or workarounds; the valve threads match the WRF535SWHZ04 plumbing without modifications.
- Installation takes 15–20 minutes once you locate the valve behind the crisper drawers; no special tools beyond a wrench needed.
What doesn’t
- If your problem is actually a frozen water line or a clogged filter, this valve won’t solve it—you’ll have wasted the part cost and still have no water.
- The valve sits in a tight space below the fridge; if you’re not comfortable working in cramped spots or shutting off the water supply, this becomes a frustrating job.
I’ve seen homeowners order the control board first because they assumed the dispenser switch was bad, only to find out the valve was stuck closed the whole time—wasted money and shipping delays. Before you go down that road, grab this Whirlpool Water Dispenser Valve Replacement Kit and confirm the valve is actually responding to the switch.
This post contains affiliate links. As an Amazon Associate, I earn from qualifying purchases at no extra cost to you.