
Door Switch Replacement for Toshiba EM925A5A-SS Countertop Microwave
The door switch replacement on the Toshiba EM925A5A-SS is one of the most common repairs needed for this compact countertop microwave model. Door switches serve as critical safety components that prevent the magnetron from operating when the door is open, while also enabling operation when properly closed. These switches can fail due to repeated use, moisture infiltration, or mechanical wear after thousands of door cycles. The Toshiba EM925A5A-SS utilizes a three-switch safety interlock system that must function perfectly for safe operation. This repair is rated as MODERATE difficulty due to the need for careful disassembly and the presence of high-voltage components that require proper safety precautions.
Symptoms
- Microwave will not start when door is closed and start button is pressed, with no display activity
- Unit starts immediately when door is closed without pressing any buttons (extremely dangerous condition)
- Display shows “DOOR” error message intermittently on the Toshiba EM925A5A-SS LED panel
- Microwave stops mid-cycle and will not restart until door is opened and firmly closed multiple times
- Interior light remains on continuously even when door is closed
- Clicking or buzzing sounds from the door latch area when attempting to start the unit
⚠️ Safety Warning
CRITICAL SAFETY NOTICE: Microwaves contain high-voltage capacitors that can store lethal electrical charge even when unplugged. The Toshiba EM925A5A-SS contains a 2100V capacitor that can remain charged for hours after disconnection. Before beginning any repair work, the unit must be unplugged for at least 24 hours, or the capacitor must be properly discharged using an insulated screwdriver across the terminals. Never attempt this repair if you are uncomfortable working with high-voltage appliances. Improper door switch installation can result in microwave radiation exposure, which poses serious health risks. Always test the repair thoroughly before returning the unit to service. Wear safety glasses and insulated gloves throughout the procedure.
Parts Needed
- Primary Door Switch – Toshiba Part Number: 7A0700300 (SPST-NC 16A 250V microswitch)
- Secondary Door Switch – Toshiba Part Number: 7A0700301 (SPST-NO 16A 250V microswitch)
- Monitor Door Switch – Toshiba Part Number: 7A0700302 (SPST-NC monitoring switch)
- Door switch mounting bracket (if damaged) – specify 0.9mm steel bracket for EM925A5A-SS
- Wire nuts or crimp connectors (22-18 AWG capacity for door switch wiring connections)
- Electrical contact cleaner spray for cleaning switch mounting area
Tools Required
- Phillips head screwdriver (size #2 for outer cabinet screws)
- Flat blade screwdriver (3/16″ for switch removal and capacitor discharge)
- Digital multimeter with continuity testing capability
- Insulated work gloves rated for electrical work
- Safety glasses with side protection
- Needle-nose pliers for wire management
- Flashlight or work light for interior visibility
Step-by-Step Instructions
Step 1: Power Disconnection and Safety Preparation
🔨 Pro Tip from Dave
On the EM925A5A-SS, there are three interlock switches that must all be tested and replaced as a set — not just the one that shows continuity failure — because when one goes, the others are typically at the same wear point and will fail within weeks of each other. Skipping this step is the single most common reason I see a ‘repaired’ microwave come back through my shop door a month later.
Unplug the Toshiba EM925A5A-SS from the wall outlet and wait a minimum of 24 hours before beginning work. This allows the high-voltage capacitor to safely discharge. Position the microwave on a stable work surface with the right side panel accessible. Remove any items from inside the cooking chamber and ensure the turntable and glass tray are removed for safety.
Step 2: Right Side Panel Removal
Locate the six Phillips head screws along the right side panel of the Toshiba EM925A5A-SS. Remove the two screws at the top rear edge, two screws at the bottom rear, and two screws along the bottom front edge. The screws are 8mm length and should be placed in a container to prevent loss. Carefully slide the right side panel toward the rear of the unit and lift away to expose the internal components.
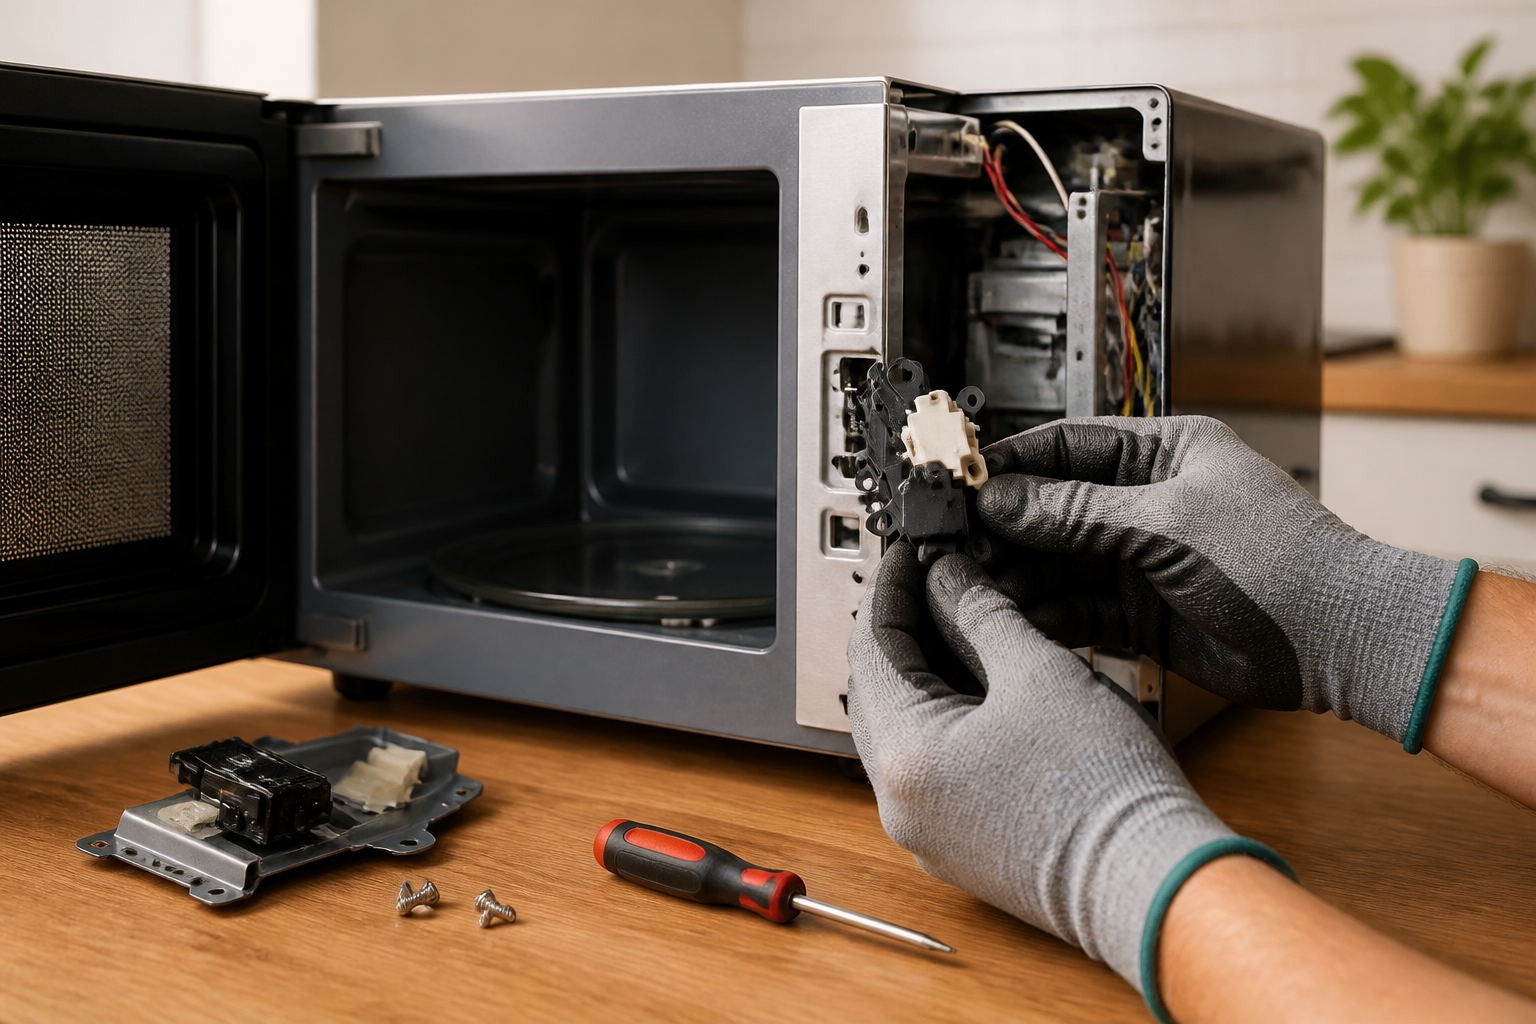
Step 3: Locate Door Switch Assembly
With the right panel removed, identify the door switch assembly mounted on the front right interior wall of the Toshiba EM925A5A-SS. The three switches are positioned vertically in a black plastic mounting bracket, located approximately 3 inches from the top of the unit and 1 inch from the front edge. The switches are labeled from top to bottom as primary, secondary, and monitor switches.
Step 4: Document Existing Wiring
Before disconnecting any wires, photograph or sketch the existing wiring configuration on the Toshiba EM925A5A-SS door switches. The primary switch typically connects to white and black wires, the secondary switch connects to blue and brown wires, and the monitor switch connects to red and yellow wires. Note the terminal positions as switch orientation is critical for proper operation.
Step 5: Disconnect Switch Wiring
Carefully disconnect the wire terminals from each door switch on the Toshiba EM925A5A-SS. Use needle-nose pliers to grip the terminal connectors, not the wires themselves. The terminals are standard 0.250″ spade connectors. Gently wiggle while pulling to avoid damaging the wire connections. Keep wires organized and separated to prevent confusion during reassembly.
Step 6: Remove Door Switch Mounting Bracket
Remove the two Phillips head screws securing the door switch mounting bracket to the interior wall of the Toshiba EM925A5A-SS. These screws are located at the top and bottom of the bracket and are 6mm in length. Carefully lift the entire switch assembly away from the mounting area. The bracket may have slight pressure against the door seal, so remove it slowly to avoid damage.
Step 7: Test Old Switches
Using a digital multimeter set to continuity mode, test each removed switch from the Toshiba EM925A5A-SS. For normally closed (NC) switches, you should read continuity when the actuator is not depressed, and no continuity when depressed. For normally open (NO) switches, the opposite applies. Document any switches that fail this test to confirm the diagnosis.
Step 8: Install New Door Switches
Mount the new door switches into the original bracket, ensuring each switch is oriented correctly according to your documentation. The actuator buttons should face toward the door opening. For the Toshiba EM925A5A-SS, the primary switch mounts at the top position, secondary in the middle, and monitor switch at the bottom. Press each switch firmly into its mounting clip until it seats completely.
Step 9: Reconnect Switch Wiring
Reconnect the wire terminals to the new door switches on the Toshiba EM925A5A-SS according to your documentation. Ensure each terminal is pushed fully onto the switch terminal and makes secure contact. Verify that no wires are pinched or stressed, and that the wire routing matches the original configuration. Double-check connections against your photos or sketches.
Step 10: Reinstall Switch Assembly
Position the door switch assembly back into its original location on the Toshiba EM925A5A-SS interior wall. Align the mounting holes and secure with the two Phillips head screws removed in Step 6. Tighten screws snugly but do not over-tighten, as this can crack the plastic mounting bracket. Verify that all switches are properly aligned with the door striker tabs.
Step 11: Test Switch Operation
Before reassembling the Toshiba EM925A5A-SS, manually test each door switch by pressing the actuators. You should feel positive click action from each switch. With the door open, carefully plug in the unit and observe that it does not start. Close the door and verify the interior light turns off and the unit is ready for operation.
Step 12: Final Assembly and Testing
Reinstall the right side panel on the Toshiba EM925A5A-SS by reversing the removal procedure. Install all six Phillips head screws in their original positions and tighten securely. Replace the turntable and glass tray, then perform a complete operational test by heating a cup of water for 30 seconds to verify proper magnetron function and automatic shutoff when the door is opened mid-cycle.
Troubleshooting
- If the Toshiba EM925A5A-SS still will not start after switch replacement, verify that all wire connections are secure and check for blown fuses in the control circuit
- If the unit starts with the door open, immediately unplug and recheck switch wiring – this indicates incorrect installation of normally open/normally closed switches
- If switches click but unit displays error codes, test the door alignment and latch mechanism for proper engagement with switch actuators
- If only some functions work, verify that all three switches are properly connected and that wire terminals are making solid contact
- If the interior light behaves incorrectly, check the monitor switch specifically as it controls lighting circuits in addition to safety functions
- If switches fail again quickly, inspect the door hinges and striker tabs for proper alignment that may be causing excessive switch wear
When to Call a Professional
- If you discover any signs of arcing, burning, or heat damage around the magnetron or high-voltage components during disassembly
- If the door switch replacement does not resolve the issue and you suspect problems with the control board or transformer
- If you are uncomfortable working around high-voltage components or do not have proper safety equipment for capacitor discharge
- If the microwave shows signs of radiation leakage or fails professional radiation testing after door switch replacement
When to Call a Professional
Most of the repairs in this guide are within reach for a careful DIYer with basic tools. In my experience, if you open this microwave and find any sign of arcing on the wiring harness, burnt or melted connector terminals near the switch cavity, or a blown HV fuse that keeps returning after replacement, you’ve crossed into high-voltage diagnostic territory that requires a certified technician with proper discharge tools — at that point, DIY troubleshooting puts you at serious risk of a lethal capacitor discharge. When in doubt, a diagnostic service call typically costs $80–$120 and can save you from a misdiagnosis that costs more in parts.
Recommended Parts & Tools
Universal Microwave Door Switch Kit – 3 Pack Safety Interlock Switches
This universal door switch kit contains three safety interlock switches that are compatible with most Toshiba microwaves including the EM925A5A-SS model. The switches are designed to replace faulty door safety mechanisms and restore proper microwave operation when the door latch system fails. Check current pricing on Amazon.
Precision Screwdriver Set with Torx and Phillips Heads – Electronics Repair Kit
This precision screwdriver set includes the specific Phillips and Torx bits needed to safely disassemble the Toshiba EM925A5A-SS microwave housing and access the door switch assembly. The magnetic tips and comfortable grip handles make it easier to work with the small screws found in microwave control panels and door mechanisms. Check current pricing on Amazon.


