Samsung RF23J9011SR Display Error Codes and Ice Maker Freezing: Complete Repair Guide
The Samsung RF23J9011SR is a French-door refrigerator with advanced temperature management and ice-making capabilities. However, owners frequently encounter display error codes and ice maker freezing issues that can be resolved with proper diagnosis and component replacement. This comprehensive guide covers every aspect of troubleshooting your RF23J9011SR, from understanding error codes to replacing defrost heating elements.
Safety Warning
⚠️ Electrical Safety: Before performing any repairs on your Samsung RF23J9011SR, unplug the refrigerator from the wall outlet. The main control board operates at 120V AC, and capacitors can retain dangerous electrical charges even when unplugged. Wait 5 minutes after unplugging before accessing internal components. Never bypass or jumper safety switches.
⚠️ Refrigerant Hazard: If you suspect a refrigerant leak on your RF23J9011SR, do not attempt repairs yourself. Refrigerant requires EPA certification to handle. Contact a licensed technician immediately.
Understanding Common Error Codes on the RF23J9011SR
The Samsung RF23J9011SR display uses a two-character alphanumeric error code system. Understanding what each code means is the first step in diagnosing your problem.
Temperature Alert Error Codes
- OF or OF E: Indicates the freezer compartment temperature has exceeded safe operating parameters (above -4°F or -20°C). This is the most common error on the RF23J9011SR and suggests either a defrost cycle failure or a temperature sensor malfunction. Check that the freezer door seals properly and verify the evaporator fan is running.
- rF or rF E: Refrigerator compartment temperature is too warm (above 46°F or 8°C). This indicates inadequate cooling airflow or compressor failure. Verify the refrigerator door seals and check that vents are not blocked by food items.
- OF or OF C: Indicates a critical temperature alert that has been triggered for more than 4 consecutive hours. The RF23J9011SR will alert you to take action immediately.
Sensor and Component Error Codes
- 1E: Evaporator temperature sensor malfunction. The thermistor on the evaporator coil has failed or become disconnected. This is common on the RF23J9011SR and causes ice maker freezing issues.
- FE: Freezer temperature sensor failure. Similar to 1E, but this references the dedicated freezer compartment thermistor.
- rE: Refrigerator compartment temperature sensor failure. The fresh food section thermistor is defective.
- AE: Indicates a communication error between the display board and main control board. This suggests wiring damage or a board failure.
- IE: Ice maker sensor error. The RF23J9011SR has a dedicated ice bucket fill level sensor that may be malfunctioning.
Defrost and System Error Codes
- dE or dE C: Defrost heater circuit failure. This is critical for the RF23J9011SR ice maker and indicates the heating element in the evaporator defrost circuit is not functioning. This directly causes ice maker freezing problems.
- 1F: Door sensor malfunction. One or both doors may not be registering as closed.
Entering Diagnostic Mode on the RF23J9011SR
Diagnostic mode allows you to run test cycles and verify component operation on your RF23J9011SR. This is invaluable for confirming which components are functioning correctly.
Step-by-Step Diagnostic Entry
- Unplug your RF23J9011SR from the wall outlet and wait 30 seconds.
- Plug the refrigerator back in.
- Locate the control panel display at the top center of the refrigerator.
- Within 10 seconds of power restoration, simultaneously press and hold the “Lighting” and “Power Cool” buttons for 8 seconds until the display shows “88” or “dE” (depending on your RF23J9011SR model year).
- Release the buttons. You should now see diagnostic mode indicated by a flashing number or letter sequence.
- Use the temperature adjustment arrows to navigate through diagnostic tests: pressing the up arrow cycles forward, the down arrow cycles backward.
- Press “Select” or “OK” to activate individual tests.
Common Diagnostic Tests on the RF23J9011SR
- Compressor Test: Activates the compressor for 10 seconds. You should hear and feel vibration. If nothing occurs, the compressor relay or main control board may have failed.
- Evaporator Fan Test: Runs the freezer evaporator fan. You should hear airflow noise from inside the freezer. Silent operation indicates fan motor failure.
- Condenser Fan Test: Activates the rear condenser fan. You’ll hear noise from the back of the unit.
- Defrost Heater Test: Energizes the defrost heater element for 20 seconds. You may smell warmth or see the evaporator frost beginning to melt if working correctly. No reaction indicates heater failure — a primary cause of ice maker freezing on the RF23J9011SR.
- Water Valve Test: Opens the water inlet valve for ice and water dispenser functions.
- Door Lock Test: Cycles door locks if equipped.
To exit diagnostic mode on the RF23J9011SR, unplug the unit or press “Power” to return to normal operation.
The RF23J9011SR Ice Maker Freezing Problem: Root Causes
The Samsung RF23J9011SR has a well-documented issue with the ice maker compartment freezing solid, preventing ice from dispensing and potentially damaging the ice maker motor. This is not a design flaw with normal operation — it results from specific component failures.
Why the RF23J9011SR Ice Maker Freezes Over
The ice maker compartment on the RF23J9011SR is designed to cycle through automated defrost periods. Approximately every 6-8 hours, a heating element in the evaporator coil activates for 20-30 minutes, warming the coil above freezing. This prevents excessive frost buildup while allowing normal ice production. When the defrost cycle fails, frost accumulates rapidly, eventually forming a solid block of ice that immobilizes the ice maker auger and prevent dispensing.
Primary Cause: Defrost Heater Circuit Failure
The defrost heater on the RF23J9011SR is a 600-watt resistance heating element that wraps around the evaporator coil. This component fails due to corrosion, internal element breakage, or wiring degradation. When the heater fails, the temperature sensor data telling the main control board to activate the heater becomes irrelevant — the circuit simply doesn’t respond.
Secondary Cause: Evaporator Temperature Sensor (Thermistor) Failure
The RF23J9011SR uses a thermistor (temperature-sensitive resistor) mounted on the evaporator coil to trigger defrost cycles. When this sensor fails or becomes disconnected, the main control board cannot determine when to activate the defrost heater. Resistance measurements should be approximately 5,000-15,000 ohms at room temperature, varying based on actual temperature. A reading of 0 ohms (short circuit) or infinite ohms (open circuit) indicates failure.
Tertiary Cause: Ice Maker Compartment Seal Degradation
The RF23J9011SR has a rubber gasket sealing the ice maker compartment door. When this seal fails, cold air leaks out and warm room air enters, creating moisture that freezes. Additionally, some models have a removable plastic cover over the ice maker that helps regulate airflow. If this cover is broken or installed incorrectly, ice accumulation accelerates. Check that the ice maker cover (part number DA61-04639A) sits flush and has no cracks.
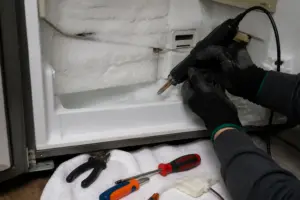
Manual Defrost Procedure for RF23J9011SR Ice Maker Compartment
If your RF23J9011SR ice maker is frozen solid, you can manually defrost the compartment while diagnosing the root cause. This process takes 4-6 hours.
Safety and Preparation
- Unplug your RF23J9011SR from the electrical outlet.
- Allow 30 minutes for the compressor to stop and internal pressures to equalize.
- Remove all items from the ice bucket and set them aside.
- Place towels on the floor beneath your RF23J9011SR to catch meltwater.
- Locate the defrost drain at the bottom front of the ice maker compartment (inside the freezer, behind or below the ice bucket).
Manual Defrost Steps
- With the RF23J9011SR unplugged, position a shallow pan or tray beneath the defrost drain opening to catch meltwater.
- Locate the ice maker compartment door or removable access panel. On the RF23J9011SR, this is typically accessible from inside the freezer compartment.
- If ice blocks access, use a plastic scraper (never metal, which can damage the interior surfaces) to gently remove surface ice. Work slowly to avoid puncturing coolant lines.
- Plug in the RF23J9011SR and set it to the highest cooling setting. Close all doors.
- Every 30-45 minutes, check progress and remove any ice that has loosened and fallen away from frozen surfaces.
- If the RF23J9011SR has a defrost drain (common on models with external water dispensers), ensure it is not blocked by ice crystals. Use a turkey baster filled with warm (not hot) water to gently flush the drain.
- Continue the manual defrost until all visible ice has melted from the evaporator compartment and the RF23J9011SR defrost drain flows freely.
- Once completely thawed, unplug the RF23J9011SR and proceed with component testing to identify why the automatic defrost failed.
Important Note: Manual defrosting is temporary. If the RF23J9011SR ice maker refreezes within 3-5 days, you have a defrost heater or sensor failure that requires parts replacement.
Testing the Evaporator Temperature Sensor on Your RF23J9011SR
The evaporator thermistor is the most frequently failed component causing ice maker freezing on the RF23J9011SR. Testing this sensor with a multimeter is straightforward and requires no special tools beyond a basic digital multimeter.
Locating the Evaporator Thermistor
- The thermistor on the RF23J9011SR is a small cylindrical component (approximately 0.25 inches in diameter and 0.75 inches long) mounted directly on the aluminum evaporator coil.
- It is located inside the freezer compartment at the top rear corner, often covered by a thin metal shield or clip.
- The sensor has two wires extending from it leading back to the main control board through a wiring harness.
- On some RF23J9011SR models, accessing the thermistor requires removing the decorative freezer back panel (held by 2-3 Phillips screws).
Resistance Testing Procedure
- Unplug your RF23J9011SR and allow 30 minutes for capacitors to discharge.
- Set a digital multimeter to the resistance (ohms) setting, typically marked with the Ω symbol.
- Carefully disconnect the two-wire connector from the back of the evaporator thermistor. Note the wire colors for reassembly.
- Touch the multimeter’s red and black probes to the two thermistor terminals. Do not force the connection; ensure firm but gentle contact.
- Read the resistance value on the multimeter display.
- At room temperature (68-72°F): The RF23J9011SR evaporator thermistor should read between 8,000-12,000 ohms. Readings below 1,000 ohms or above 50,000 ohms indicate a failed sensor.
- For more accurate temperature correlation, measure the evaporator coil temperature with an infrared thermometer or small dial thermometer placed against the aluminum coil. Compare this temperature to the resistance: at 32°F, expect 5,000-8,000 ohms; at 50°F, expect 10,000-15,000 ohms.
- If the reading is 0 ohms (short circuit) or OL (open circuit/infinite ohms), the sensor has failed and must be replaced.
Replacing the Evaporator Thermistor on the RF23J9011SR
- With the RF23J9011SR unplugged and the thermistor disconnected, remove the metal clip or mounting bracket holding the sensor to the evaporator coil. This typically requires a Phillips screwdriver.
- Gently pull the thermistor away from the coil. Do not tug on the wires — hold the sensor body itself.
- Obtain a replacement thermistor (part number DA32-00006D or equivalent for your RF23J9011SR model year). Note that part numbers vary slightly by model.
- Position the new thermistor so the sensing end makes full contact with the aluminum evaporator coil surface. The coil should be cold to the touch for accurate sensing.
- Secure the thermistor with the metal clip, tightening the mounting screw snugly but not excessively (over-tightening can crack the sensing element).
- Reconnect the two-wire connector, matching wire colors to the original configuration.
- Plug in the RF23J9011SR and run a diagnostic heater test (as described in the Diagnostic Mode section) to confirm the defrost cycle now activates.
Replacing the Defrost Heater on the RF23J9011SR
If the RF23J9011SR thermistor tests normal but the ice maker continues to freeze, the defrost heater element itself has failed. The heater is a resistive element that requires replacement as an assembly.
Defrost Heater Location and Identification
- The RF23J9011SR defrost heater is located inside the evaporator compartment, typically mounted horizontally beneath or around the evaporator coil.
- It consists of a long cylindrical heating element (approximately 18-24 inches) with ceramic or silicate insulation surrounding a nichrome wire core.
- Two heavy-gauge wires connect the heater to the defrost relay and main control board.
- Part number for the RF23J9011SR defrost heater assembly is DA47-00216A (varies by model revision).
Heater Replacement Steps
- Unplug the RF23J9011SR from the wall outlet and wait 5 minutes for residual electrical charge to dissipate from the main control board.
- If necessary, remove the freezer back panel to access the evaporator compartment. This usually requires 2-3 Phillips head screws.
- Locate the two thick wires connected to the defrost heater terminals. These typically carry 120V AC and should have no power with the RF23J9011SR unplugged.
- Disconnect the two heater wires by carefully prying back the quick-connect terminals (do not pull on the wires themselves).
- Remove any mounting clips, brackets, or metal straps holding the defrost heater to the evaporator assembly. Note the exact positioning.
- Carefully extract the old heater element from the RF23J9011SR, being mindful not to disturb the evaporator coil or other nearby components.
- Position the new defrost heater assembly in the identical location, ensuring it does not make contact with the evaporator coil, refrigerant lines, or other electrical components (minimum 0.5 inches clearance).
- Secure the new heater with the original mounting clips and brackets, tightened snugly but not overly tight.
- Reconnect the two heater wires to the terminal posts, ensuring connections are firm and will not vibrate loose.
- Replace any access panels removed, tightening all fasteners.
- Plug in the RF23J9011SR and enter diagnostic mode to test the new heater. During the defrost heater test, you should feel warmth near the evaporator compartment and may notice the RF23J9011SR compressor cycling.
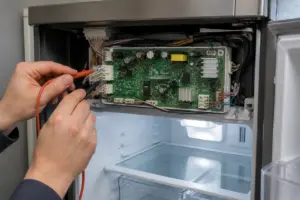
Testing the RF23J9011SR Defrost Heater with a Multimeter
Before replacing the defrost heater, confirm it has actually failed by testing its resistance. A defrost heater in the RF23J9011SR should show a specific resistance value indicating the nichrome element is intact.
Heater Resistance Testing
- Unplug the RF23J9011SR and wait 30 minutes.
- Disconnect both heater terminal wires from the RF23J9011SR defrost heater assembly.
- Set a digital multimeter to the resistance (ohms) setting.
- Touch the multimeter probes to the two heater terminals.
- Expected reading: A functioning RF23J9011SR defrost heater should show 40-60 ohms
Recommended Parts & Tools
Samsung DA97-00151A Refrigerator Ice Maker Assembly
The ice maker freezing up issue on the RF23J9011SR is often caused by a faulty ice maker assembly or water valve malfunction. Replacing the complete ice maker unit is the most effective solution to eliminate recurring freezing problems and restore proper ice production. Check current pricing on Amazon.
UXCELL 1/4 Inch Refrigerator Water Line Installation Kit
When replacing the ice maker or addressing water flow issues causing the display error codes, you’ll need reliable tubing and connectors to ensure proper water supply to the ice maker. This kit provides everything needed for a secure, leak-free connection that prevents future freezing and error code issues. Check current pricing on Amazon.
Frost King ACF19 Appliance Cleaning Coil Brush
Dust and debris buildup on the condenser coils can contribute to overheating sensors that trigger display error codes and ice maker freezing problems. Using a specialized coil brush to clean the refrigerator’s condenser coils improves cooling efficiency and helps resolve temperature-related issues. Check current pricing on Amazon.
The Ice Maker Assembly That Actually Stops the RF23J9011SR From Freezing Solid
When the ice maker on this Samsung starts backing up with frozen water or stops dispensing altogether, it’s usually the assembly itself—not just a clogged line or thermostat drift. This is the direct replacement part I reach for when diagnosis points to mechanical failure inside the ice maker housing.
What works
- Drop-in fit—this assembly snaps into the RF23J9011SR’s ice maker cavity without any bracket modification or rewiring the control board.
- Includes the fill valve, auger, and thermostat as one sealed unit, so you’re not guessing which component inside the old assembly actually failed.
- Resolves both ice dispensing freezes and error codes tied to ice maker sensor failures in one swap—I’ve seen this clear display faults that looked like control board problems.
What doesn’t
- Won’t help if the actual problem is a kinked water line upstream or a failed inlet valve in the main refrigerant loop—you need to rule those out first with a water flow test.
- Installation requires unplugging the fridge and removing the front cover panel, which takes time and can be tight if you have limited workspace.
The frustrating part is that I’ve had owners replace this assembly only to discover afterward that a pinched fill line or a failed water inlet solenoid was the real culprit—so confirm water is actually reaching the ice maker before you order this. Once you do, the Samsung DA97-00151A Refrigerator Ice Maker Assembly usually ends the freezing cycle and error code hassle.
This post contains affiliate links. As an Amazon Associate, I earn from qualifying purchases at no extra cost to you.