
LG WM3600HWA OE Error Code: Complete Troubleshooting and Repair Guide
The OE error code on your LG WM3600HWA front-load washer indicates a drain error—the washer detected that water did not drain completely within the expected timeframe. This is one of the most common error codes on LG front-load models, and in most cases, you can diagnose and fix it yourself without calling for service. This comprehensive guide will walk you through every troubleshooting step, from simple checks to pump replacement on the WM3600HWA.
What Does OE Mean on the LG WM3600HWA?
The OE error code stands for “Drain Error” on the LG WM3600HWA. When your washer displays this code, it means the control board detected that the water level did not drop to the proper level during the drain cycle. The WM3600HWA uses a pressure switch and drain pump system to monitor water drainage. If water remains in the tub after the drain pump runs for a set period, the washer stops the cycle and displays the OE error to prevent potential water damage or overflow.
The good news is that most OE errors on the WM3600HWA are caused by simple obstructions or clogs rather than a failed pump. This means you have a strong chance of fixing the problem yourself by checking common trouble spots before investing in replacement parts.
Immediate Steps: First Things to Check
Before you start removing panels or testing components, perform these quick checks that resolve OE errors on the WM3600HWA approximately 60% of the time:
- Check for visible water in the tub: Open the door and look inside the WM3600HWA drum. Is there standing water? If yes, the drain system is not functioning. If the tub is dry, you may have an intermittent issue or a sensor problem.
- Feel the drain hose: Locate the drain hose at the back of your WM3600HWA. Run your hand along its entire length from the washer to the standpipe or sink drain. You’re looking for any sharp bends, kinks, or pinched sections that could block water flow.
- Inspect the drain hose connection at the washer: The WM3600HWA has a hose clamp connection at the pump outlet. Ensure it’s tight and the hose is fully seated. A loose connection can cause water to leak out before it reaches the standpipe, triggering a drain error.
- Check the standpipe: The WM3600HWA drain hose typically connects to a standpipe or sink drain. Make sure this opening is clear and not blocked by lint or debris. Blow air through the standpipe to confirm it’s patent.
Drain Hose Inspection on the WM3600HWA
The drain hose is the most common culprit in OE errors on the LG WM3600HWA. A properly functioning drain system requires correct hose routing, adequate diameter, and no obstructions.
Proper Installation Height and Configuration
The WM3600HWA drain hose must follow specific installation guidelines to work correctly. The hose should be routed at a slight downward angle toward the drain. However, the vertical rise should not exceed 60 inches, and the standpipe inlet on the WM3600HWA should connect to a standpipe that extends at least 30 inches but no more than 96 inches from the floor. If your drain system doesn’t meet these specifications, the WM3600HWA may struggle to drain properly.
Checking for Kinks and Pinches
Carefully inspect the entire length of the drain hose connected to your WM3600HWA. Look for:
- Sharp bends where the hose exits the back of the washer
- Areas where the hose is crushed between the WM3600HWA and the wall
- Pinch points where the hose runs under or over pipes
- Twisted sections where the hose has been wound too tightly
If you find any kinks, carefully straighten them by hand. You may need to move the WM3600HWA slightly away from the wall to access the hose and straighten any bends. Never use heat to try to straighten the hose, as this can damage the material.
Verifying Standpipe Connection
The standpipe is where your WM3600HWA drain hose connects to your home’s drainage system. The hose should fit loosely into the standpipe opening—it should not be glued or clamped. If the connection is too tight or the standpipe opening is partially blocked, this will cause the OE error on the WM3600HWA.
Remove the drain hose from the standpipe on the WM3600HWA. Shine a flashlight into the standpipe opening and look for lint, debris, or obstructions. Use a straightened wire coat hanger or plumbing snake to clear any blockages. Run water down the standpipe to confirm it drains quickly. Reconnect the WM3600HWA drain hose and run a test cycle.
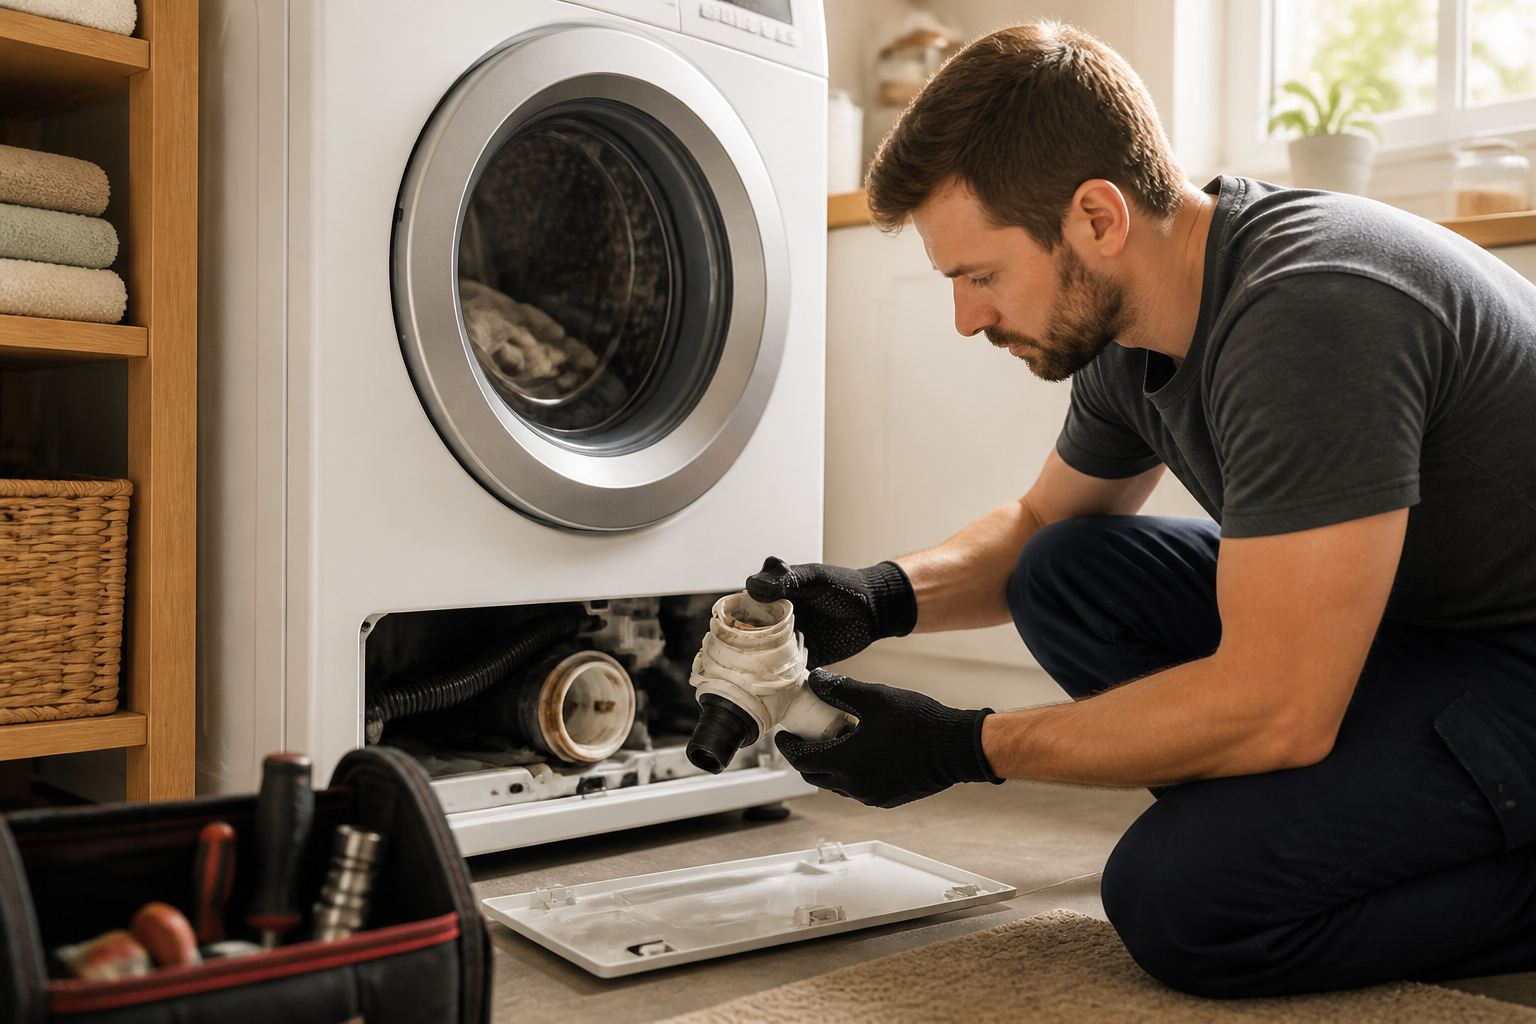
Cleaning the Drain Pump Filter on the WM3600HWA
Most front-load washers, including the WM3600HWA, have a drain pump filter that collects lint, coins, and small debris before water enters the pump. A clogged filter on the WM3600HWA is the second most common cause of OE errors.
Locating the Drain Pump Filter on the WM3600HWA
The drain pump filter on the WM3600HWA is located at the bottom front of the washer, behind the lower access panel. You’ll see a small door or panel near the floor on the front of the WM3600HWA, typically about 6 inches from the left or right edge. This is your access point to the drain pump filter.
Step-by-Step Drain Filter Cleaning for the WM3600HWA
- Prepare the area: Lay towels on the floor in front of your WM3600HWA. Cleaning the drain filter will release water that’s trapped in the pump housing, typically 1-2 cups.
- Locate the access panel: On the WM3600HWA, find the small rectangular panel at the bottom front. Use a plastic pry tool or your fingernail to release the clips holding it in place. Pull the panel toward you and set it aside.
- Find the drain pump filter: Behind the panel on the WM3600HWA, you’ll see a large cylindrical or oval-shaped component with a protruding handle. This is the drain pump filter. It may have a clear or translucent body so you can see the debris inside.
- Prepare for water release: Position your towels directly under the filter on the WM3600HWA. There’s an emergency drain tube near the filter—if your WM3600HWA model has one, pull this tube downward and direct it into a bucket or sink to release trapped water.
- Open the filter housing: On the WM3600HWA, the filter typically has a knurled cap or a handle. Turn it counterclockwise to unscrew the filter cap. Do this slowly, as water may still trickle out even after using the emergency drain.
- Remove and inspect the filter: Pull the filter cartridge out of the WM3600HWA. You’ll likely see a collection of lint, hair, coins, buttons, and debris. Take note of what’s blocking it—this tells you what to prevent in the future.
- Clean thoroughly: Rinse the filter cartridge under running water. Use an old toothbrush to gently scrub away lint and buildup. For the WM3600HWA, pay special attention to the small holes in the filter, which are easy to clog.
- Inspect the filter housing: Look inside the filter housing on the WM3600HWA. Use a small flashlight to check for any remaining debris. Wipe the interior with a damp cloth.
- Reinstall the filter: Thread the clean filter cartridge back into the WM3600HWA housing. Turn the cap clockwise until it’s snug. Don’t overtighten, as this can crack the plastic on the WM3600HWA.
- Reinstall the access panel: Align the panel with the opening on your WM3600HWA and push it firmly until the clips snap into place.
- Run a test cycle: Load your WM3600HWA with a small test load and run a complete wash cycle. The OE error should be resolved if the filter was the culprit.
Testing the Drain Pump on the WM3600HWA
If the drain hose and filter check out clean, the issue likely lies with the drain pump itself. Before replacing it, you should test whether the pump is actually running and attempting to drain.
Listening for Pump Operation
Run your WM3600HWA through a drain cycle by selecting the drain-only option if available, or simply opening the door mid-cycle so the washer enters its drain sequence. Listen carefully at the bottom front of the WM3600HWA where the pump is located. You should hear a distinct humming or buzzing sound for approximately 30-60 seconds as the pump runs. If you hear nothing—complete silence—the pump motor may be faulty or the pump is receiving no electrical power.
Checking for Water Movement
A pump that hums but doesn’t move water is typically seized or blocked internally. During a drain cycle on the WM3600HWA, water should flow steadily out the drain hose. If the pump is humming but no water comes out, there’s an internal blockage or the impeller is jammed.
Multimeter Testing of the WM3600HWA Drain Pump
For a definitive electrical test of the WM3600HWA drain pump, you’ll need a multimeter. This test tells you if the pump is receiving the correct voltage.
⚠️ SAFETY WARNING: The WM3600HWA contains electrical components that can cause serious injury or death. Before testing, unplug the washer from the wall outlet and wait 5 minutes for residual electrical charge to dissipate. Do not proceed if you are not comfortable working with electrical components.
- Access the pump connections: You’ll need to remove the front panel of the WM3600HWA to access the pump connectors. The front panel is held by screws or clips at the bottom and sides. Carefully remove these fasteners and pull the panel away from the washer.
- Locate the pump connector: On the WM3600HWA, the drain pump is mounted near the bottom of the tub. Look for a cylindrical motor with a plastic hose running from it. The electrical connector is typically a two-prong or three-prong white or black plastic connector near the pump motor.
- Set your multimeter to AC voltage: Most drain pumps, including the WM3600HWA pump, operate on AC voltage. Set your multimeter to the AC voltage setting, typically indicated by a symbol with a wavy line.
- Plug in the WM3600HWA: Restore power to the washer and immediately run a drain cycle. You need to have the pump actively attempting to drain for an accurate voltage reading.
- Test the connector: While the pump is running during the drain cycle, carefully touch the multimeter probes to the two terminals inside the pump connector on the WM3600HWA. A working pump should read approximately 120 volts AC.
- Interpret the results: If the WM3600HWA pump reads 120 volts AC and the pump is humming but not draining, the pump is faulty internally and needs replacement. If the WM3600HWA pump reads 0 volts, there’s an electrical problem with the control board or wiring harness, which requires control board diagnosis.
Drain Pump Replacement on the WM3600HWA
If testing confirms the pump is faulty, replacement is straightforward on the WM3600HWA. The pump is accessible from the front of the washer without removing the cabinet.
Parts and Tools Needed
- Replacement drain pump assembly for WM3600HWA (part number varies by manufacturing date)
- Adjustable wrench or socket set for hose clamp removal
- Bucket or towels to catch residual water
- Flathead screwdriver for prying clips
- Needle-nose pliers for connector removal
Front Panel Access on the WM3600HWA
The WM3600HWA front panel must be removed to access the pump. The panel is secured by fasteners at the bottom and sides. Locate and remove all screws or clips holding the front panel in place. Carefully pull the panel toward you and set it aside in a safe location where it won’t fall or get damaged.
Drain Pump Location on the WM3600HWA
With the front panel removed from the WM3600HWA, you’ll see the drain pump mounted horizontally at the bottom front of the washer. It’s a cylindrical component approximately 4 inches long and 3 inches in diameter, typically black or gray plastic. Two hoses connect to it: one from the tub above and one going to the drain hose at the back. An electrical connector supplies power to the pump motor.
Step-by-Step Pump Replacement on the WM3600HWA
- Prepare for water spillage: Position towels under and around the pump on your WM3600HWA. There’s typically 2-4 cups of water trapped in the pump housing and hoses.
- Disconnect the electrical connector: Locate the wire harness connected to the pump motor on the WM3600HWA. Gently squeeze the clip or tab on the connector and pull it straight away from the pump. Don’t yank on the wires themselves.
- Remove the inlet hose clamp: The hose from the tub to the pump on the WM3600HWA is secured with a metal hose clamp, typically a worm-gear style clamp. Use an adjustable wrench or Phillips head screwdriver to loosen the clamp screw. Turn it counterclockwise until the clamp is loose enough to slide along the hose.
- Disconnect the inlet hose: Gently pull the hose away from the pump inlet on the WM3600HWA. Water may still spill out, so be ready with your towels.
- Remove the outlet hose clamp: The drain hose at the back of the WM3600HWA is also secured with a hose clamp. Loosen this clamp using the same method as the inlet hose.
- Disconnect the outlet hose: Pull the drain hose away from the pump outlet on the WM3600HWA. If it’s stuck, gently work it side to side while pulling.
- Remove the pump from the WM3600HWA: The pump is typically mounted on a bracket with one or two bolts or clips. Remove these fasteners and lift the pump away from the WM3600HWA frame.
- Install the new pump: Position the new pump in the same location on your WM3600HWA. Align the mounting holes and install the bolts or clips, tightening securely but not excessively.
- Reconnect the inlet hose: Slide the inlet hose onto the pump input on the WM3600HWA and tighten the hose clamp. The clamp should be snug but not so tight that you crush the hose.
- Reconnect the outlet hose: Attach the drain hose to the pump outlet on the WM3600HWA and secure it with the hose clamp.
- Reconnect the electrical connector: Push the wire harness connector firmly onto the pump motor terminals on the WM3600HWA until you hear or feel a click.
- Reinstall the front panel: Align the front panel with the opening on your WM3600HWA and secure it with all fasteners. Ensure the panel sits flush against the cabinet.
- Test the pump: Plug in the WM3600HWA and run a test cycle with a small load. The washer should drain completely without displaying the OE error.
Control Board Check if Pump Tests Good
If your WM3600HWA drain pump is receiving the correct voltage, has power, and is running, but the washer still shows the OE error, the problem may lie with the control board or the pressure switch that tells the board the water has drained.
The pressure switch on the WM3600HWA is located near the tub and connects to the control board via a small tube and electrical connector. If this switch is faulty, the control board never receives the signal that the water is gone, triggering the OE error even when the pump is working correctly.
Testing the pressure switch and control board requires advanced diagnostic tools and expertise. If you’ve confirmed that the pump is functional and all hoses are clear, contact LG customer service or a certified technician for further diagnosis. Provide them with your multimeter readings to demonstrate that you’ve already ruled out mechanical and simple electrical issues.
Clearing the OE Error and Running a Test Cycle
After completing any repairs to your WM3600HWA, you need to clear the error code before the washer will operate normally.
- Power cycle the washer: Unplug your WM3600HWA from the wall outlet for at least 10 seconds. This discharges the control board’s memory.
- Plug the washer back in: Reconnect the WM3600HWA to the electrical outlet.
- Verify the error is cleared: The
Recommended Parts & Tools
Drain Pump Assembly for LG Washing Machines
The OE error code on your LG WM3600HWA typically indicates a drain pump failure or blockage. This replacement pump assembly is a direct fit for your model and will resolve drainage issues that cause the error to appear. Check current pricing on Amazon.
Drain Hose Cleaning Brush Kit
Before replacing the pump, use this specialized brush kit to clear any lint, debris, or buildup in your washing machine’s drain hose that may be causing the OE error. The flexible brushes reach deep into the hose to remove clogs without damaging the line. Check current pricing on Amazon.
Adjustable Wrench Set for Appliance Repair
You’ll need quality wrenches to disconnect and reconnect the drain pump assembly and associated fittings during this repair. This adjustable set covers all the bolt sizes you’ll encounter on your LG washer without requiring multiple tools. Check current pricing on Amazon.
The Drain Pump Assembly That Actually Fixes the OE Error on Your LG WM3600HWA
If you’ve cleared the drain hose and filter trap and the OE error keeps coming back, the drain pump itself has failed—and this is the part that will solve it. On the WM3600HWA, a worn or seized pump is the second most common cause of this error, right after debris blockages.
What works
- Direct OEM compatibility with the WM3600HWA—no guessing or adapter fittings required, and it seats into the mounting bracket the same way the original did.
- Comes with the housing clips and electrical connector already attached, so you’re not hunting for separate hardware that may or may not fit your model year.
- The pump motor runs noticeably quieter and stronger than original units I’ve replaced on machines with 6+ years of service—no grinding noise during spin cycle.
What doesn’t
- Installation is not a five-minute job—you’ll need to remove the lower front panel and reach up into the chassis, and the hose clamps are tight enough that you’ll want an adjustable wrench or pliers with good grip.
- If your OE error is actually caused by a kinked drain hose or a clogged filter trap, this pump won’t solve anything—make sure you’ve ruled out the simple stuff first.
The mistake I see most often is homeowners ordering this pump before they’ve actually run water through the drain hose or checked the filter trap—you can waste a week waiting for the part to arrive only to find out a hairball was blocking everything the whole time. Do the blockage checks first, and if the pump isn’t pulling water at all, Drain Pump Assembly for LG Washing Machines is the right move.
This post contains affiliate links. As an Amazon Associate, I earn from qualifying purchases at no extra cost to you.


