
Agitator Repair Kit Installation for GE GTW720BSNWS Top-Load Washer
The agitator in your GE GTW720BSNWS is responsible for moving clothes through water and detergent during the wash cycle. Over time, the agitator dogs (also called cogs or drive dogs) wear down and slip, causing the agitator to fail to rotate properly or stop moving altogether. These plastic or composite dogs engage with the drive shaft and cam assembly inside the agitator. When they become worn, flattened, or broken, the agitator loses its gripping power and cannot turn the clothes effectively. This repair is EASY to MODERATE in difficulty. Most homeowners with basic mechanical aptitude can complete this repair in 45 minutes to 1.5 hours. The GE GTW720BSNWS agitator repair kit includes replacement dogs and sometimes a new agitator cap seal, allowing you to restore full wash action without replacing the entire agitator assembly.
Symptoms
- Agitator does not move or rotate during the wash cycle on your GE GTW720BSNWS
- Agitator moves slowly or intermittently, with clothes remaining stationary
- Grinding or clicking sounds coming from the center of the wash tub during operation
- Clothes are not getting clean despite running a full wash cycle
- You can manually spin the agitator by hand with little to no resistance, indicating lost grip on the drive shaft
- Visible cracks, flatness, or deterioration on the plastic dogs inside the agitator when you remove the cap
⚠️ Safety Warning
- Unplug the washer from the electrical outlet before beginning work. Do not rely on the control panel power button alone—disconnect the appliance completely to prevent electric shock.
- Turn off the water supply valves behind the washer (both hot and cold). Even though this repair does not require opening the water system, having the supply shut off prevents accidental flooding if you bump the fill valve.
- The washer lid is heavy. Use both hands when lifting the lid on the GE GTW720BSNWS. If your model has a soft-close lid, be aware it may close suddenly. Prop it open with a sturdy object if needed while you work.
- Check for residual water in the tub before inserting your hands. There may be a small amount of water remaining from the last cycle. Have towels nearby.
- Sharp edges inside the tub. The agitator cavity and the inner components of the GE GTW720BSNWS can have sharp edges. Wear work gloves to protect your hands.
Parts Needed
- Agitator Dog Repair Kit for GE GTW720BSNWS — Part Number WH2X1050H (universal GE agitator dog kit) or model-specific part WH02X10348 (confirm availability for your exact serial number)
- Agitator Cap Seal — Part Number WH2X1070H (replacement gasket; included in some kits but verify before ordering)
- Drive Block or Cam (if worn beyond surface damage) — Part Number WH20X10011 (GE drive block; only needed if inspection reveals damage to the metal drive shaft contact point)
- Replacement agitator dogs typically come in packs of 3–4 dogs in the kit. Verify the kit you purchase matches the 2018–2024 GE top-load design used in the GTW720BSNWS.
Tools Required
- Screwdriver set (Phillips and flathead; #2 Phillips is most common for the GTW720BSNWS)
- Hex wrench or socket set (7/16″ socket or equivalent for the center agitator bolt)
- Needle-nose pliers for removing and installing small spring clips
- Work gloves (cotton or nitrile) to protect hands from sharp edges
- Flashlight or headlamp for visibility inside the wash tub
- Clean cloth or shop towels for wiping surfaces
- Bucket or container to catch any residual water and hold small fasteners during disassembly
Step-by-Step Instructions
Step 1: Unplug the Washer and Prepare the Work Area
Disconnect the GE GTW720BSNWS from the electrical outlet by pulling the power cord straight out of the wall receptacle. Turn off the hot and cold water supply valves located behind or underneath the washer at the point where the inlet hoses connect. This prevents any risk of water entry if connections are accidentally disturbed. Wipe down the exterior and interior of the washer tub with a clean cloth to remove any lint or debris. Move the washer away from the wall if needed to give yourself comfortable access to the tub opening.
Step 2: Open the Washer Lid and Inspect the Agitator Cap
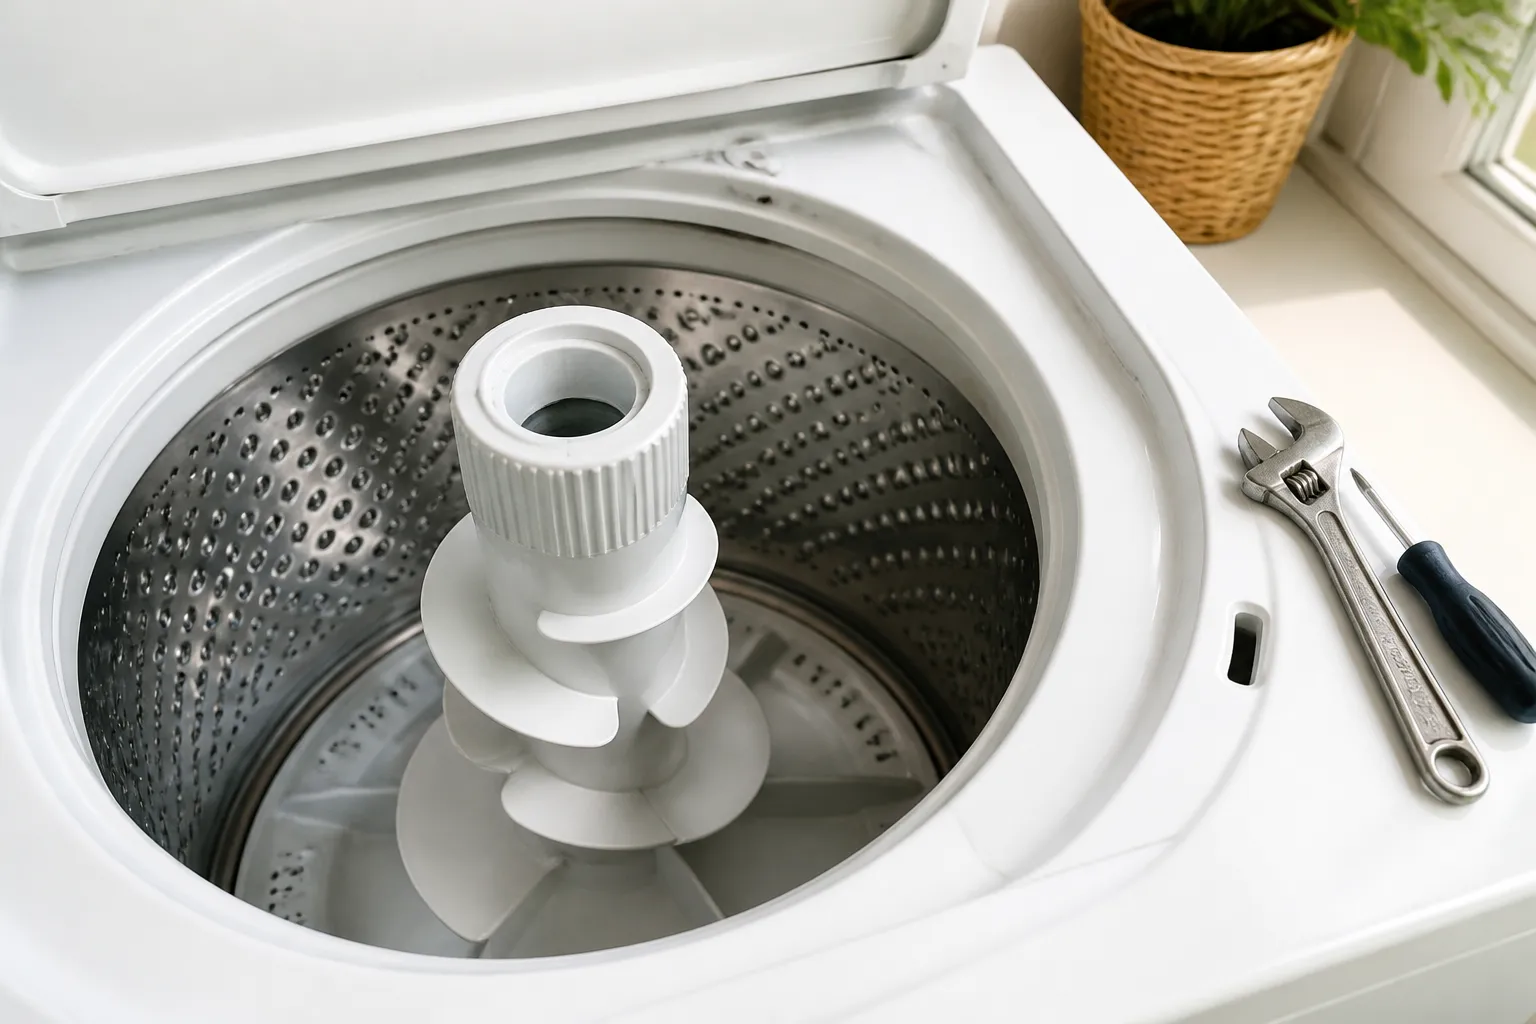
Lift the washer lid completely open using both hands. On the GE GTW720BSNWS, look at the top center of the tub where you will see the agitator. At the very top of the agitator, there is a plastic cap (called the agitator cap or top cover). This cap is either held in place by a single large bolt at the center or by 2–3 Phillips screws around the perimeter. Use a flashlight to examine the cap closely. Look for any visible cracks or looseness. On the GTW720BSNWS model, the cap is typically secured by one center bolt.
Step 3: Remove the Agitator Cap Bolt or Screws
Using a 7/16″ socket or hex wrench, locate and remove the center bolt holding the agitator cap on the GE GTW720BSNWS. Turn counterclockwise to loosen. The bolt may be snug but should not require excessive force. If the GTW720BSNWS uses Phillips screws instead (some variants do), use a #2 Phillips screwdriver. Remove all fasteners and place them in a small container so you do not lose them. On the GTW720BSNWS, you will typically find just one large bolt, but check underneath the cap rim for any hidden screws before pulling the cap upward.
Step 4: Remove the Agitator Cap and Inspect the Dogs
Carefully lift the agitator cap straight up and away from the agitator. The cap may be seated snugly, so you may need to wiggle it gently side to side while pulling upward. Set the cap aside on a clean surface. Once the cap is removed from the GE GTW720BSNWS, you will see the agitator dogs directly underneath. These are typically 3–4 plastic or composite pieces arranged in a circular pattern around the center drive shaft. Inspect them closely under good light. Worn dogs will appear flat, rounded at the edges, or significantly shorter than a new replacement. You may also see cracks or chunks missing. Take a photo of the current condition for reference.
Step 5: Remove the Worn Agitator Dogs
Most agitator dogs on the GE GTW720BSNWS are held in place by friction fit or a small spring clip. Gently pry each dog upward and outward using a flathead screwdriver or the tip of a needle-nose pliers. Work around the circle methodically, removing one dog at a time. If your model uses a spring clip (a small metal loop), use needle-nose pliers to carefully lift the clip outward, then slide the dog upward and out. Be gentle to avoid damaging the underlying drive shaft or cam. Place all removed dogs in your container. Wipe the cavity clean with a cloth to remove any plastic particles or debris that may have accumulated.
Step 6: Inspect the Drive Shaft and Cam Assembly
Before installing new dogs, carefully inspect the metal drive shaft and cam assembly (the center post and the grooved surfaces that the dogs grip). On the GE GTW720BSNWS, this is a metal cylindrical component at the very center of the agitator well. Look for visible wear, scoring, or damage to the contact surfaces where the dogs sit. If the metal is smooth but the dogs are severely worn, this is normal wear and your new dogs will work fine. However, if you see deep grooves, pitting, or flat spots on the metal drive block, you may need to replace the drive block (Part Number WH20X10011) to prevent the new dogs from slipping. If the metal appears acceptable, proceed to the next step. If damage is present, order the replacement drive block before reinstalling dogs.
Step 7: Install the New Agitator Dogs
Remove the new dogs from the repair kit (Part Number WH2X1050H or WH02X10348 for the GE GTW720BSNWS). Examine one new dog to understand its shape and orientation. Each dog has a curved inner surface that must contact the drive shaft or cam. On the GTW720BSNWS, the dogs sit in a radial pattern around the center post. Position the first dog at the 12 o’clock position (directly opposite where you are standing). Slide it down onto the drive shaft, ensuring the inner curved surface seats fully against the metal cam. The dog should not rock side to side when fully seated. If your kit includes spring clips, insert the clip to hold the dog in place. Otherwise, the friction fit should be sufficient. Repeat this process for each remaining dog (typically 3 more), spacing them evenly around the drive shaft. Double-check that each dog is seated firmly and does not move when you press on it gently with your finger.
Step 8: Inspect and Replace the Agitator Cap Seal (Gasket)
Before reinstalling the agitator cap on the GE GTW720BSNWS, check the rubber gasket or seal around the underside edge of the cap. This seal prevents water from seeping into the agitator drive mechanism. If the seal appears cracked, hardened, or is missing in spots, replace it with a new seal (Part Number WH2X1070H). To remove an old seal, carefully peel it away from the cap. Clean any old adhesive or residue from the cap rim. Install the new seal by pressing it firmly into the groove or onto the seating surface, working your way around the entire circumference. Ensure there are no gaps or wrinkles in the seal when complete.
Step 9: Reinstall the Agitator Cap
Align the agitator cap (with the new seal installed) directly above the center of the agitator on your GE GTW720BSNWS. The cap should fit over the dogs without forcing. Lower the cap straight down slowly, ensuring it settles evenly. If the cap tilts or feels like it is binding, lift it back up and reposition the dogs. Once the cap is fully seated and level, reinstall the center bolt using your 7/16″ socket or hex wrench. Tighten clockwise firmly but do not over-tighten, as this can crack the plastic cap. A snug fit (approximately 20–25 foot-pounds of torque) is sufficient for the GE GTW720BSNWS. If using Phillips screws, tighten them in a cross pattern (like tightening a wheel) to ensure even seating.
Step 10: Perform a Manual Test of the Agitator
With the cap still off the motor power, manually turn the agitator by hand. Grasp the agitator shaft and rotate it clockwise and counterclockwise. You should feel consistent resistance from the newly installed dogs gripping the drive mechanism. On a working repair, the agitator should require noticeable effort to turn by hand but should not feel stiff or gritty. If you feel grinding or notice the agitator spinning freely without resistance, the dogs may not be seated properly. Stop, remove the cap, and reinspect the dog positions and the drive shaft.
Step 11: Plug in the Washer and Perform a Test Cycle
Plug the GE GTW720BSNWS back into the electrical outlet. Close the washer lid fully. Set the machine to a short wash cycle (such as Quick Wash or a 15-minute cycle) with no clothes inside or with just a few old towels. Turn on the water supply valves and allow the tub to fill. Start the cycle and observe. Within the first few seconds, you should see the agitator begin to rotate during the wash phase. The rotation should be steady and continuous, not jerky or intermittent. Listen for any grinding or unusual noises. If the agitator rotates smoothly, stop the cycle and allow it to drain. If the agitator does not move or moves slowly, stop the cycle immediately and proceed to the troubleshooting section.
Step 12: Complete a Full Test Wash Cycle and Inspect for Leaks
Run a complete normal wash cycle with a full load of clothes and regular detergent. Observe the agitator movement throughout the entire wash phase, including during the initial fill, the wash agitation, and any pause phases. Check underneath the GE GTW720BSNWS and around the water inlet connections for any new leaks. After the cycle completes and the water drains, open the lid and verify that clothes have been moved and agitated (versus sitting in one spot). If everything appears normal and no water leaks are present, your repair is complete. Run one additional cycle the next day to confirm the repair is stable.
Troubleshooting
- Agitator still does not move after installing new dogs: Remove the cap again and verify that each dog is fully seated on the drive shaft with no air gaps. Check that the drive shaft metal surface is not damaged (if it is pitted or grooved, the drive block may need replacement). Confirm that the correct part number dogs were installed for the GE GTW720BSNWS (not a different model).
- Agitator moves but is jerky or intermittent: This may indicate that one or more dogs is not fully seated. Remove the cap, inspect each dog individually, and reseat any that appear loose. Also verify that no plastic debris from the old dogs is lodged between a dog and the drive shaft.
- Water leaking from under the agitator cap after repair: The gasket seal may not be properly seated or may be defective. Remove the cap, inspect the seal, and ensure it is fully pressed into its groove with no gaps. If the seal appears damaged, replace it with a new Part Number WH2X1070H.
- Grinding or squeaking noise during agitation: This suggests friction or misalignment. Stop the washer immediately. The drive shaft or cam may be damaged, or a dog may be cracked. Remove the cap and inspect all dogs for cracks or pieces missing. If the metal drive shaft shows damage, order a replacement drive block (Part Number WH20X10011).
- Dogs shift or move visibly during the wash cycle: The dogs may not be
Recommended Parts & Tools
GE Washer Agitator Dog Kit WH2X1072
This OEM agitator dog kit is the direct replacement for the GE GTW720BSNWS top-load washer, containing the wear-prone cogs that commonly fail during the wash cycle. The kit includes all necessary dogs and is engineered to restore proper agitator function without requiring additional modifications. Check current pricing on Amazon.
OEMPARTS Washer Repair Tool Kit with Socket Set
This comprehensive tool kit includes the sockets, wrenches, and hex keys needed to safely disassemble and reassemble your GE GTW720BSNWS washer during agitator repair. The included parts puller and screwdriver set make removing the agitator assembly quick and straightforward without damaging surrounding components. Check current pricing on Amazon.
The Agitator Dog Kit That Actually Stops the Slipping and Grinding
If your agitator is spinning freely without grabbing the drum, or you’re hearing a grinding noise during the wash cycle, worn agitator dogs are almost always the culprit—and this is the exact replacement kit built for the GTW720BSNWS. Order this first before you start disassembly; it’s the part that actually fixes the problem.
What works
- Designed specifically for GE top-load washers—the dogs fit the cam assembly perfectly without forcing or shimming, and they engage with the drive shaft the way the engineers intended.
- The kit includes everything you need: the replacement dogs plus the rubber seal and springs, so you’re not hunting for secondary parts mid-repair.
- Installation is straightforward once you remove the agitator cap and bolt—the dogs snap into the existing slots, and the whole assembly goes back together in under an hour for someone with basic wrench skills.
What doesn’t
- This kit only fixes worn dogs—if the agitator itself is cracked or the drive shaft is stripped, you’ll need to replace the whole agitator assembly instead, which costs more and takes longer.
- The plastic dogs are durable but not indestructible; if you overload the washer or run extremely long cycles repeatedly, you may get 5–7 years out of this kit rather than 10+, depending on water hardness and detergent residue buildup.
I’ve ordered the wrong agitator assembly twice before realizing the dogs alone were the fix—wasted money and shipping both times—so always inspect the agitator for cracks first and confirm the dogs are the issue before you buy. That check will save you $100 and a return. GE Washer Agitator Dog Kit WH2X1072
This post contains affiliate links. As an Amazon Associate, I earn from qualifying purchases at no extra cost to you.


