
DISCLAIMER: This guide is for educational purposes. Gas appliance repair involves safety risks. If you’re uncomfortable working with gas appliances or lack proper tools, contact a licensed technician.
Understanding the Igniter Electrode on Bosch Gas Cooktops
Eighteen years of taking appliances apart has taught me that understanding the components of your Bosch gas cooktop is crucial, and the igniter electrode is where most ignition trouble starts. This small part is central to the spark ignition system. Unlike the old cooktops with pilot lights, modern Bosch gas ranges use electronic spark ignition (ESI) to light burners on demand. The igniter electrode is a small ceramic or porcelain rod with a metal tip positioned near the burner flame port. When you turn a burner knob, electricity pulses through this electrode, creating a spark that ignites the gas.
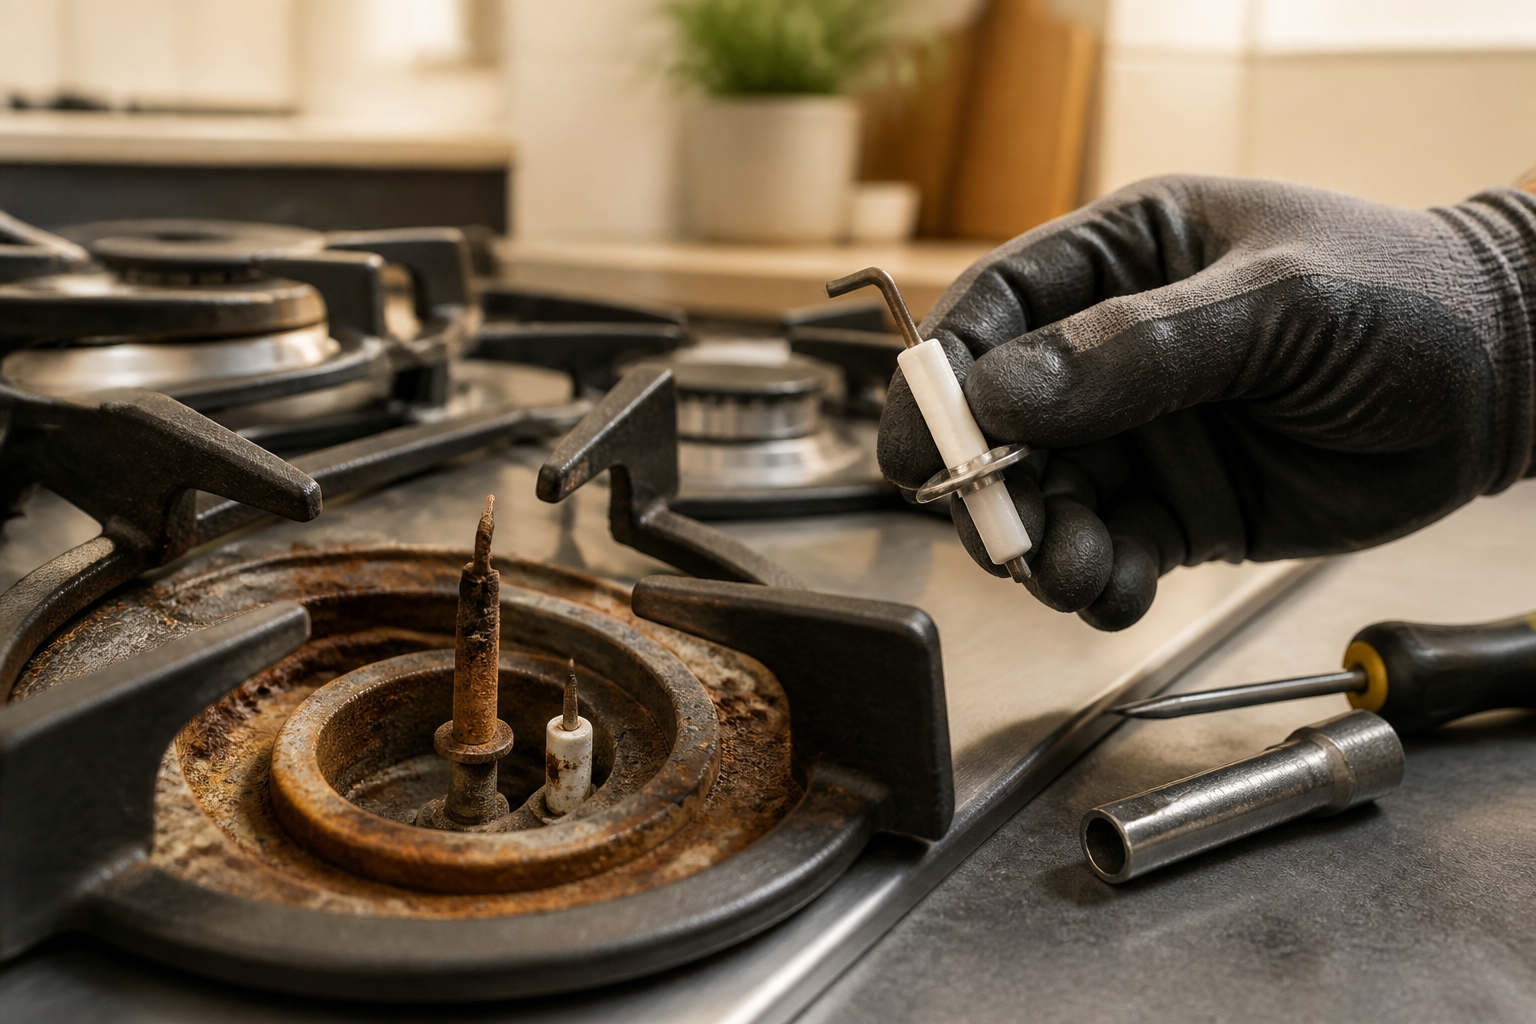
On Bosch cooktops, there’s usually one electrode per burner, right next to where the flame emerges. The electrode assembly has three main parts: the ceramic insulator body, the inner metal conductor, and the metal mounting bracket that secures it underneath the cooktop surface. The electrode tip is exposed to the heat from the burner flame, making it vulnerable to corrosion, cracking, and rust accumulation over time.
The electrode generates a high-voltage spark (typically 10,000-14,000 volts) across a small air gap between the electrode tip and the burner bowl. This spark ignites the gas mixture as it flows from the burner head, and all of this happens in mere milliseconds, which is why you hear that rapid clicking sound when you try to ignite a burner.
How Rust and Brittleness Develop on Electrodes
From my experience, igniter electrodes on Bosch gas cooktops deteriorate due to several mechanisms, all tied to the harsh conditions they function in:
Spilled Liquids and Mineral Deposits
Let’s face it, spills happen. Boiling water, cooking sauces, and acidic liquids often splash onto the cooktop surface and seep down around the electrode assembly. Over time, water contains minerals that oxidize the metal parts of the electrode. Acidic foods like tomato sauce speed up this corrosion. Even small spills can accumulate beneath the cooktop, creating an environment that rusts the electrode tip and mounting hardware.
Cleaning Product Residue
I’ve seen many homeowners use commercial cooktop cleaners, vinegar-based solutions, or abrasive pads on their Bosch cooktops. If these chemicals drip or spray underneath, they react with the metal and ceramic materials. Alkaline cleaners are particularly bad for the ceramic insulator, causing micro-fractures that can lead to bigger cracks over time.
Heat Cycling Stress
The electrode experiences extreme temperature changes. During normal operation, it heats to 400-600°F, then cools rapidly when the burner is turned off. This constant expansion and contraction creates stress on the ceramic insulator. The different thermal expansion rates of the ceramic and metal components cause tiny separations at the bond line, trapping moisture and cleaning residue that corrode the metal core.
Oxidation from Repeated Sparking
Each time the electrode sparks, it ionizes a tiny amount of metal that deposits on the ceramic surface or in the surrounding air gap. Over thousands of spark cycles, this creates a rough, corroded texture. The ceramic insulator also degrades from electrical stress, becoming more porous and prone to moisture absorption.
Symptoms of a Failed or Failing Igniter Electrode
If the electrode is starting to fail, you might see one or more of these signs:
- No spark or very weak spark: You turn the knob and hear no clicking or see no spark near the burner.
- Continuous clicking that doesn’t stop: The electrode keeps trying to spark even after the burner ignites, indicating it can’t establish proper contact.
- Burner won’t ignite: You hear clicking but no flame appears, even though gas is flowing (you can smell it).
- Wrong burner ignites: Sparking occurs at an adjacent burner instead of the one you turned on, suggesting misalignment or electrical crossover.
- Intermittent ignition: Sometimes the burner lights, sometimes it doesn’t, depending on how hard you turn the knob or environmental humidity.
- Visible corrosion or white crusty deposits: Looking down at the burner, you can see rust, mineral buildup, or a dull, pitted surface on the electrode tip.
- Cracked or brittle ceramic: The ceramic insulator appears visibly cracked or has chunks missing.
Cleaning the Electrode Before Replacement
Before jumping to replace an electrode, I always suggest trying to clean it first. In many cases, rust and mineral deposits can be removed, restoring function. This non-invasive first step can save you some money and labor.
Safety First
⚠️ SAFETY WARNING: Turn off the gas supply at the main shutoff valve before cleaning. Even though you won’t be opening any gas lines, it’s essential to eliminate any risk. Also, ensure the cooktop is completely cool—wait at least 2 hours after the last use.
Cleaning Steps
- Locate the electrode: Lift the cooktop surface grates and the burner caps (the metal rings). Look directly at the base of each burner to find the small ceramic rod with a metal tip positioned near the flame port.
- Inspect closely: Use a flashlight to see the electrode tip. Note the color and texture. Rust appears orange-brown; mineral deposits are white or chalky; a healthy electrode has a dark gray or black tip.
- Prepare cleaning tools: Gather a soft brass brush (never steel wool), a small soft cloth, distilled water, and optionally a small amount of white vinegar or rubbing alcohol. Avoid commercial cooktop cleaners or abrasive materials.
- Gently brush the electrode tip: Using light, circular motions, brush the electrode tip where the spark should emerge. Be gentle—the ceramic is brittle. The goal is to remove loose rust and deposits, not to scrub aggressively.
- Wipe away debris: Use a slightly damp cloth to wipe away loosened rust particles and dust. Allow it to dry completely.
- Check the electrode gap: The distance between the electrode tip and the nearest point on the burner bowl should be 3-4 mm (approximately 1/8 inch). If the electrode is bent or positioned incorrectly, this gap may be too large or small, preventing proper spark. If you notice misalignment, do not attempt to bend it yourself—the ceramic is too fragile.
- Test the burner: Turn the gas back on, replace the burner components, and test if the burner ignites properly. If it does, the cleaning was successful.
When Cleaning Doesn’t Work
If the electrode is visibly cracked, if large sections of the ceramic are missing, or if cleaning doesn’t restore function, then replacement is necessary. Heavily corroded or chemically damaged electrodes can’t be reliably cleaned.
Removing and Replacing the Igniter Electrode
Safety Precautions
⚠️ SAFETY WARNING: Before you start any disassembly work, shut off the gas supply at the main valve. This is non-negotiable. Additionally, turn off power to the cooktop at the circuit breaker. The igniter circuit operates at high voltage (10,000+ volts), which can cause serious injury. Avoid touching any wiring or internal components unnecessarily. If you’re uncomfortable working with gas and electrical components, stop and call a licensed technician.
Accessing the Electrode Assembly
- Remove the cooktop grates: Lift out all metal grates and set them aside on a clean surface to avoid scratches.
- Remove the burner caps: These are the metal rings that sit on top of the cooktop. On Bosch cooktops, they typically lift straight up. If they’re stuck, gently rock them side-to-side while lifting.
- Remove the burner heads: Under each burner cap is the burner head (the brass or steel piece with the flame ports). These usually lift straight up as well. Note how they’re oriented; there are typically small tabs aligning with notches in the cooktop base.
- Locate the electrode connector: Once the burner head is removed, look directly below into the cooktop cavity. You should see the electrode rod sticking up through a hole. Below the cooktop surface, there should be a wire connector attached to the base of the electrode assembly. A flashlight may help you see in the cavity.
- Access the electrode mounting hardware: Depending on your specific Bosch model (like the NGM5655UC, NGM8055UC, and others), you may need to remove one or more metal panels or trim pieces from beneath the cooktop to access the electrode mounting nut. This usually requires removing a few Phillips-head screws. Some models have the electrode accessible from above if you remove additional trim pieces around the burner area.
Removing the Electrode
- Disconnect the igniter wire: The electrode has a thin wire connected to it, usually with a push-on connector or a small wire nut. Gently pull the connector straight away from the electrode. If it’s a wire nut, carefully unscrew it counterclockwise. Don’t yank on the wire itself; this can break internal connections. Note which wire attaches to ensure proper reconnection.
- Remove the mounting nut: The electrode assembly is typically held in place by a single fastener (7 mm, 8 mm, or 10 mm nut, depending on the model) on the mounting bracket beneath the cooktop. Using the appropriate wrench or socket, turn this nut counterclockwise. You may need to hold the electrode rod steady from above with your other hand to prevent it from spinning. The nut should come free with moderate effort—don’t force it, as you might damage the threads.
- Pull the electrode assembly out: Once the nut is removed, the entire electrode assembly (ceramic rod, metal tip, mounting bracket, and all) will be free. Carefully pull it straight out and set it aside. Avoid dropping it on a hard surface, as the ceramic can shatter.
Selecting the Correct Replacement Electrode
Bosch uses several different electrode designs depending on the cooktop model. Here are the most common:
- NGM5655UC, NGM5855UC, NGM8055UC: These 30-inch and 36-inch cooktops typically use the same electrode design, part number 00613317 (or equivalent OEM part from Bosch).
- Newer models (post-2015): Some newer Bosch cooktops utilize a slightly different electrode with integrated mounting, sometimes listed as part number 00649382 or similar.
- Dual-burner models: High-end Bosch cooktops with dual stacked burners may use specialized electrodes, so refer to your specific model number.
To identify the correct part number for your cooktop, follow these steps:
- Locate the model number plate on your Bosch cooktop. This is usually found on the side of the cooktop, inside the oven cavity, or on a label affixed to the back panel. The model number will look like “NGM5655UC” or similar.
- Note the complete model number and search your appliance’s documentation or contact Bosch directly to confirm the correct electrode part number.
- Alternatively, you can remove the old electrode and physically compare it to parts shown in online Bosch parts diagrams or parts retailer listings.
- Order the OEM (original equipment manufacturer) part from an authorized Bosch parts distributor. Aftermarket electrodes can vary in quality; genuine Bosch parts ensure a proper fit and reliable performance.
Installing the New Electrode
- Prepare the new electrode: Remove the new electrode from its packaging. Inspect it for any damage or debris. Avoid touching the electrode tip with bare hands, as skin oils can interfere with spark generation.
- Insert the electrode into the opening: Align the mounting bracket with the hole beneath the cooktop and push the electrode assembly straight up into place. It should slide in smoothly, with the ceramic rod protruding upward through the cooktop surface, right next to the burner head opening.
- Install the mounting nut: Thread the mounting nut onto the threaded stud beneath the cooktop by hand first to ensure it’s aligned correctly. Then, use your wrench or socket to tighten it. Make sure it’s snug but don’t over-tighten, as this can crack the ceramic insulator or strip the threads. A snug fit is all you need—typically hand-tight plus a quarter turn with a wrench.
- Reconnect the igniter wire: Reattach the wire connector to the electrode. For a push-on connector, push it straight on until it feels secure. If it’s a wire nut, twist it clockwise until snug. Verify the connection is secure by gently tugging on the wire; it shouldn’t pull free.
- Route the wire properly: Ensure the igniter wire is away from sharp edges and does not touch any gas tubes or moving parts. If there was a wire clip or securing element from the original wire, use it for the new electrode as well.
Reassembling the Cooktop
- Reinstall the burner head: Carefully place the burner head back in position, aligning any tabs with notches. It should sit flush and not rock.
- Reinstall the burner cap: Place the metal ring (burner cap) back on top of the burner head, ensuring it sits flat and not twisted.
- Reinstall the grates: Place the metal grates back on the cooktop in their original positions.
- Turn on gas and power: Restore the gas supply at the main valve and flip the circuit breaker back on to restore power to the cooktop.
- Test the burner: Turn the specific burner knob to the ignite position. You should hear rapid clicking and see a spark. Within 2-3 seconds, the burner should ignite with a flame. Adjust the knob to your desired flame level. Repeat this test for any other burners you worked on.
When Electrode Replacement Doesn’t Resolve the Problem
If you’ve installed a new electrode and the burner still won’t ignite, the issue lies elsewhere in the spark ignition system:
Checking the Igniter Module and Control Board
Each burner is controlled by an igniter module (also called the spark generator or ignition control board). This component sends the high-voltage pulse to the electrode. If the module fails, no voltage reaches the new electrode, and you won’t get a spark.
Signs of a failed igniter module: All four burners fail to ignite at once, or several burners fail while others work. If a single burner fails after electrode replacement, it suggests a module issue for that burner.
Igniter modules are located beneath the cooktop, either integrated into the main control board or as separate components. Replacing them requires removing the lower access panels of the cooktop and disconnecting a connector from the old module. This is more complex than electrode replacement and typically requires a technician unless you’re experienced with appliance repair. The modules are not user-serviceable parts in most cases—they must be sourced as OEM components.
Checking for Gas Flow Issues
If the electrode sparks but no flame appears, gas may not be reaching the burner. Check:
- The burner cap and head are seated correctly and not clogged with food debris or mineral deposits.
- The small flame port holes in the burner head are clear (use a paper clip or thin wire to gently clear any blockages).
- You can smell gas when the burner knob is turned to ignite, confirming gas is reaching the burner.
- No gas smell indicates a problem with the gas valve for that specific burner, which requires replacement.
Checking Wire Connections and Continuity
If you have a multimeter, you can test whether voltage is reaching the electrode:
- Set your multimeter to AC voltage mode (not DC).
- Place one probe on the electrode wire connector and the other on a ground point (the cooktop metal frame).
- Have someone turn the burner knob to ignite while you watch the multimeter (be cautious—this involves high voltage).
- The multimeter should show a pulsing voltage signal (typically 100-1000 V AC as the needle jumps). If you see zero voltage, the problem is in the control board or wiring, not the electrode.
This test requires careful handling. If you’re not confident with high-voltage testing, skip it and call a technician.
Preventive Maintenance to Avoid Future Electrode Failures
- Clean spills immediately: Don’t let sauces or boiling water sit on the cooktop. Wipe them up as soon as they occur.
- Use gentle cleaners: Clean your cooktop with a soft cloth and mild soap and water, or a specialized glass cooktop cleaner. Avoid acidic vinegar solutions or harsh chemical cleaners.
- Never use abrasive pads on the cooktop surface: Abrasive scrubbing can scratch the surface and push debris down into the electrode cavity.
- Ensure proper burner assembly: After cleaning, always reinstall the burner head, cap, and grates correctly. Gaps allow liquids to seep into the electrode cavity.
- Inspect electrodes annually: Once a year, lift the grates and burner caps to visually inspect the electrodes. If you see early rust or white deposits, gently clean them with a soft brush before they worsen.
Recommended Parts & Tools
Bosch Gas Range Igniter Electrode Replacement Kit
This OEM-compatible electrode is the primary component you’ll need to replace if your Bosch stove’s electrode is brittle or damaged. The kit includes the electrode assembly that creates the spark needed to ignite your gas burners.
White Lithium Grease Multipurpose Lubricant Spray
Use this corrosion-resistant lubricant to clean away rust buildup from the electrode area and protect metal components from future oxidation. This product is ideal for kitchen appliances as it’s food-safe once dried and won’t attract dirt like traditional oils.
Multimeter Digital Voltage Tester
This essential tool allows you to test the igniter circuit and verify that your new electrode is receiving proper voltage before and after installation. Testing ensures the repair is successful and helps diagnose whether the issue is with the electrode itself or the control board.
The Electrode Replacement Kit That Actually Stops the Rusting and Spark Failures
If your Bosch cooktop is clicking but not igniting, or you’re seeing rust and white corrosion buildup on the electrode itself, the electrode has degraded beyond cleaning and needs replacement. This kit is the direct fix—not a workaround or temporary patch.
What works
- The electrode material is matched to Bosch’s factory spec, so you get consistent spark gap and reliable ignition from burner to burner without having to adjust gap yourself.
- Replacement takes 10–15 minutes once you identify which burner’s electrode is failing; no gas line disconnection needed for most Bosch models.
- The corrosion and brittleness that makes old electrodes snap off mid-repair simply doesn’t happen with a fresh part, so you avoid the frustration of breaking the component while trying to clean it.
What doesn’t
- Some aftermarket kits are generic and don’t account for Bosch’s specific electrode geometry; make sure the listing clearly states your exact model number before ordering.
- If your ignition module itself is failing (you hear no clicking at all), replacing the electrode alone won’t solve the problem—diagnosis first with a multimeter is worth the time.
I once ordered a generic electrode kit and didn’t cross-check the ceramic insulation diameter—it fit loose in the burner assembly, and spark wouldn’t ground properly. Waste of two days troubleshooting. Grab the Bosch Gas Range Igniter Electrode Replacement Kit and verify the model match in the product listing before checkout.
About This Article

Written by Dave Holt. Dave Holt has been taking apart and fixing household appliances since he was a teenager who couldn't leave a broken one alone. Eighteen years later, after fixing things for neighbors, friends, and anyone who'd let him, he's seen almost every failure mode there is. When he writes a repair guide here, it's based on the actual job, not a manufacturer overview. More about this site.
Scope and limits. Dave is a self-taught repairer, not a certified appliance technician. Unplug before you open anything, and leave sealed refrigeration systems, gas connections, and hardwired circuits to a qualified technician.



