GE GDP665SYN5FS Dishwasher Float Switch and Flood Valve Switch: Complete Repair Guide
The GE GDP665SYN5FS is a reliable built-in dishwasher with multiple water level protection systems. Two critical components work together to prevent water overflow and damage to your kitchen: the float switch and the flood valve switch. This comprehensive guide will walk you through locating, cleaning, testing, and replacing these essential safety components.
Understanding Your GE GDP665SYN5FS Water Level Protection System
What Is the Float Switch?
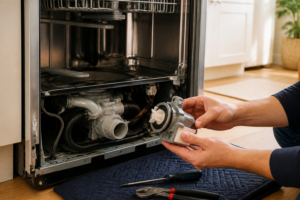
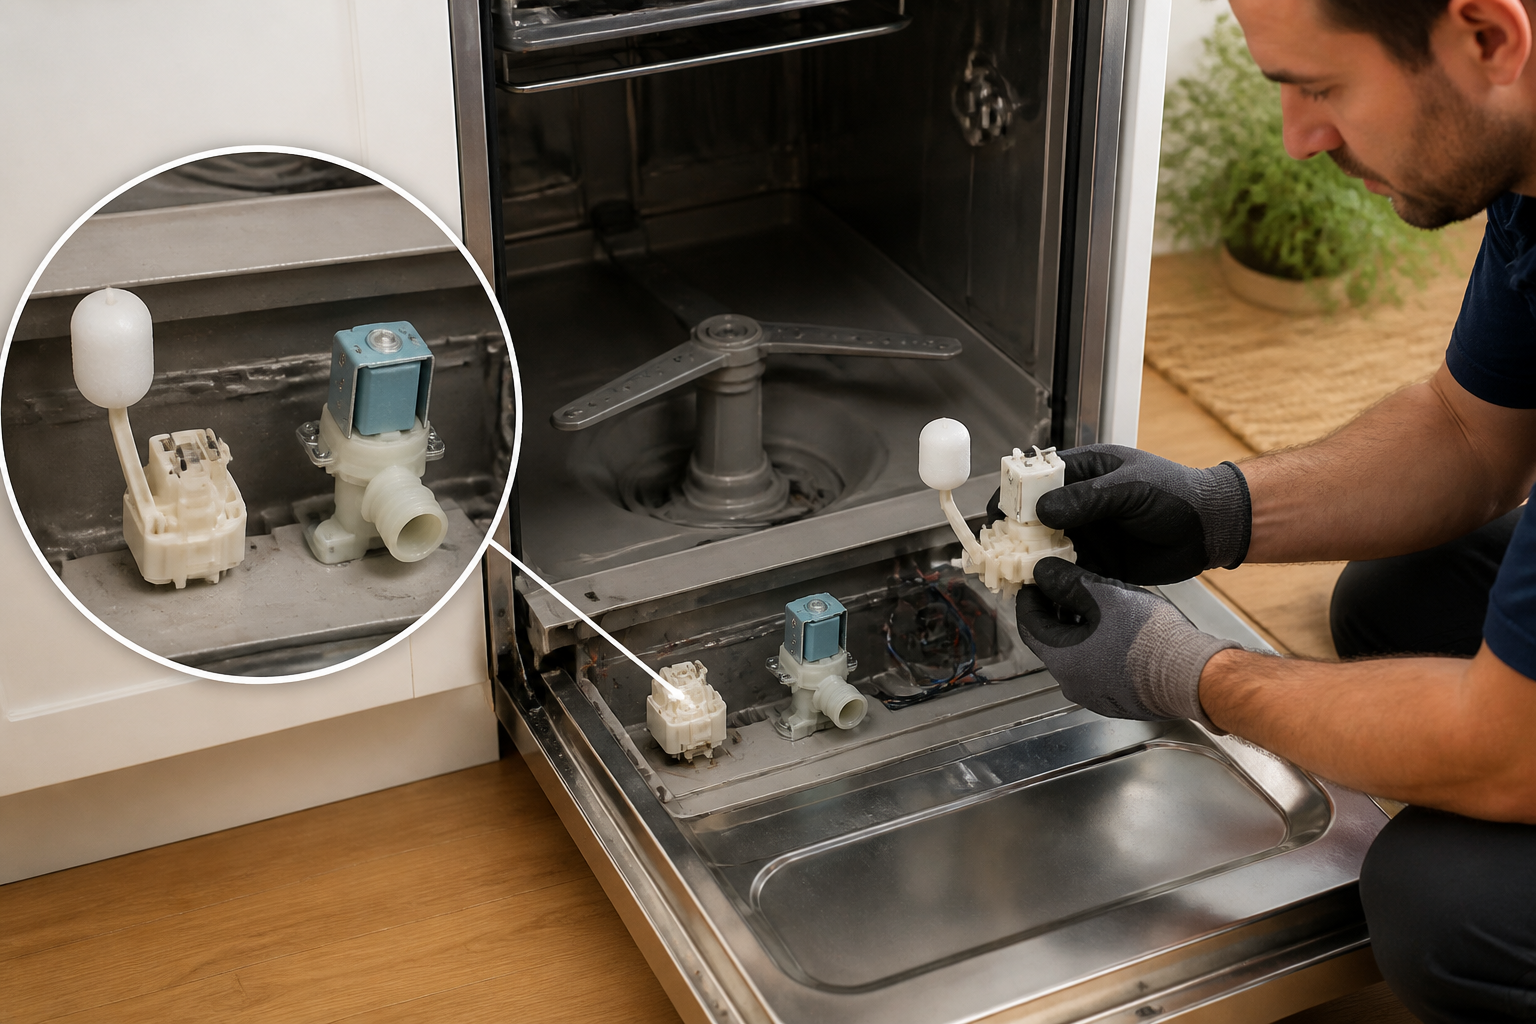
The float switch on your GE GDP665SYN5FS dishwasher is a critical overfill protection device located in the bottom front of the wash tub. This small but important component consists of a floating ball or cup mechanism that rises and falls with water level changes inside the dishwasher tub. When water reaches the correct operating level, the float rises and triggers a switch that signals the fill valve to close. If the water level rises above normal operating height, the float switch detects this abnormal condition and cuts off water supply before flooding occurs.
What Is the Flood Valve Switch?
The flood valve switch on the GE GDP665SYN5FS is an additional safety mechanism located on the water inlet valve assembly beneath the dishwasher. This solenoid-operated switch works in conjunction with the main fill valve to provide secondary flood protection. The flood protection solenoid monitors water pressure and inlet conditions, creating a dual-layer safety system that prevents catastrophic water overflow.
Float Switch Location on the GE GDP665SYN5FS
On the GE GDP665SYN5FS, the float switch is located in the bottom front corner of the wash tub, directly underneath the lower spray arm. To visualize its position: when you open your dishwasher and look down at the floor of the tub, you’ll see a small cylindrical cap or cover in the front-left or front-right corner (depending on your specific model orientation). Beneath this removable cap lies the float assembly and the electrical switch mechanism that controls water intake.
The float is housed under the tub floor in a protected chamber that allows it to move freely up and down as water levels change. This design keeps the float mechanism clean and protected from debris while allowing it to respond quickly to water level changes during normal wash cycles.
Common Symptoms of a Stuck or Faulty Float Switch
Float Switch Stuck in Up Position
When the float switch becomes stuck in the raised position, your GE GDP665SYN5FS will exhibit a specific symptom: the dishwasher fills with water for only a few seconds, then immediately drains without completing any wash cycles. This occurs because the stuck-up float continuously signals to the fill valve that the tub is full, preventing normal water accumulation. You may hear the fill valve clicking open and closed repeatedly, or notice that the wash arms lack sufficient water pressure to operate effectively.
Float Switch Stuck in Down Position
Conversely, if the float switch becomes stuck in the lowered position, your GE GDP665SYN5FS will overfill dangerously. Water will continue entering the tub even after reaching normal operating levels. You may observe water spilling out from under the dishwasher door, pooling on your kitchen floor, or backing up into your sink. This represents a serious risk of water damage to your kitchen cabinetry and flooring.
Other Indicators of Float Problems
- Dishwasher fills but never begins wash cycle
- Water drains continuously during wash cycle
- Error codes displayed on control panel (if applicable to your model)
- Weak spray arm performance due to insufficient water levels
- Unusual drain valve sounds during operation
- Persistent dampness or water stains around dishwasher base
⚠️ Safety Warning
⚠️ Before performing any repair work on your GE GDP665SYN5FS dishwasher, you must completely disconnect the appliance from electrical power. Locate the circuit breaker that controls your dishwasher and switch it to the OFF position. If your dishwasher is hardwired directly to the electrical panel rather than plugged into a standard outlet, you must switch off the breaker. Do not attempt any float switch or flood valve work with power applied to the unit. Additionally, allow all water to drain from the tub completely and ensure the tub is dry before beginning internal work. Water and electricity create serious shock hazards.
How to Access and Clean the Float Switch on the GE GDP665SYN5FS
Tools and Materials Needed
- Phillips head screwdriver
- Flashlight or headlamp for visibility
- Soft-bristled brush or old toothbrush
- Clean cloth or paper towels
- Small container for screws and small parts
- Multimeter (for testing)
- Circuit breaker or main disconnect switch access
Step-by-Step Float Switch Access and Cleaning Process
- Disconnect power: Switch off the circuit breaker controlling your GE GDP665SYN5FS. Wait 5 minutes to ensure all electrical charge dissipates from the control circuits.
- Open the dishwasher door: Pull the door open fully and allow any residual water to drain completely. If water remains in the tub, use a towel to absorb it.
- Remove the lower rack: Locate the roller wheels or glides at the bottom of the lower rack. Lift the front of the rack and slide it forward and out of the dishwasher completely. Set it aside in a safe location.
- Remove the lower spray arm: Locate the center column where the lower spray arm attaches to the tub floor. Look for a cap or collar at the base of this column. Some GE models use a simple push-fit design; others require a counterclockwise rotation to remove. Gently lift the spray arm assembly upward and away from the column. Set it aside carefully to avoid losing any small parts or seals.
- Locate the float switch cap: Look at the bottom front corner of the wash tub (typically the lower left or lower right corner, depending on model configuration). You’ll see a small cylindrical plastic cap or cover approximately 2-3 inches in diameter. This cap covers the float assembly chamber.
- Remove the float cap: The float cap may be held in place by pressure fit, small screws, or a quarter-turn bayonet lock. Examine the cap carefully for screws. If screws are present, remove them with your Phillips head screwdriver. If the cap appears to be a press-fit design, gently pry upward using a plastic lever or screwdriver blade. Be careful not to crack the plastic cap.
- Inspect the float and chamber: Once the cap is removed, you’ll see the float mechanism and the electrical switch below it. Use your flashlight to examine the chamber for debris. Common contaminants include food particles, grease buildup, mineral deposits, and detergent residue.
- Clean the float assembly: Using a soft-bristled brush and a damp cloth, gently clean the float ball or cup and the surrounding chamber walls. Do not use harsh chemicals or abrasive scrubbing pads, as these can damage plastic components or the protective coating on the float. Pay special attention to the bottom of the float and the contact surfaces of the electrical switch below.
- Clean the switch contacts: Use a clean, dry cloth to gently wipe the electrical switch contacts where the float mechanism makes contact. These contacts must be clean and free of oxidation for proper electrical operation. If you notice green or blue oxidation on metal contacts, use the edge of the cloth to gently polish them.
- Check float movement: With the cap removed, gently push the float upward by hand and release it. It should move smoothly and return to its resting position with minimal resistance. If the float feels sticky, binding, or moves with difficulty, it may require replacement rather than cleaning.
- Reinstall the float cap: Once cleaning is complete and you’ve verified smooth float movement, reinstall the float cap by reversing your removal process. If screws were present, reinstall them firmly but without excessive force, which could crack the cap.
- Reinstall the lower spray arm: Place the lower spray arm back onto the center column and secure it according to your specific model’s design (either press-fit or threaded).
- Reinstall the lower rack: Slide the lower rack back into the dishwasher, ensuring the wheels or glides are properly aligned with the rack guides on both sides of the tub.
- Restore power: Switch the circuit breaker back to the ON position to restore power to your GE GDP665SYN5FS.
- Test the dishwasher: Run a short wash cycle and observe whether the water level is normal and the dishwasher fills and drains properly.
Flood Valve Switch Location on the GE GDP665SYN5FS
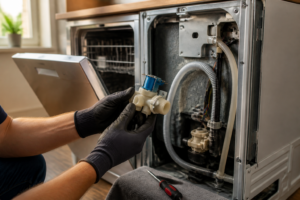
The flood protection solenoid and flood valve switch on your GE GDP665SYN5FS are located on the water inlet valve assembly, which is mounted underneath the dishwasher near the kitchen cabinet wall. To access this component, you’ll need to either remove the front access panel of the dishwasher or view it from below if your cabinet design allows.
The inlet valve assembly is typically mounted on a bracket secured to the frame of the dishwasher. The flood valve solenoid appears as a cylindrical magnetic coil attached to the side of the main water inlet valve body. Two fill hoses connect to this valve assembly—one from the hot water supply line and sometimes a cold water inlet depending on your model configuration. The flood protection solenoid on the GE GDP665SYN5FS works as a secondary safety shutoff that monitors water pressure and inlet conditions.
How to Safely Access the Flood Valve Switch
Accessing the flood valve switch requires disconnecting your water supply to the dishwasher. Locate the water shutoff valve for your kitchen—typically found under the sink or where your hot water line enters the dishwasher. Turn this shutoff valve clockwise to close the water supply completely. Once water supply is isolated and power is disconnected via the circuit breaker, you can safely view and service the flood valve assembly. The flood valve switch is a sealed solenoid unit that generally cannot be cleaned or repaired—if faulty, it requires replacement as a complete assembly.
Testing the Float Switch with a Multimeter
Understanding Float Switch Electrical Operation
The float switch on your GE GDP665SYN5FS is an electrical component that changes resistance (and continuity) as the float moves up and down. When the float is in the down position (water low), the switch should show continuity (low resistance). When the float rises to the up position (water at normal level), the switch should show an open circuit (infinite resistance or no continuity). Testing this behavior with a multimeter confirms whether the switch is functioning properly.
Multimeter Testing Steps
- Disconnect power completely: Ensure your GE GDP665SYN5FS is disconnected from all electrical sources before touching any electrical components.
- Set your multimeter to ohms (resistance) mode: Turn the dial to the ohms (Ω) setting, typically marked with the omega symbol.
- Remove the float cap: Follow the access steps outlined earlier to expose the float switch mechanism.
- Locate the switch terminals: Below or adjacent to the float chamber, you’ll find two electrical terminals or wire connectors. These connections lead to the switch mechanism. You may need to trace the wires connected to this area or look for a small terminal block.
- Test continuity with float down: Place one multimeter probe on each terminal. When the float is in the down position, the multimeter should read 0 ohms or very low resistance (typically under 5 ohms), indicating continuity.
- Manually raise the float: Gently push the float upward to simulate a high water level condition.
- Test continuity with float up: While holding the float in the raised position, read the multimeter display. It should show infinite resistance (∞) or no continuity, confirming the switch has opened. Most multimeters will display “OL” (open line) when there is no continuity.
- Repeat the test: Move the float between up and down positions several times, verifying that continuity changes reliably with each movement. If the readings are inconsistent or if continuity fails to change when moving the float, the switch mechanism is faulty and requires replacement.
- Document your findings: Note whether your multimeter shows expected resistance changes. If resistance does not change with float position, or if you observe erratic readings, you have confirmed a faulty float switch.
Interpreting Multimeter Results
Expected Results: Float down = ~0-5 ohms (continuity); Float up = ∞ ohms or “OL” (no continuity)
Problem Signs: Resistance doesn’t change with float position, readings jump erratically, or switch remains open or closed regardless of float position all indicate a faulty switch requiring replacement.
Replacing the Float Switch Assembly on the GE GDP665SYN5FS
Parts Information
The float switch assembly for the GE GDP665SYN5FS is available as a complete replacement unit. When ordering a replacement, reference your specific model number (GDP665SYN5FS) to ensure you receive the correct assembly. The float switch is typically sold as a single unit that includes the float mechanism, chamber cap, and integrated electrical switch.
Replacement Procedure
- Disconnect power and water: Switch off the circuit breaker to your GE GDP665SYN5FS and shut off the water supply valve under your sink.
- Access the float switch: Follow all steps outlined in the “Access and Clean” section to expose the float chamber and remove the float cap.
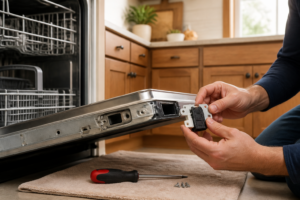
- Disconnect electrical terminals: Locate the wire connectors attached to the float switch terminals. On the GE GDP665SYN5FS, these are typically simple push-on connectors. Gently pull the connectors away from the terminals, taking note of their positions if the connector design allows reversal (typically, one connector is marked positive and one negative, or they’re physically different sizes to prevent incorrect installation).
- Remove the old float assembly: If the float mechanism is held in place with screws, remove them. If the float assembly is a press-fit design, it may require gentle twisting or leverage with a plastic tool to dislodge it. Once freed, remove the old float assembly from the chamber completely.
- Clean the chamber: Before installing the new float assembly, use a clean cloth to wipe down the interior of the float chamber, removing any debris or old grease that could affect the new mechanism’s operation.
- Position the new float assembly: Carefully insert the new float assembly into the chamber, aligning it with any mounting holes or alignment guides present. On the GE GDP665SYN5FS, the float mechanism must be properly centered in the chamber to move freely.
- Secure the new assembly: Reinstall any screws that hold the float assembly in place, or press firmly if the design is a press-fit. Do not overtighten screws, which could crack plastic components.
- Reconnect electrical terminals: Push the wire connectors firmly onto the new switch terminals. Ensure connections are secure and cannot be easily pulled apart. If connectors feel loose, the connection is unreliable and will cause switch failure.
- Reinstall the float cap: Place the protective cap back over the float chamber and secure it with screws or by pressing firmly into place, depending on your model design.
- Reassemble the dishwasher: Reinstall the lower spray arm and lower rack, following the removal procedure in reverse.
- Restore power and water: Turn the circuit breaker back to ON and open the water shutoff valve under your sink to restore water supply.
- Test the new float switch: Run a full wash cycle and observe normal fill and drain behavior. The dishwasher should fill to appropriate levels, maintain that level throughout the wash cycle, and drain completely when the cycle finishes.
Flood Valve Switch Replacement
If your testing confirms that the flood valve solenoid switch on your GE GDP665SYN5FS is faulty, replacement requires accessing the water inlet valve assembly underneath the dishwasher. This is a more complex repair involving disconnection of water supply hoses and electrical connectors. The flood valve solenoid is a sealed unit and cannot be repaired—it must be replaced as a complete assembly with the inlet valve.
Replacement of the flood valve switch assembly on the GE GDP665SYN5FS requires: complete water supply shutdown, electrical power disconnection, removal of inlet hoses (with towels ready to catch residual water), disconnection of electrical connectors from the solenoid, and unbolting the entire inlet valve assembly from its mounting bracket. Installation reverses this procedure. If you’re uncomfortable with this level of repair, consulting a professional technician is recommended, as incorrect water valve installation can lead to leaks and water damage.
Troubleshooting Tips for Your GE GDP665SYN5FS
- Dishwasher drains immediately after filling: Float switch stuck up position; clean or replace float assembly
- Dishwasher overfills: Float switch stuck down position; clean or replace float assembly
- Weak water pressure during wash: Confirm float is allowing adequate water level; also check inlet screens for debris
- Water pools under dishwasher: Check for inlet valve leaks; may indicate flood valve solenoid failure
- Dishwasher won’t start after water fills: Float may be stuck down, preventing drain; cycle may have error locks preventing operation
- Intermittent fill and drain behavior: Faulty float switch making unreliable electrical contact; clean switch contacts or replace assembly
Frequently Asked Questions
Recommended Parts & Tools
GE WD28X10011 Dishwasher Float Switch Assembly
This is the direct replacement float switch for the GE GDP665SYN5FS model, designed to restore proper water level detection in your dishwasher. A worn or stuck float switch is often the root cause of flooding issues, and replacing it ensures your flood valve operates correctly. Check current pricing on Amazon.
IFIXIT Essential Electronics Toolkit
This comprehensive tool set includes screwdrivers, pliers, and other precision instruments needed to safely access the float switch and flood valve compartments on your dishwasher. Having the right tools prevents damage to clips, connectors, and plastic housing during disassembly. Check current pricing on Amazon.
Damp-Rid Moisture Absorber
After cleaning mineral deposits and debris from the float switch and flood valve, use this moisture absorber to dry out the compartment and prevent future corrosion or mold growth. It’s particularly useful for removing residual water trapped in tight spaces around the valve assembly. Check current pricing on Amazon.
The Float Switch Assembly That Actually Stops Water Overflow on Your GE GDP665SYN5FS
If you’ve confirmed the float mechanism is stuck or the switch contacts are corroded beyond cleaning, replacing the entire float switch assembly is the fastest path to a functioning water level protection system. This OEM part gets you back to a dishwasher that won’t flood your kitchen when something goes wrong.
What works
- Direct OEM fit for the GDP665SYN5FS — the connector and mounting tabs line up without forcing or adapting anything.
- Comes with the complete float arm and housing, so you’re not troubleshooting half a system if the float itself is warped or cracked.
- The electrical contacts are fresh, so you get reliable continuity the moment you reinstall — no guessing whether a cleaned switch will hold up.
What doesn’t
- More expensive than trying a cleaning-first approach, so if you haven’t actually inspected the switch yet, you might be ordering this unnecessarily.
- Installation requires draining the tub fully and removing the lower spray arm — not a five-minute job if you’re new to the model.
I’ve seen homeowners order this part after just one cycle of standing water, when really the float was just stuck with soap scum — so actually pull the lower access panel and look at the float chamber first before ordering. If the float arm won’t move freely or the switch lever is pitted, then GE WD28X10011 Dishwasher Float Switch Assembly is your move.
This post contains affiliate links. As an Amazon Associate, I earn from qualifying purchases at no extra cost to you.