Complete Guide to Badger Garbage Disposal Splash Guard Replacement and Sink Flange Gasket Repair
A leaking or malfunctioning garbage disposal doesn’t always require professional service. Many homeowners can address splash guard issues and certain flange gasket problems without removing the entire unit from under the sink. This comprehensive guide walks you through diagnosing the problem, accessing the components, and performing the repair yourself.
Understanding Your Badger Garbage Disposal Components
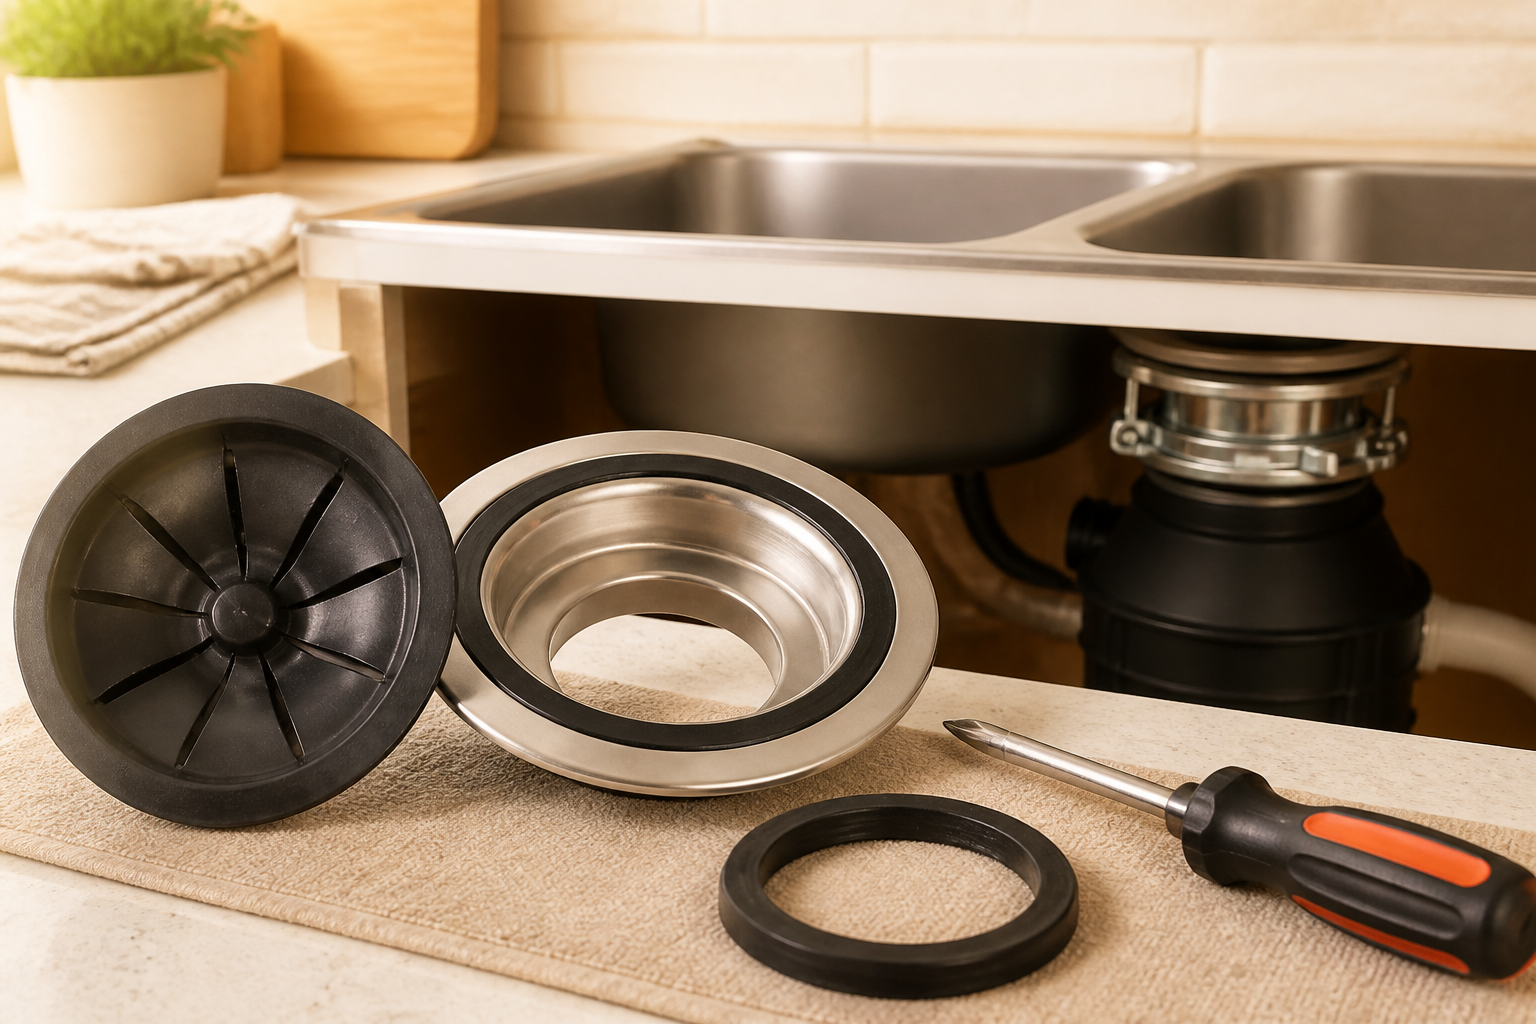
Before attempting any repair, it’s important to understand the three main sealing areas of a Badger garbage disposal where leaks commonly occur: the splash guard at the top of the grinding chamber, the sink flange gasket where the disposal connects to the sink drain opening, and the drain outlet gasket where the discharge pipe connects to the disposal housing.
The splash guard is a rubber ring located at the very top of the grinding chamber, just below the sink drain opening. Its primary function is to prevent water, food particles, and debris from splashing back up into the sink during operation. When this guard becomes cracked, hardened, or dislodged, you’ll notice water splashing out around the sink drain during disposal operation.
The sink flange gasket is the seal between the sink flange itself and the actual sink surface. This is different from the mounting gasket underneath the sink. Water can leak from this location if the seal deteriorates or if the mounting bolts loosen over time.
The drain outlet gasket is a rubber ring that seals the connection between the discharge pipe and the disposal housing. Leaks at this location appear underneath the disposal unit itself.
How to Replace the Splash Guard on Your Badger Disposal
When to Replace Your Splash Guard
Signs that your splash guard needs replacement include visible cracks or chunks missing from the rubber ring, visible hardening or brittleness of the material, water splashing out of the sink drain during normal operation, or the guard becoming dislodged inside the grinding chamber. Badger splash guards typically last 5-10 years depending on water quality and usage frequency.
What You’ll Need
- Badger SP-NG replacement splash guard (compatible with Badger 1, 5, 500, and 900 series models)
- Flashlight or headlamp
- Small mirror (optional but helpful for seeing into the disposal)
- Bucket or towel to catch water drips
Safety Precautions Before You Begin
⚠️ ELECTRICAL SAFETY WARNING: Before working on any garbage disposal, you must ensure it cannot be accidentally activated. Turn off the disposal at the wall switch, then flip the circuit breaker controlling the disposal to the OFF position. Test that the disposal will not start by attempting to turn it on at the switch. Never rely on the switch alone. Lock out the breaker if your home has a lockable breaker system. Do not attempt to work inside the grinding chamber while the unit is plugged in or has power access.
Even though splash guard replacement doesn’t involve the grinding chamber, you must still follow complete power disconnection protocols to ensure your safety.
Step-by-Step Splash Guard Removal
- Ensure complete power disconnect: Verify the disposal is completely unpowered and cannot activate. Double-check the breaker switch is in the OFF position and stays there.
- Position yourself: Sit or crouch under the sink with good visibility of the disposal unit. Position a bucket or towel underneath to catch any water drips from the sink trap or disposal.
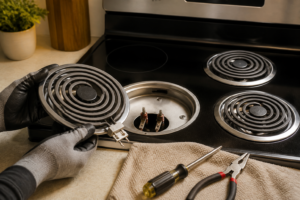
- Locate the splash guard: Using your flashlight, look directly into the drain opening from above the sink. The splash guard is the dark rubber ring visible at the very top of the disposal’s grinding chamber, approximately 2-3 inches below the sink rim.
- Insert your fingers: Reach up into the drain opening with your index and middle fingers. Most people can comfortably fit two fingers into a standard sink drain opening. The splash guard ring should be easily accessible at the top of the grinding chamber.
- Locate the retaining groove: Feel around the inner edge of the splash guard. You’ll find a slight groove or ridge where the guard sits. This groove is what holds the guard in place—it’s typically located about 0.5 inches below the rim of the disposal opening.
- Pull the guard straight down: Once you’ve positioned your fingers under the splash guard, pull it straight downward with steady, even pressure. The guard should come free easily. If you encounter significant resistance, stop and re-examine the installation to ensure you’ve found the correct component.
- Remove completely: Pull the splash guard all the way out of the disposal. You should now be able to see into the grinding chamber more clearly.
- Inspect the groove: Examine the groove or retaining channel where the old splash guard sat. Clean out any debris, hardened rubber particles, or buildup. Use a soft cloth to wipe the groove clean.
Installing the New Badger SP-NG Splash Guard
- Examine the new splash guard: Remove the replacement Badger SP-NG guard from its packaging. The guard is a solid rubber ring approximately 4.5-5 inches in diameter with a slight lip or ridge on one side that matches the retaining groove in the disposal.
- Orient the guard correctly: The ridge or lip of the new splash guard must face downward toward the grinding chamber. This lip seats into the retention groove and prevents the guard from moving or dislodging during operation.
- Position your hands: Insert your fingers into the drain opening again, this time holding the new splash guard between your thumb and fingers. Position the guard so the ridge faces downward.
- Insert into the opening: Carefully push the splash guard up into the drain opening until the ridge or lip enters the retaining groove. You should feel a subtle “click” or resistance as the lip seats into the groove.
- Press firmly into the groove: Once the lip is partially in the groove, press the entire splash guard upward and inward. Apply firm, even pressure around the entire circumference of the guard if possible. The guard should be flush with the grinding chamber opening.
- Verify proper installation: The splash guard should sit smoothly in the groove with no gaps or loose areas. If any portion of the guard appears to stick up above the opening or feels loose, remove it and reinstall, ensuring the lip is fully seated in the groove.
- Test the fit: Gently tug on the splash guard with your fingers. It should not move or come loose. A properly installed splash guard will be secure and immovable.
After Installation: Testing Your Work
- Close the cabinet doors under the sink and return to normal conditions.
- Turn the circuit breaker back ON.
- Fill the sink with a few inches of water and turn on the disposal.
- Observe for any splashing back into the sink around the drain opening.
- Let the disposal run for 10-15 seconds, then turn it off and listen carefully.
- The water should drain smoothly without splashing, and you should not hear any unusual grinding or rattling sounds indicating the splash guard is loose.
If splashing continues or the guard appears to have become dislodged during the initial test, turn off the disposal immediately, verify power is disconnected, and reinstall the splash guard using the procedure above.
Repairing a Leaky Sink Flange Gasket Without Removing the Disposal
Identifying Flange Gasket Leaks
A leaking sink flange appears as water dripping from the area where the sink drain opening meets the sink surface itself. You’ll notice water pooling on the counter around the sink rim or dripping down the underside of the sink. This is distinctly different from leaks that occur at the mounting bolts underneath the sink or at the drain outlet where the discharge pipe connects.
The good news: many flange leaks can be repaired without removing the entire garbage disposal, though the specific approach depends on where exactly the leak originates.
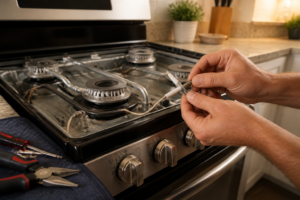
Quick Fix: Tightening the Mounting Bolts
Before attempting any more complex repairs, try the simplest solution first. Over time, the three mounting bolts that hold the flange assembly to the sink can loosen, creating gaps that allow water to leak past the gasket seal.
- Look under the sink at the disposal mounting assembly. You should see three bolts arranged in a triangular pattern around the mounting ring.
- Using an adjustable wrench that fits the bolt head (typically 1/2-inch or 9/16-inch), carefully tighten each bolt in a clockwise direction.
- Tighten gradually and evenly—don’t fully tighten one bolt and then move to the next. Instead, tighten each bolt about 1/4 turn, then cycle through all three again. This ensures even pressure distribution.
- Fill the sink with water and watch for leaks. Stop tightening once the leak stops.
- Do not over-tighten the bolts, as this can crack the sink or damage the gasket. You’re looking for snug, firm pressure, not maximum force.
If tightening the bolts stops the leak, you’re done. Many flange leaks are solved this simply.
Plumber’s Putty Repair Method
If tightening the bolts didn’t stop the leak, and the leak is specifically at the top of the flange where it meets the sink surface, you can often repair this without removing the disposal by using plumber’s putty to re-seal the flange perimeter.
Materials Needed
- Plumber’s putty (standard oil-based or modern water-based non-staining variety)
- Adjustable wrench (matching your mounting bolt size)
- Flashlight
- Small putty knife or old butter knife
- Bucket to catch water
- Cloth towel
Safety Precautions
⚠️ ELECTRICAL SAFETY WARNING: Disconnect power to the garbage disposal at the circuit breaker before beginning this repair. The disposal must be completely powered off and the breaker in the OFF position. Test that the unit will not activate. This is necessary because you’ll be working in the area beneath the sink where the electrical connections are located, and you may accidentally bump the power cord or connections while maneuvering.
Step-by-Step Plumber’s Putty Repair
- Disconnect power: Turn off the circuit breaker controlling the disposal and verify it’s completely de-energized.
- Prepare your workspace: Place a bucket under the disposal and surrounding pipes. Position a towel underneath as well to catch water drips.
- Slightly loosen the mounting bolts: Using your adjustable wrench, loosen the three mounting bolts by about 1/4 to 1/2 turn each. Do not completely remove them. The bolts should be loose enough to allow slight upward movement of the flange, but still engaged enough to support the disposal weight.
- Carefully push the flange upward: Gently push the disposal mounting flange upward by a few millimeters. You’re not removing it, just creating a small gap between the flange and the sink surface. This allows you to access the perimeter seal.
- Clean the existing seal area: Using an old putty knife, scrape away any old, dried plumber’s putty or gasket material from around the flange perimeter under the sink. This creates a clean surface for the new putty seal.
- Apply new plumber’s putty: Roll a rope of plumber’s putty approximately 1/4-inch in diameter and about 24-30 inches long. This length is sufficient to go completely around the flange perimeter.
- Press putty into the gap: Starting at one point and working your way around, press the putty rope into the gap between the flange and the sink surface. Work it into the entire perimeter, creating a continuous seal.
- Smooth the putty: Use your putty knife or a wet finger to smooth the putty and ensure it fills any gaps completely. The putty should form a consistent bead around the entire flange edge.
- Re-tighten the mounting bolts: Tighten the three bolts again in a gradual, even pattern (1/4 turn each, cycling through all three). This presses the flange down against the new putty seal. Tighten until snug but not over-tight.
- Allow curing time: Do not use the sink for at least 2-4 hours to allow the plumber’s putty to set and cure. Modern putties typically cure faster than traditional versions.
- Test the seal: After curing time has elapsed, fill the sink with water and observe the flange area both above and below the sink. Water should not drip from the flange perimeter.
When You Must Remove the Disposal
Some flange leaks require disposal removal. This is necessary if:
- The flange itself is corroded, cracked, or damaged
- The mounting gasket underneath the sink is deteriorated or missing
- Water is leaking from the underside of the flange mounting bolts despite tightening
- The flange has lifted or warped and cannot seat properly against the sink
In these cases, the disposal must be removed, the old flange unbolted and removed, and a new flange assembly installed. This is a more involved repair that typically benefits from professional assistance, as it requires proper drainage alignment and reconnection of the electrical and plumbing connections.
Replacing the Drain Outlet Gasket
Identifying Drain Gasket Leaks
The drain outlet gasket is located where the discharge pipe connects to the disposal housing. Leaks at this location appear as water dripping directly under the disposal unit, typically at the point where the discharge pipe enters the disposal body. This is a common wear item, as this gasket is exposed to water flow every time the disposal runs.
Materials and Tools Needed
- Replacement drain outlet gasket (typically Badger part number 88-DG or equivalent rubber gasket)
- Adjustable wrench or slip-joint pliers
- Bucket or container to catch drain water
- Cloth towels
- Flashlight
Safety Precautions
⚠️ ELECTRICAL SAFETY WARNING: Turn off the circuit breaker controlling the garbage disposal and verify it’s in the OFF position. Do not proceed with work until you’ve confirmed the disposal cannot be activated.
⚠️ WATER HAZARD WARNING: The drain trap and pipes under the sink may contain standing water or food debris. Have a bucket ready to catch this water. Protect the floor with towels, as water may spill when you disconnect the drain trap.
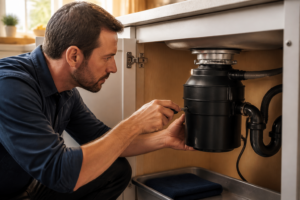
Step-by-Step Drain Gasket Replacement
- Confirm power is disconnected: Verify the circuit breaker is OFF and the disposal is completely de-energized.
- Position a bucket: Place a bucket directly under the disposal discharge connection point. The drain trap and connected pipes will contain water that will drain out when you disconnect them.
- Locate the discharge connection: Under the sink, find where the discharge pipe connects to the disposal unit. This connection typically uses a slip nut—a large nut that threads onto the discharge pipe.
- Loosen the slip nut: Using your adjustable wrench or slip-joint pliers, turn the slip nut counter-clockwise. It should loosen by hand after 2-3 turns with the wrench. Once loose enough, you may be able to unscrew it by hand. Turn slowly to allow water to drain gradually into the bucket.
- Disconnect the discharge pipe: Once the slip nut is completely removed, carefully pull the discharge pipe downward and away from the disposal. Position it so any remaining water drains into your bucket. Some water will still be trapped in the pipe.
- Locate the old gasket: Look at the discharge connection point on the disposal unit. You should see a rubber gasket ring seated in the outlet. The gasket may still be visible, or it may have compressed and become hard to see.
- Remove the old gasket: Using a small flathead screwdriver or putty knife, carefully pry the old gasket out of the discharge outlet. The gasket will likely be hardened and may break into pieces as you remove it. Take care not to damage the outlet rim while removing the old gasket.
- Clean the outlet: Using a dry cloth, wipe out the discharge outlet thoroughly. Remove any remaining pieces of the old gasket, mineral deposits, or debris. The outlet should be clean and dry.
- Install the new gasket: Take your new drain outlet gasket and position it in the discharge outlet. The gasket should sit evenly in the outlet, with the lip or flange facing outward toward the pipe connection. Press it firmly into place, ensuring it’s fully seated.
- Reconnect the discharge pipe: Carefully push the discharge pipe back onto the disposal outlet. The pipe should slide over the new gasket. Align the slip nut at the base of the outlet.
- Hand-tighten the slip nut: Thread the slip nut onto the discharge pipe by hand. Once it’s finger-tight, use your adjustable wrench to tighten it approximately 1.5 to 2 turns. The connection should be snug and leak-free but not over-tightened, as this can damage the new gasket.
- Restore power: Turn the circuit breaker back to the ON position.
- Test the connection: Run water and the disposal for 10-15 seconds. Listen and watch carefully for any drips at the discharge connection. If water drips steadily, turn off the disposal, verify the
Recommended Parts & Tools
Badger Garbage Disposal Sink Flange & Gasket Replacement Kit
This OEM replacement kit includes both the sink flange and gasket needed for your Badger disposal repair, ensuring perfect compatibility with your unit. Installing the correct replacement parts prevents leaks and maintains a secure seal under your sink. Check current pricing on Amazon.
Adjustable Wrench Set (6-24mm)
You’ll need a reliable wrench to remove the mounting bolts holding the old splash guard and flange in place, then reinstall the new components securely. This adjustable set provides the right sizes for most garbage disposal mounting hardware. Check current pricing on Amazon.
White Lithium Grease Multi-Purpose Lubricant
Apply this lubricant to the new gasket and mounting points to ensure smooth installation and prevent corrosion on metal components under your sink. It also helps create a better seal between the flange and sink basin. Check current pricing on Amazon.
The Flange Gasket Kit That Stops Water Pooling Under Your Sink
If you’re seeing water collect under the sink when the disposal runs, the gasket between the flange and sink bowl has likely failed. This kit gives you everything needed to reseal that connection without removing the entire disposal unit.
What works
- The gasket material is thick enough to compress properly and actually seal—thin knockoff gaskets won’t compress into the groove and you’ll have leaks again in six months.
- Includes the correct backing ring and all fasteners for Badger models, so you’re not hunting through the hardware store for a ring that fits the flange groove.
- The kit instructions match Badger’s actual design, not some generic disposal—critical because the flange orientation and gasket seating are model-specific.
What doesn’t
- If your leak is actually from the discharge tube or trap connection (not the flange), this kit won’t fix it—you’ll need to diagnose the water source first before ordering.
- Installation requires removing the sink flange completely, which means draining the trap and working in tight space—takes about 30 minutes if you haven’t done it before.
I’ve seen homeowners order just a gasket from a generic parts supplier, only to find it doesn’t seat right or the backing ring is the wrong size for the Badger flange groove. This kit solves that problem by including exactly what your Badger model needs. Badger Garbage Disposal Sink Flange & Gasket Replacement Kit
This post contains affiliate links. As an Amazon Associate, I earn from qualifying purchases at no extra cost to you.