Complete LP Conversion Kit Installation Guide for Samsung NX60A6511SS Gas Range
The Samsung NX60A6511SS is a premium 30-inch gas range that ships from the factory configured for natural gas operation. If you’re relocating to an area with only propane (LP) service available, or if your home uses LP gas exclusively, you’ll need to convert your NX60A6511SS to LP operation. This comprehensive guide walks you through the entire conversion process, including orifice replacement, regulator adjustment, and safety testing procedures.
The LP conversion process involves replacing the natural gas orifices with smaller LP orifices on all burners, adjusting the pressure regulator to handle the different fuel characteristics, and fine-tuning flame heights. While this may sound complex, a methodical approach and proper tools make this a manageable DIY project for homeowners with mechanical aptitude.
Understanding LP Conversion: What Changes and Why
Natural gas and propane (LP) are both gaseous fuels, but they have different pressure requirements and burn characteristics. Your Samsung NX60A6511SS arrives configured for natural gas at approximately 4 inches of water column (IWC) inlet pressure. Propane requires approximately 10 inches of water column inlet pressure. The orifices—tiny brass components that meter fuel flow into each burner—differ in size because propane delivers more energy per unit volume than natural gas.
LP orifices are smaller in diameter than natural gas orifices, typically measuring approximately 0.068 inches for LP versus 0.083 inches for natural gas on comparable burner sizes. This size difference is critical; using the wrong orifice size results in either insufficient flame or excessively high flames that can damage cookware or present a safety hazard.
The pressure regulator on your NX60A6511SS also requires adjustment or reversal to accommodate LP’s higher inlet pressure requirement. Most Samsung ranges use reversible regulators that can be flipped to switch between natural gas and LP modes.
Required LP Conversion Kit and Part Numbers
For the Samsung NX60A6511SS, the correct LP conversion kit is typically part number RA-LG120H or equivalent Samsung LP conversion kit. Before beginning your project, verify the exact part number for your model by:
- Checking your range’s user manual (usually available on Samsung’s website)
- Contacting Samsung customer service at 1-800-SAMSUNG with your model number (NX60A6511SS)
- Checking the manufacturer’s label inside the oven cavity or on the back of the range
The LP conversion kit for the NX60A6511SS includes:
- Four LP orifices for the surface burners
- One LP orifice for the oven burner
- One LP orifice for the broiler burner
- Regulator adjustment components or replacement regulator
- LP operation label/decal
- Installation instructions specific to this model
Do not attempt this conversion with generic LP orifices from other manufacturers. The specific geometry and sizing of Samsung’s orifices ensures proper flame characteristics on the NX60A6511SS.
⚠️ Critical Safety Information
Before beginning any work on your Samsung NX60A6511SS:
- Shut off the gas supply at the meter or tank valve and wait 5 minutes. This ensures all gas pressure is relieved from the lines.
- Work in a well-ventilated area. Open windows and doors. Do not work in a closed kitchen.
- Do not use an open flame or perform this work near pilot lights or ignition sources. Even brief exposure to gas can accumulate in the room.
- Have a working gas leak detector on hand. This is not optional—it’s essential safety equipment for this project.
- Do not convert your range back and forth between natural gas and LP. Once converted to LP on your NX60A6511SS, have a professional technician handle any future conversions.
- If you smell gas during or after the conversion, immediately stop work, leave the house, and call your gas utility or 911. Do not use electrical switches or create sparks.
- Never assume a connection is tight. Every single connection point must be tested with soapy water before operating the range.
Tools and Materials You’ll Need
- LP conversion kit for the NX60A6511SS (part RA-LG120H or equivalent)
- Adjustable wrench set (6-inch, 8-inch, and 10-inch wrenches)
- Screwdriver set (both Phillips and flathead)
- Socket wrench set with 1/4-inch and 5/16-inch sockets
- Gas leak detector (electronic or liquid soap solution)
- Dish soap and spray bottle with water
- Paper towels or absorbent cloth
- Work gloves (cotton or leather)
- Flashlight or headlamp for interior visibility
- Your NX60A6511SS user manual
Step-by-Step LP Conversion Process
Step 1: Prepare Your Work Area and Disconnect the Range
Begin by shutting off the main gas supply valve or LP tank valve. Wait a minimum of 5 minutes for residual gas pressure to escape from the system. Open all windows and doors in your kitchen to ensure adequate ventilation throughout the conversion process.
Pull your Samsung NX60A6511SS away from the wall approximately 18 inches, giving yourself enough clearance to access the back connections. Do not disconnect the gas line yet—you’ll do that as part of the conversion process. However, if you feel comfortable doing so, you may disconnect it now to provide more working space.
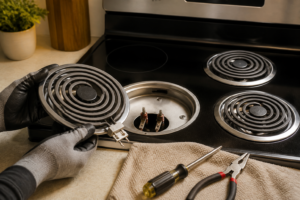
Step 2: Remove the Surface Burner Caps and Grates
On your NX60A6511SS, there are four surface burners arranged across the cooktop. Start with the front-left burner. Lift the burner cap straight up and remove it. The burner cap is not permanently attached—it simply sits on top of the burner base.
Next, remove the burner grate that sits above the burner base. On the NX60A6511SS, grates are held in place by their own weight and positioning; simply lift them straight up and set them aside in a safe location. Do this for all four surface burner locations (two front, two rear).
Step 3: Remove the Burner Heads and Locate Natural Gas Orifices
With the caps and grates removed, you can now see the burner base assembly on your NX60A6511SS. The burner head—the component with the flame ports around its perimeter—is removable. Lift straight up on the burner head; it will slide off the burner base. Set it aside carefully.
Beneath where the burner head was installed, you’ll see the burner base mounted to the cooktop. Underneath the cooktop surface, accessed from below the range or by carefully tilting the cooktop on some models, is the orifice assembly. On the NX60A6511SS, orifices are typically accessed by tilting the cooktop up toward the back.
Tilting the cooktop: Locate the hinge points at the very back of the cooktop. Slowly and carefully tilt the cooktop up toward the back wall. Do not force it—it should move smoothly. Most NX60A6511SS models will tilt up about 45 degrees, providing excellent access to the orifices underneath. Support the cooktop carefully so it doesn’t fall back down.
Looking at the underside of each burner location on your NX60A6511SS, you’ll see a small brass fitting—this is the natural gas orifice. It has a tiny hole in the center (the actual orifice opening) and threads that screw into the gas manifold.
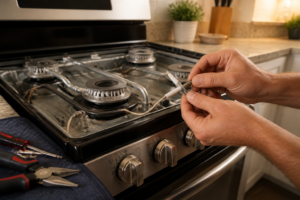
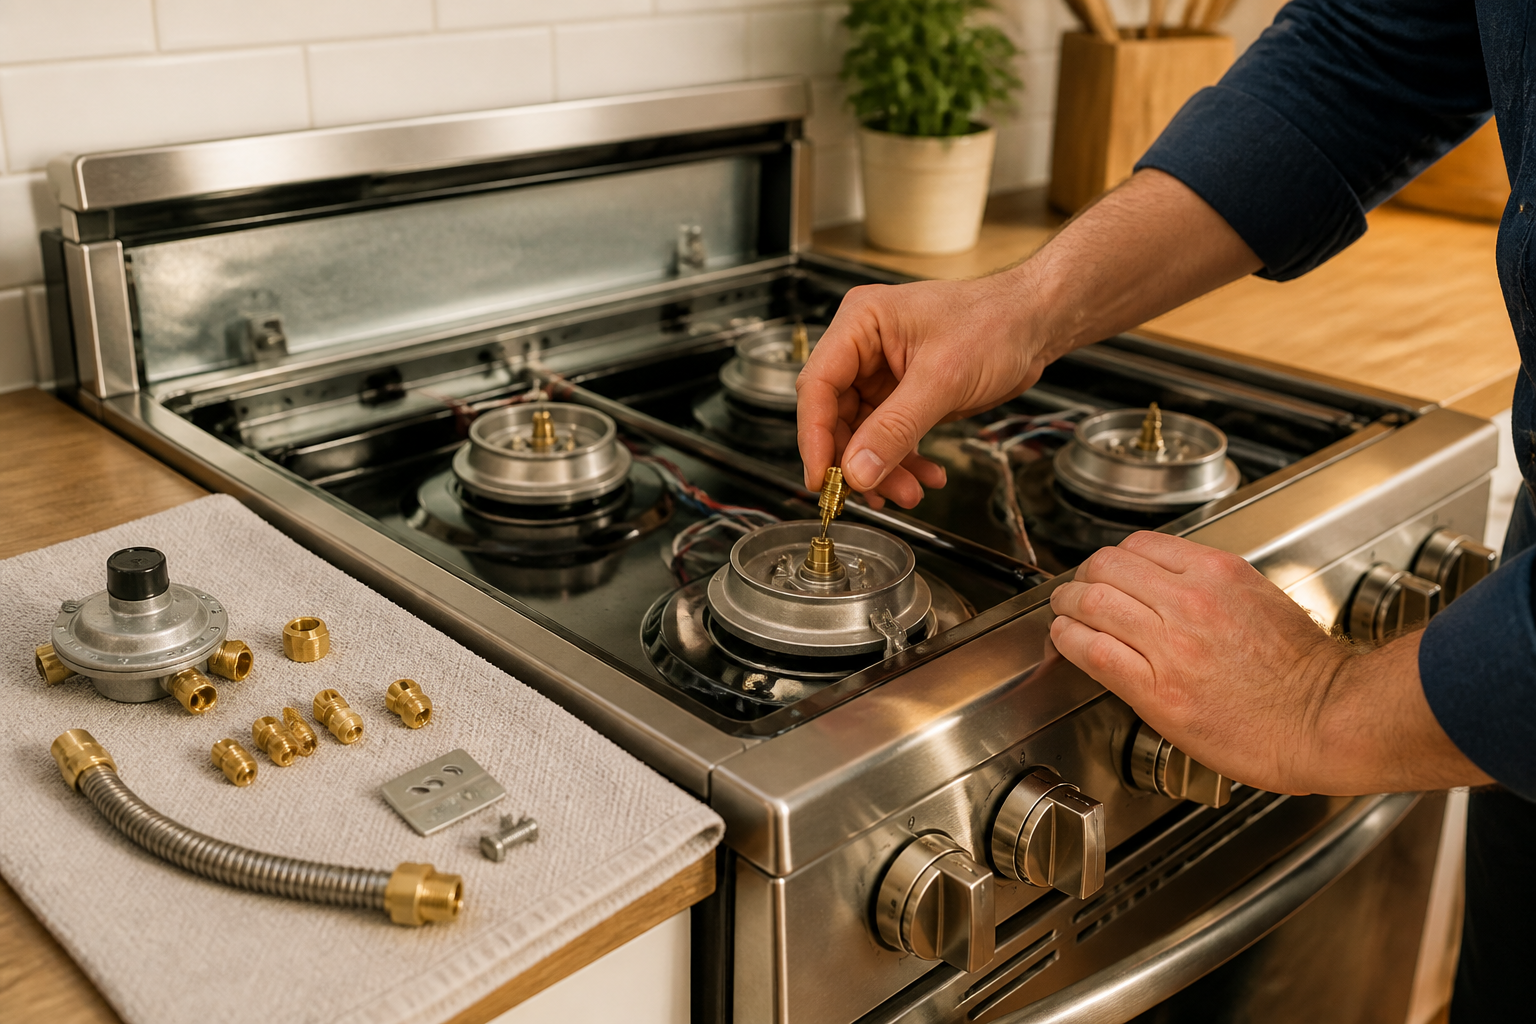
Step 4: Remove and Replace Surface Burner Orifices
Using your adjustable wrench or a dedicated orifice wrench (if one came in your LP conversion kit), grasp the natural gas orifice on the front-left burner of your NX60A6511SS. Hold the wrench steady and turn it counterclockwise approximately 2-3 turns. The orifice should unscrew easily.
Once unscrewed, remove the natural gas orifice completely. It will be a small brass component, approximately 1/2 inch long. Inspect the hole in its tip—you’ll see a relatively large opening, characteristic of natural gas orifices.
Take the corresponding LP orifice from your conversion kit. Hold it up to a light and look through it; the opening will be noticeably smaller than the natural gas version. Verify you have the correct size by comparing it to the natural gas orifice you just removed.
Thread the LP orifice into the same hole on your NX60A6511SS where the natural gas orifice was installed. Hand-thread it first to ensure you don’t cross-thread it. Once hand-tight, use your wrench to snug it—do not over-tighten. Use only moderate pressure; orifices are soft brass and can be damaged by excessive force.
Repeat this process for all four surface burners on your NX60A6511SS. Work systematically: front-left, front-right, rear-left, rear-right. Double-check that you’ve replaced all four before moving to the oven burner.
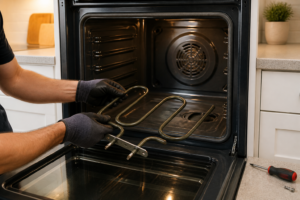
Step 5: Replace the Oven Burner Orifice
While your cooktop is still tilted up on the NX60A6511SS, locate the oven burner orifice. It will be positioned toward the back and center of the range, slightly to one side (usually the right side on most Samsung models). The oven burner orifice looks identical to the surface burner orifices but may be positioned differently.
Using the same technique as with the surface burners, unscrew the natural gas oven orifice from your NX60A6511SS with your wrench, turning counterclockwise. Remove it completely and set it aside with the surface burner orifices.
Install the LP oven orifice from your conversion kit, hand-threading it first and then snugging it with your wrench. Do not over-tighten.
Step 6: Replace the Broiler Burner Orifice
On the NX60A6511SS, the broiler is located in the drawer below the main oven. Access the broiler burner by opening the broiler drawer fully and removing any racks inside. The broiler burner orifice will be accessible from above the broiler compartment, similar to the oven burner orifice location.
Using the same counterclockwise rotation technique, unscrew the natural gas broiler orifice from your NX60A6511SS. It may take slightly more force than the surface burner orifices. Remove it completely.
Install the LP broiler orifice from your conversion kit, hand-threading first and then snugging with your wrench.
Step 7: Lower the Cooktop and Reassemble Burners
Carefully lower the cooktop on your NX60A6511SS back to its normal position. Support it as you lower it to prevent it from dropping suddenly. Once fully lowered, ensure it’s seated properly and lies flat.
Reinstall the burner heads on each surface burner location of your NX60A6511SS, pushing them straight down until they’re fully seated. Reinstall the burner caps, pushing them straight down. They should sit firmly in place. Reinstall the grates, seating them properly in their positions.
Your surface burners and cooktop should now look exactly as they did before, but with LP orifices underneath.
Step 8: Adjust or Replace the Pressure Regulator
This step is critical for proper LP operation of your NX60A6511SS. The pressure regulator is typically located inside the range cabinet, near where the gas line enters the unit from the back.
On many Samsung NX60A6511SS models, the regulator is reversible—it can be flipped to switch between natural gas and LP operation. Your LP conversion kit should include instructions specific to your regulator type. However, general procedure:
- Locate the regulator on your NX60A6511SS (usually a cylindrical brass component with inlet and outlet ports).
- Using your adjustable wrench, unscrew the regulator from the manifold inlet. You may see a small amount of residual gas escape—this is normal and expected. Allow it to dissipate.
- Examine your regulator. If it has a removable cap or internal diaphragm, consult your specific conversion kit instructions. Many Samsung regulators simply need to be reversed (flipped 180 degrees) and reinstalled.
- If your kit includes a replacement regulator, remove the old one completely and install the new LP-specific regulator in its place.
- Once the regulator is adjusted or replaced, hand-thread it back into the manifold inlet on your NX60A6511SS, then snug it with your wrench. Do not over-tighten.
If you’re uncertain about your specific regulator type, refer to the documentation that came with your LP conversion kit or contact Samsung support for clarification on the NX60A6511SS regulator setup.
Step 9: Reconnect the Gas Line and Test for Leaks
If you disconnected the gas line earlier, now is the time to reconnect it. The gas line typically uses a 1/2-inch or 3/8-inch compression fitting at the back of your NX60A6511SS. Hand-thread the fitting to start, then use two wrenches (one to hold the fitting on the range, one to tighten the compression nut) to snug the connection. Do not over-tighten.
Prepare your leak detection solution: mix one part dish soap with two parts water in a spray bottle. You’ll use this to check every connection point on your NX60A6511SS for gas leaks.
Before turning on the gas supply, ensure all your work is complete and all connections are hand-tight at minimum. Turn the main gas supply back on slowly. Listen and watch carefully for any hissing sounds.
Spray the soapy water solution on every connection point:
- The main gas line connection at the back of the NX60A6511SS
- The regulator inlet and outlet connections
- The manifold connections where you installed the new orifices
- Any other gas line connections visible inside the range cabinet
Look carefully for bubbles forming in the soapy water. Bubbles indicate a leak. If you see any bubbling, immediately turn off the gas supply and tighten that connection slightly. Retest with fresh soapy water. Do not operate your NX60A6511SS if any leaks are present.
Step 10: Test Ignition and Adjust Flame Heights
Once you’ve confirmed no leaks, you can test ignition on your NX60A6511SS. Turn on one surface burner and observe the flame. LP flames will be noticeably different from natural gas flames—they’ll be more compact, burn hotter, and may appear slightly more blue.
On the burner control knob, you’ll notice small adjustment screws (typically hidden behind or beneath the knob on your NX60A6511SS). These control the minimum flame height when the burner is at its lowest setting. You may need to adjust these screws to fine-tune the flame.
The minimum flame should be steady and blue with just a tiny bit of yellow at the tip. If the flame is excessively high at the minimum setting, use a small flathead screwdriver to turn the adjustment screw counterclockwise (usually) approximately 1/4 turn. Test the burner again. Repeat as necessary.
Test all four surface burners, the oven burner, and the broiler burner on your NX60A6511SS, adjusting flame heights as needed. Each burner may require different adjustment.
Step 11: Install the LP Operation Label
Your LP conversion kit includes a label or decal indicating the range now operates on LP gas. This label is essential for safety and future reference. Install it in the location specified in your kit instructions—typically on the back of the range or inside the oven cavity door.
The label tells future technicians, movers, or owners that this NX60A6511SS has been converted to LP operation. Never remove or obscure this label.
Step 12: Final Inspection and Documentation
After 10 minutes of operation, turn off all burners and smell carefully around the range. You should smell no gas. If any odor is present, turn off the gas immediately and investigate the source with your leak detection solution.
Once satisfied with your conversion, write down the date of conversion and initial the LP operation label on your NX60A6511SS. Keep your conversion kit box and any documentation for future reference.
Flame Characteristic Differences: What to Expect After LP Conversion
After converting your NX60A6511SS to LP operation, expect these differences compared to natural gas:
- Flames will be more compact and burn hotter, reaching higher temperatures at the same burner setting
- Cooking times may decrease slightly—adjust recipes and cooking times accordingly
- The flame color will be predominantly blue with minimal yellow (yellow tips indicate complete combustion, not incomplete burning)
- Minimum flame settings may seem higher than you’re accustomed to; this is normal for LP operation
- The range may be slightly louder during ignition; this is normal
Troubleshooting Common LP Conversion Issues on the NX60A6511SS
Flame won’t ignite on one or more burners: Most commonly caused by debris in the orifice opening or incomplete connection of burner components. Remove the burner head, look through the orifice opening with a flashlight, and verify it’s not blocked. Ensure the burner head is fully seated.
Flame is excessively high even at minimum setting: Your orifice may be too large (wrong part installed) or the adjustment screw may need further counterclockwise rotation. If you used a non-Samsung o
Recommended Parts & Tools
Dryer Vent Conversion Kit LP Adapter
This LP conversion adapter is essential for properly converting your Samsung gas range from natural gas to propane operation. The kit includes all necessary fittings and regulators required for safe and correct installation on the NX60A6511SS model. Check current pricing on Amazon.
Adjustable Wrench Set (6-inch)
You’ll need a quality adjustable wrench to disconnect and reconnect the gas line fittings during the LP conversion process. This tool ensures you can safely tighten connections to the proper specifications without damaging the brass fittings. Check current pricing on Amazon.
Gas Leak Detection Spray (16 oz)
After completing your LP conversion installation, this non-toxic leak detection spray is critical for verifying that all connections are secure and there are no gas leaks. Simply apply it to all connection points—bubbles will immediately indicate any leaks that need to be addressed. Check current pricing on Amazon.
Gas Leak Detection Spray — Your Safety Check Before Firing Up the Converted Range
After you’ve completed the LP conversion on your NX60A6511SS, testing for gas leaks isn’t optional—it’s the step that keeps your kitchen safe. This is where a reliable leak detection spray becomes essential, catching any connection you might have missed or any valve that didn’t seal properly on the first try.
What works
- Catches pinhole leaks and loose fittings you’d never spot visually—especially around the orifice plugs and regulator connections where cross-threading can happen.
- Fast bubble formation means you get immediate feedback instead of wondering if your conversion held pressure, which saves the anxiety of testing your work blind.
- Works on all gas connections (brass fittings, aluminum, stainless steel valve bodies) without damage or leaving residue that requires cleanup afterward.
What doesn’t
- Won’t detect leaks smaller than what produces visible bubbles—extremely minor weeps at thread connections might not show, though those are rare with hand-tight brass fittings.
- Requires the gas supply to be pressurized to work, so you need LP actually flowing before you can test (unlike a pressure gauge that tests static connections).
The first time I converted one of these ranges, I skipped the leak test because I’d torqued everything carefully—then smelled gas the next morning at a fitting I’d thought was tight. That 30 seconds of spray application would’ve saved me a nervous hour tracking down why my kitchen smelled like rotten eggs. Grab a Gas Leak Detection Spray (16 oz) and test every connection before you consider the job done.
This post contains affiliate links. As an Amazon Associate, I earn from qualifying purchases at no extra cost to you.