Electrolux Front-Load Washer Black Mold in Door Gasket: Complete Repair Guide
Black mold in the door rubber gasket of Electrolux front-load washers is one of the most common complaints from owners of these machines. The problem isn’t a defect in the appliance itself, but rather a natural consequence of how front-loaders operate. Understanding why this happens, how to clean it effectively, and when replacement is necessary will help you maintain your washer and protect your family’s health.
Why Electrolux Front-Loaders Develop Black Mold in the Door Gasket
The door gasket (also called the door boot seal or door rubber) on Electrolux front-load washers like the EFLS627UTT, EFLS517SIW, EFLS626SIW, and EFLS521SIW models is constructed with multiple accordion-like folds. These folds serve an important purpose—they allow the gasket to compress and expand as the door opens and closes while maintaining a watertight seal during the wash cycle.
However, these same folds create the perfect environment for black mold growth:
- Moisture accumulation: Water naturally gets trapped in the folds during and after each wash cycle
- Limited air circulation: The folds are so tight together that air cannot circulate freely to dry them out completely
- Detergent residue: Soap film from HE detergent (and especially regular detergent) accumulates in the folds and provides nutrients for mold growth
- Low light environment: The inside of the gasket folds receives no direct light, which mold spores prefer
- Temperature stability: The rubber maintains a consistent warm temperature, which accelerates microbial growth
Unlike top-load washers with exposed agitators, front-loaders are inherently prone to this issue because the water level is much lower and the door gasket must form a complete seal. This design tradeoff allows front-loaders to use less water and be more energy-efficient, but it requires more diligent maintenance to prevent mold.
How to Safely Clean Existing Black Mold from the Door Gasket
Safety Considerations
⚠️ Safety Warning: Black mold can trigger respiratory issues, allergies, and asthma attacks in sensitive individuals. Wear nitrile gloves and an N95 or N100 mask rated for mold spores when cleaning. Ensure adequate ventilation by opening windows and doors. Do not use bleach and ammonia together, as this creates toxic chlorine gas. If you have immunocompromised family members or severe mold allergies, consider professional remediation.
Cleaning Method 1: Bleach Solution (Most Effective)
Sodium hypochlorite bleach is the most effective treatment for killing black mold spores and preventing regrowth for several weeks.
- Unplug the washer from the electrical outlet or turn off the breaker if it’s hardwired
- Prepare a cleaning solution by mixing one part chlorine bleach with three parts water (roughly 1 cup bleach to 3 cups water)
- Pour the solution into a spray bottle or pour it directly into a bucket
- Open the washer door fully and inspect the gasket from the front and sides
- Using a soft-bristled brush (an old toothbrush works well) or a microfiber cloth, apply the bleach solution to the visible mold spots
- Gently work the brush into each fold of the gasket, being careful not to damage the rubber material
- For deep mold in the lower folds, use a flexible cleaning brush or straightened wire with a cloth attached to reach into hard-to-access areas
- Allow the bleach solution to sit for 10-15 minutes to kill the mold spores
- Wipe away the solution thoroughly with clean, damp cloths
- Repeat the wipe-down with plain water 2-3 times to remove all bleach residue, as leftover bleach can degrade the rubber over time
- Use a dry towel to wipe the gasket completely dry
- Leave the washer door open for at least 4 hours (preferably overnight) to allow complete air drying
Cleaning Method 2: Vinegar Solution (Gentler Alternative)
White vinegar is a safer alternative if you have concerns about bleach exposure, though it’s less effective at preventing mold regrowth.
- Unplug the washer from the electrical outlet
- Mix equal parts white vinegar and water in a spray bottle
- Spray the solution directly onto all visible mold areas
- Use a soft-bristled brush to gently scrub the gasket folds
- Allow the vinegar solution to sit for 30 minutes
- Scrub again gently with the brush
- Wipe thoroughly with clean, damp cloths until no vinegar smell remains
- Dry completely with a towel
- Leave the door open for several hours to air dry
Note: Vinegar is less effective at killing mold spores compared to bleach. You may need to repeat this process every 2-3 weeks rather than every month.
Cleaning Method 3: Gasket Deep Cleaning Cycle
Some Electrolux front-load washers include a dedicated gasket or tub clean cycle. Check your model’s manual for this feature.
- Place 2 cups of white vinegar or 1 cup of chlorine bleach in the detergent dispenser (use vinegar if your manual recommends it; otherwise use bleach)
- Select the “Gasket Clean,” “Tub Clean,” or equivalent cycle on your control panel
- Run the cycle without any clothes in the washer
- After the cycle completes, manually inspect and wipe the gasket dry
- Leave the door open for 4+ hours to air dry completely
When Mold Won’t Come Off: Assessing the Need for Gasket Replacement
Signs the Gasket Must Be Replaced
If you’ve attempted cleaning multiple times and the mold keeps returning within a few weeks, or if the mold has penetrated deep into the rubber material itself, replacement is necessary. Additionally, you should replace the gasket if:
- The rubber has become permanently discolored with black staining that won’t come off
- The mold returns within 1-2 weeks of cleaning despite following prevention measures
- The rubber shows cracks, splits, or deterioration
- Water leaks from the door during the wash cycle (indicating a seal failure)
- The gasket emits a strong musty odor even after cleaning
- Family members experience respiratory issues or allergy flare-ups when using the washer
Health Considerations for Mold in the Gasket
Deep mold colonies in the door gasket release spores continuously, especially during the spin cycle when air is drawn through the washer. These spores are distributed on your clothes and into your home’s air. While occasional mold exposure is generally not dangerous for healthy individuals, repeated exposure—particularly for people with asthma, allergies, or compromised immune systems—can trigger serious health effects. If you notice musty odors on your clothes or family members experiencing new or worsening respiratory symptoms, replacing the gasket is the safest solution.
Door Boot Seal Replacement for Electrolux Front-Load Washers
Tools and Materials Needed
- Replacement door gasket (part number varies by model—see below)
- Flathead screwdriver or gasket removal tool
- Toothbrush and soapy water (to clean the groove)
- Cloth or paper towels for drying
- Work gloves to protect hands
Common Electrolux Front-Loader Door Gasket Part Numbers
- EFLS627UTT, EFLS626SIW: Part #134515400 or 134515401
- EFLS517SIW, EFLS521SIW: Part #5303918349 or 5303918350
- EFLS620STT, EFLS721STT: Part #134515600
- EFLS6437AS, EFLS6437ATT: Part #134515401
Important: Always verify your exact model number before ordering a replacement gasket, as using the wrong part can result in water leaks and further damage to your washer. Find your model number on the rating plate located inside the door frame or on the back of the washer.
Step-by-Step Gasket Replacement Procedure
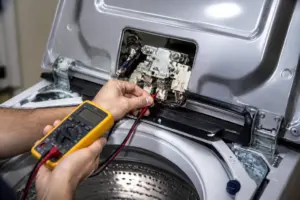
- Unplug the washer: Disconnect the electrical power by unplugging the unit or turning off the circuit breaker. Wait at least 5 minutes to ensure any residual electrical charge dissipates.
- Empty the drum: Make sure the washer drum is completely empty. Open the door and look inside to verify.
- Locate the gasket: Open the washer door fully. The gasket is the rubber ring around the opening where clothes go in. You’ll see that it’s held in place by a metal or plastic retaining ring (clamp) that runs around the entire circumference.
- Remove the retaining ring: The retaining ring is typically held in place by a single screw or by a series of small tabs. If there’s a visible screw, use a flathead screwdriver to remove it. If the ring is held by tabs, gently pry it up using a flathead screwdriver, working your way around the entire ring gradually (don’t force it at one spot). The ring should lift away cleanly.
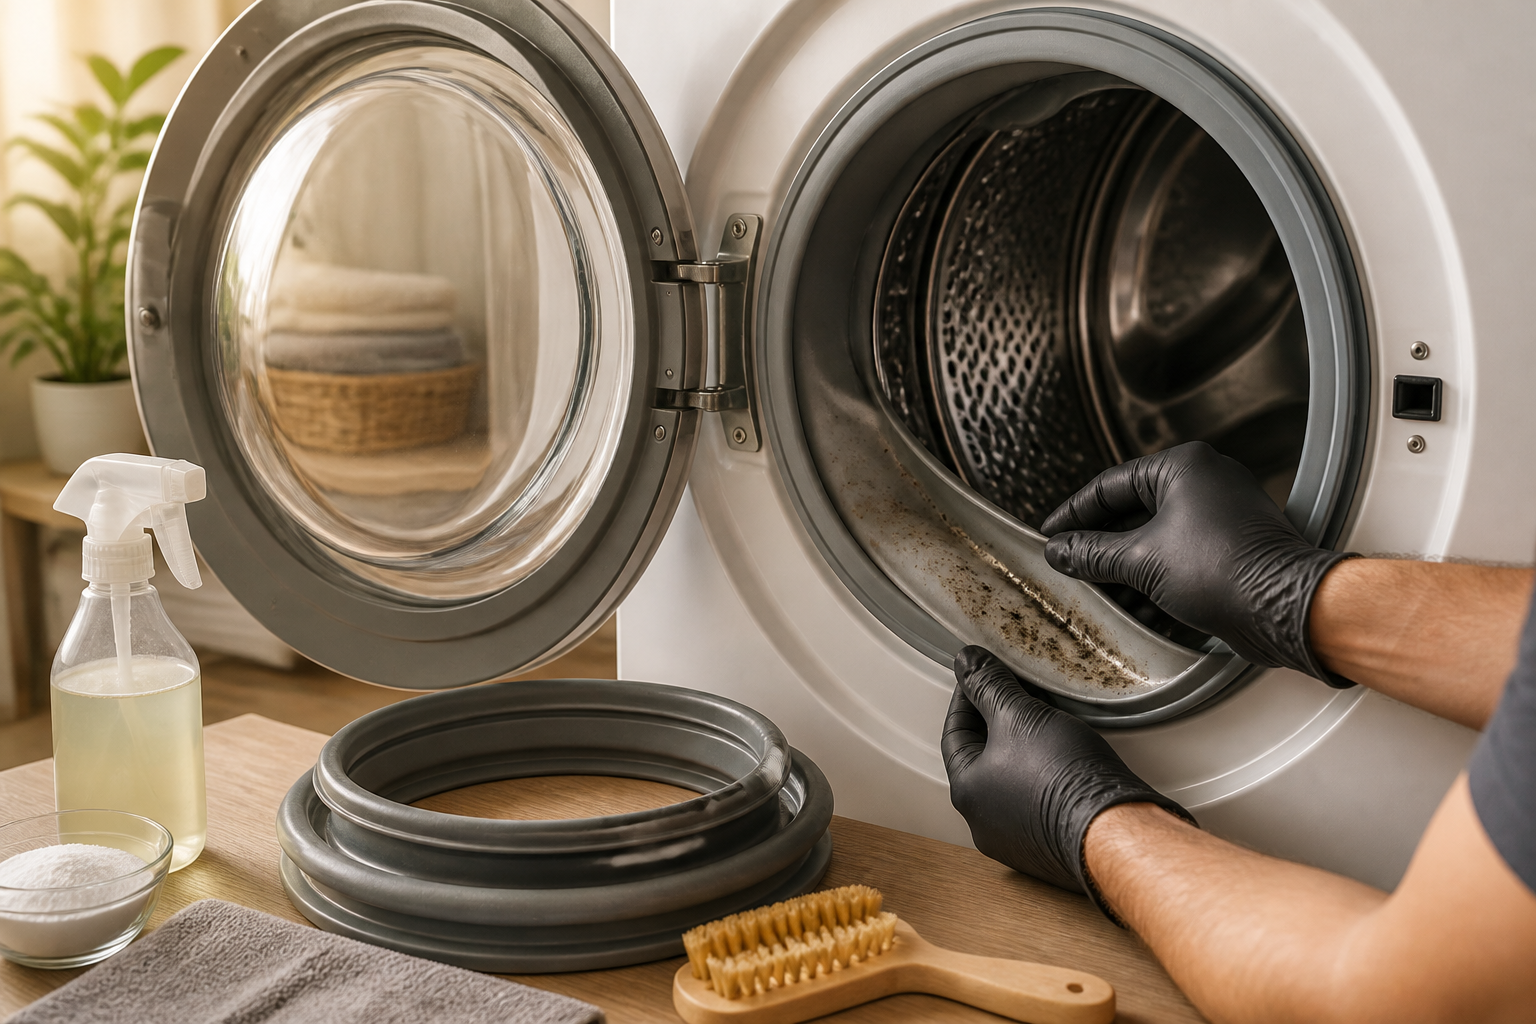
- Remove the old gasket: With the retaining ring removed, you can now pull the old gasket out of the groove. It should come out relatively easily. If it’s stuck, spray a small amount of warm water along the groove to loosen it. Set the old gasket aside—you may want to inspect it to confirm the extent of mold damage.
- Clean the gasket groove: Using a damp cloth, toothbrush, and warm soapy water, thoroughly clean the groove where the gasket sits. This groove will have accumulated water, detergent residue, and possibly mold spores. Scrub gently but thoroughly, then wipe dry with a clean cloth. This is critical—any contamination left behind will cause the new gasket to develop mold quickly.
- Install the new gasket: Remove the new gasket from its packaging. The gasket should be slightly curved to match the contour of the door opening. Starting at the top center of the door opening, begin feeding the gasket into the groove. Work your way around the opening, ensuring the gasket sits evenly in the groove all the way around. The gasket should fit snugly without being forced.
- Replace the retaining ring: Once the gasket is fully seated, position the retaining ring back into place. If it uses a screw, insert and tighten the screw firmly (but don’t overtighten, as this can crack the ring). If the ring uses tabs, press it down firmly and evenly around the entire circumference until you hear or feel it click into place.
- Test the door seal: Close the washer door gently. It should close smoothly without excessive resistance. If you feel significant pressure, the gasket may not be properly seated—open the door and reposition it.
- Run a test cycle: Plug the washer back in and run a short wash cycle with no clothes inside. Watch for any water leaks from the door or gasket area. If you see leaks, stop the cycle, unplug the washer, and recheck your gasket installation.
Estimated time for replacement: 30-45 minutes for the first-time DIY repair, 15-20 minutes for experienced repairs.
Prevention: Keeping Your Door Gasket Mold-Free
Immediate Post-Wash Care
The most effective prevention strategy is removing moisture from the gasket immediately after each wash cycle.
- Leave the door open: This is the single most important prevention step. After each wash, immediately open the door fully and leave it open for at least 2-4 hours (longer is better). The open door allows air circulation that dries the gasket folds completely. Many owners find it convenient to leave the door open overnight.
- Wipe the gasket dry: After each wash, use a dry cloth to wipe down the interior face of the gasket. Pay special attention to the folds—gently wipe between the folds to remove trapped water droplets.
- Wipe the door frame: Any water on the metal or plastic door frame should also be dried, as this moisture can seep into the gasket area.
- Use the correct detergent: Only use HE (high-efficiency) detergent in your Electrolux front-loader. Regular detergent creates far more suds and leaves excessive soap residue in the gasket folds. This residue promotes mold growth. HE detergent produces minimal suds and dissolves more completely.
- Use the appropriate detergent amount: Even with HE detergent, use only the amount recommended on the detergent container for your load size. Too much detergent leaves more residue in the gasket.
Monthly Preventive Cleaning
Schedule a monthly cleaning session to prevent mold from establishing itself, even if you don’t see visible signs of growth.
- Once monthly, run a cleaning cycle with either 2 cups of white vinegar or 1 cup of chlorine bleach in the detergent dispenser (check your manual for the recommended cleaning agent)
- Run this cycle with no clothes in the washer
- After the cycle completes, manually wipe the gasket dry
- Leave the door open for 4+ hours
This preventive cleaning will stop mold before it develops and is far easier than treating an established mold problem.
Environmental Factors
- Humidity: If your laundry room is particularly humid (above 50% relative humidity), consider running a dehumidifier or exhaust fan during and after laundry cycles
- Temperature: Keep the laundry room at a reasonable temperature. Mold grows faster in warm, humid environments (70-85°F is ideal for mold growth, so keeping the room cooler helps)
- Ventilation: Ensure your laundry room has adequate air circulation. If possible, crack a window during laundry day to introduce fresh air
Does Mold in the Door Gasket Affect Wash Performance?
Odor Issues
Black mold in the gasket is almost always responsible for musty, moldy odors on freshly washed clothes. The mold spores and the volatile organic compounds they release accumulate on your clothes during the spin cycle. This odor typically cannot be eliminated by rewashing—it requires treating the mold source itself. The first step is cleaning the gasket thoroughly with bleach; if the odor persists, gasket replacement is necessary.
Cleaning Performance
Mold in the gasket does not directly impact washing performance. Your clothes will still get clean because the mold is in the gasket seal itself, not in the wash chamber or spray jets. However, the odor transfer to your clothes makes them unpleasant to wear, which defeats the purpose of washing.
Health and Allergy Concerns
While clothes may wash clean, mold spores released by the gasket are transferred to your clothes. For people with mold allergies or asthma, wearing these clothes can trigger symptoms. Additionally, these spores are distributed throughout your home during wear, creating a persistent mold contamination cycle. Health-conscious families should not delay in addressing gasket mold.
Frequently Asked Questions
Is it safe to use my washer if there’s black mold in the gasket?
Using your washer with mold in the gasket is safe for most people, but the mold spores will transfer to your clothes, causing odors and potential allergen exposure. For people with asthma, allergies, or immunocompromised conditions, it’s not advisable to continue using the washer until the mold is eliminated. The longer you delay treatment, the more established the mold colony becomes, making it harder to clean or requiring gasket replacement.
Can I prevent mold by running the self-cleaning cycle on my Electrolux washer?
The self-cleaning or “Tub Clean” cycle helps, but it’s not a complete solution for mold prevention. These cycles clean the interior drum and spray jets but don’t thoroughly clean the gasket folds. You must supplement the self-cleaning cycle with manual gasket drying and periodic vinegar or bleach treatments. That said, running the clean cycle once monthly is a good practice.
How long does a replacement door gasket typically last?
A properly maintained door gasket lasts 5-8 years on average, though this varies based on water quality, detergent use, and drying habits. If you consistently leave the door open after each wash and perform monthly preventive cleaning, your gasket should last toward the longer end of this range. Gaskets installed in humid environments with poor drying habits may degrade faster.
Will bleach
Recommended Parts & Tools
Electrolux Front Load Washer Door Gasket Seal
If your door rubber is severely damaged, cracked, or torn beyond cleaning, you’ll need to replace the entire gasket seal. This OEM-compatible replacement part fits Electrolux front load washers and prevents water leaks and mold growth in the future. Check current pricing on Amazon.
Affresh Washer Machine Cleaner
This specialized cleaning tablet is designed to dissolve mold, mildew, and detergent buildup inside washers, including the door rubber gasket. Using it monthly after cleaning the door seal will prevent black mold from returning to your Electrolux washer. Check current pricing on Amazon.
Microfiber Cleaning Cloth Set
Microfiber cloths are ideal for scrubbing away mold and mildew from the rubber door gasket without scratching the surface, and they’re reusable for multiple cleaning sessions. Their absorbent material effectively removes moisture that contributes to mold growth. Check current pricing on Amazon.
The Door Gasket Replacement That Actually Stops Mold from Coming Back
If you’ve cleaned the mold multiple times and it keeps returning within weeks, the gasket itself has likely deteriorated enough that moisture is trapped in the material permanently. Replacing the seal is the only long-term fix that stops the cycle.
What works
- The fit is exact for Electrolux front-loaders—no guessing whether you ordered the right gasket or dealing with oversized/undersized alternatives.
- Genuine OEM material resists moisture retention far better than aftermarket rubber that hardens and cracks within a season.
- Installation is straightforward—the gasket pulls out of the groove without tools, and the new one seats firmly without forcing or gaps.
What doesn’t
- It won’t solve the problem if your washer’s drain or ventilation is compromised—mold will return if moisture isn’t drying between cycles.
- More expensive than cleaning supplies upfront, though it’s the only solution that actually eliminates repeated mold growth rather than treating the symptom.
I’ve had customers order cleaning products first, spend months fighting recurring mold, then finally replace the gasket and realize the rubber had already started to fail—visible cracks showed up once we removed it. That’s when they should’ve gone straight to replacement. Order the Electrolux Front Load Washer Door Gasket Seal if you’re seeing black spots return after cleaning, or if the rubber looks visibly hardened or cracked around the edges.
This post contains affiliate links. As an Amazon Associate, I earn from qualifying purchases at no extra cost to you.