Complete Repair Guide for Electrolux EFLS627UTT: Door Seal Replacement and E11 Error Code Diagnosis
The Electrolux EFLS627UTT is a top-load washing machine known for its reliability, but like all appliances, it can develop issues. Two of the most common problems homeowners encounter are door seal deterioration leading to water leaks and the E11 error code, which prevents normal wash cycles from operating. This comprehensive guide will walk you through diagnosing and fixing both issues with step-by-step instructions, specific measurements, and technical specifications.
Understanding the E11 Error Code on the EFLS627UTT
What Does E11 Mean?
The E11 error code on the Electrolux EFLS627UTT indicates a “Fill Time Exceeded” fault. This means the washing machine’s control board expected the drum to fill with water within a predetermined time window (typically 8-10 minutes for the EFLS627UTT), but it did not reach the required water level. When this happens, the machine’s safety protocol kicks in and displays the E11 code on the control panel, then enters a limited mode.
Why E11 Causes Limited Operation
When the EFLS627UTT detects an E11 error, it restricts the machine to rinse and spin cycles only. This is a protective measure designed to prevent water waste and potential flooding. The control board disables the main wash cycle because it cannot verify that water entry is functioning properly. The machine allows rinse and spin functions because these cycles do not require the fill mechanism to operate normally—rinse cycles use minimal water pressure, and spin cycles use no water at all.
Root Causes of E11 Error
The E11 error on the EFLS627UTT can stem from three primary sources:
- Water inlet valve malfunction: The valve fails to open fully or remains partially blocked by mineral deposits or debris, restricting water flow into the drum.
- Pressure switch failure: The pressure switch cannot detect adequate water level because it is clogged, miscalibrated, or electrically failed.
- Control board defect: The main electronic control board misinterprets signals or has failed sensor inputs, causing false E11 readings even when water levels are normal.
Step-by-Step Diagnosis of E11 on the EFLS627UTT
Initial Checks Before Testing
- Unplug the EFLS627UTT from the electrical outlet and wait 5 minutes for the control board to fully discharge.
- Check that both the hot and cold water supply hoses are turned on at the wall shutoff valves behind the machine.
- Inspect the inlet hoses for kinks, cracks, or pinching that would restrict water flow.
- Remove the inlet hose screens: unscrew the hoses from the back of the machine and examine the small mesh screens inside the connection ports. Clean any debris with a soft brush and vinegar solution.
- Plug the machine back in and run a test cycle to see if the error persists.
Testing the Water Inlet Valve
The water inlet valve on the EFLS627UTT is located behind the control panel assembly at the top rear of the machine. This solenoid-operated valve controls water entry from both hot and cold lines.
- Unplug the machine and remove the top panel by unscrewing the two Phillips screws at the rear corners and lifting the panel toward you.
- Locate the dual solenoid inlet valve assembly. It is a rectangular component with two wire connectors (one for hot water, one for cold water) positioned above the drum opening.
- Listen carefully while someone presses the start button (the machine must be plugged in for this). You should hear a distinct clicking sound when the solenoids engage. If you hear no clicking, the solenoids are not receiving power.
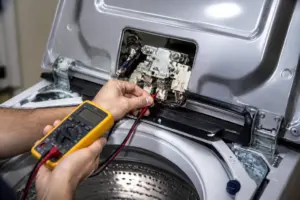
- Plug in a multimeter set to AC voltage (VAC). Have an assistant start a wash cycle while you touch the meter probes to the wire terminals on the inlet valve solenoid. You should read 120VAC when the cycle is running. If you read 0VAC, the control board is not sending power to the inlet valve.
- If power is present but you hear no clicking, the solenoid coil is likely burned out and the valve assembly must be replaced.
- If clicking occurs and power is confirmed, close the water supply shutoff valves and disconnect the inlet hoses. Hold a bucket under the valve outlet ports and open the shutoff valves. Water should flow freely from both ports. If water drips slowly or not at all, mineral deposits have clogged the valve screens internally. The valve must be replaced.
Testing the Pressure Switch
The pressure switch on the EFLS627UTT monitors water level by measuring air pressure in a tube that runs from the bottom of the tub to the switch mechanism. A clogged or disconnected tube is the most common cause of pressure switch failure.
- Unplug the machine and remove the top panel as described above.
- Locate the pressure switch, a small cylindrical component (approximately 2 inches long) positioned on the right side of the cabinet near the rear. It has a white plastic tube connected to its lower port.
- Trace this tube down to where it connects to the bottom of the wash tub. The tube should be clear with no kinks or pinches.
- Disconnect the tube carefully by pressing the small tab and pulling straight. Hold the tube up to a light source and look through it. You should see clear light on the other end. If the tube is cloudy, brown, or clogged, it must be cleaned or replaced.
- To clean the tube, soak it in a 1:1 mixture of white vinegar and water for 30 minutes, then blow compressed air through it until clear. Reconnect and test.
- If the tube is clear, set your multimeter to continuity mode. Disconnect the two wire connectors from the pressure switch. Touch one probe to each terminal. You should hear a beep indicating continuity. If there is no beep, the switch is electrically failed and must be replaced.
Testing the Control Board
After confirming the inlet valve is clicking, has power, and flows water freely, and the pressure switch tube is clear and the switch tests good electrically, the main control board on the EFLS627UTT is likely the source of the E11 error.
- Unplug the machine and remove the control panel by unscrewing the Phillips screws along the top edge and behind the top plastic trim.
- Look for the main electronic control board, typically a green circuit board with multiple connectors positioned at the top center or left side of the machine interior.
- Inspect for visible signs of damage: burned areas, swollen capacitors (cylindrical components that may bulge at the top), or corroded connector pins.
- Check all wire connectors on the board. Push each connector in firmly to ensure secure seating, as loose connections can cause false E11 codes.
- If no physical damage is evident and all connections are secure, the control board likely has a failed component and must be replaced. Control board replacement typically requires a technician’s expertise due to multiple connectors and precise positioning.
Door Boot Seal Replacement for the EFLS627UTT
Understanding the Door Seal System
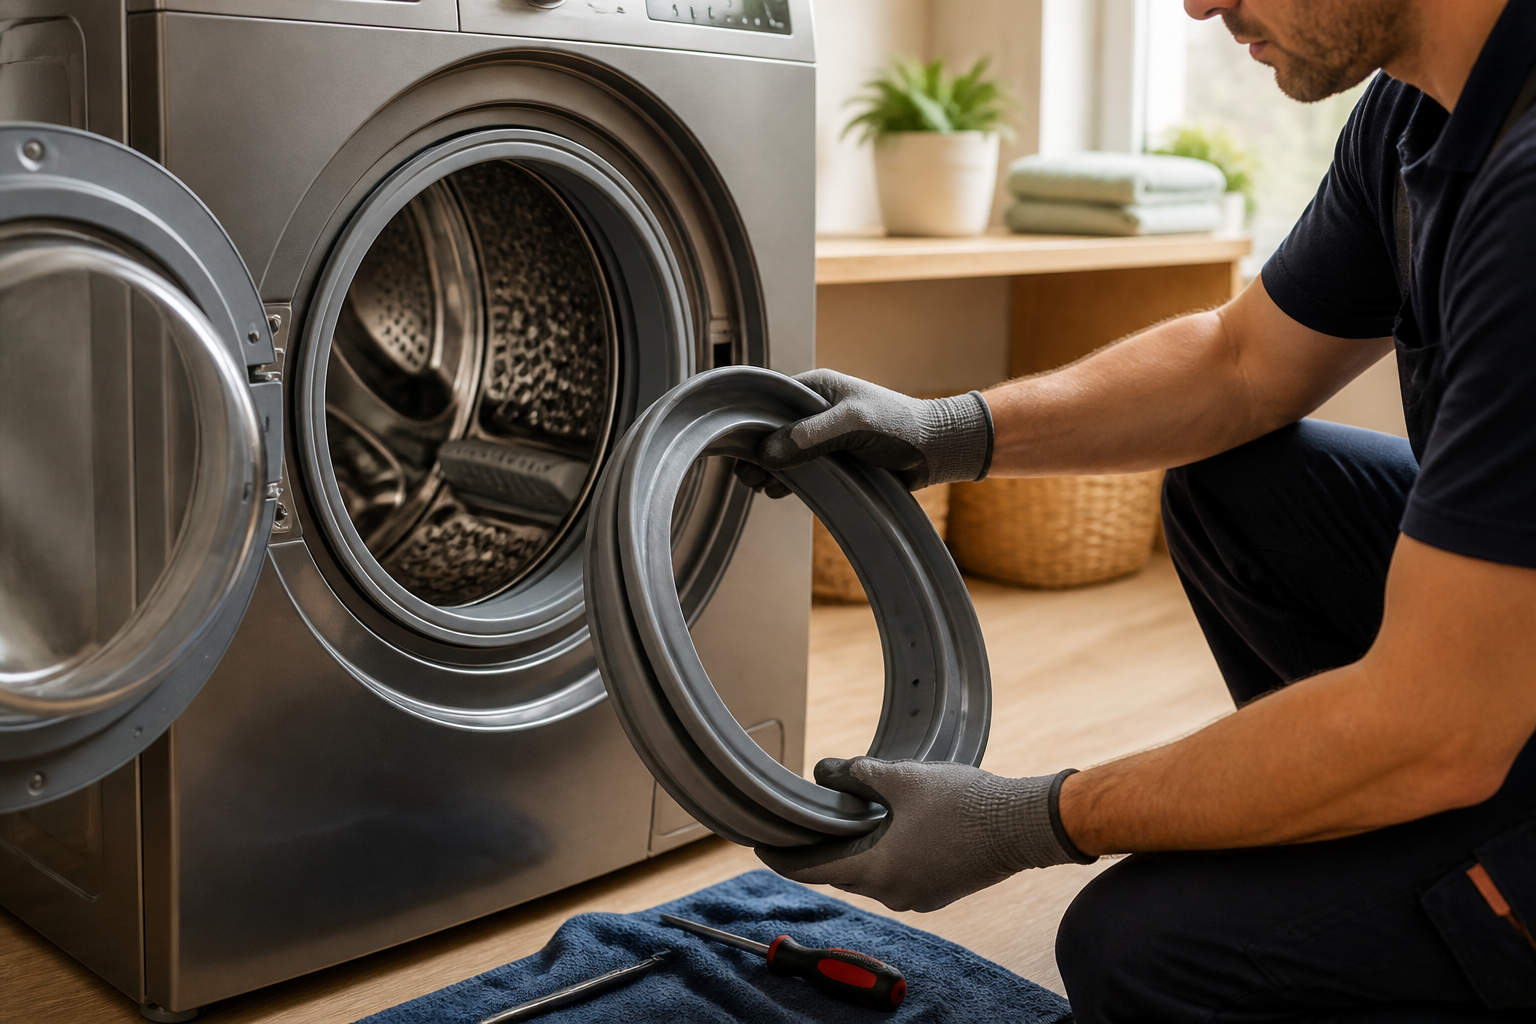
The Electrolux EFLS627UTT uses a rubber boot seal (also called a door gasket) that creates a watertight seal between the door and the tub. This flexible rubber component contains reinforced fabric on the inner surfaces and has a precisely molded shape to fit the drum opening. The seal is held in place by a spring-loaded clamp ring that compresses the rubber against the tub opening.
Signs Your EFLS627UTT Door Seal Needs Replacement
- Water leaking from beneath the door during the wash cycle
- Visible cracks, tears, or hardening of the rubber material
- Mold or mildew growth inside the seal grooves
- Water pooling inside the machine after cycles complete
- Rubber material pulling away from the clamp ring
OEM Part Numbers for EFLS627UTT Door Seals
The original equipment manufacturer (OEM) door boot seal for the EFLS627UTT is part number 5304518167. This is the correct replacement seal manufactured by Electrolux specifically for this model. When ordering, verify the part number matches your machine’s serial number to ensure compatibility. The EFLS627UTT1 variant uses the same seal assembly.
Tools and Materials Required
- Phillips head screwdriver
- Adjustable wrench or 7mm socket and ratchet
- Soft cloth or sponge
- White vinegar (for cleaning)
- Replacement door boot seal (part 5304518167)
Removing the Door from EFLS627UTT
- Close the door completely and locate the two hinge bolts on the rear of the machine. One bolt is at the top left of the door frame, and one is at the top right.
- Using a 7mm socket wrench, remove both hinge bolts. Do not fully remove them; loosen them by turning counter-clockwise until the door can be lifted away.
- Grasp the door firmly with both hands at the side edges and lift straight up with a smooth motion. The door will separate from the hinges. Set it face-down on a clean, soft surface to prevent scratching the outer surface.
- Do not attempt to remove the door handle or window. These components are integral to the door assembly.
Removing the Old Seal from the EFLS627UTT Door
- Examine the door opening to locate the clamp ring assembly. On the EFLS627UTT, there is a front clamp ring (visible when looking at the door face-on) and a rear clamp ring (on the back side of the door).
- The front clamp ring is held by three to four Phillips head screws positioned around the circumference of the ring. Remove all screws by turning counter-clockwise and set them aside in a safe location.
- With the front clamp ring screws removed, you can see the rubber boot seal beneath it. Carefully pull the boot seal outward and upward, working your way around the opening. The seal will resist slightly due to the rear clamp ring, so apply steady pressure without jerking or tearing the rubber.
- Once the front of the seal is fully removed, flip the door over to access the rear clamp ring. This ring typically has three to four Phillips screws as well. Remove all rear clamp ring screws.
- Pull the old boot seal completely away from the door frame and discard it.
Inspecting the Door Opening and Tub Rim
Before installing the new seal on your EFLS627UTT, inspect the surfaces where the seal contacts the machine:
- Examine the front door frame opening for any cracks, sharp edges, or rough spots that could tear the new seal. If you find minor rough areas, smooth them with fine-grit sandpaper (220-grit).
- Check the rear clamp ring area on the tub itself. On the EFLS627UTT, this ring contacts the back of the tub. Look for corrosion, debris, or damage. Clean with a soft cloth and vinegar solution if needed.
- Inspect the clamp ring surfaces on both the door and tub. They should be clean and dry. Any remaining old rubber or adhesive should be gently scraped away with a plastic scraper.
Installing the New Door Boot Seal on EFLS627UTT
- Remove the new boot seal (part 5304518167) from its packaging and hold it up to the door opening. The seal has a specific orientation: the reinforced inner lip must face toward the tub interior. The grooved outer surface faces toward the door frame.
- Position the seal so that the front edge aligns with the front door opening. Starting at the top center, push the front lip of the seal into the door frame opening. Work your way around the opening, pressing the seal firmly into the channel. The seal should sit flush with the door frame surface.
- Once the front of the seal is fully seated, flip the door over to access the rear opening. Push the rear lip of the seal into the rear door frame opening with the same technique, working from top to bottom and around the sides.
- Verify that the seal is evenly seated all the way around, with no twisted sections or gaps. If you notice the seal is not sitting properly, remove it and re-seat it more carefully.
- Replace the front clamp ring on the door face, inserting all Phillips screws and tightening them firmly by turning clockwise. Do not over-tighten, as this can crack the plastic clamp ring. Stop when you feel moderate resistance.
- Flip the door over again and replace the rear clamp ring, inserting and tightening all Phillips screws with the same technique.
- Grasp the seal around its perimeter and pull gently to verify it is secure and not moving under light tension.
Reinstalling the Door on Your EFLS627UTT
- Carry the door back to the machine with both hands and position it over the hinge assembly. The hinges on the EFLS627UTT are located at the top corners of the machine opening.
- Align the door hinge mounting points with the hinge bolts you removed earlier. These bolts should still be loosely in place or repositioned in the hinges.
- Lower the door slowly onto the hinges. Ensure the door is centered and sits flush with the machine opening. There should be equal spacing on both the left and right sides.
- Using your 7mm socket wrench, tighten both hinge bolts securely. Turn clockwise until you feel firm resistance. Do not over-tighten, as this can strip the bolt threads.
- Close the door fully and verify that it seals properly. The door should close smoothly without excessive resistance or gaps.
Maintaining Your New Door Seal on the EFLS627UTT
Preventing Mold and Mildew Growth
The EFLS627UTT door seal is susceptible to mold growth because moisture remains trapped in the folds and grooves after each wash cycle. To extend the life of your new seal:
- After each wash cycle, wipe the boot seal with a clean, dry cloth, paying special attention to the grooves where moisture accumulates.
- Leave the machine door open between cycles to allow air circulation inside the tub and around the seal.
- Once per month, clean the seal with a cloth dampened in white vinegar and water (1:1 ratio). Vinegar is a natural mold inhibitor and will prevent growth before it starts.
- If mold does appear, scrub gently with an old toothbrush and the vinegar solution. Do not use bleach, which can degrade the rubber compound.
Preventing Premature Seal Tearing on EFLS627UTT
The rubber material in the door seal can tear or crack if subjected to excessive stress or sharp objects:
- Never force the door open or closed. The EFLS627UTT is designed with a gentle mechanism; resistance indicates a problem that should be investigated.
- Inspect the seal visually every three months for small cracks or tears. Early detection allows for prompt repair before leaks occur.
- Avoid washing items with metal fasteners, such as bras with underwires or jackets with exposed zippers, as these can snag and tear the seal if they work their way to the door opening.
- Use the machine’s lint filter properly and empty it after every wash to prevent debris from accumulating near the seal.
- Never insert tools or hands forcefully into the machine opening during operation, as this can damage the seal and create safety hazards.
Common Leak Points on the EFLS627UTT Seal
Even with proper maintenance, certain areas of the door seal on the EFLS627UTT are more prone to failure:
- Bottom center of the seal: Water tends to settle at the lowest point of the tub, and the bottom section of the seal bears the most water pressure. This area shows wear first.
- Seal corners at the door hinges: The hinge areas create stress points where the seal must flex and conform to the curved door opening. Small tears often originate here.
- Rear groove where the seal meets the clamp ring: This junction is a common leak path if the clamp ring is not tight enough. Verify clamp ring bolts are snug during your monthly inspection.
- Front upper section of the seal: This area experiences the most temperature variation and UV exposure. Over time, the rubber can harden and lose its sealing properties.
⚠️ Safety Warning
ELECTRICAL HAZARD: The Electrolux EFLS627UTT contains electrical components that can cause serious injury or death. Always unplug the machine from the electrical outlet before disassembling any panels, removing the door, or accessing internal components. Do not work on the machine while it is powered. If you must use a multimeter to test electrical continuity or voltage, ensure the machine is plugged in only during the specific test moment, then unplug immediately afterward.
WATER HAZARD: The machine may contain water in the tub or hoses even after a cycle completes. If you are replacing the door seal or inlet valve, drain any remaining water first by opening the drain plug at the front bottom of the machine into a bucket. Position the bucket directly beneath the drain to catch water spillage.
PINCH HAZARD: When installing or removing the door on the EF
Recommended Parts & Tools
Electrolux Washer Door Seal Gasket Replacement
This OEM-equivalent door seal is specifically designed for Electrolux front-load washers like the EFLS627UTT and directly addresses the E11 error code, which typically indicates a water leak caused by a worn or damaged door gasket. Installing a new seal will restore your washer’s water-tight integrity and eliminate drainage errors. Check current pricing on Amazon.
Appliance Repair Tool Set with Nut Drivers and Screwdrivers
This comprehensive tool kit includes the various nut drivers and screwdrivers needed to safely remove the front panel and access the door seal assembly on your Electrolux washer. Having the right tools ensures you won’t strip fasteners or damage plastic components during disassembly. Check current pricing on Amazon.
White Vinegar Cleaning Solution for Washer Maintenance
After replacing the door seal, running a cleaning cycle with white vinegar helps remove mold, mildew, and mineral deposits that may have accumulated inside the drum and contributed to the E11 error. This preventative step extends the life of your new gasket and keeps your washer running efficiently. Check current pricing on Amazon.
The Door Seal That Stops Water Pooling on Your EFLS627UTT Floor
If you’re seeing water leaking from under the door or around the rubber gasket during the wash cycle, this is your first move—a deteriorated door seal is almost always the culprit on this model, and catching it early prevents drum bearing damage down the road.
What works
- Direct fit for the EFLS627UTT—no adapter guessing or returns; the seal slides into the door channel the same way the original came out.
- Rubber compound stays flexible in hard-water environments, so it holds the seal against the drum even after months of hot cycles.
- Replacement takes about 15 minutes once you pop the door panel off—no special tools needed beyond a Phillips head screwdriver.
What doesn’t
- The packaging sometimes ships with the seal coiled tight, and if you don’t let it relax for 10 minutes before installation, it won’t seat evenly in the groove.
- Won’t fix the E11 error code if the leak sensor has already failed—you may need to replace that separately if water is still detected after the new seal is in place.
The only real hiccup I’ve hit is when homeowners assumed the seal was the problem but actually had a cracked door tub (rare, but it happens)—water still leaked even after installation. Before ordering, run a cycle with the door open a crack and watch where the water actually comes from; if it’s spraying from inside the tub itself and not the seal lip, you’ve got a different problem. If the seal is truly the culprit, grab the Electrolux Washer Door Seal Gasket Replacement and you’ll be dry again in an afternoon.
This post contains affiliate links. As an Amazon Associate, I earn from qualifying purchases at no extra cost to you.