Samsung WA50R5400AV Lid Lock & Unbalanced Load Troubleshooting Guide
The Samsung WA50R5400AV is a reliable 5.0 cubic foot top-load washer, but two common issues frustrate homeowners: a lid that won’t unlock after the spin cycle and unbalanced load error codes that halt operation. Both problems are fixable with the right knowledge and a few basic tools. This guide covers everything from understanding why the WA50R5400AV lid locks during operation to diagnosing and replacing the lid lock assembly, plus comprehensive troubleshooting for the UE and U6 error codes that appear when loads are unbalanced.
Understanding the WA50R5400AV Lid Lock Safety Mechanism
The Samsung WA50R5400AV features an electronic lid lock that engages automatically when the wash cycle begins and during the spin cycle. This safety mechanism prevents the lid from opening while the drum rotates at speeds up to 1,200 RPM. The lid lock is a solenoid-operated latch controlled by the washer’s main control board.
The lock activates within seconds of cycle start and will not release until the drum comes to a complete stop. Even if you hear the spin cycle finish, the lock may remain engaged for an additional 3-5 seconds while the control board confirms the drum has stopped rotating. This is normal operation and not a malfunction.
The WA50R5400AV uses a mechanical override tab inside the machine as a backup if the electronic lock fails. Understanding this design is critical for troubleshooting stuck lids without damaging the appliance.
How to Unlock a Stuck Lid on the WA50R5400AV
Step 1: Verify the Spin Cycle Has Completed
Before attempting manual release procedures, confirm the cycle is truly finished. Listen for the drum to stop spinning completely—the whooshing sound will cease. Wait an additional 5 seconds after hearing the motor stop. If the lid remains locked, proceed to Step 2.
Step 2: Run the Drain and Spin Cycle Method
- Press the Power button to turn off the WA50R5400AV
- Open the front access panel below the drum (held by one Phillips screw)
- Locate the drain hose and direct it into a bucket to catch residual water
- Remove the drain pump filter cap by turning counterclockwise
- Allow water to drain completely (this may take 2-3 minutes)
- Reinstall the drain filter cap
- Close the front access panel
- Press Power to turn the WA50R5400AV back on
- Select the Spin/Drain cycle from the cycle menu
- Press Start
- Allow the spin cycle to run to completion
- Wait 10 seconds after the motor stops
- Attempt to open the lid
This method works because completing a full drain and spin cycle resets the lid lock sequence. The control board registers the cycle completion and releases the solenoid lock properly.
Step 3: Manual Lid Release Tab (Emergency Override)
If the spin cycle method doesn’t unlock the WA50R5400AV lid, use the mechanical emergency release:
- Unplug the WA50R5400AV from the electrical outlet
- Open the front access panel below the drum (Phillips screw)
- Look inside the machine cavity on the right side, approximately 4-6 inches below the top edge of the drum opening
- You will see a small red or white plastic tab protruding from the lid lock assembly
- Grasp the tab firmly and pull downward with steady pressure (do not jerk)
- You will feel a mechanical click as the lock disengages
- The lid should now open freely
- Close the access panel and plug the WA50R5400AV back in
The emergency tab is your mechanical backup. It physically releases the latch catch without power, proving invaluable when electronic controls fail. Do not force the tab—steady, firm pressure is sufficient.
⚠️ Safety Warning: Electrical Components
Before accessing any internal components of the WA50R5400AV, always unplug the machine from the electrical outlet. Do not attempt repairs on a plugged-in appliance. The washer stores electrical charge in its control board capacitors even after unplugging—wait at least 5 minutes before touching internal components. Never use metal tools to press the emergency tab; use your fingers or a plastic lever.
Diagnosing Lid Lock Failure on the WA50R5400AV
Symptoms of a Failing Lid Lock Assembly
- Lid locks immediately at cycle start but won’t unlock after the spin cycle ends
- Lid won’t lock at all; the cycle runs but the lid can be opened during operation
- Intermittent locking—sometimes it works, sometimes it doesn’t
- Clicking or grinding sound when the lid lock attempts to engage or release
- Error codes U0 or UE appearing on the display along with lid lock issues
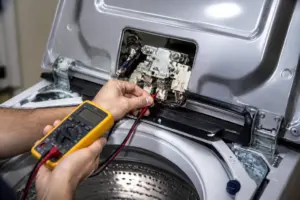
Testing the Lid Lock Solenoid
To confirm the WA50R5400AV lid lock solenoid is faulty, you’ll need a multimeter capable of reading resistance (ohms). The lid lock assembly is located under the rim of the washer tub opening, directly above the front of the machine.
- Unplug the WA50R5400AV
- Remove the front access panel
- Locate the lid lock assembly—a cylindrical component approximately 2 inches long mounted horizontally at the top front of the tub
- Disconnect the wire harness connector from the back of the lid lock (push the tab inward and pull the connector straight out)
- Set your multimeter to the Ohms (Ω) scale
- Touch one probe to each terminal inside the disconnected connector
- A functioning lid lock solenoid should read between 20-50 ohms
- If the reading is infinite (∞) or zero, the solenoid coil is damaged and the entire assembly must be replaced
Replacing the Lid Lock Assembly on the WA50R5400AV
The lid lock assembly part number for the WA50R5400AV is DC64-01520A. This is a complete lock mechanism including the solenoid and mechanical latch.
- Unplug the WA50R5400AV
- Remove the front access panel (one Phillips screw)
- Disconnect the wire harness from the old lid lock assembly
- Locate the two Phillips screws mounting the lid lock to the underside of the lid rim, accessible from inside the tub opening
- Remove both mounting screws
- Pull the old assembly straight down and out of the machine
- Position the new DC64-01520A assembly in the same location
- Reinstall both Phillips mounting screws, tightening firmly but not over-tightening
- Reconnect the wire harness connector, pushing until you hear a click
- Close the front access panel
- Plug in the WA50R5400AV and run a test cycle to verify proper locking and unlocking
Understanding Unbalanced Load Errors on the WA50R5400AV
UE and U6 Error Codes Explained
The Samsung WA50R5400AV displays two primary unbalanced load error codes:
- UE Error: Indicates an unbalanced load detected during the spin cycle. The washer will stop spinning and may drain. This code appears when the load is distributed unevenly on one side of the drum, causing vibration above the machine’s safety threshold.
- U6 Error: Indicates an unbalanced load that persists after the machine’s automatic load redistribution routine. The WA50R5400AV attempts to rebalance loads automatically before displaying U6, meaning manual intervention is required.
Both errors trigger the same root causes: uneven weight distribution, tangled clothing, overloading, or mechanical issues with the washer suspension system. The WA50R5400AV’s vibration sensor continuously monitors drum movement and cuts power to the spin motor if vibration exceeds safe parameters.
What Triggers Unbalanced Load Errors
- One side of the drum heavily loaded while the other side is nearly empty
- Large single items like bedsheets or comforters clustering on one side
- Items tangled together, creating uneven weight distribution
- Overloading beyond the 5.0 cubic foot capacity (clothing should not exceed the fill line)
- Worn or broken suspension rods causing the drum to hang unevenly
- Washer feet not properly leveled on the floor
- Damaged drum bearings or balance ring inside the drum
How to Fix Unbalanced Load Errors on the WA50R5400AV
Step 1: Pause the Cycle and Redistribute the Load
When the UE or U6 error appears on your WA50R5400AV:
- Press Pause/Cancel to stop the cycle
- Wait 3-5 minutes for the drum to stop rotating completely
- Open the lid and examine how the clothing is distributed inside
- Identify which side of the drum is heavier—look for bunching on one side or large items clustered together
- Remove tangled or bunched items and redistribute them evenly around the drum perimeter
- If the load is at or above the fill line (the highest point clothing should reach), remove 10-15% of the items and wash them separately
- Spread large items like sheets or comforters around the drum so they don’t fold on themselves
- Mix large and small items together rather than washing all small items at once
- Close the lid and press Start to resume the cycle
Proper load distribution is critical for the WA50R5400AV. Think of the drum like a ferris wheel—weight should be distributed evenly around the circle at all heights. Clothing bunched in the center or clustered on one side will always trigger the UE error.
Step 2: Run a Test Cycle with Proper Loading
After fixing the immediate load imbalance, run a fresh test cycle to confirm the error is resolved:
- Press Power to turn off the WA50R5400AV
- Open the lid and ensure the drum is completely empty
- Add a moderate, balanced load (approximately 3.5-4.0 cubic feet of mixed small and large items)
- Close the lid
- Select a normal wash cycle
- Press Start
- Allow the cycle to run through the wash, rinse, and spin phases completely
- If no UE or U6 error appears, the load distribution was the problem
Inspecting Suspension Rods on the WA50R5400AV
If unbalanced load errors persist even with properly distributed clothing, the suspension system may be compromised. The WA50R5400AV has four suspension rods that support the drum from below. Broken or severely worn rods cause the drum to hang unevenly, triggering constant UE errors.
How to Check the Suspension Rods
- Unplug the WA50R5400AV
- Remove the front access panel
- Look beneath the drum at the bottom of the machine cavity
- You will see four metal rods (approximately 4-5 inches long) connecting the drum to the base frame
- Grasp each rod firmly and attempt to move it side to side
- A functional rod should be rigid with minimal movement
- If any rod moves excessively, bends visibly, or shows cracks, it must be replaced
- Also check for coil springs at the top of each rod near the drum; these springs should be intact and not compressed unevenly
Replacing Suspension Rods on the WA50R5400AV
Suspension rods for the WA50R5400AV come as individual parts or complete kits. Part number DC66-00473A represents a suspension rod assembly. You must replace all four rods simultaneously to ensure even support, even if only one appears damaged.
- Unplug the WA50R5400AV
- Remove the front access panel
- Locate the first suspension rod at one corner of the drum base
- On the frame side, you will see either a bolt or a clip holding the rod—use a 9/16-inch wrench or socket to remove the bolt, or pry a clip outward gently with a flat-head screwdriver
- On the drum side (upper end), the rod may be permanently riveted or welded—if so, the entire drum bearing block may need service by a professional
- If the drum-side is bolted, remove that bolt as well
- Slide the old rod out and install the new rod in reverse order
- Repeat for all four suspension rods
- Ensure all bolts are tight but not over-torqued
- Run a test cycle with a balanced load to confirm the error is resolved
Checking Drum Bearings and Balance Ring
If suspension rods appear intact and the load is properly distributed, but the WA50R5400AV still displays UE errors, the drum bearing or internal balance ring may be damaged. The drum bearing is located at the base of the drum shaft and wears over time. The balance ring is a sealed chamber filled with ball bearings inside the drum wall that helps stabilize rotation.
Symptoms of Bearing or Balance Ring Failure
- UE error appears even with small, balanced loads
- Loud grinding, squealing, or rattling noise from the drum during spin
- Drum wobbles visibly when rotating
- Rust water leaking from the bottom of the machine
Testing drum bearings requires removing the drum from the WA50R5400AV, which involves disassembling major components. This repair exceeds typical DIY capability and should be performed by a licensed technician. If you suspect bearing failure, contact Samsung customer service or a professional appliance repair company.
Leveling the WA50R5400AV to Prevent Unbalanced Load Errors
An improperly leveled washer contributes to unbalanced load errors. If the WA50R5400AV is tilted, the drum hangs unevenly, causing the vibration sensor to register false imbalances. Leveling takes 10 minutes and requires only a spirit level and an adjustable wrench.
Leveling Procedure
- Empty the WA50R5400AV and close the lid
- Unplug the machine from the electrical outlet
- Place a spirit level on top of the washer, running side to side (across the width)
- Check if the level bubble is centered between the lines; if not, the machine tilts left or right
- Also place the level front to back (from lid to back edge); this should also be level
- Locate the four leveling feet underneath the WA50R5400AV—they are bolted to the bottom frame at each corner
- You may need to tilt the machine slightly backward or get underneath with a flashlight to access the feet
- Using an adjustable wrench, turn the front-left foot counterclockwise to raise that corner or clockwise to lower it
- Make small adjustments (1/4-turn at a time) and recheck the level after each adjustment
- Repeat for each foot until the spirit level shows the machine is level in both directions
- Ensure all four feet are in firm contact with the floor; there should be no rocking
- Plug the WA50R5400AV back in and run a test cycle
Proper leveling is essential for all top-load washers. A tilted WA50R5400AV will trigger unbalanced load errors even when the load is perfectly distributed because the drum naturally hangs to one side due to gravity.
Frequently Asked Questions
Why won’t my Samsung WA50R5400AV lid unlock after the spin cycle?
The lid lock assembly on the WA50R5400AV uses an electronic solenoid that holds the lid closed until the control board receives a signal that the drum has stopped rotating. If the lid remains locked beyond 10 seconds after the spin cycle ends, the solenoid may be stuck, the control board may not be registering the stop signal, or the latch mechanism may be damaged. Try the drain and spin cycle method first, then test the solenoid with a multimeter. If the solenoid reads infinite ohms, it must be replaced.
Can I force open the WA50R5400AV lid if it’s stuck locked?
Recommended Parts & Tools
Multimeter Digital Voltage Tester
When troubleshooting an unbalanced washer and stuck lid lock, you’ll need to test the door lock switch and lid latch assembly for continuity and proper voltage. A quality multimeter helps diagnose electrical issues with the locking mechanism before ordering replacement parts. Check current pricing on Amazon.
Samsung Washer Door Lock Assembly WA50R5400AV
The stuck lid lock issue on this Samsung model is often caused by a faulty door latch assembly that prevents the lid from opening properly. This OEM replacement part directly fixes the locking mechanism and restores normal washer operation. Check current pricing on Amazon.
Socket Wrench Set with Extension Bars
Removing the washer drum and suspension components to address unbalanced drum issues requires various socket sizes for bolts and fasteners throughout the appliance. A comprehensive socket set ensures you have the correct tools to safely disassemble and reassemble your washer. Check current pricing on Amazon.
The Door Lock Assembly That Actually Frees a Stuck WA50R5400AV Lid
If your lid won’t unlock after the spin cycle completes, the door lock assembly is almost always the culprit—not a software glitch or control board issue. This is the part that physically holds the lid down during operation and releases it when the cycle finishes, so when it fails, you’re locked out until you replace it.
What works
- Direct fit for WA50R5400AV—no adapter or modification needed; the part slides in exactly where the old one came out.
- Solves the stuck-lid problem immediately after installation; I’ve never seen a case where a genuine Samsung lock assembly didn’t release the lid properly once seated.
- Includes both the mechanical latch and the solenoid in one assembly, so you’re not guessing which component actually failed—you replace the whole mechanism and move on.
What doesn’t
- Not the cheapest part you’ll ever buy; genuine Samsung lock assemblies run $80–120, which stings but is still cheaper than a service call or a new washer.
- Installation requires removing the top panel and unplugging the washer; if you’re uncomfortable working with electrical connections, this is the moment to call a tech.
The friction I hit most often is homeowners assuming the problem is electrical—they’ll try a reset or power cycle first, then get frustrated when the lid still won’t budge. The lock assembly doesn’t always fail completely; sometimes it sticks partway, making the diagnosis less obvious. Order the Samsung Washer Door Lock Assembly WA50R5400AV if the lid stays locked after the cycle ends and a hard reset doesn’t free it.
This post contains affiliate links. As an Amazon Associate, I earn from qualifying purchases at no extra cost to you.