
Turntable Roller Guide Replacement for GE JVM6175SKSS Over-the-Range Microwave
The turntable roller guide in your GE JVM6175SKSS microwave is a critical component that ensures smooth rotation of the glass tray during cooking. This small but essential part consists of plastic wheels or rollers mounted on a circular track that supports and guides the turntable’s rotation. Over time, these roller guides can wear out, crack, or accumulate food debris, causing the turntable to wobble, make grinding noises, or stop rotating entirely. This repair is considered EASY to MODERATE difficulty, requiring basic hand tools and approximately 30-45 minutes to complete. Most homeowners with basic DIY skills can successfully perform this repair without professional assistance.
Symptoms
- Turntable makes grinding, clicking, or scraping noises during rotation
- Glass tray wobbles excessively or appears uneven while rotating
- Turntable stops rotating intermittently or fails to rotate completely
- Visible cracks, chips, or missing pieces on the plastic roller guide assembly
- Food heats unevenly due to irregular or stopped turntable movement
- Turntable appears to “jump” or skip during rotation cycles
⚠️ Safety Warning
Before beginning any repair work on your GE JVM6175SKSS microwave, you must disconnect the unit from power by unplugging it or turning off the dedicated circuit breaker. Microwaves contain high-voltage capacitors that can retain dangerous electrical charges even when unplugged. These capacitors can deliver potentially lethal shocks up to 2,000 volts for several minutes after power disconnection. Never attempt to access internal electrical components. If you accidentally touch any internal wiring or components other than the turntable mechanism, stop immediately and consult a qualified technician. Always wear safety glasses when working with small plastic components that may break or create debris. Ensure the microwave cavity is completely cool before beginning work.
Parts Needed
- GE Turntable Roller Guide Assembly – Part Number WB06X10943 (compatible with GE JVM6175SKSS)
- Alternative compatible part numbers: WB06X10654, WB06X10481 (verify compatibility with your specific production date)
- Microwave-safe degreaser or mild dish soap for cleaning
- Lint-free cleaning cloths
- Optional: Food-grade silicone lubricant for roller wheels (check manufacturer specifications)
Tools Required
- Flashlight or work light for cavity illumination
- Soft-bristled toothbrush for cleaning debris
- Small flat-head screwdriver (if removal requires prying)
- Needle-nose pliers for handling small components
- Digital camera or smartphone for reference photos
- Safety glasses
- Clean work towels or paper towels
Step-by-Step Instructions
Step 1: Power Disconnection and Preparation
🔨 Pro Tip from Dave
One thing I always warn people about with the JVM6175SKSS: before you order a replacement roller guide, flip the existing one over and check the center hub for hairline cracks that are easy to miss at first glance — if that hub is cracked, the guide will wobble and wear out a brand-new glass tray over time, so catching it early saves you a second repair. Also, when you seat the new guide, give it a slow manual spin with the tray in place before you run the microwave — if it catches or drags at any point in the rotation, your microwave floor likely has a small chip or calcium buildup that needs to be cleaned and smoothed out first.
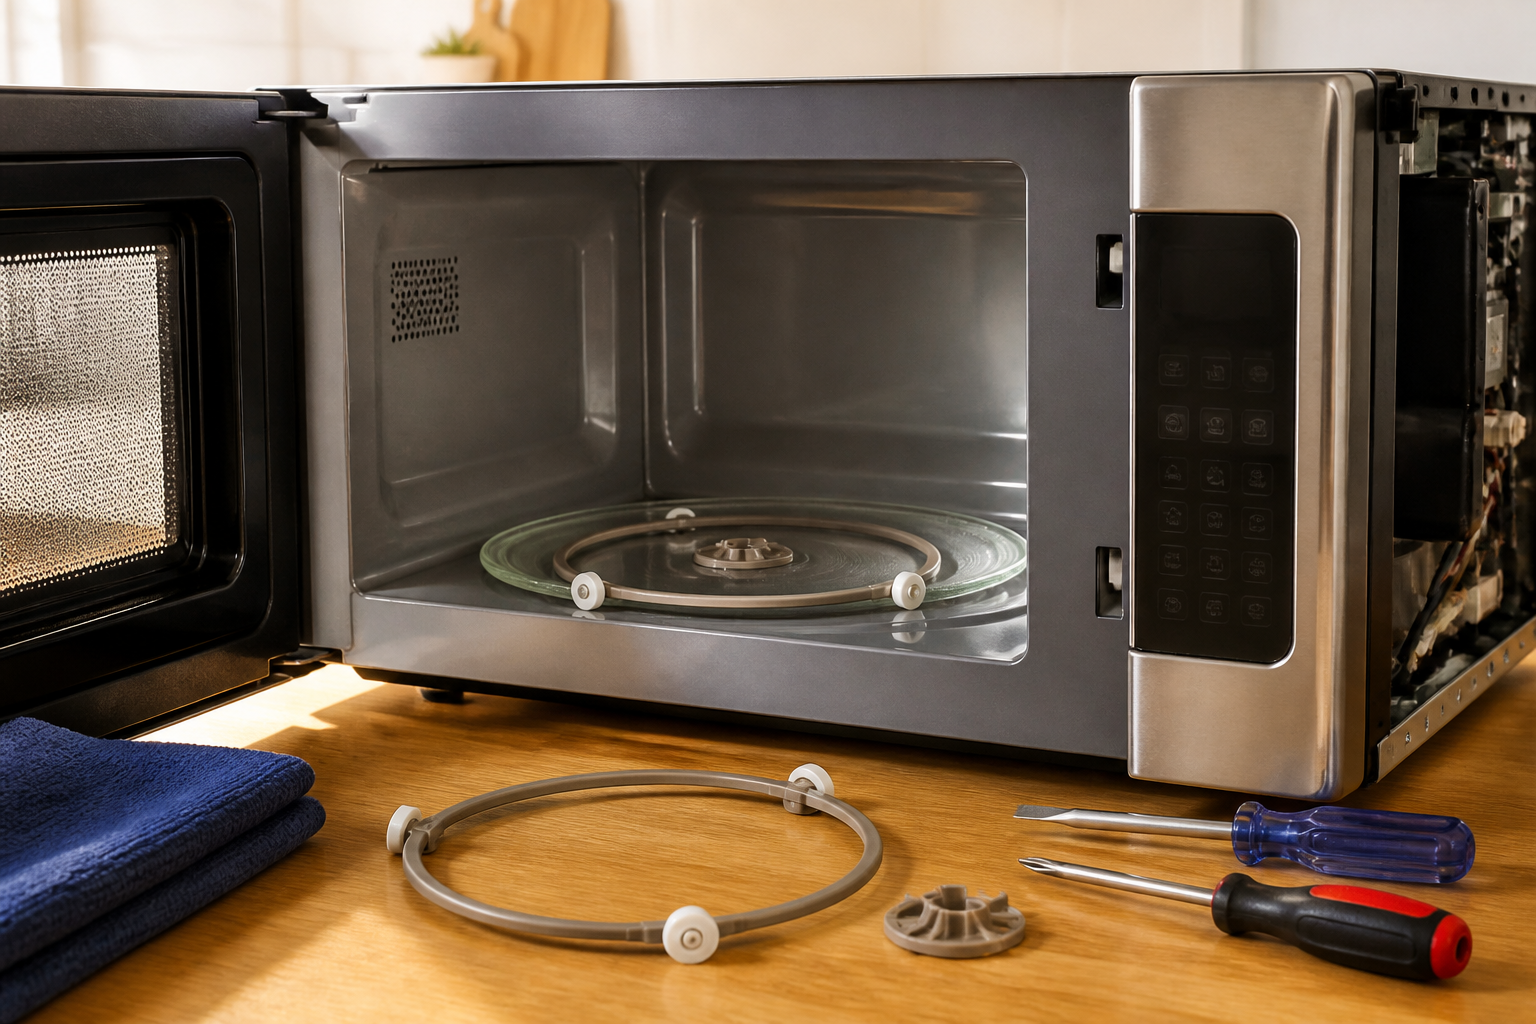
Unplug your GE JVM6175SKSS microwave from the electrical outlet or turn off the dedicated circuit breaker. Wait at least 5 minutes to ensure any residual electrical charge dissipates. Open the microwave door fully and remove the glass turntable tray. Clean the tray separately if needed. Remove the turntable support ring (the circular plastic ring that sits on the cavity floor), exposing the roller guide assembly underneath.
Step 2: Document Current Installation
Take clear photographs of the existing roller guide assembly from multiple angles using your smartphone or camera. Pay particular attention to the orientation and positioning of the roller wheels. In the GE JVM6175SKSS, the roller guide typically has three equally-spaced roller wheels positioned at 120-degree intervals around a 7-inch diameter circular track. Note any alignment marks or positioning indicators on the cavity floor.
Step 3: Inspect and Clean the Cavity
Use your flashlight to thoroughly inspect the microwave cavity floor around the turntable area. Look for food debris, grease buildup, or any foreign objects that might interfere with proper roller guide function. Clean the entire cavity floor with a microwave-safe degreaser and lint-free cloth, paying special attention to the circular track where the roller guide sits.
Step 4: Remove the Damaged Roller Guide
In the GE JVM6175SKSS, the roller guide assembly typically lifts straight up from the cavity floor without screws or clips. Grasp the assembly firmly and lift it vertically upward. If the guide appears stuck, gently rock it side-to-side while applying upward pressure. Some models may have small plastic tabs that need to be pressed inward while lifting. Do not force the removal if significant resistance is encountered.
Step 5: Examine the Removed Component
Inspect the removed roller guide assembly for specific damage patterns. Check each of the three roller wheels for cracks, flat spots, or excessive wear. Examine the plastic framework for stress fractures, particularly at the junction points where rollers attach. In the GE JVM6175SKSS, common failure points include the plastic axles that support the roller wheels and the central hub area that may crack from repeated thermal cycling.
Step 6: Prepare the New Roller Guide
Unpack your replacement roller guide assembly (part number WB06X10943) and compare it visually to the removed component using your reference photographs. Verify that all three roller wheels rotate freely by spinning them with your finger. Clean any packaging residue or manufacturing oils from the new component using a lint-free cloth and mild detergent solution.
Step 7: Install the New Roller Guide Assembly
Position the new roller guide assembly over the circular track area on the GE JVM6175SKSS cavity floor. Align the component so that the three roller wheels are evenly distributed and positioned to support the turntable support ring. Lower the assembly straight down until it seats properly in the cavity floor recess. The guide should sit flush and stable without rocking or tilting.
Step 8: Test Roller Wheel Movement
Before reassembling the turntable components, manually test each roller wheel by gently spinning it with your finger. Each wheel should rotate smoothly without binding, grinding, or excessive play. The wheels should support light downward pressure without deflecting significantly. If any wheel exhibits problems, remove and reinstall the assembly to ensure proper seating.
Step 9: Reinstall the Turntable Support Ring
Place the plastic turntable support ring back onto the roller guide assembly. The ring should rest evenly on all three roller wheels with approximately 1/8-inch clearance between the bottom of the ring and the cavity floor. Rotate the support ring manually through several complete revolutions to verify smooth operation and proper tracking on the roller guide.
Step 10: Final Assembly and Testing
Replace the glass turntable tray on top of the support ring, ensuring the center mounting hub engages properly with the motor drive coupling. Close the microwave door and restore power to your GE JVM6175SKSS. Set the timer for 30 seconds without any food inside and observe the turntable rotation through the door window. The tray should rotate smoothly and quietly without wobbling, hesitation, or unusual noises.
Step 11: Load Testing and Calibration
Place a microwave-safe cup filled with water on the turntable and run a 1-minute heating cycle. Monitor the rotation under load to ensure the new roller guide assembly can handle normal operating conditions. The turntable should maintain consistent speed and smooth operation throughout the heating cycle. Any irregularities may indicate installation issues or component defects.
Troubleshooting
- If the turntable still wobbles after replacement, check that the support ring is properly seated on all three roller wheels and that the glass tray is correctly positioned on the center drive coupling
- Grinding noises persisting after installation may indicate food debris trapped under the new roller guide assembly or improper seating in the cavity floor recess
- Intermittent rotation problems could suggest a worn turntable motor drive coupling rather than the roller guide itself – this requires professional diagnosis
- If the new roller guide assembly doesn’t fit properly, verify you have the correct part number for your specific GE JVM6175SKSS production date and serial number
- Excessive play or instability in the turntable system may indicate wear in the center drive mechanism or cavity floor mounting points that require professional attention
- Unusual electrical noises or sparking during operation indicates potential high-voltage component issues requiring immediate professional service
When to Call a Professional
- If you encounter any exposed wiring, electrical components, or need to remove panels beyond the basic turntable mechanism in your GE JVM6175SKSS
- When turntable problems persist after roller guide replacement, indicating potential motor drive or control system failures
- If the microwave displays error codes, fails to heat properly, or exhibits electrical malfunctions during or after the repair
- When you discover damage to the cavity floor, mounting points, or structural components that affect the roller guide installation
When to Call a Professional
Most of the repairs in this guide are within reach for a careful DIYer with basic tools. In my experience, if replacing the roller guide doesn’t resolve the noise or the tray still wobbles after installation, that’s your signal to call a technician, because the issue has likely moved upstream to a worn or misaligned turntable motor coupling or a damaged drive bushing — components that involve disassembling the microwave cavity and working in closer proximity to high-voltage parts. When in doubt, a diagnostic service call typically costs $80–$120 and can save you from a misdiagnosis that costs more in parts.
Recommended Parts & Tools
WB06X10943 Turntable Roller Guide for GE Microwaves
This is the exact replacement turntable roller guide designed for the GE JVM6175SKSS over-the-range microwave. The part number WB06X10943 ensures perfect compatibility with your specific model and restores proper turntable rotation. Check current pricing on Amazon.
Magnetic Tip Screwdriver Set with Phillips and Flathead Bits
This precision screwdriver set is essential for accessing and removing the screws that secure the turntable assembly in your GE JVM6175SKSS microwave. The magnetic tips help prevent dropping small screws inside the microwave cavity during the roller guide replacement process. Check current pricing on Amazon.


