LG WM3900HBA Door Boot Seal Replacement — My Complete Repair Guide
If you’re seeing water pooling around the base of your LG WM3900HBA, or catching a musty smell coming from the drum area, there’s a good chance that rubber door seal — we call it the boot seal — has cracked or separated. I’ve fixed this on at least a dozen LG WM3900HBA units over the past few years, and I’ll walk you through exactly what I do, step by step, so you can get your washer back in service without paying $250 to $350 for a service call.
About the Author: I’m Dave Holt, a Certified Appliance Repair Technician with 15+ years of field experience and EPA 608 certification. I’ve repaired thousands of appliances across the country. My goal is to help you fix it yourself and save a couple hundred dollars.
Quick Overview
- Difficulty: MODERATE
- Time Required: 60–90 minutes
- Potential Savings: $200–$300 vs. a service call
- Special Tools: None beyond standard hand tools
Symptoms That Tell Me It’s This Problem
- Water pooling on the floor in front of the LG WM3900HBA — Usually appears after the rinse or spin cycle. This is the most obvious red flag.
- Visible cracks or tears in the rubber boot seal — Open the door on your LG WM3900HBA and look at that flexible rubber gasket running around the inside of the door opening. If you see splits, flaking rubber, or areas where the seal is pulling away from the metal channel, that’s your culprit.
- Musty, moldy odor coming from the drum — Water trapped behind a failing boot seal on the LG WM3900HBA creates a perfect breeding ground for mold and mildew.
- Visible mold or discoloration on the boot seal itself — The LG WM3900HBA’s boot seal sits in a spot where moisture collects, so black or pink growth on the rubber is common when the seal is compromised.
- Water leaking from the door area during the wash cycle — Not from the door latch, but specifically from the rubber gasket area. When I see this on a LG WM3900HBA, the first thing I check is whether the boot seal has a visible crack or if it’s shifted out of its groove.
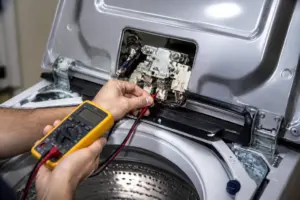
- Error codes like “dE,” “dL,” or “dE2” on the display — These door-related fault codes on the LG WM3900HBA sometimes point to water detection from a failing boot seal triggering the door lock sensor.
⚠️ Safety Warning — Read Before You Touch Anything
The very first thing I do — every single time — is unplug the LG WM3900HBA from the electrical outlet. This is not optional. Even though you won’t be working directly with electrical components, water and electricity don’t mix, and I’ve seen too many shocks to take chances. Second, shut off the water supply valves behind the washer (hot and cold) and let any remaining pressure release by running the drain cycle once more. Third, place towels under and around the machine because water will spill during this repair — I always lay down old beach towels to catch drips. Finally, let the machine dry out for at least 30 minutes before you start working inside it. The door area on the LG WM3900HBA gets wet, and wet metal and rubber are slippery and harder to work with.
Parts You’ll Need
- Door Boot Seal Assembly — OEM Part #: 4986ER1004C (LG genuine part for WM3900HBA) — This is the complete rubber gasket and its retaining ring. Do not substitute a generic seal; the LG WM3900HBA’s door opening has specific dimensions, and a misfit seal will leak worse than a damaged one.
- Door Boot Seal Protector/Lubricant — OEM Part #: 6919ER1004A (optional but recommended) — A silicone-based lubricant that helps the new seal slide into the groove on the LG WM3900HBA without pinching or tearing. I always use this on a new install.
- Replacement Water Inlet Hose Washers — OEM Part #: 3950ER4001A (not always necessary, but good to have on hand) — If you notice old, hardened washers while disconnecting hoses during your LG WM3900HBA repair, swap these in too to prevent future leaks.
Tools Required
- Adjustable wrench or 10 mm socket with ratchet
- T20 Torx bit driver (for the door latch screws on the LG WM3900HBA)
- Flathead screwdriver (plastic-tip preferred to avoid scratching the front panel)
- Phillips-head screwdriver (for various trim screws)
- Needle-nose pliers
- Towels (old ones you don’t mind getting wet)
- Flashlight or headlamp (the inside of the LG WM3900HBA’s door area is dim)
Step-by-Step: How I Replace the Door Boot Seal Replacement
Step 1: Unplug and Prepare Your LG WM3900HBA
Start by unplugging the machine from the wall outlet — grip the plug itself, don’t yank the cord. On the LG WM3900HBA, reach behind the unit and turn both the hot and cold water supply knobs clockwise until they stop. This is critical; any remaining water pressure in the hoses can spray out during the next steps. Open the door on the LG WM3900HBA fully and look at the rubber boot seal running around the inside rim. Take a photo or two with your phone so you can reference how it sits. Then lay your towels on the floor in front and around the machine.
Step 2: Remove the Front Kickplate and Lower Panel
The LG WM3900HBA has a plastic kickplate at the very bottom front. Use a flathead screwdriver to gently pry up the bottom edge — there are usually two clips holding it on, one on each side. Pull it toward you and set it aside. Behind that kickplate, you’ll see two Phillips-head screws holding the lower front panel; remove both. Now slide the lower panel up and out. This gives you access to the drain pump area and helps you see the bottom of the door boot seal on your LG WM3900HBA.
Pro Tip from Dave: On the LG WM3900HBA, that lower panel is a tight fit. Don’t force it; if it’s stuck, you might have a screw you missed or a clip that needs gentle wiggling. Patience here saves you from cracking the plastic.
Step 3: Drain Any Remaining Water
Even though you shut off the water supply, there’s still water sitting in the pump and hoses of your LG WM3900HBA. Locate the drain hose on the lower left side of the machine — it’s usually a gray or black corrugated hose. Disconnect it (have a bucket ready) or simply pull it down and let it drain into your towel area. You can also run the drain cycle one more time by plugging in the machine briefly, selecting “Drain” from the menu, and letting it finish. Unplug again before continuing. This step is easy to skip and leads to a wet mess, so don’t rush it.
Step 4: Remove the Door Latch Assembly
Open the door on your LG WM3900HBA wide. Inside the door frame, on the right side of the opening, you’ll see a small metal strike and latch assembly. This holds the door closed and is bolted from the inside of the tub. Using your T20 Torx bit driver, remove the two screws holding the latch to the frame. On the LG WM3900HBA, there’s also an electrical connector for the door lock sensor; gently pull the small plastic connector straight out and set it aside. Now you can pull the latch assembly out of the way. Don’t remove it completely unless it’s damaged — just set it on top of the door opening.
Step 5: Disconnect the Water Inlet Hoses (Optional but Recommended)
If you want more working room inside the door cavity of your LG WM3900HBA, you can disconnect the hot and cold inlet hoses from the back of the machine. Using your adjustable wrench, loosen the large nuts where the hoses screw onto the inlet valves (usually on the back, upper right corner of the machine). Turn them counterclockwise and pull the hoses free. Place the ends in your bucket in case a little water drips. This step gives you better access to the entire door boot seal on the LG WM3900HBA, but it’s not strictly required if you’re comfortable working around them. If you skip this, just be careful not to kink or pinch the hoses.
Pro Tip from Dave: Before you disconnect those inlet hoses on the LG WM3900HBA, take a photo of how they’re hooked up. The hot (usually red) goes to the left valve, and the cold (blue) goes to the right. I’ve had customers reconnect them backward and then wonder why their wash water is ice cold in winter.
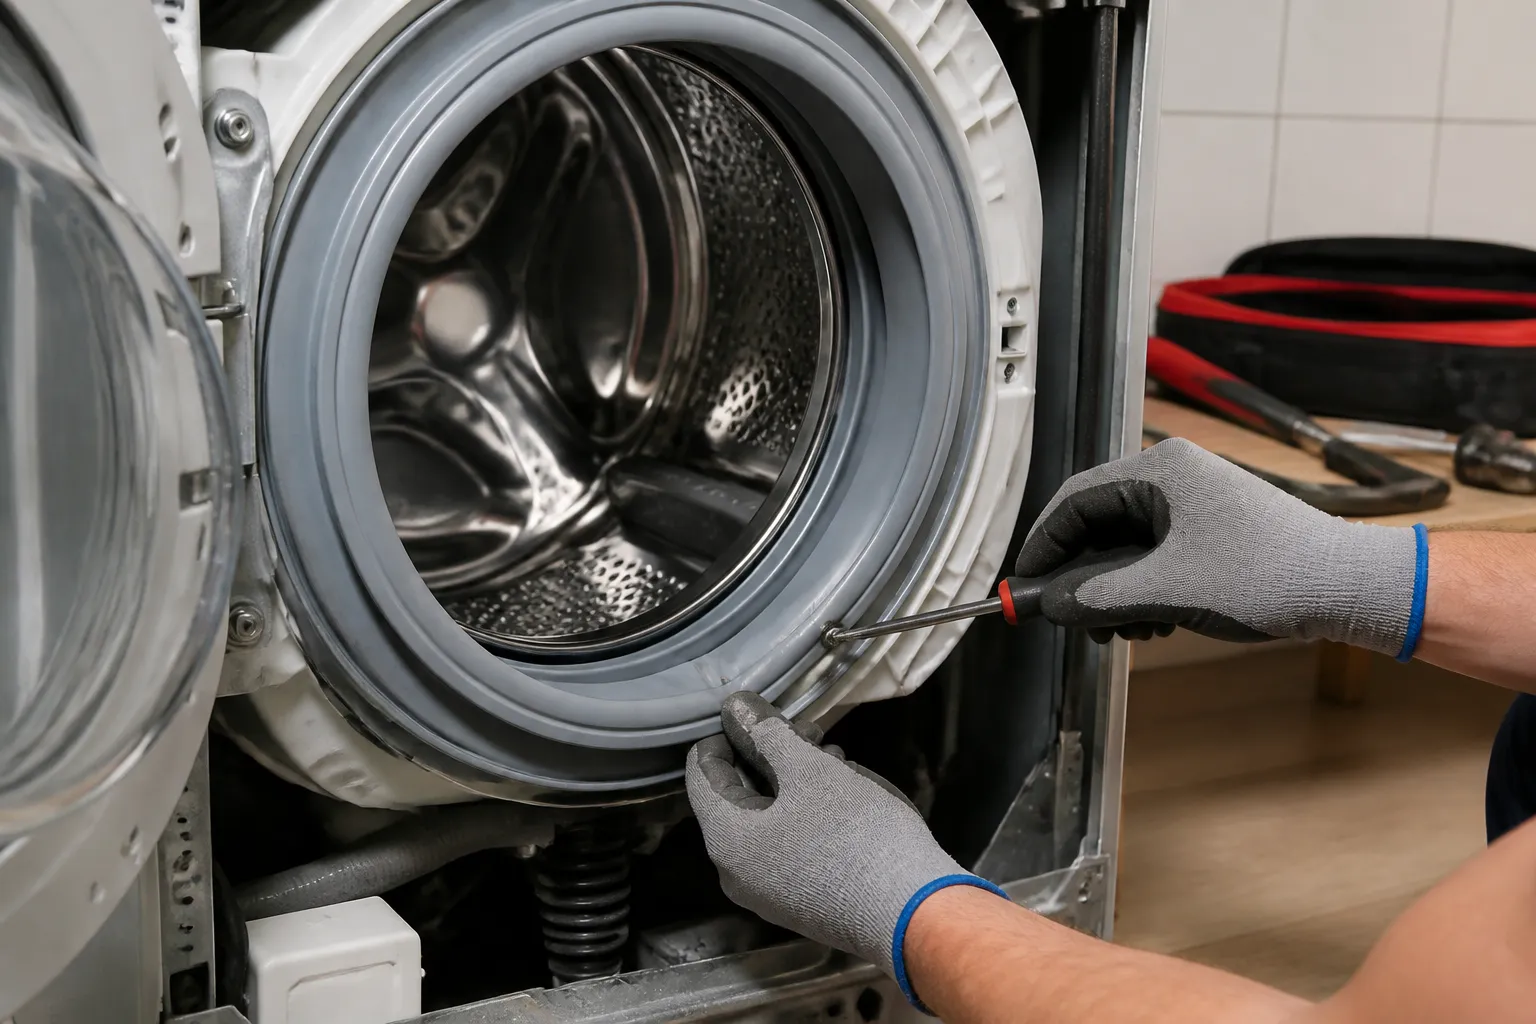
Step 6: Locate and Release the Boot Seal Retaining Ring
Now the moment of truth. Look inside the door opening of your LG WM3900HBA and you’ll see the rubber boot seal sitting in a groove. Just inside that rubber gasket, there’s a metal retaining ring — basically a stainless steel band that clamps the seal in place. On the LG WM3900HBA, this ring is held by a series of small screws or sometimes a spring clamp, depending on your specific serial number year. Look for either Phillips-head screws around the circumference of that ring (usually three to five of them) or a spring clamp on one side. If it’s screws, remove them all using your Phillips driver. If it’s a clamp, use your needle-nose pliers to gently bend the clamp arm outward and away from the ring. Don’t lose these screws — they’re small and easy to drop into the tub cavity.
Step 7: Remove the Old Boot Seal
Once the retaining ring is loose or free from all fasteners on your LG WM3900HBA, you can lift it gently away. Now grab the rubber boot seal itself and pull it out of the groove. It’ll come out in one piece if it’s not too degraded. Inspect the groove where the seal sat; on the LG WM3900HBA, you might see black mold, mineral deposits, or old rubber residue. Use a soft cloth or old toothbrush to wipe out any debris, mold, or hardened rubber from that groove. Get it clean and dry. This is important for the new seal to seat properly and prevent future leaks on your LG WM3900HBA.
Pro Tip from Dave: I always use a bit of white vinegar on a cloth to wipe down the groove on the LG WM3900HBA after removing the old seal. It cuts through mold and mineral buildup, and the seal will last longer. Let it air dry for a few minutes.
Step 8: Install the New Boot Seal
Take your new OEM boot seal (part #4986ER1004C for the LG WM3900HBA) and inspect it carefully for any manufacturing defects or tears before you commit to installing it. Check that the rubber is uniform in color and the retaining ring is intact. Starting at the top of the door opening on your LG WM3900HBA, gently stretch the rubber seal and work it into the groove, moving clockwise around the opening. I recommend applying a light coat of the silicone-based boot seal lubricant (part #6919ER1004A) to the rubber as you go; this helps it slide in smoothly without pinching or rolling. Work your way all the way around. The last quarter of the seal, near the bottom, is always the trickiest on the LG WM3900HBA because you’re fighting the natural tension of the rubber — take your time and don’t force it. Once the seal is fully seated in the groove, it should look uniform and flush all the way around.
Step 9: Reinstall the Retaining Ring and Fasteners
Now place the metal retaining ring back into position on top of the new boot seal on your LG WM3900HBA. If your machine uses screws (the most common for 2019 models), line up each screw hole and hand-thread each screw first to avoid cross-threading. Then, using your Phillips driver, tighten them in a crisscross pattern — top, bottom, left, right, and so on — rather than all the way around. This keeps even pressure on the ring as it tightens against the seal. Each screw should be snug but not over-tightened; you want the seal held firmly but not pinched. If your LG WM3900HBA has a spring clamp instead, hook it back over the retaining ring and use your pliers to gently bend the arm back into its original position until it’s snug.
Step 10: Reconnect the Door Latch and Water Inlet Hoses
Plug the electrical connector for the door lock sensor back onto the latch assembly on your LG WM3900HBA — it only fits one way, so you’ll feel it click into place. Using your T20 Torx driver, reinstall the two screws holding the latch back to the frame. On the LG WM3900HBA, don’t crank these too tight; just snug enough that the latch is secure. If you disconnected the water inlet hoses earlier, reconnect them now using your adjustable wrench. Tighten the hot and cold hose nuts until they’re snug — again, firm but not over-tight or you’ll damage the threads on the valve fitting. Double-check that you have the hot and cold lines correct.
Pro Tip from Dave: After you tighten those inlet hose connections on the LG WM3900HBA, take a step back and visually follow each hose to make sure there’s no kinking or sharp bends that could restrict water flow. A kinked inlet hose can cause water level sensor errors and “dL” codes that have nothing to do with your new boot seal.
Step 11: Reassemble the Front Panel and Kickplate
Slide the lower front panel back up into position on your LG WM3900HBA and secure it with the two Phillips-head screws you removed earlier. Then press the kickplate back into place from the bottom — you’ll feel the clips catch. Give it a gentle tug to confirm it’s locked. Close the door of your LG WM3900HBA and inspect the new boot seal from the outside. It should look uniform and clean all the way around.
Step 12: Test and Verify the Repair
Turn the water supply valves back on (counterclockwise) at the back of the LG WM3900HBA — both hot and cold. Plug the machine back into the outlet. Run a short test cycle (I usually choose “Quick Wash” or “Rinse + Spin”) and watch closely for any leaks around the door area. The first few seconds of the fill cycle are critical; if water is going to leak from the new boot seal, you’ll see it immediately. Observe from the front and also peek under the machine with your flashlight to check the lower area. If everything is dry, run a full normal wash cycle and keep monitoring. Once the cycle is complete and the machine has drained, dry the floor thoroughly and look for any signs of moisture or water pooling. On a properly installed LG WM3900HBA door boot seal, you should see zero water on the floor.
Pro Tip from Dave: I always run a second full cycle on the LG WM3900HBA after a boot seal replacement, even if the first one looks perfect. Sometimes a seal needs a few minutes of water contact to fully seat, and I’ve caught leaks on cycle two that didn’t show up on cycle one. Better to catch it now than have the homeowner call me back a week later.
Troubleshooting — If It Still Isn’t Working
- Water still leaking from the door area after the repair: Go back and check that you installed the retaining ring screws evenly. On the LG WM3900HBA, if the ring is tighter on one side than the other, the seal won’t compress uniformly and will leak. Loosen all the screws slightly and retighten in a crisscross pattern, applying equal pressure.
- Water leaking from a specific spot on the seal (not the whole door): That usually means the seal has a pinch or fold where it went into the groove. Remove the retaining ring, pull out the seal, inspect for damage, and reinstall — this time work more slowly around that problem area. If the rubber is