I’ve been inside more than 10,000 homes over 18 years as an appliance repair technician. The single most common thing I hear at the door isn’t a symptom — it’s a confession: “I didn’t know where to start.” That’s exactly why I built this home appliance troubleshooting guide. Not to replace a service call when you genuinely need one, but to give you the same mental framework I use every single time I walk up to a broken machine.
Most appliance problems are not mysterious. In my experience, roughly 70% of the service calls I run come down to a handful of repeatable failures — a clogged filter, a tripped thermal fuse, a worn door seal. The other 30% are electrical or mechanical issues that do require a technician. This guide teaches you how to tell the difference before you spend $125–$200 on a diagnostic fee.
I’ve organized this by appliance — refrigerator, washer, dryer, dishwasher, and oven. Each section covers the most common symptoms, the parts to check first, safe DIY fixes, and clear signals that it’s time to call a pro. Bookmark this page. Come back to it every time something stops working. Let’s get started.
How to Use This Home Appliance Troubleshooting Guide
Before you touch any appliance, follow one rule: unplug it or shut off the circuit breaker. I know that sounds like boilerplate safety advice. However, I’ve personally seen a homeowner receive a nasty shock from a dryer that “should have been off.” Live 240-volt circuits are no joke. Always confirm power is disconnected before opening any panel or pulling out any component.
Second, grab your model number before you do anything else. It’s usually on a sticker inside the door frame, on the back panel, or under the lid. Write it down. That number unlocks the correct wiring diagram, the right replacement parts, and often a factory service manual you can find online for free. I’ve wasted 20 minutes on a repair because I assumed a part was universal — and it wasn’t.
Third, understand the troubleshooting logic. Start with the simplest, cheapest explanation first. Work your way toward complex and expensive. Technicians call this process of elimination. It keeps you from replacing a $180 control board when the real culprit was a $12 door switch.
Tools You’ll Actually Need
- Digital multimeter (tests continuity and voltage — buy one, you’ll use it constantly)
- Nut driver set (1/4″ and 5/16″ cover 90% of appliance screws)
- Flathead and Phillips screwdrivers
- Needle-nose pliers
- Flashlight or headlamp
- Appliance brush or vacuum with a crevice tool
A decent multimeter costs $25–$40. That single tool has saved my customers hundreds of dollars by confirming a part is bad before buying a replacement. It’s the most important item on that list.
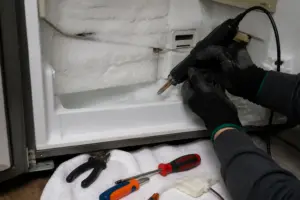
Refrigerator Not Cooling — What to Check First
A refrigerator that stops cooling is the most urgent appliance failure in any home. Food spoilage can cost $200–$400 in groceries. The good news is that the cause is often simpler than you’d expect. I’ve resolved dozens of “fridge not cooling” calls just by cleaning the condenser coils — a job that takes 15 minutes and costs nothing.
Common Symptoms and Likely Causes
- Fridge warm, freezer cold: Evaporator fan motor failure or defrost system problem
- Both compartments warm: Dirty condenser coils, failed condenser fan, or compressor issue
- Fridge runs constantly: Dirty coils, worn door gasket, or refrigerant leak
- Ice buildup on back wall: Defrost heater or defrost thermostat failure
- Water pooling inside or underneath: Clogged defrost drain
Start with the condenser coils. On most bottom-freezer and side-by-side models, coils are located underneath, behind a kick plate. On older top-freezer models, they may be on the back. Dust and pet hair insulate those coils and force the compressor to work harder. A refrigerator with severely dirty coils can run 15–20% less efficiently. Clean them with a coil brush and vacuum every 6–12 months.
Next, check the door gasket. Close the door on a dollar bill. If you can pull it out without resistance, the seal is weak. A bad gasket lets warm humid air in constantly, making the fridge work overtime. Replacement gaskets run $20–$60 depending on the model. That’s a worthwhile DIY fix in most cases.
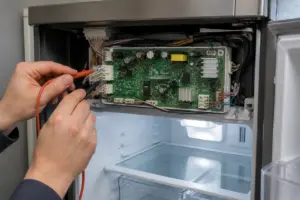
When to call a pro: If the compressor is hot to the touch, making a clicking noise every few minutes, or the unit is tripping the circuit — stop. Compressor and refrigerant work requires EPA Section 608 certification. That’s not a DIY job. [INTERNAL LINK: refrigerator not cooling troubleshooting]
Washing Machine Problems — Leaks, No Spin, and Error Codes
Washers generate more service calls than any other appliance in my experience. They’re complex machines — water, electricity, motors, and sensors all working together. However, the most common failures are mechanical and very fixable at home.
Top-Load vs. Front-Load — Different Failure Points
Top-load washers most commonly fail at the lid switch, drive coupler, or pump. Front-load washers are more prone to door boot seal tears, bearing wear, and drain pump clogs. Knowing your machine type narrows your diagnosis immediately.
For a washer that won’t spin, start with the lid switch on a top-loader. That small switch tells the control board the lid is closed. When it fails, the machine fills and agitates but refuses to spin. Test it with a multimeter — it should show continuity when depressed. Replacement cost is typically $15–$30 for the part. This is one of my most common same-day fixes.
Leaks are usually the door boot seal on front-loaders or the water inlet valve on either type. Check the boot seal first — look for cracks or tears around the rubber gasket at the door opening. A torn boot seal on a front-loader will spray water inside the cabinet and appear to leak from underneath. Replacement seals run $40–$90. It’s a moderately involved DIY job — budget about 90 minutes.
Decoding Common Error Codes
Modern washers display error codes that are genuinely useful. For example, an F21 or F9E1 on a Whirlpool front-loader means a long drain time — almost always a clogged pump filter. That filter is behind a small access panel at the bottom front of the machine. Pull it out, clean it, and the error usually clears immediately. I’ve seen filters packed with coins, bobby pins, and what appeared to be an entire sock collection.
When to call a pro: Loud grinding or rumbling during the spin cycle often means worn drum bearings. Bearing replacement on a front-loader requires near-complete disassembly. Labor alone can run $150–$300. On older machines, that repair cost approaches replacement value — get an honest estimate first. [INTERNAL LINK: washing machine won’t spin fixes]
Dryer Not Heating — The Fix Most Homeowners Miss
Here’s the honest truth about dryers: they are the most dangerous appliance in your home from a fire risk standpoint. The U.S. Fire Administration reports roughly 2,900 dryer fires annually, and 34% are caused by failure to clean lint. Before you troubleshoot anything mechanical, clean your lint trap and inspect your vent duct. Every single time.
Why Your Dryer Runs But Won’t Heat
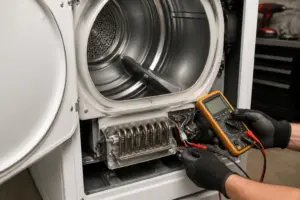
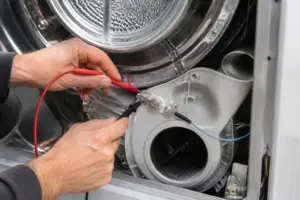
A dryer that tumbles but produces no heat points to one of three things in 90% of cases: a blown thermal fuse, a failed heating element, or a tripped high-limit thermostat. I always start with the thermal fuse. It’s a one-time-use safety device that blows when the dryer overheats — usually because the vent is restricted.
The thermal fuse is typically located on the exhaust duct inside the dryer cabinet, near the heating element housing. Test it with a multimeter. A blown fuse shows no continuity. Replacement costs $5–$15 for the part. However — and this is critical — if you replace the fuse without fixing the vent restriction that caused it to blow, the new fuse will blow again within weeks. Always check the full vent path first.
Vent duct inspections are something I recommend doing annually. Disconnect the duct from the back of the dryer. Run the dryer briefly and check for strong airflow at the exterior vent cap. Weak airflow means a blockage. Rigid metal duct is always preferable to flexible foil — foil crushes easily and traps lint at every bend.
Gas Dryer vs. Electric Dryer Differences
Gas dryers use an igniter and gas valve coils instead of a heating element. If the igniter glows but the burner doesn’t light, the gas valve coils (also called solenoids) have likely failed. This is a very common repair on Whirlpool and Maytag gas dryers. The coil kit costs $20–$35 and the repair takes about 45 minutes. Specifically, check the radiant flame sensor as well — it’s often overlooked but fails just as frequently.
When to call a pro: Any suspected gas leak — smell of gas, hissing sounds near connections — stop immediately. Ventilate the space, leave the building, and call your gas utility. Do not attempt to diagnose a gas leak yourself.
Dishwasher Not Cleaning or Not Draining — Systematic Fixes
Dishwashers are remarkably reliable machines when maintained properly. Most cleaning and draining complaints I see trace back to one thing: the filter hasn’t been cleaned in months — or ever. I learned this the hard way early in my career when I replaced a wash pump on a nearly new Samsung dishwasher, only to discover afterward that the self-cleaning filter was completely blocked with food debris. The customer was gracious. I was embarrassed.
Dishes Coming Out Dirty or Cloudy
Start by removing and cleaning the filter assembly at the bottom of the tub. On most modern dishwashers, it twists out counterclockwise. Rinse it under running water with a soft brush. Also inspect the spray arm holes for blockages — use a toothpick to clear any clogged ports. This simple maintenance step resolves most poor-cleaning complaints instantly.
Cloudy glassware is almost always a hard water issue, not a mechanical failure. Check your rinse aid dispenser — it should be filled and set to an appropriate dosage level. For severe hard water areas, a water softener or a citric acid wash cycle (run an empty machine with citric acid powder) can dramatically improve results.
Dishwasher Won’t Drain — Where to Look
Standing water at the bottom of the tub after a cycle means a drain restriction or pump issue. Check the filter first. Then inspect the drain hose where it connects to the garbage disposal or sink drain. If you recently installed a new disposal, confirm the knockout plug inside the disposal’s dishwasher inlet has been removed. That’s an extremely common oversight — and it blocks drainage completely.
The drain pump itself can also fail. You’ll typically hear it trying to run but getting nowhere, or it may be silent entirely. Drain pump replacements cost $40–$80 for the part and are manageable DIY repairs on most brands. [INTERNAL LINK: dishwasher not draining fixes]
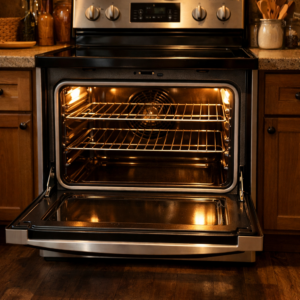
Oven and Range Problems — From Uneven Baking to Igniter Failures
Ovens are the appliance people are most hesitant to work on themselves — and I understand why. However, many common oven failures are completely approachable for a careful DIYer. The key is knowing which ones are safe to tackle and which require a professional.
Electric Oven Not Heating Evenly or At All
An electric oven that won’t heat up almost always has a failed bake element or broil element. These are the visible heating elements at the bottom and top of the oven cavity. Inspect them visually — a failed element often shows a visible break, blister, or burn mark. Replacement elements cost $20–$60 and typically slide out after removing two screws and disconnecting two wires. This is one of the most beginner-friendly appliance repairs there is.
Uneven baking is trickier. It can mean a weak bake element, a faulty oven temperature sensor, or a miscalibrated control board. Start with the temperature sensor — it’s a thin probe at the back of the oven cavity. Test its resistance with a multimeter. At room temperature (around 70°F), most sensors read approximately 1,080–1,090 ohms. A reading significantly outside that range means the sensor needs replacement. Sensors typically cost $20–$40.
Gas Range Igniter Clicks Constantly or Won’t Light
A burner that clicks continuously even when not in use usually means moisture got into the igniter module — often after a boilover. Remove the burner cap and let it dry thoroughly, sometimes overnight. In my experience, this resolves about 60% of constant-clicking complaints without any parts at all.
If a burner lights slowly or won’t ignite at all, clean the igniter and burner ports first. Carbon buildup is frequently the culprit. Use a straightened paper clip to clear the small ports around the burner head. A weak spark from a worn igniter requires replacement — they cost $15–$40 each and are straightforward to swap on most ranges.
When to call a pro: Self-cleaning cycle failures, control board errors, or any issue involving the gas supply line are not DIY territory. A malfunctioning self-clean cycle that locks the door or overheats the oven needs professional diagnosis.
Common Mistakes Beginners Make — And How to Avoid Them
Mistake 1: Replacing Parts Without Testing First
This is the most expensive mistake I see. Someone watches a YouTube video, assumes their symptom matches, and orders the part — without verifying it with a multimeter. That approach turns a $15 fix into a $60 guessing game. Test before you buy. Always.
Mistake 2: Ignoring the Error Code
Modern appliances are designed to communicate. That blinking code on your display is not decoration. Look it up in your service manual or search the exact code with your model number. Error codes cut diagnosis time in half. In my experience, homeowners who use the error code find the right part on the first try far more often than those who don’t.
Mistake 3: Skipping the Reset
Before spending a dollar, do a hard reset. Unplug the appliance for 60 seconds, then restore power. On dishwashers and front-load washers especially, a control board that’s encountered a voltage spike or communication error will clear itself with a power cycle. It sounds too simple. However, I’d estimate 8–10% of my callbacks could have been solved this way.
Mistake 4: Using the Wrong Parts
Always use OEM (original equipment manufacturer) or confirmed-compatible aftermarket parts. A cheap off-brand heating element that doesn’t meet the original wattage spec can damage your control board or create a fire hazard. Get your model number, look up the correct part number, and verify compatibility before ordering. Saving $8 on a generic part is not worth it.
Mistake 5: Underestimating the Job
Some repairs are genuinely complex. Drum bearing replacement on a front-load washer, sealed system refrigerant work, and gas valve replacement on a range are jobs where the risk of causing further damage — or personal injury — is real. Know your limits. There’s no shame in calling a technician. A $150 service call is far cheaper than a $900 repair caused by a DIY gone wrong.
Final Thoughts — Your Home Appliance Troubleshooting Guide in One Rule
After 18 years and 10,000+ service calls, here’s what I know for certain: most appliance problems are solvable. They’re not magic. They’re not hopeless. They follow patterns, and those patterns are learnable. This home appliance troubleshooting guide gives you the same systematic thinking I apply every single time I walk into someone’s home with a broken machine.
The one rule that covers everything: start simple, work toward complex. Clean the filter before you replace the pump. Test the thermal fuse before you order a control board. Check the vent before you blame the heating element. That discipline alone will save you hundreds of dollars a year.
Specifically, remember these priorities:
- Safety first — always disconnect power before opening any panel
- Get your model number before anything else
- Start with the cheapest, simplest possible cause
- Test parts with a multimeter before replacing them
- Know when the job exceeds your skill level — and call for help without hesitation
You can handle more than you think. I’ve watched complete beginners successfully replace a dryer thermal fuse, clear a dishwasher pump, and reseal a refrigerator door — all in the same afternoon. The right information makes an enormous difference. That’s what this site exists to give you.
Dig into the appliance-specific guides linked throughout this post for deeper step-by-step walkthroughs. And if you hit a wall — leave a comment. I read every single one.