
Maytag MVWB865GW Agitator Directional Cogs Replacement — My Complete Repair Guide
When the agitator on a Maytag MVWB865GW starts slipping during the wash cycle or you hear that distinctive grinding noise, nine times out of ten it’s the directional cogs wearing out. I’ve fixed this on at least a dozen Maytag MVWB865GW units over the years, and it’s honestly one of the more satisfying repairs — the kind where you can feel the difference the moment you power it back on. The directional cogs are plastic components inside the agitator assembly that engage and disengage to create the dual-action wash motion these machines are known for. When they crack or wear flat, your machine loses its agitation power or starts making noise like there’s gravel in there. I’ll walk you through exactly what I do, step by step.
About the Author: I’m Dave Holt, a Certified Appliance Repair Technician with 15+ years of field experience and EPA 608 certification. I’ve repaired thousands of appliances across the country. My goal is to help you fix it yourself and save a couple hundred dollars.
Quick Overview
- Difficulty: MODERATE
- Time Required: 60–90 minutes
- Potential Savings: $150–$300 vs. a service call
- Special Tools: Agitator puller tool (rented or purchased ~$20–$40) — absolutely worth it to avoid stripping the agitator bolt
Symptoms That Tell Me It’s This Problem
- Grinding or crunching noise during wash: The cogs are chipped or cracked, and you’re hearing plastic fragments move. This happens on the Maytag MVWB865GW whether the machine is in agitation mode or the slow drain cycle.
- Weak or no agitation: The agitator spins but clothes barely move. I see this when the cogs are so worn that they’ve lost their teeth entirely — the engagement just isn’t happening.
- Agitator moves side-to-side but doesn’t turn: The directional cogs on your Maytag MVWB865GW allow the agitator to move in both directions. If they’re seized or stripped, you’ll get lateral movement but zero rotational action.
- Water temperature is inconsistent: Less common, but damaged cogs can affect the timing of mechanical components in the valve assembly on this model.
- Agitator locks up mid-cycle: On the Maytag MVWB865GW, a completely failed cog set can jam the whole assembly, forcing you to manually unlock the lid and restart.
- Clicking sound when you manually rotate the agitator: Grab the top of the agitator and turn it by hand — if you feel or hear distinct clicking, the cogs have lost their smooth engagement.
⚠️ Safety Warning — Read Before You Touch Anything
The very first thing I do — every single time — is unplug the Maytag MVWB865GW from the wall outlet. Even though you’re working on a mechanical part, there are electrical connections nearby, and water always finds its way. After unplugging, I shut off the water supply at the inlet valves (two valves behind the machine, clearly labeled hot and cold). Let any water in the drum drain completely by opening the manual drain plug at the lower-left front corner — it’s a small cap you turn counterclockwise. Dry the inside of the tub with old towels before you begin. Never work inside an energized machine, and never let water touch the motor or control board area.
Parts You’ll Need
- Agitator Directional Cogs Kit — OEM Part #: W10821263 — This is the Maytag factory kit that includes both cogs pre-assembled. It’s the cleanest option and exactly what I use on the Maytag MVWB865GW. Make sure your retailer confirms it matches your serial number prefix (MVWB).
- Agitator Seal / Cam Follower Seal — OEM Part #: W10447783 — I always replace this when I’m in there doing cog work. The seal around the agitator shaft can wear at the same time, and you don’t want a second teardown in six months.
- Agitator Bolt (if damaged during removal) — OEM Part #: W10006191 — Standard 7/16″ x 1.5″ hex bolt. If your puller tool spins the bolt without backing it out, this part is your backup.
Tools Required
- Agitator puller tool (rented from Ace Hardware or Home Depot for ~$20 for a day, or bought on Amazon for ~$35) — Without this, you risk rounding off the bolt head or damaging the agitator cap.
- 7/16″ socket and ratchet — For the agitator bolt that secures the agitator to the drive shaft.
- Adjustable wrench or 1/2″ open-end wrench — To secure the puller tool’s center nut while you work.
- Needle-nose pliers — For disconnecting small spring clips and retaining rings inside the agitator housing.
- Flathead screwdriver — To pry the agitator cap off and loosen any seated components.
- Towels or old rags — To absorb residual water and clean the work area.
- Flashlight or headlamp — The inside of the Maytag MVWB865GW tub is dark; you’ll need to see what you’re doing.
Step-by-Step: How I Replace the Agitator Directional Cogs on the Maytag MVWB865GW
Step 1: Confirm the Water Supply Is Off and the Tub Is Completely Dry
I walk around to the back of the Maytag MVWB865GW and locate the two water inlet valves — one with a red cap (hot water) and one with a blue cap (cold water). I turn both counterclockwise until they’re snug and can’t turn anymore. Now I open the lid and look inside the tub. If there’s any water pooled at the bottom, I use a small hand pump or wet vacuum to remove it. The last thing you want is water pouring out onto your floor the moment you tilt the agitator assembly. I use old towels to wipe down the drum walls and the agitator itself. Once it’s bone dry, I’m ready to move forward.
Pro Tip from Dave: On the Maytag MVWB865GW, there’s a small manual drain tube near the bottom-left front corner under the machine. I pull that out and let any residual water drip into a bucket — it usually catches another pint or so that the tub pump missed. This step saves a mess.
Step 2: Remove the Agitator Cap and Locate the Bolt
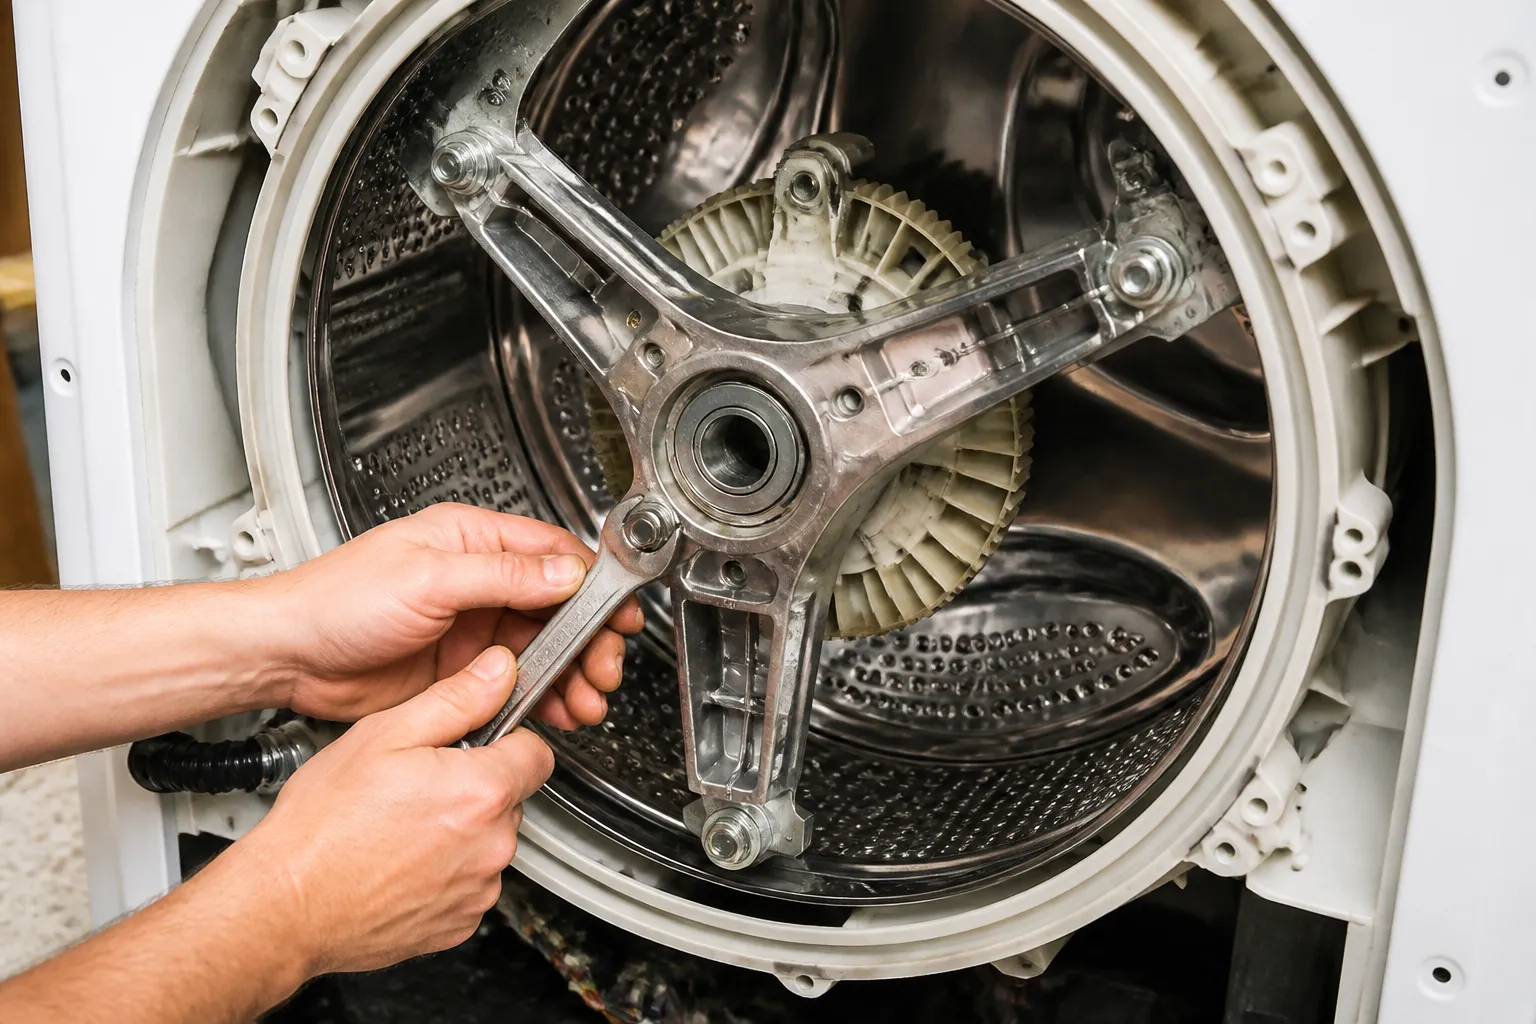
Looking down into the open Maytag MVWB865GW, the agitator cap is a plastic dome at the very top center of the agitator. It’s usually held in place by friction (no screws). I use a flathead screwdriver to gently pry up one edge of the cap, working my way around until it pops free. Underneath, you’ll see the agitator bolt — a 7/16″ hex head bolt sitting on top of the drive shaft. This bolt is what holds the entire agitator assembly in place. I set the cap aside in a safe spot.
Step 3: Use the Agitator Puller Tool to Remove the Agitator Bolt
This is where most DIYers get into trouble. The bolt on the Maytag MVWB865GW is tight, and if you just use a socket wrench, you’ll round it off in two seconds. Instead, I mount the agitator puller tool — it looks like a three-legged puller with a center screw. I thread the puller’s three legs under the lip of the agitator shaft collar (the ring just below the bolt), and I thread the center screw down slowly. As I turn that center screw with my 7/16″ socket, the puller gradually lifts the agitator straight up and simultaneously backs out the bolt. I keep turning until the bolt is free and the agitator lifts away from the drive shaft. The entire agitator assembly — usually about 5–6 pounds on the Maytag MVWB865GW — comes out in one piece.
Pro Tip from Dave: Once the puller tool starts to lift the agitator, I stop cranking and look for any clips or retainers that might be holding it in place. On the Maytag MVWB865GW, sometimes a small spring clip under the agitator cap can pinch, and you’ll think the whole thing is stuck. If it won’t budge, I back off the puller, locate that clip, and remove it with needle-nose pliers before trying again.
Step 4: Inspect the Old Cogs and Disassemble the Agitator
Now I have the agitator out on my work surface. I flip it over or tilt it to expose the bottom where the directional cogs live. On the Maytag MVWB865GW, the cogs are usually held together with a retaining ring — a C-clip or snap ring made of spring steel. I use needle-nose pliers to carefully expand that ring and slide it off. Once it’s off, the cog assembly usually falls apart into two pieces: the upper cog and the lower cog, each about 2 inches in diameter. I lay them out and inspect them. If they’re cracked, chipped, or if the teeth are worn flat (like they’ve been sanded down), that’s your smoking gun. These plastic cogs should have distinct, sharp teeth that mesh together smoothly. If they look like smooth circles with no teeth, they’re definitely done.
Step 5: Remove Any Remaining Seals or Washers
Underneath the old cogs on your Maytag MVWB865GW, there’s usually a rubber seal or felt washer. This is the agitator seal I mentioned in the parts list. I pull it out and set it aside. I also look for any metal washers or spacers — on this model, there are typically one or two small washers that sit below the cogs. I note their position because I need to install them in the exact same order when I reassemble. I take a photo with my phone if I’m unsure about the order.
Pro Tip from Dave: The agitator shaft on the Maytag MVWB865GW is splined — it has grooves running up the sides. The cogs have matching grooves on the inside so they can’t rotate independently. When you reassemble, line up those splines or the cogs won’t go on. I always take a second look at those grooves to make sure they’re not damaged. If the shaft itself is cracked or chipped, that’s a bigger job, and you might be better off calling a pro.
Step 6: Install the New Directional Cogs Kit
I unbox the new W10821263 cog kit for the Maytag MVWB865GW. It comes with both cogs pre-assembled and usually a new retaining ring. I start by sliding the new cog assembly over the agitator shaft, making sure those splines on the shaft line up with the grooves on the cogs. The assembly should slide down smoothly without any forcing. Once it’s seated, I reinstall the metal washers in the same order I removed them — this is critical on the Maytag MVWB865GW because the washers control the height and engagement of the cogs. Then I install the new rubber seal (if not already part of the kit) and finally the retaining ring, making sure the ring snaps fully into its groove.
Step 7: Test the New Cogs for Smooth Engagement
Before I reinstall the agitator into the machine, I rotate the cog assembly by hand to make sure everything moves freely. On the Maytag MVWB865GW, the cogs should rotate smoothly without any clicking, grinding, or resistance. If there’s any roughness, I stop immediately and check whether I installed something in the wrong order or if the new cogs are seated correctly. Smooth rotation is your confirmation that the assembly is right.
Pro Tip from Dave: Some techs skip this test and reinstall the agitator, only to find out the cogs aren’t meshing right. Then you have to pull the whole agitator back out. Test it now while it’s out — it takes 30 seconds and saves 20 minutes of frustration.
Step 8: Reinstall the Agitator Assembly Into the Maytag MVWB865GW
I carry the agitator back to the machine and align it over the drive shaft. On the Maytag MVWB865GW, the drive shaft sits dead center at the bottom of the tub. I lower the agitator straight down, guiding it so that the shaft passes through the center opening of the cog assembly. The agitator should slide down until it seats fully — you’ll feel a slight resistance as the components nest together. This is normal and expected on the Maytag MVWB865GW.
Step 9: Reinstall the Agitator Bolt
Now I thread the 7/16″ agitator bolt back into the drive shaft by hand first — just a few turns to get it seated. I don’t fully tighten it by hand. Instead, I use my 7/16″ socket and ratchet to snug it down. On the Maytag MVWB865GW, the bolt should be torqued to approximately 15–20 foot-pounds. If you don’t have a torque wrench, just tighten it firmly until you feel resistance, then give it a quarter turn more. Over-tightening can crack the plastic agitator cap, so don’t go crazy.
Step 10: Reinstall the Agitator Cap
I align the cap with the agitator shaft and press it down firmly until it seats. On the Maytag MVWB865GW, it should click or snap into place with a satisfying pop. If it doesn’t sit flush, the bolt underneath might not be tightened enough. I give the cap a gentle tug — it shouldn’t move. If it wiggles, I pull it back off, tighten the bolt a bit more, and try again.
Step 11: Turn the Water Supply Back On and Check for Leaks
I walk back to the rear of the Maytag MVWB865GW and turn both the hot and cold water inlet valves clockwise until they’re snug. I don’t force them — just snug is fine. I then run the machine on a short rinse or drain cycle to check for leaks around the agitator shaft. Watch the seal area where the agitator enters the tub. A tiny bit of moisture is normal, but if water is actively dripping or pooling, you might need to reseat the seal. Let the cycle complete, then open the lid and inspect the agitator. It should move freely side-to-side with no grinding or unusual noise.
Pro Tip from Dave: On the Maytag MVWB865GW, run a full wash cycle with a small load of rags or old clothes on a high-water level. Listen carefully for any grinding during the agitation phase. If the new cogs are installed correctly, the wash cycle should sound noticeably quieter and smoother than before. You’ll hear a difference — and that’s how you know you nailed it.
Step 12: Final Check — Run a Full Wash Cycle
I close the lid and start the Maytag MVWB865GW on a normal wash cycle with warm water and a small load. During the agitation phase, I listen closely at the lid for any of the grinding sounds that prompted this repair. I also watch the agitator through the lid to confirm it’s rotating smoothly in both directions. At the end of the cycle, I open the lid and feel the agitator — it should be warm but not hot, and it should move freely when I grab it. If everything looks and sounds good, you’re done. Congratulations — you just saved yourself a $200+ service call.
Troubleshooting — If It Still Isn’t Working
- Still hearing grinding noise: If you replaced the part but the grinding persists, I check whether the cogs are seated correctly. Remove the agitator cap again, unthread the bolt slightly, and look down the shaft. The cogs should sit flush and centered. If they’re tilted or off-center, pull the agitator out and reseat them. Also confirm that the splines on the shaft weren’t damaged — if the shaft itself is chipped, you’re


