
⚠️ Safety Warning
Before beginning any repair work on your Samsung DVE45R6100C dryer, ensure your safety by following these critical precautions:
- Disconnect the dryer from electrical power by unplugging it from the wall outlet
- Turn off the gas supply valve if you have a gas model (this guide covers electric models only)
- Allow the dryer to cool completely if it has been recently used
- Wear safety glasses when working with small components
- Never attempt repairs while the unit is connected to power
- If you smell gas at any point, stop work immediately and contact a professional
Symptoms of a Failing Heating Element in Samsung DVE45R6100C
The heating element in your Samsung DVE45R6100C dryer is responsible for generating the hot air needed to dry your clothes effectively. When this component begins to fail, you’ll notice several telltale symptoms that indicate replacement is necessary.
Primary Symptoms
- No heat production: The dryer runs through its cycle normally, tumbling clothes and circulating air, but produces no heat whatsoever
- Significantly extended drying times: Loads that previously dried in 45-60 minutes now take 2-3 hours or longer
- Premature cycle termination: The dryer shuts off early due to overheating protection systems activating
- Clothes remain damp: Even after extended cycles, clothing comes out noticeably wet or damp
- Cool air circulation: Air flowing from the dryer feels room temperature or only slightly warm
Secondary Indicators
- Error codes appearing on the display panel
- Unusual cycling patterns where the dryer starts and stops repeatedly
- Higher than normal electricity usage without corresponding heat output
- Lint accumulation due to inadequate moisture removal
Required Parts and Components
For the Samsung DVE45R6100C dryer heating element replacement, you will need the following specific parts:
Primary Replacement Part
- Heating Element Assembly: Samsung part number DC47-00019A (5300W, 240V)
- This assembly includes the heating coils, mounting bracket, and protective housing
- Verify compatibility by checking your dryer’s model number label located inside the door frame
Potentially Required Additional Parts
- Thermal Fuse: DC96-00887A (if testing reveals failure)
- High Limit Thermostat: DC47-00018A (if damaged during inspection)
- Cycling Thermostat: DC47-00016A (if showing signs of wear)
- Wire Connectors: If existing connectors show heat damage or corrosion
Tools and Equipment Needed
Gather these tools before beginning the repair to ensure efficient completion:
- 5/16-inch nut driver: For removing the back panel screws (10 total screws)
- 1/4-inch nut driver: For heating element mounting screws
- Phillips head screwdriver: For various component screws
- Digital multimeter: For testing electrical continuity and resistance
- Needle-nose pliers: For handling wire connectors
- Work gloves: To protect hands from sharp metal edges
- Smartphone or camera: For photographing wire connections before removal
- Flashlight or headlamp: For improved visibility in the dryer cabinet
Step-by-Step Heating Element Replacement Process
Step 1: Preparation and Access
🔨 Pro Tip from Dave
On the DVE45R6100C, the heating element housing has a small tab that catches on the rear duct channel during reinstallation — if you force it without aligning that tab first, you’ll crack the housing and be ordering another part. Dry-fit the assembly before connecting any wires so you can feel it seat fully before you commit.
- Unplug the Samsung DVE45R6100C dryer from the electrical outlet
- Move the dryer away from the wall, providing at least 3 feet of working space behind the unit
- Locate the back panel, which covers the entire rear of the dryer
- Take a photo of the back panel for reference during reassembly
Step 2: Remove the Back Panel
- Using the 5/16-inch nut driver, remove the 10 screws securing the back panel
- The screw locations are: 4 screws along the top edge, 3 screws along each side edge
- Carefully lift and remove the back panel, setting it aside in a safe location
- You now have access to the internal components of the dryer
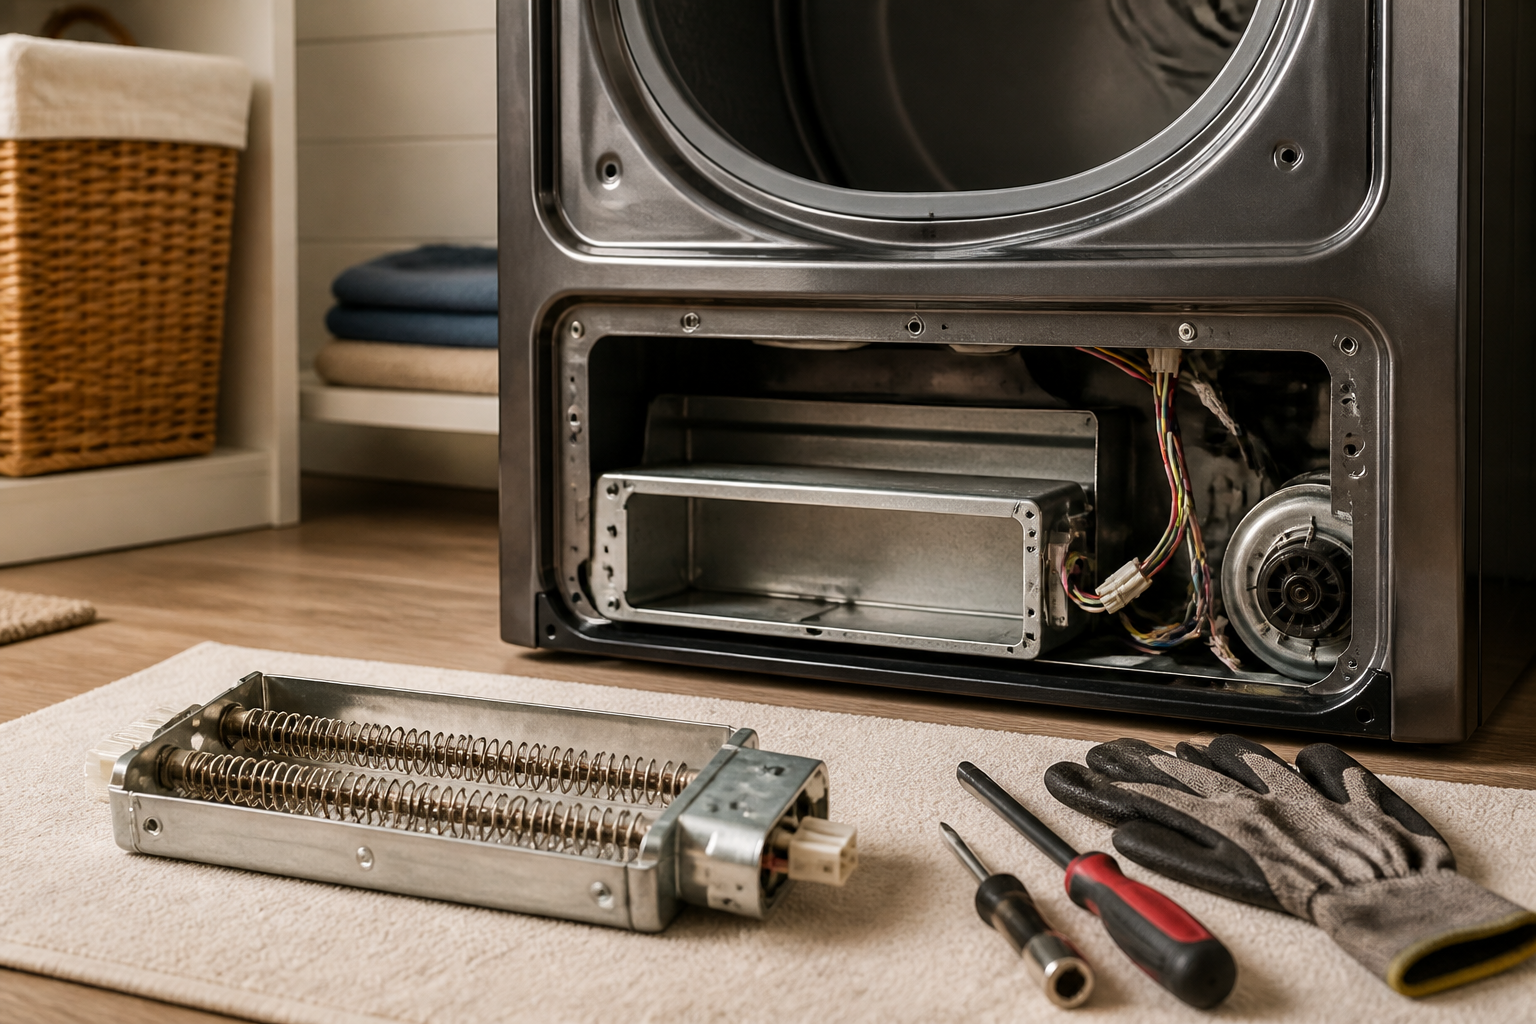
Step 3: Locate the Heating Element Assembly
- Look for a large rectangular metal housing in the lower right section of the dryer cabinet
- The heating element assembly measures approximately 14 inches long by 8 inches wide
- Identify the silver metal housing with multiple wire connections on the front face
- Note the position of the blower housing directly adjacent to the heating element
Step 4: Document and Disconnect Wiring
- Take detailed photos of all wire connections before removal
- Locate the main wiring harness connector on the heating element assembly
- Identify the two high-voltage wires (typically red and black) connected to the heating coils
- Carefully disconnect the main connector by pressing the locking tab and pulling straight out
- Remove the individual wire terminals from the heating element terminals
- Set aside all wiring, keeping it organized for reinstallation
Step 5: Remove the Old Heating Element
- Locate the four mounting screws securing the heating element assembly to the dryer cabinet
- These screws are positioned at each corner of the heating element housing
- Using the 1/4-inch nut driver, remove all four mounting screws
- Carefully pull the heating element assembly straight out from the cabinet
- The assembly should slide out easily once all screws and wires are disconnected
- Place the old heating element on a clean work surface for testing and comparison
Step 6: Install the New Heating Element
- Unpack the new DC47-00019A heating element assembly
- Compare it visually with the old element to ensure proper match
- Align the new heating element with the mounting holes in the dryer cabinet
- Slide the assembly into position, ensuring proper seating against the cabinet
- Install the four mounting screws finger-tight initially
- Tighten the screws in a cross pattern to ensure even pressure distribution
- Final torque should be snug but not overtightened to avoid cracking the housing
Step 7: Reconnect Electrical Connections
- Refer to your photos to ensure correct wire placement
- Connect the high-voltage wires to their respective terminals on the heating element
- Ensure all connections are tight and properly seated
- Reconnect the main wiring harness connector until it clicks securely in place
- Verify that no wires are pinched or stressed in their new positions
- Double-check all connections against your reference photos
Step 8: Reassemble the Dryer
- Position the back panel against the rear of the dryer cabinet
- Align all screw holes carefully before inserting any screws
- Install all 10 screws finger-tight first, then tighten systematically
- Ensure the panel sits flush against the cabinet on all edges
- Move the dryer back to its original position
- Reconnect the electrical power cord to the outlet
Step 9: Test the Repair
- Load the dryer with a small amount of damp clothing
- Select a normal drying cycle and start the dryer
- After 10-15 minutes, check that hot air is circulating from the exhaust
- Allow the cycle to complete and verify that clothes are properly dried
- Monitor the first few cycles to ensure consistent performance
Testing the Old Heating Element with a Multimeter
Before discarding the old heating element, test it to confirm the failure and understand the problem for future reference.
Resistance Testing Procedure
- Set your digital multimeter to the resistance (ohms) setting
- Locate the two main terminals on the heating element where the high-voltage wires connected
- Place one multimeter probe on each terminal
- A functioning heating element should read between 8-15 ohms of resistance
- An infinite reading (no continuity) indicates a broken heating coil
- A reading of 0 ohms indicates a short circuit in the element
Ground Testing
- Test from each terminal to the metal housing of the heating element
- This reading should be infinite (no continuity)
- Any continuity reading indicates the element is grounding out and must be replaced
- A grounding element can cause circuit breakers to trip or create safety hazards
Additional Components to Check During Repair
While you have access to the internal components of your Samsung DVE45R6100C, it’s wise to inspect and test other related parts that commonly fail.
Thermal Fuse Inspection
- Located on the blower housing, usually a small white or black component
- Test for continuity across the two terminals
- Should read close to 0 ohms if functional
- An infinite reading indicates a blown fuse requiring replacement
- Part number DC96-00887A for the Samsung DVE45R6100C
High Limit Thermostat Testing
- Usually mounted on or near the heating element assembly
- Test for continuity at room temperature
- Should show continuity (low resistance) when cool
- Visual inspection for burn marks or damaged terminals
- Replace if showing signs of heat damage or lack of continuity
Cycling Thermostat Evaluation
- Controls the on/off cycling of the heating element during operation
- Test for continuity at room temperature
- Should show continuity when cool
- Examine wire connections for heat damage or corrosion
- Replace if continuity testing fails or physical damage is evident
Preventive Maintenance Tips
To extend the life of your new heating element and prevent premature failure, follow these maintenance recommendations:
- Clean the lint filter after every load to ensure proper airflow
- Inspect and clean the exhaust vent annually to prevent airflow restrictions
- Avoid overloading the dryer which can cause extended run times and overheating
- Use appropriate heat settings for different fabric types
- Ensure proper installation with adequate clearance around the dryer
- Replace worn exhaust ducting that may be restricting airflow
Troubleshooting Common Issues After Installation
If you experience problems after installing the new heating element, consider these potential causes:
No Heat After Installation
- Verify all electrical connections are secure and properly seated
- Check that the thermal fuse hasn’t blown during the repair process
- Ensure the circuit breaker hasn’t tripped
- Confirm the heating element is receiving proper voltage (240V)
Intermittent Heating
- Inspect wire connections for looseness or corrosion
- Test cycling thermostat operation
- Check for airflow restrictions in the exhaust system
- Verify proper installation of the heating element assembly
Excessive Heat or Overheating
- Clean lint buildup from exhaust ducting
- Inspect high limit thermostat functionality
- Check for blocked exhaust vents
- Ensure proper clearances around the dryer unit
Frequently Asked Questions
How long should a heating element last in a Samsung DVE45R6100C dryer?
A properly maintained heating element in the Samsung DVE45R6100C typically lasts 8-12 years under normal usage conditions. Factors affecting lifespan include frequency of use, load sizes, exhaust system condition, and maintenance practices. Heavy usage, poor ventilation, or lint buildup can significantly reduce element life.
Can I use a generic heating element instead of the Samsung DC47-00019A?
While generic elements may physically fit, it’s strongly recommended to use the specified Samsung part number DC47-00019A for the DVE45R6100C. This ensures proper wattage (5300W), voltage rating (240V), and mounting compatibility. Generic parts may have different specifications that could affect performance or safety.
What causes heating elements to fail prematurely?
The most common causes of premature heating element failure include restricted exhaust airflow, lint buildup, overloading the dryer, frequent high-heat cycles, power surges, and age-related thermal cycling fatigue. Poor ventilation is the leading cause, as it forces the element to work harder and run longer cycles.
Do I need to replace thermostats when changing the heating element?
Thermostats don’t require automatic replacement when changing the heating element. However, it’s wise to test them while you have access. Replace any thermostat that fails continuity testing or shows physical damage such as burnt terminals or heat discoloration.
Why does my dryer work sometimes but not others after replacing the element?
Intermittent operation after element replacement typically indicates loose electrical connections, a failing cycling thermostat, or airflow issues. Check all wire connections for tightness, test the cycling thermostat for proper operation, and ensure the exhaust system isn’t restricted.
How can I tell if the thermal fuse is blown without removing it?
You cannot definitively test the thermal fuse without accessing it and using a multimeter to check for continuity. However, if your dryer runs but produces no heat and the heating element tests good, a blown thermal fuse is a likely culprit. The thermal fuse is a safety device that must be replaced if blown.
Is it normal for the new heating element to smell during first use?
A slight metallic or “new part” smell during the first few cycles is normal as manufacturing oils burn off the new heating element. However, strong electrical burning smells, plastic odors, or continuing smells beyond the first few uses indicate a problem requiring immediate attention.
Can a bad heating element cause the dryer to not start at all?
A shorted heating element can potentially cause the dryer to not start by tripping circuit breakers or activating safety systems. However, a simply burned-out element typically allows the dryer to run normally without producing heat. Complete failure to start usually involves other components like door switches or control boards.
When to Call a Professional
Most of the repairs in this guide are within reach for a careful DIYer with basic tools. In my experience, if your dryer tripped a heating element AND a thermal cutoff fuse more than once in the past year, that’s a strong signal of a restricted exhaust duct or a failing cycling thermostat — a pattern that requires proper airflow measurement and component load-testing that goes beyond a straightforward element swap. When in doubt, a diagnostic service call typically costs $80–$120 and can save you from a misdiagnosis that costs more in parts.
Recommended Parts & Tools
Samsung Dryer Heating Element Assembly DC47-00019A
This is the exact replacement heating element assembly designed specifically for Samsung DVE45R6100C dryers. The part includes the heating coil and housing assembly needed to restore proper heat generation. Check current pricing on Amazon.
CRAFTSMAN 11-piece Screwdriver Set
A quality screwdriver set is essential for removing the dryer panels and accessing the heating element compartment. This set includes both Phillips and flathead drivers in the sizes needed for Samsung dryer repairs. Check current pricing on Amazon.
Fluke 1AC-A1-II Non-Contact Voltage Tester
Safety is critical when working with electrical appliances, and this non-contact voltage tester ensures power is completely disconnected before beginning the repair. It provides reliable detection of live electrical circuits without requiring direct contact with wires. Check current pricing on Amazon.


