
Ice and water dispenser not working
This step-by-step repair guide walks you through fixing ice and water dispenser not working on your Whirlpool WRS325SDHZ (Side-by-Side). With the right tools and parts, most homeowners can complete this repair in 1–2 hours and avoid a costly service call.
🔨 Pro Tip from Dave
On the WRS325SDHZ, a lot of techs overlook the dispenser door switch (part W10594481) and go straight for the control board — that’s an expensive mistake. Before replacing anything, test that door switch with a multimeter first because it fails silently and reads fine visually. Also check the child lock feature on the control panel; it’s easy to accidentally activate and will kill both ice and water dispensing completely.
Part of our Top 20 Refrigerator Models & Common Repair Issues Guide. Browse all refrigerator repair guides for related models and issues.
“`html
Common Symptoms & Causes
These signs point to a failing ice and water dispenser on the Whirlpool WRS325SDHZ:
- Pressing the dispenser paddle produces no water or ice, even after a 24-hour reset
- The dispenser control panel lights up but neither water nor ice is dispensed
- Ice maker stops producing cubes while the freezer holds correct temperature (around 0°F)
- Water dispenser runs for 2–3 seconds then cuts off before filling a glass
These issues are most commonly caused by a faulty door switch, a clogged or frozen water inlet valve, a failed dispenser control board, or a worn dispenser actuator that no longer signals the system correctly.
“`
Safety First
- Unplug the refrigerator from the power outlet before starting any repair — never work on a live appliance.
- Shut off the water supply valve before disconnecting any water lines or hoses.
- Wear work gloves when handling metal brackets, sheet metal edges, or sharp components.
- Take photos with your phone before disconnecting any wiring harnesses or connectors.
- Work in a well-lit area with enough floor space to lay removed panels flat.
Tools & Parts Needed
Essential Tools
- Phillips #2 screwdriver
- ¼” nut driver
- Needle-nose pliers
- Multimeter
- Flashlight or work light
Replacement Parts
Step-by-Step Repair Instructions
Step 1
Unplug the refrigerator before starting any work to eliminate shock risk. Replace the water filter first by twisting it counter-clockwise and pulling it out, then inserting the new filter and twisting clockwise until seated — a clogged filter restricts flow to both the ice maker and water dispenser, so skipping this step can send you chasing a false electrical fault. Pro tip: if the filter indicator light has been on, this is almost certainly your fix.
Step 2
The dispenser switch is the paddle-activated trigger that tells the control board you want water or ice, so a failed switch means nothing happens even if every other component is fine. Pry off the paddle trim with a plastic spudger to avoid cracking it, then test the switch on Rx1 with a multimeter — you should read zero ohms (continuity) when the paddle is pressed and open when released. Replace the switch if it reads open in both positions or shows erratic resistance.
Step 3
The dispenser control board sits behind the dispenser housing on the freezer door and interprets switch signals to open the water valve and run the ice auger — a damaged board can kill both functions simultaneously. Remove the two Phillips screws securing the housing, pull the board, and visually inspect for burnt traces, cracked solder joints, or swollen capacitors, which are the most common failure signs. If you find visible damage, replace the board; if it looks clean, move on before purchasing a new one.
Step 4
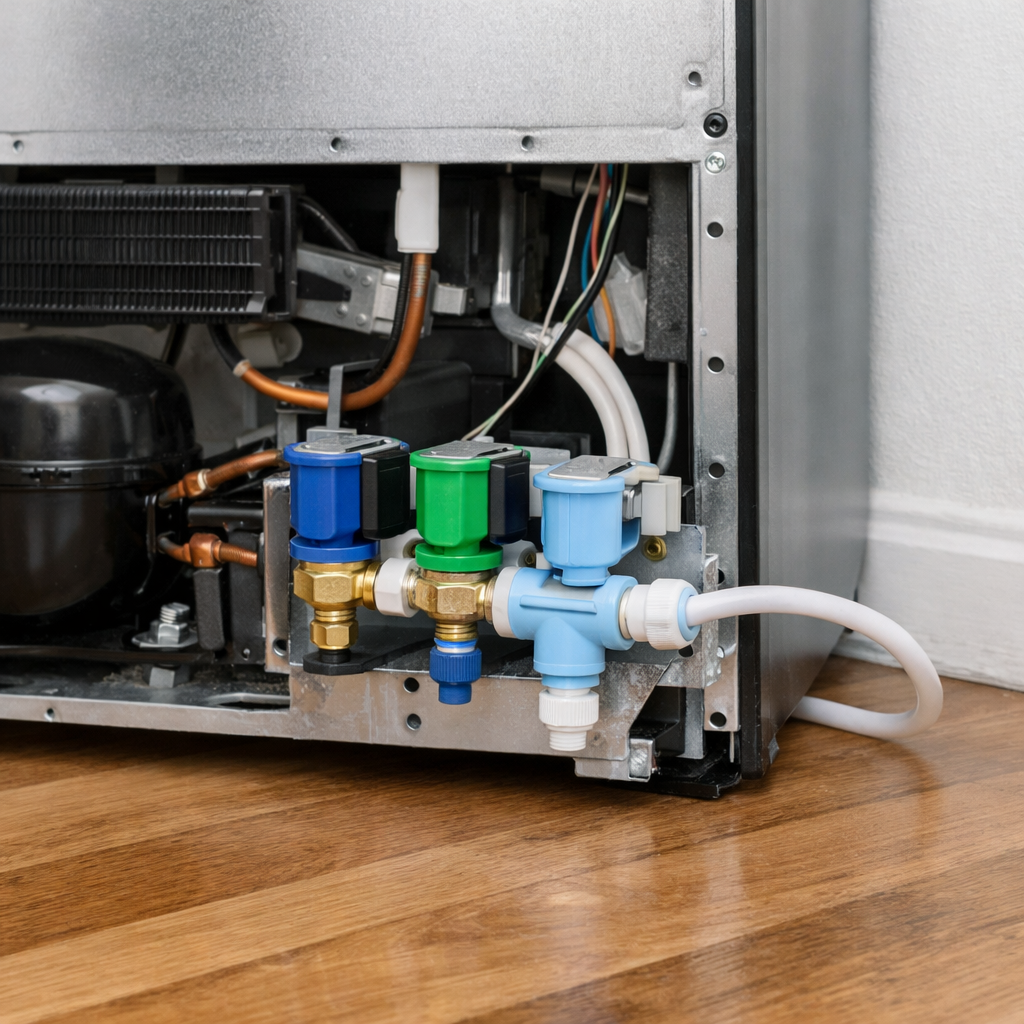
The water inlet valve at the rear lower panel controls water supply to both the dispenser and ice maker, so a failed solenoid coil will cut off one or both functions. Remove the four ¼-inch hex screws from the lower rear panel to access the valve, then test each solenoid coil with a multimeter — a healthy coil reads 200–500Ω, and an open (infinite resistance) reading confirms the coil has failed and the valve must be replaced. Safety note: have a towel ready and shut off the household water supply before disconnecting any valve lines.
Step 5
The door switch signals the control board that the refrigerator door is properly closed, and many Whirlpool models disable the dispenser entirely when this switch reads ‘door open’ as a safety and energy-saving measure. Locate the door switch plunger, actuate it by hand, and test on Rx1 — it should show open continuity when the plunger is out and closed continuity when depressed. A switch that reads open in both states or fails to change state is the fault; replace it before reassembling.
Step 6
Restore power and dispense water continuously for about two minutes to purge any air trapped in the lines after filter replacement or valve work — air pockets cause sputtering and low flow that can be mistaken for a remaining fault. Confirm that water flows at normal pressure and that the ice maker begins its cycle (you should hear the inlet valve click and water fill the ice mold within the first hour). If water flows but ice production is slow, give the ice maker up to 24 hours to reach full output after a filter or valve replacement.
Where to Buy Replacement Parts
Find genuine OEM and aftermarket replacement parts for your Whirlpool WRS325SDHZ (Side-by-Side) on Amazon:
- Whirlpool WRS325SDHZ dispenser control board W10861091
- Whirlpool refrigerator water inlet valve W10498990
- EveryDrop EDR1RXD1 refrigerator water filter replacement
When to Call a Professional
If the issue persists after completing all steps above, the problem may involve the sealed refrigerant system, a failed main control board, or wiring that requires specialized diagnostic equipment. Contact a licensed appliance technician — attempting sealed-system repairs without EPA 608 certification is illegal and unsafe.
“`html
How Much Does This Repair Cost?
DIY parts for fixing an ice and water dispenser on the Whirlpool WRS325SDHZ typically cost between $15 and $120, depending on the faulty component. A professional service call usually runs $150 to $300 once you factor in labor and parts. Tackling this repair yourself can save you $100 or more in labor costs alone.
“`
Frequently Asked Questions
Why is neither ice nor water dispensing from my Whirlpool WRS325SDHZ?
The most common cause is a locked control panel — press and hold the dispenser lock button for three seconds to disable child lock. If that doesn’t help, check that the refrigerator door is fully closed and the water supply line is turned on.
How do I know if the water inlet valve needs replacing?
If water still won’t dispense after confirming adequate water pressure (at least 20 psi), the inlet valve is likely faulty and should be replaced.
Could a clogged water filter stop the dispenser from working?
Yes, a severely clogged or incorrectly installed filter can restrict water flow entirely. Replace the filter every six months and ensure it is fully seated and locked into position.
Recommended Products
These are the parts and tools we recommend for this repair, based on compatibility and customer reviews:
- BlueStars WP3406107 3406107 Dryer Door Switch – For Whirlpool Maytag Kenmore Dryers – Replaces 3406109 3405100 3405101 3406100 3406101 AED4475TQ1 MEDC400VW0 Series 60/70/ 80/90/ 500/600/ 700/800
- 2Pcs Refrigerator Door Light Switch 3Pin Momentary Fridge Switch Compatible with GE, Whirlpool, LG, Kenmore, Maytag, Amana, Crosley, KitchenAid, Magic Chef Freezer Light Switches 1NC 1NO AC 250V 2.5A
- FOJOO Refrigerator Door Light Switch – Compatible with Whirlpool, GE, Maytag, Amana, Kenmore, KitchenAid, Admiral,Fridge Light Replacement
As an Amazon Associate, I earn from qualifying purchases.


