Is It Normal for an Outlet to Be Warm?
The direct answer is no — a standard duplex outlet (the ordinary white 15-amp or 20-amp receptacle you use daily) should never feel warm to the touch. This is a passive device with no internal power-consuming components. It contains only brass contact springs, a phenolic or plastic body, and screw terminals. If the outlet is warm, that warmth is being generated elsewhere and conducted to the outlet, or it’s originating from a loose electrical connection at the outlet itself.
However, the answer changes depending on the type of device:
- Standard duplex outlets (15A or 20A): Should be indistinguishable in temperature from the surrounding wall. Room temperature. If it’s warm, something is wrong.
- GFCI outlets (with TEST/RESET buttons): These contain active electronics — a sensing circuit, a solenoid that trips the mechanism, and other components that consume power even in standby. A GFCI that runs slightly warm (5–10°F above ambient) while delivering current through an appliance can be within normal operation. A GFCI that is noticeably hot, or warm with nothing plugged in, is exhibiting a fault condition.
- Dimmer switches: These use TRIAC (Triode for Alternating Current) semiconductor components that deliberately dissipate power to regulate current flow. Running warm — even hot — is normal operation. A dimmer that reaches 140°F+ may indicate an overloaded circuit, but moderate warmth is expected.
- Smart plugs and outlet adapters: These contain transformer coils, voltage regulation circuitry, and wireless modules. Warmth is expected — typically 15–25°F above ambient under normal operation. If a smart plug is too hot to touch comfortably, the internal transformer or power supply has failed.
- Outlet cover plates: The faceplate itself should never be more than a few degrees above room temperature. A hot cover plate indicates heat radiating from the outlet body behind it.
When homeowners ask “is it normal for an outlet to get warm,” they are usually confused about baseline expectations. The answer is: no, it is not normal, and you should investigate immediately.
⚠️ When a Warm Outlet Is a Danger Sign
A warm or hot outlet is a warning that electrical resistance is present somewhere in the circuit, and electrical resistance generates heat. At sufficient current, that heat can ignite insulation and wood framing inside your walls.
These are the most dangerous causes of warm outlets — any of them can lead to electrical fire:
Overloaded Circuit
A 15-amp circuit is rated to safely deliver 15 amps at 120 volts continuously, which equals 1,800 watts (using the formula P = I × V). The National Electrical Code (NEC Article 210.21) specifies that for continuous loads (loads running more than 3 hours), the circuit should not exceed 80% of its rating. This means:
- 15A circuit: safe continuous load = 1,440 watts (15 × 120 × 0.80)
- 20A circuit: safe continuous load = 1,920 watts (20 × 120 × 0.80)
When actual current exceeds this, the wiring itself heats up due to I²R losses (current squared times resistance). The 14 AWG wire that typical 15A circuits use has a resistance of approximately 2.5 ohms per 1,000 feet. If a 15A circuit is fully loaded and runs 50 feet from panel to outlet and back, that’s 100 feet of wire, equaling 0.25 ohms of resistance. At 15 amps, this generates 15² × 0.25 = 56.25 watts of heat in the wiring. The outlet, being at the end of this hot wire, will feel warm — and the wiring insulation is being degraded.
This is a use-pattern problem, not an outlet failure. The fix: redistribute loads. Move high-draw devices to different circuits or add a dedicated circuit for frequent high-draw appliances.
Loose or Backstab Connection
This is the most common cause of warm outlets in homes — and the most dangerous.
Screw-terminal connections: Outlets have two brass screw terminals on each side (hot and neutral). If the screw is not tightened fully, the contact pressure between the wire and the terminal decreases, increasing contact resistance. A loose connection that should have 0.001 ohms of resistance might have 0.1 or even 0.5 ohms. At 12 amps, a 0.1-ohm connection generates 12² × 0.1 = 14.4 watts of heat at that single point — enough to discolor the brass terminal and the wire insulation around it. This heat accelerates oxidation of the copper wire and degrades the insulation. The connection becomes even looser (thermal cycling — heating and cooling — causes expansion and contraction). Eventually, arcing begins.
Backstab (push-in) connections: Many outlets manufactured from the 1980s through early 2010s used backstab terminals — holes in the back of the outlet where you push the wire in rather than wrapping it around a screw. These connections rely on a spring clip to grip the wire. Backstab terminals are notorious for developing high resistance over time because:
- The spring clip weakens with age
- The wire itself can oxidize and slip backward in the hole
- Unlike a screw terminal, there’s no way to re-tighten a backstab connection
- The contact area between wire and spring is smaller than a screw terminal
A backstab connection that is 10 years old has likely developed 0.05–0.2 ohms of resistance even though it feels “plugged in.” The outlet will run warm under load. This is a defect in the device design — the fix is to replace the outlet with a screw-terminal model.
Faulty or Worn-Out Outlet
The contact springs inside an outlet that grip the plug prongs are made of beryllium copper — a material chosen for its springiness and conductivity. Over years of plugging and unplugging, these springs lose tension through mechanical fatigue and work-hardening. A 15-year-old outlet in a kitchen (which receives frequent plug activity) has looser contacts than a new outlet. When you plug in a device, the prongs don’t contact the springs with sufficient pressure. Contact resistance increases. The outlet runs warm under load.
Additionally, the contacts can develop oxidation or corrosion, adding a thin layer of insulating oxide that further increases resistance. If you look inside an old outlet with a flashlight, you may see the brass contacts appear dull gray rather than shiny — that’s oxidation.
The fix: replace the outlet. Outlets are inexpensive (typically $0.50–$3.00 wholesale, $5–$15 retail). There is no repair for contact wear except replacement.
Aluminum Wiring
Homes built between approximately 1965 and 1973 sometimes contain aluminum branch-circuit wiring (as opposed to the copper feeder lines most homes use). Aluminum was used because it was cheaper and lighter than copper, but it has several electrical disadvantages:
- Oxidation: Aluminum corrodes much more readily than copper. Within weeks of installation, the surface of aluminum wire oxidizes to aluminum oxide (Al₂O₃), which is an insulator with very high resistivity. This oxide layer forms a barrier between the wire and the terminal connection, dramatically increasing contact resistance.
- Expansion coefficient: Aluminum expands and contracts more than copper with temperature changes, causing repeated mechanical stress at connections.
- Creep: Aluminum wire has a tendency to “creep” — the wire gradually moves under pressure at terminals, especially under heating and cooling cycles. A connection that was tight at installation becomes loose within a few months.
An outlet with aluminum wiring connected to a standard (non-CO/ALR rated) outlet will develop high contact resistance. The outlet body may overheat, the wire insulation can melt, and the connection can arc. Aluminum wiring is particularly dangerous at outlets because outlets see frequent current surges (appliances being switched on and off) and because they are often in areas (kitchens, laundries) where water exposure or high-amperage loads stress the connections.
If you discover aluminum wiring, it must be remediated with:
- CO/ALR-rated outlets and switches (AL9CU compatible), or
- Pigtailing — splicing a short section of copper wire to the aluminum using a proper connector filled with anti-oxidant compound
This is not a DIY repair. Call a licensed electrician certified to work with aluminum wiring.
Wire Gauge Mismatch
A circuit breaker is rated to trip (disconnect) when current exceeds its rating. A 15-amp breaker should trip at 15 amps. A 20-amp breaker should trip at 20 amps. The wire, however, must be sized to safely carry the breaker’s rated current without excessive heat generation.
Wire gauge and ampacity are specified in NEC Article 310:
- 14 AWG copper wire: 15A maximum (safe continuous ampacity is 12A)
- 12 AWG copper wire: 20A maximum (safe continuous ampacity is 16A)
- 10 AWG copper wire: 30A maximum (safe continuous ampacity is 24A)
If a 20-amp breaker is protecting a circuit wired with 14 AWG wire, the breaker will allow 20 amps to flow through wire rated for only 15 amps. The wire will overheat. The resistance of 14 AWG wire is approximately 2.57 ohms per 1,000 feet. A 50-foot circuit (100 feet round-trip) has 0.257 ohms. At 20 amps, this generates 20² × 0.257 = 102.8 watts of heat — enough to degrade insulation rapidly.
An outlet on such a circuit will run warm because it’s receiving current-heated wire. The fix: the circuit must be rewired with the correct gauge, or the breaker must be downrated to 15 amps. Call an electrician.
Ground Fault (Early-Stage Failure)
A ground fault occurs when current leaks from the hot wire to ground (the grounding conductor or earth) instead of flowing through the neutral back to the panel. This can happen if insulation is damaged, if water is present, or if two conductors are in contact. A ground fault generates heat at the point where the fault occurs.
If a ground fault exists inside a wall cavity near an outlet, the outlet cover plate may feel warm even though the outlet itself is not directly faulted. The heat is radiating from the arcing or high-resistance point inside the wall.
A ground fault will eventually be detected by a GFCI device (if one is installed), but not by a standard breaker. If you suspect a ground fault, call an electrician to trace it with specialized equipment (a megohmmeter or insulation tester can measure leakage resistance).
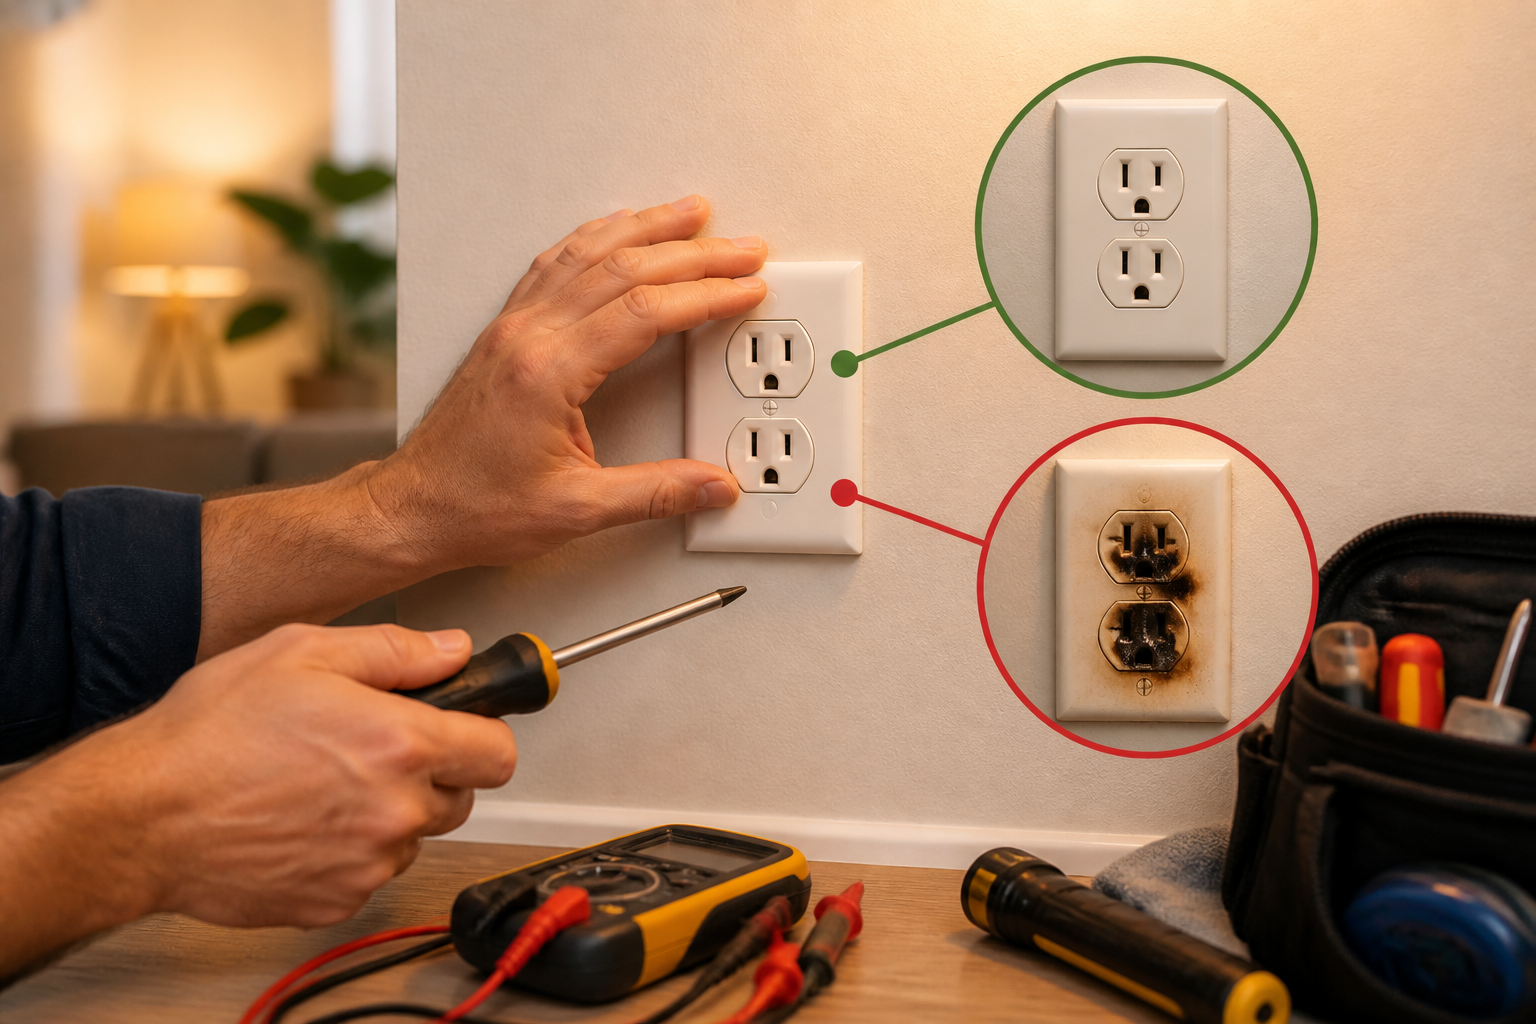
The Temperature Test: How Warm Is Too Warm?
Temperature measurement is critical to diagnosis. A subjective assessment (“it feels a bit warm”) is not sufficient.
Temperature Baseline and Thresholds
Use an infrared thermometer (also called a laser temperature gun or thermal imaging camera) to measure the outlet cover plate and outlet body. These are inexpensive (typically $15–$50) and provide accurate surface readings without contact. Some tools worth considering:
- Klein Tools IR5: Basic non-contact IR thermometer, accurate to ±3%, about $20–$25
- Flir One thermal camera: Smartphone-based thermal imaging, shows heat distribution patterns, $200–$300
- Etekcity Lasergrip 774: Entry-level IR thermometer, adequate for outlet diagnosis, about $15–$20
Measurement protocol:
- Measure the ambient room temperature (measure the wall near the outlet, away from the outlet itself)
- Measure the outlet cover plate surface temperature
- Measure the visible outlet body (the brass or tan receptacle itself)
- If an appliance is plugged in, measure again and record the load (e.g., “space heater running”)
- Repeat measurements every 5 minutes for 15 minutes to see if temperature is rising or stable
Interpretation:
- Within 5°F of room temperature: Normal. The outlet is functioning correctly.
- 5–15°F above ambient with a large appliance plugged in (heater, air conditioner, etc.): Likely acceptable, but investigate further. A circuit delivering its maximum safe continuous load (1,440W on 15A) will have some resistive heating. However, the outlet and cover plate should not exceed 130°F, and the rise should stabilize — not continue climbing. If temperature continues climbing, turn off the appliance.
- More than 15°F above ambient with nothing plugged in, or more than 20°F above ambient with normal appliances plugged in: Abnormal. Indicates a connection problem or wiring issue. Stop using the outlet and investigate.
- Outlet or plate too hot to touch comfortably (approximately 130°F or higher surface temperature): Dangerous. Fire hazard. Turn off the circuit at the breaker immediately. Do not use the outlet.
- Any temperature rise that continues climbing (not stabilizing after 10–15 minutes): Do not continue the test. Turn off the circuit. This indicates a thermal runaway — the increasing heat is causing increasing resistance, which causes more heat.
Safety note: Do not measure with your bare hand on an outlet you suspect is dangerously hot. Use the infrared thermometer from a distance. If the outlet is visibly discolored, scorched, or emits any smell, do not test it further — turn off the breaker and call an electrician.
Safe Diagnosis Steps (In Order)
Follow this diagnostic procedure to safely identify the cause of a warm outlet without creating additional risk.
Step 1: Identify Connected Loads
Document every device plugged into the outlet and into any other outlets on the same circuit (typically, a 15A circuit has 3–4 outlets wired in series). List the amperage drawn by each:
- Space heater: typically 10–13A (on a dedicated circuit, or causes problems)
- Hair dryer: 8–12A
- Microwave: 7–10A
- Toaster: 9–12A
- Coffee maker: 5–8A
- Refrigerator: 3–5A (but runs continuously)
- Standard lamp: 0.5–1A
Add up the amperage of all devices running simultaneously. If the total approaches or exceeds 12A on a 15A circuit (80% rule), the circuit is overloaded under normal use.
Decision point: If the outlet is warm and you have a space heater or air conditioner running on it (and no other problems are present), the circuit is likely at the edge of its capacity. The outlet may feel warm but not be failing. However, this situation should not continue indefinitely — the circuit is aging faster than it should. Consider upgrading to a dedicated circuit for the space heater or moving it to a 20A circuit.
Step 2: Unplug Everything and Wait
Turn off all devices on the circuit. Wait 15 minutes for the outlet to cool.
- If the outlet returns to room temperature, the warmth was caused by load. Go to Step 3.
- If the outlet remains warm or hot with nothing plugged in, you have an active wiring fault or ground fault. Skip to Step 5 and then call an electrician.
Step 3: Test Wiring Configuration with an Outlet Tester
A basic outlet tester (three-light tester) costs $8–$15 and checks for common wiring errors. Plug it into the outlet. The light pattern indicates:
- All three lights on (correct): Wiring is correct — hot, neutral, and ground properly connected.
- Two lights on, one off: Open ground — the grounding conductor is missing or disconnected. This can cause issues with certain devices and indicates an installation defect.
- One light on: Open neutral — a critical fault. Current cannot return properly, and ground rods or other paths become the return path. This creates unusual voltage and heating.
- No lights: No power at the outlet, or the outlet is miswired (hot and neutral reversed). Check the breaker; check for a tripped GFCI upstream.
- Two lights, different pattern than “correct”: Hot and neutral reversed (polarity reversed). This can happen if the outlet was installed backwards or if there’s a wiring error at the panel.
If you find an error: Do not attempt to repair a miswired outlet yourself unless you are confident in your skills. Wrong polarity can damage electronics. An open neutral or open ground is a serious safety issue. Call an electrician.
Step 4: Voltage Drop Test
This test reveals excessive resistance in the circuit.
Equipment needed: a multimeter (analog or digital) set to AC voltage mode.
Procedure:
- Measure the voltage at the outlet with nothing plugged in. Normal is 118–122V (the National Standard is 120V, but the NEC allows ±10% variance).
- Plug in a known load — a lamp or appliance that draws 5–10A (avoid heaters or high-draw devices for the first test). Measure voltage again. Record both the voltage and the load (example: “Space heater running, voltage = 114V”).
- Calculate the voltage drop: initial voltage minus loaded voltage. Example: 119V – 114V = 5V drop.
- If voltage drop is more than 3V under normal load, or more than 5V under maximum circuit load, you have excessive resistance.
What excessive voltage drop means:
- 3–5V drop: The circuit is approaching its limit. The wiring is likely sized correctly (14 AWG on 15A), but the run is long or there’s a marginal connection. Monitor this circuit and avoid overloading it.
- More than 5V drop: Problem confirmed. The circuit has either:
- Undersized wiring (14 AWG on a 20A breaker)
- Very long wire run (rarely an issue in residential; would need to be more than 150 feet)
- A loose connection somewhere — either at the outlet, at another outlet on the circuit, or at the breaker
- Aluminum wiring with oxidized connections
Next steps if voltage drop is high: Proceed to Step 5. Inspect the outlet physically.
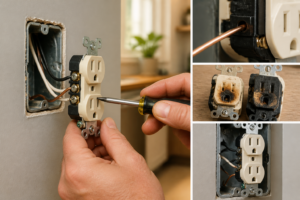
Step 5: Physical Inspection of the Outlet
SAFETY FIRST: Turn off the breaker protecting this circuit. Confirm the outlet is de-energized using a non-contact voltage tester or multimeter.
With the power off, remove the cover plate and visually inspect:
- Discoloration, scorch marks, or blackening: Indicates arcing or overheating. The outlet has failed and must be replaced. The wire insulation may also be damaged — look carefully at the insulation where the wire enters the outlet terminals.
- Smell: A burnt or acrid smell coming from the outlet box indicates arcing or insulation breakdown. Do not restore power to this outlet until it’s replaced.
- Wire insulation condition: Is the insulation brittle, melted, or discolored? Properly insulated wire should be intact and flexible. Damaged insulation = wiring fault.
- Wire color inside the box: All neutral wires should be white, all hot wires should be black (or red, blue, etc. for 240V circuits). If the colors are wrong, the outlet may be miswired.
- Screw terminal tightness: Using a screwdriver, gently attempt to turn the screw terminals clockwise (the way you’d tighten them). They should not turn easily. If a screw can be turned more than 1/4 turn without resistance, it’s loose. Mark it for tightening or note it in your findings.
- Backstab terminals: If the outlet has backstab holes on the back (wires pushed in rather than wrapped around screws), note this. Backstab connections are unreliable and should be replaced.
- Wire stranding or corrosion: Are the wire ends inside the terminal discolored or corroded? Copper should be shiny. If it’s dull gray or white, oxidation is present. This can happen with aluminum wiring.
If you find:
- Scorch marks, discoloration, or melting — replace the outlet immediately. This is a fire risk.
- Loose screw terminals — tighten them fully (turn the screw clockwise until you feel resistance, then an additional 1/4 turn). If a terminal was loose, this may resolve the warm outlet problem. Restore power and retest temperature. If the outlet is still warm after tightening, continue investigating.
-
Recommended Tools & Products
Fluke 62 Max Non-Contact Infrared Thermometer
Identifying whether an outlet is dangerously hot requires accurate temperature measurement without direct contact. This infrared thermometer lets you safely measure outlet surface temperature from a distance to determine if overheating indicates a serious electrical problem. Check current pricing on Amazon.
Klein Tools Non-Contact Voltage Tester Pen
Before troubleshooting any electrical outlet, you need to verify whether power is present to ensure your safety. This voltage tester detects live electricity without requiring contact with the outlet, helping you confirm whether the outlet is energized before proceeding with diagnosis. Check current pricing on Amazon.
Leviton Outlet Tester with GFI and Polarity Testing
Diagnosing warm outlets requires understanding wiring problems like reversed polarity, loose connections, and ground faults that cause excessive heat buildup. This three-light outlet tester quickly identifies common outlet wiring issues that lead to dangerous overheating conditions. Check current pricing on Amazon.
The Infrared Thermometer That Pinpoints Exactly Where the Heat Is Coming From
When an outlet feels warm, your hands and a visual inspection won’t tell you whether the problem is the outlet itself, the wire behind it, or a loose connection at the breaker—you need actual temperature data. An infrared thermometer lets you map heat across the outlet, the wall around it, and the breaker panel to narrow down the real source before you start pulling things apart.
What works
- Reads surface temperature instantly without contact—critical when you’re checking a live outlet and don’t want fingers near it for too long.
- Spot size is tight enough to isolate the outlet faceplate, the screw terminal area, and the wall cavity separately, so you can tell if heat is radiating from inside the wall or just the device itself.
- Laser target is accurate enough that you won’t waste time troubleshooting the wrong breaker or circuit—I’ve caught loose connections at the panel this way before they tripped.
What doesn’t
- Won’t tell you *why* there’s heat—only where it is; you still need a voltage tester and the diagnostic steps in this guide to confirm the cause (overloaded circuit, loose wire, bad breaker).
- Reflective surfaces (shiny outlet covers, metallic tape) can throw off readings slightly, so you may need to take a reading from the outlet body itself rather than through a cover.
I initially tried diagnosing a warm outlet just by feel and assumption—turned out the heat was actually radiating from the breaker panel, not the outlet itself, which pointed to a completely different problem than I expected. Grab a Fluke 62 Max Non-Contact Infrared Thermometer before you make that same mistake.
This post contains affiliate links. As an Amazon Associate, I earn from qualifying purchases at no extra cost to you.