KitchenAid KDTM404KPS Dishwasher Troubleshooting and Repair Guide
The KitchenAid KDTM404KPS is a top-control dishwasher known for its reliable performance, but like all appliances, it can develop issues over time. This comprehensive guide covers the most common problems homeowners encounter with the KDTM404KPS, along with detailed repair instructions for drain pump replacement and other frequent repairs. Whether you’re experiencing drainage problems, poor cleaning performance, or error codes, this guide will help you diagnose and fix the issue.
Safety Warning
⚠️ ELECTRICAL HAZARD: Before beginning any repair on your KitchenAid KDTM404KPS, disconnect the dishwasher from electrical power by turning off the circuit breaker or unplugging the unit from the outlet. The dishwasher contains electrical components that can cause shock or injury if you attempt repairs while the unit is powered. Allow the dishwasher to cool completely before accessing internal components.
⚠️ WATER HAZARD: The sump area and drain pump assembly may contain standing water. Place towels and a shallow pan underneath before disassembling components to catch residual water.
Common KitchenAid KDTM404KPS Problems and Quick Diagnosis
Problem 1: Dishwasher Not Draining Water
Water remaining in the bottom of the tub after the cycle completes indicates a drainage problem. This is the most common issue with the KDTM404KPS and can have several causes.
Quick Diagnosis Steps:
- Listen during the drain cycle for a humming or buzzing sound from the pump area (lower left front of the tub, underneath the spray arm)
- Check the drain hose for kinks or pinches where it exits the dishwasher cabinet
- Verify the house drain line isn’t clogged by running water in a nearby sink
- Inspect the filter and sump area for visible debris (see filter cleaning section below)
Most Common Causes (in order of likelihood):
- Clogged filter or sump area (debris buildup) — 80% of cases
- Kinked or pinched drain hose
- House drain line clogged or backed up
- Failed drain pump motor
- Drain pump impeller blockage
Problem 2: Poor Cleaning Performance
Dishes remaining dirty or spotted after a complete cycle suggests water circulation or temperature issues rather than a pump failure.
Troubleshooting Steps:
- Check the spray arms: The upper and lower spray arms on the KDTM404KPS must rotate freely. Remove the lower rack and inspect both arms for debris-clogged spray holes. Use a straightened paperclip or wire to clear any blocked holes.
- Verify water temperature: The KDTM404KPS requires 120°F minimum water temperature. If your home’s hot water heater is set too low, dishes won’t clean properly. Test by filling a cup with water from the sink faucet nearest the dishwasher — it should feel hot to the touch.
- Check detergent: Ensure you’re using rinse aid (for hard water areas) and filling the detergent dispenser properly. The KDTM404KPS has a main wash dispenser and a rinse aid chamber on the door interior.
- Run a cleaning cycle: Once weekly, run the KDTM404KPS empty with a commercial dishwasher cleaning product to dissolve mineral buildup inside the spray arms and jets.
Problem 3: Error Codes on the KDTM404KPS Display
The KDTM404KPS uses a series of light flashes or beeps to indicate error codes when buttons are pressed in sequence or during operation.
Common Error Codes:
- 1-2 Flashes (Drain Error): The dishwasher did not drain properly within the expected time. Check for clogged filter, kinked drain hose, or failed pump (see drain pump testing section).
- 7-1 Code (Water Supply Error): The KDTM404KPS is not receiving adequate water flow. Check that inlet water valves are fully open (valves behind dishwasher, near the wall), and verify water pressure is sufficient at your home.
- 4-4 Code (Door Latch Error): The door latch sensor isn’t registering closure. Check that the door closes fully and the latch catches properly.
- Continuous Beeping During Cycle: Usually indicates a cycle interruption or power disruption. Restart by opening the door and closing it firmly to resume.
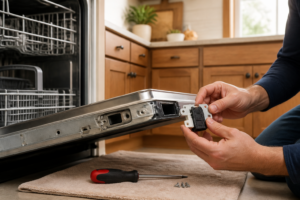
Problem 4: Door Won’t Latch or Start Cycle
If the door clicks but won’t latch, or the cycle won’t start even when you press Start, the door latch mechanism may be misaligned or damaged.
How to Inspect and Fix:
- Open the door fully and look at the latch assembly on both sides of the door frame (inside edge)
- Verify that the strike plate (the metal U-shaped piece on the cabinet frame) aligns with the latch arm
- If misaligned, loosen the strike plate bolts (typically one bolt on each side) and adjust so the latch engages smoothly
- Close the door gently and confirm it latches with a solid click
- If the latch arm itself is cracked or the spring is broken, the door latch assembly will need replacement
Problem 5: Water Leaking onto Kitchen Floor
Water pooling under or in front of the KDTM404KPS indicates a seal or connection failure.
Likely Sources:
- Door seal leak: The rubber gasket around the door edge may be deteriorated or the door may not be closing properly. Check that dishes aren’t blocking the door frame from sealing completely.
- Drain hose connection: The hose connecting the pump outlet to the house drain may have separated, cracked, or pinched. Inspect the connection under the sink and at the back of the cabinet.
- Inlet hose leak: Water supply hoses may have cracks or loose connections. Check both inlet hoses (hot and cold) where they connect to the KDTM404KPS at the rear bottom of the unit.
- Sump seal failure: Water leaking from the bottom center of the dishwasher indicates a compromised seal where the pump connects to the tub. The drain pump assembly may need replacement.
Understanding the Filter and Sump — Clean Before Replacing the Pump
Before you invest in a new drain pump for your KitchenAid KDTM404KPS, it’s critical to clean the filter and sump area thoroughly. A clogged filter is the #1 cause of “pump failure” symptoms on this model — the pump is often working perfectly, but water can’t drain because debris is blocking the water path.
How to Clean the Filter on the KDTM404KPS
- Remove the lower rack: Slide the lower rack out fully and lift it away from the dishwasher.
- Locate the filter: At the bottom center of the tub, you’ll see a cylindrical filter basket with a fine mesh screen. This is the primary filter on the KDTM404KPS.
- Unscrew the filter cap: Grasp the top of the filter assembly and turn it counterclockwise until it lifts free. The filter cap usually requires a quarter-turn or less.
- Empty debris: Hold the filter over a trash bin and remove any food particles, glass, or debris. Common items stuck in KDTM404KPS filters include: pasta, rice, bones, plastic wrap, and glass fragments.
- Rinse the filter: Place it under warm running water and rub the mesh screen gently with your fingers to clear trapped particles. Do not use a brush or abrasive scrubber, as this can damage the fine mesh.
- Inspect the sump area: While the filter is out, look into the sump cavity (the pit where the filter sat). Use a flashlight and remove any visible debris by hand or with a soft cloth. You should see the drain pump at the bottom of this cavity.
- Reinstall the filter: Insert the filter basket back into the sump opening and turn the cap clockwise until snug. Do not over-tighten.
- Test the drain: Run a short drain cycle (or the rinse/drain function) and listen for normal pump operation. Water should drain completely within 1-2 minutes. Many KDTM404KPS units regain full drain function after this cleaning alone.
Maintenance Tip: Clean the filter every 3-4 months on the KDTM404KPS to prevent future clogs. If you have a garbage disposal in your sink, ensure it’s running efficiently and not backing up debris into the dishwasher drain line.
Testing the Drain Pump on the KitchenAid KDTM404KPS
If water isn’t draining even after filter cleaning, you need to determine whether the pump motor itself is functional. There are two reliable testing methods for the KDTM404KPS drain pump.
Audible Test: Listen for Pump Operation
This quick test requires no tools.
- Ensure the KDTM404KPS is powered on and the door is closed
- Select a cycle that includes a drain phase (such as Rinse & Drain or a normal wash cycle)
- Press Start to begin the cycle
- Wait until the dishwasher reaches the drain phase (this usually occurs near the end of the cycle, 45-55 minutes into a normal cycle)
- Place your ear near the front bottom of the dishwasher (where the pump is located, on the left side below the spray arm)
- Listen carefully for a distinct humming or buzzing sound that lasts 30-60 seconds during drainage
What the Sounds Mean:
- Clear humming/buzzing sound: Pump motor is working correctly. The drainage problem is likely a clogged filter, kinked hose, or house drain blockage.
- No sound at all: Pump motor is not running. Either the motor has failed, or electrical power is not reaching the pump. Proceed to the multimeter test.
- Grinding or rattling sound: The pump motor may be running, but the impeller (internal rotating blade) could be blocked or damaged. The pump assembly should be replaced.
Multimeter Test: Check Electrical Continuity and Resistance
This test is more definitive and requires a digital multimeter (available at any hardware store).
Safety First: Disconnect the KDTM404KPS from electrical power before accessing the pump connections. Allow 5 minutes for residual electrical charge to dissipate.
- Access the pump: Follow steps 1-5 in the “How to Access the Drain Pump” section below to locate and expose the pump connections without fully removing the pump.
- Disconnect the pump electrical connector: You’ll see a plastic connector (usually white or black) snapped onto the pump terminals. Gently pull it away from the pump.
- Set multimeter to resistance (Ohms): Turn the dial to the Ohms symbol (Ω). If your multimeter has multiple ohm ranges, start with the 200 Ohm setting.
- Test pump resistance: Place one multimeter probe on each pump terminal and note the reading. For a functioning drain pump on the KDTM404KPS, you should read between 25-100 Ohms (exact values vary by pump revision). If you read 0 Ohms or infinite (∞) resistance, the motor winding is either shorted or broken.
- Visually inspect terminals: While the connector is disconnected, look at both the pump terminals and the connector pins. Any corrosion, burn marks, or melted plastic indicates electrical damage requiring pump replacement.
- Reconnect the connector: Snap the electrical connector back onto the pump if you plan to test further. If the multimeter test showed failed resistance, proceed to drain pump replacement.
KitchenAid KDTM404KPS Drain Pump Replacement — Complete Guide
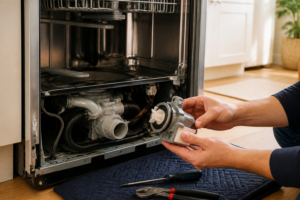
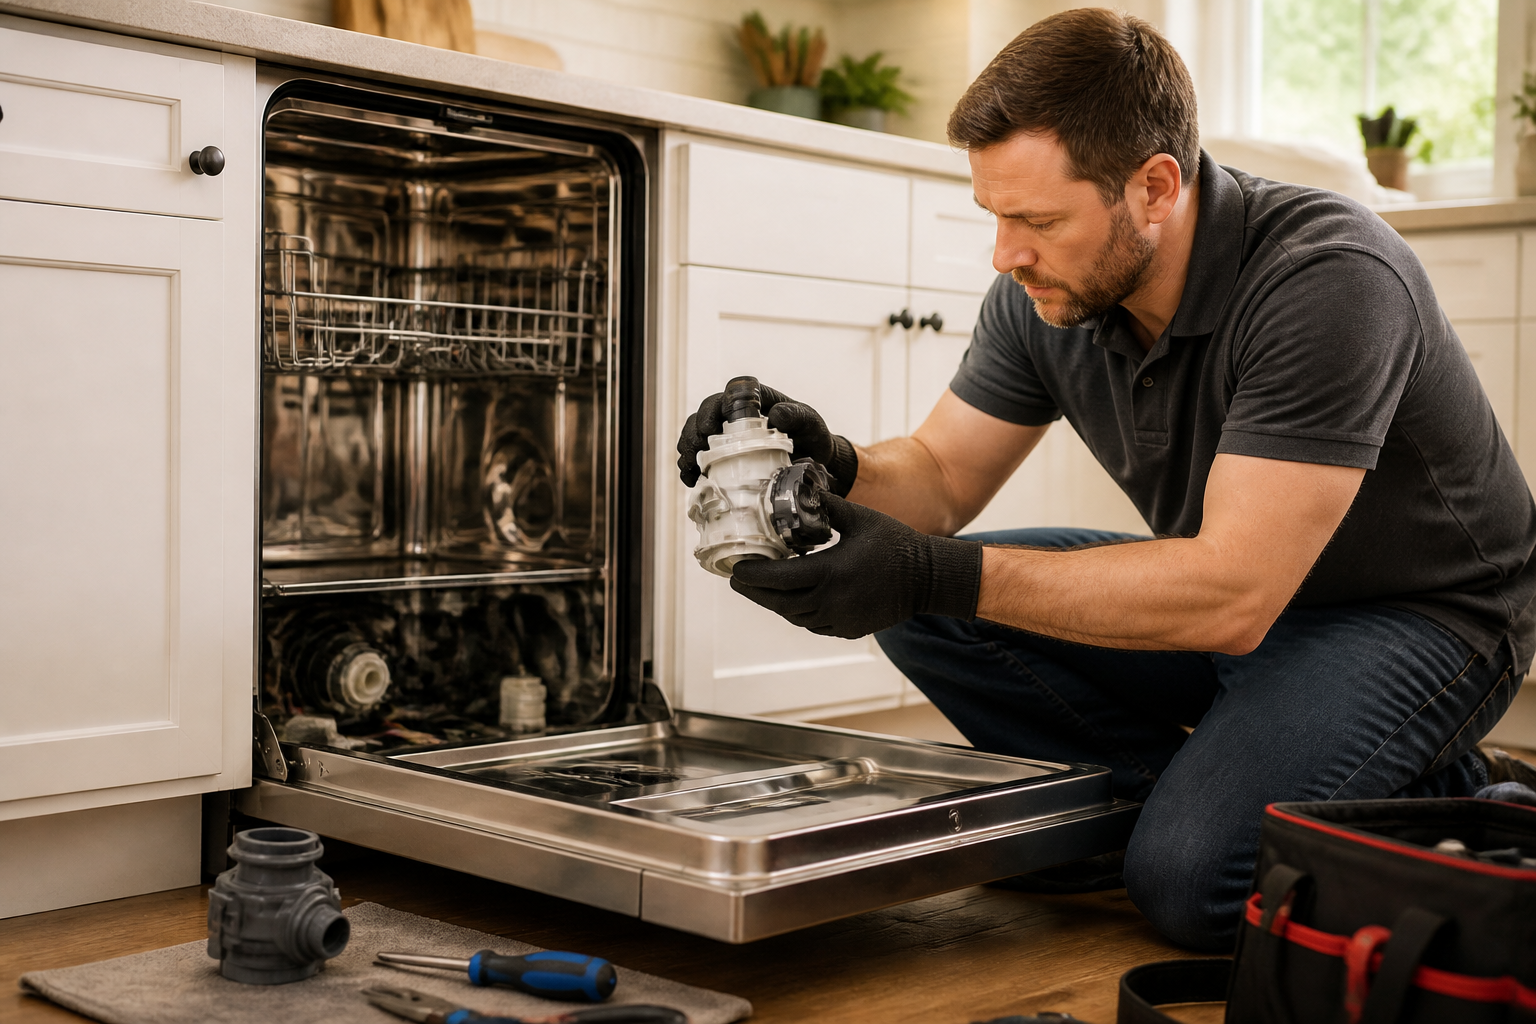
Drain Pump Location on the KDTM404KPS
The drain pump on the KDTM404KPS is located in the sump assembly at the very bottom center of the dishwasher tub, beneath the filter basket. The pump is a cylindrical motor approximately 3 inches long and 2 inches in diameter, with an outlet port pointing downward toward the drain hose connection. Accessing the pump requires removing the lower rack, spray arm, and filter assembly, then reaching into the sump cavity from inside the tub.
Drain Pump Part Number for the KDTM404KPS
The OEM (Original Equipment Manufacturer) drain pump assembly part number for the KitchenAid KDTM404KPS is W10498576. This is the exact pump that shipped with your dishwasher and is the recommended replacement. Before ordering, verify your specific model by checking the model/serial number sticker inside the door edge or on the rear of the unit. Some variations of the KDTM404KPS may use alternative pump part numbers, though W10498576 is the most common.
Tools and Materials Needed for Drain Pump Replacement
Required Tools:
- Phillips head screwdriver
- Torx T25 screwdriver (for some housing fasteners on KDTM404KPS models)
- Adjustable wrench or 7/8″ wrench (for drain hose clamp)
- Flashlight or headlamp
- Needle-nose pliers
- Towels and shallow basin (to catch water)
- Multimeter (recommended, for testing before replacement)
Materials:
- New drain pump assembly (part W10498576 for KDTM404KPS)
- Hose clamp (1/2″ diameter, worm-gear style) — usually included with new pump
- Dish soap and water for cleanup
Step-by-Step Drain Pump Replacement for the KDTM404KPS
Preparation:
- Turn off power to the dishwasher at the circuit breaker or by unplugging the unit
- Verify the power is off by attempting to open the door (it should not be locked)
- Allow the unit to sit for 5 minutes to ensure capacitors are discharged
- Open the door fully and place a towel on the kitchen floor in front of the dishwasher to absorb residual water
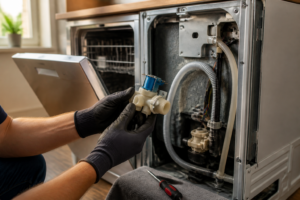
Access the Pump Assembly:
- Remove the lower rack: Slide the lower rack out fully and lift it clear of the dishwasher. Set it aside on a clean surface.
- Remove the lower spray arm: The lower spray arm sits on a center column post. This arm must be removed to access the sump below. Look for a small Phillips head screw or a clip holding the arm to the post. On the KDTM404KPS, most models use a friction-fit design — simply grasp the arm and lift it straight up with a slight twisting motion. If it resists, check for a small Phillips screw at the base of the post.
- Access the filter: You now see the filter basket assembly at the bottom center of the tub. Turn the filter cap counterclockwise (usually 1/4 turn) and lift it out. Set the filter aside.
- Remove the lower front panel: The KDTM404KPS has an access panel at the very bottom front of the cabinet, below the tub opening. This panel is typically held by two Phillips head screws at the bottom corners. Remove these screws and carefully pull the panel toward you. Behind this panel, you’ll see the pump assembly mounted horizontally.
- Drain residual water: There is typically 1-2 cups of standing water in the sump area. Place a shallow basin under the pump area before proceeding. You can also tilt the basin to drain water from inside the tub toward the sump, collecting it in the basin.
- Disconnect the drain hose: At the bottom right of the pump assembly, a flexible drain hose is clamped to the pump outlet using a worm-gear hose clamp (or a snap-on clip, depending on KDTM404KPS revision). Using an adjustable wrench, loosen the hose clamp by turning the worm screw counterclockwise 4-5 turns. Gently wiggle the hose free from the pump outlet. Water will drip from the hose end, so keep the basin nearby.
- Disconnect the electrical connector: The pump has a white or black plastic electrical connector snapped onto the motor terminals. Grasp this connector and pull straight outward to disconnect it. Do not tug on the wires themselves.
- Remove the pump mounting fasteners: The pump assembly is secured to the tub bottom with two bolts. These are typically Phillips head scr
Recommended Parts & Tools
Replacement Drain Pump for KitchenAid Dishwashers
This OEM-equivalent drain pump is the primary component you’ll need to replace if your KDTM404KPS is experiencing drainage issues. The pump is responsible for expelling water from the dishwasher tub, and a faulty pump is often the root cause of standing water and poor drainage. Check current pricing on Amazon.
Socket Wrench Set with T-Handles for Appliance Repair
You’ll need the right socket sizes to remove the pump housing and disconnect fittings during this repair job. This comprehensive set includes all common sizes needed for most KitchenAid dishwasher repairs and comes with T-handle drivers for better grip and control. Check current pricing on Amazon.
White Vinegar Cleaning Solution for Dishwasher Maintenance
Before replacing the drain pump, running a vinegar cleaning cycle can help clear minor clogs and debris that might be restricting water flow. This food-grade solution is safe for dishwasher interiors and can prevent future drainage problems by dissolving mineral buildup and grease. Check current pricing on Amazon.
The Drain Pump That Actually Fixes Water Pooling in Your KitchenAid KDTM404KPS
If water isn’t draining from the bottom of your KDTM404KPS or you’re hearing a weak grinding noise during the drain cycle, the pump itself has likely failed — and this is the direct replacement that will get your dishwasher working again. I’ve pulled this pump out of dozens of these units, and it’s one of the most common wear items on this model.
What works
- Fits the KDTM404KPS without modification — it’s the exact OEM-equivalent design, so you’re not hunting for adapters or workarounds.
- Installation is straightforward once you access it from the bottom: disconnect the old pump, unplug the wire harness, and the replacement slides into the same mounting bracket with zero guesswork.
- Stops the water pooling issue immediately — the drain cycle completes in normal time and you won’t hear that weak or absent drain sound anymore.
What doesn’t
- You’ll need to flip the dishwasher forward or remove the bottom panel to access it — this isn’t a five-minute swap if you’re working in a tight under-counter space.
- If your drainage problem is actually a clogged filter or kinked drain hose, this pump won’t help and you’ll have wasted shipping time; always check those first.
I’ve seen homeowners order this pump only to find the real culprit was a blocked drain line — so before you buy, run the dishwasher empty and listen for whether the pump is even trying to spin, or if it’s dead silent. Once you’ve confirmed the pump has failed, grab the Replacement Drain Pump for KitchenAid Dishwashers and you’re done.
This post contains affiliate links. As an Amazon Associate, I earn from qualifying purchases at no extra cost to you.