
Ice maker not making ice
This step-by-step repair guide walks you through fixing ice maker not making ice on your LG LRMVS3006S (French Door). With the right tools and parts, most homeowners can complete this repair in 1–2 hours and avoid a costly service call.
🔨 Pro Tip from Dave
On the LRMVS3006S, don’t overlook the ice maker assembly part number AEQ73110224 — it’s a frequent failure point that many DIYers miss while chasing other causes. A common mistake I see is skipping the water inlet valve test; the dual solenoid valve (part# MJX41178908) feeds both the ice maker and water dispenser, and a weak solenoid can starve the ice maker while the dispenser still works fine, throwing you off the diagnosis entirely.
Part of our Top 20 Refrigerator Models & Common Repair Issues Guide. Browse all refrigerator repair guides for related models and issues.
“`html
Common Symptoms & Causes
If your LG LRMVS3006S ice maker has stopped producing ice, watch for these telltale signs before beginning your repair.
- The ice maker bin is completely empty despite the unit running normally
- The ice maker arm is in the down position but no cubes are being dispensed
- You hear the ice maker cycle running but no water fills the tray
- The refrigerator display shows a “FF” or “Er IF” error code
These symptoms are most commonly caused by a frozen fill tube, a faulty water inlet valve, a failed ice maker assembly, or a defective ice maker control board that has worn out over time.
“`
Safety First
- Unplug the refrigerator from the power outlet before starting any repair — never work on a live appliance.
- Shut off the water supply valve before disconnecting any water lines or hoses.
- Wear work gloves when handling metal brackets, sheet metal edges, or sharp components.
- Take photos with your phone before disconnecting any wiring harnesses or connectors.
- Work in a well-lit area with enough floor space to lay removed panels flat.
Tools & Parts Needed
Essential Tools
- Phillips #2 screwdriver
- ¼” nut driver
- Needle-nose pliers
- Multimeter
- Flashlight or work light
Replacement Parts
Step-by-Step Repair Instructions
Step 1
Unplug the refrigerator from its 120V outlet and shut off the water supply valve under the sink before touching any components. These two actions eliminate the risk of electric shock and prevent water from flooding the work area if a line is disturbed. Never skip either step, even for a quick inspection.
Step 2
Open the freezer and remove the 2 Phillips #2 screws securing the ice maker bracket, then tilt the assembly forward to access the 2-pin wiring harness. Press the release tab firmly and unplug the connector — a loose or corroded connector here is a common cause of complete ice maker failure. Handle the assembly gently; the tray and auger are plastic and crack easily in freezer temperatures.
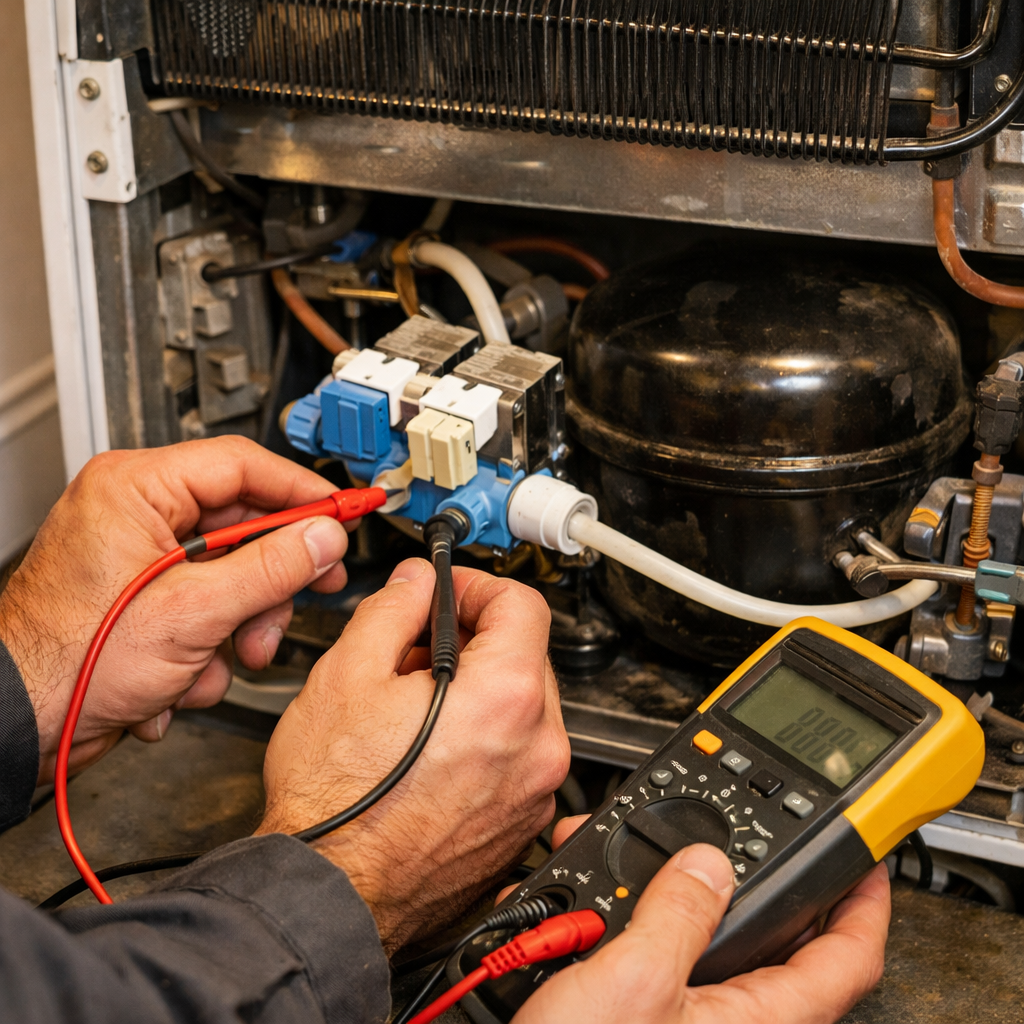
Step 3
Set your multimeter to Rx1 and probe the L and N terminals on the ice maker module to check for continuity. A good module will show continuity; no continuity means the internal thermostat or heater has failed and the module must be replaced. This test pinpoints whether the module itself is dead before you spend time chasing water supply issues.
Step 4
Remove the lower rear access panel by backing out 4 quarter-inch hex screws with a quarter-inch nut driver, then test each solenoid coil on the water inlet valve with your multimeter — a healthy coil reads 200–500 ohms. A reading outside that range means the coil is open or shorted and the valve must be replaced, which would explain why water never reaches the ice maker. Pro tip: while the panel is off, check the wire harness to the valve for chafing against the compressor bracket, a frequent but overlooked issue.
Step 5
With the unit pulled away from the wall, trace the water supply line and look for any kinks or tight bends that would restrict flow, then attach an inline pressure gauge to confirm household water pressure falls between 20 and 120 PSI. Pressure below 20 PSI is the single most common reason the inlet valve fails to open fully, resulting in hollow or misshapen cubes or no ice at all. If pressure is marginal, check the saddle valve or supply stop for partial closure before replacing any parts.
Step 6
Reconnect the 2-pin harness until you hear it click, reinstall the ice maker bracket with both Phillips screws driven snug but not over-torqued, then replace the rear access panel. Restore the water supply, plug the refrigerator back in, and set the freezer temperature to 0°F for optimal ice production. Allow a full 24 hours before judging results — the freezer needs time to stabilize and the ice maker typically completes its first fill cycle 90 minutes after reaching target temperature.
Where to Buy Replacement Parts
Find genuine OEM and aftermarket replacement parts for your LG LRMVS3006S (French Door) on Amazon:
- LG LRMVS3006S ice maker assembly replacement
- LG refrigerator water inlet valve AJU72992603
- LG ice maker module test multimeter kit
When to Call a Professional
If the issue persists after completing all steps above, the problem may involve the sealed refrigerant system, a failed main control board, or wiring that requires specialized diagnostic equipment. Contact a licensed appliance technician — attempting sealed-system repairs without EPA 608 certification is illegal and unsafe.
“`html
How Much Does This Repair Cost?
DIY parts for this repair typically cost between $20–$120, depending on whether you need a replacement ice maker assembly, water inlet valve, or filter. A professional service call on an LG French Door refrigerator usually runs $150–$300 including labor. Tackling this repair yourself can save you $100 or more.
“`
Frequently Asked Questions
How long does it take for the LG LRMVS3006S ice maker to start producing ice after a reset?
After resetting the ice maker, allow 24 hours for the unit to begin producing ice. Make sure the freezer temperature is set to 0°F for optimal ice production.
Could a faulty water inlet valve cause my LG LRMVS3006S to stop making ice?
Yes, a defective water inlet valve is a common culprit that prevents water from reaching the ice maker. Replacing the valve typically resolves the issue.
Is the ice maker on the LG LRMVS3006S covered under warranty?
LG generally covers ice maker defects under their standard one-year parts and labor warranty. Contact LG support with your model and serial number to verify your coverage status.
Recommended Products
These are the parts and tools we recommend for this repair, based on compatibility and customer reviews:
- MJX41178908 Refrigerator Water Inlet Valve Replacement,for LG Kenmore Refrigerators – Replaces AP4451762 PS3536019 AH3536019 5221JA2011J
- Zreneyfex MJX41178908 Refrigerator Water Inlet Valve, Replacement for LG & Replacement for Kenmore Refrigerators, Replaces AP4451762 PS3536019 EA3536019
As an Amazon Associate, I earn from qualifying purchases.


