
Drum scratching clothes
This step-by-step repair guide walks you through fixing drum scratching clothes on your Samsung DVE45T3400W (Electric). With the right tools and parts, most homeowners can complete this repair in 1–2 hours and avoid a costly service call.
🔨 Pro Tip from Dave
On the DVE45T3400W, pay close attention to the front drum bearing glides (part DC97-16782A) — these plastic slides wear unevenly and often develop jagged edges that owners miss during a quick visual inspection. A common mistake is replacing only the felt seal and reassembling, only to find the glides were the real culprit all along. Always replace all four glides as a set while you have the drum out.
Part of our Top 20 Dryer Models & Common Repair Issues Guide. Browse all dryer repair guides for related models and issues.
“`html
Common Symptoms & Causes
If your Samsung DVE45T3400W is damaging laundry, these specific symptoms point to a drum scratching problem.
- Clothes come out with snag marks, pulls, or small holes after a normal dry cycle
- A rhythmic scraping or grinding noise occurs while the drum is spinning
- Visible rough spots, chips, or exposed metal edges found along the drum interior
- Items with delicate fabric or loose threads catch and tear consistently on the same drum area
This issue is most commonly caused by worn or chipped drum baffles, damaged drum seals, or a broken drum lifter that has left rough edges exposed inside the drum.
“`
Safety First
- Unplug the dryer from the power outlet before starting any repair — never work on a live appliance.
- Wear work gloves when handling metal brackets, sheet metal edges, or sharp components.
- Take photos with your phone before disconnecting any wiring harnesses or connectors.
- Work in a well-lit area with enough floor space to lay removed panels flat.
Tools & Parts Needed
Essential Tools
- Phillips #2 screwdriver
- ¼” nut driver
- Putty knife
- Multimeter
- Work gloves
Replacement Parts
Step-by-Step Repair Instructions
Step 1
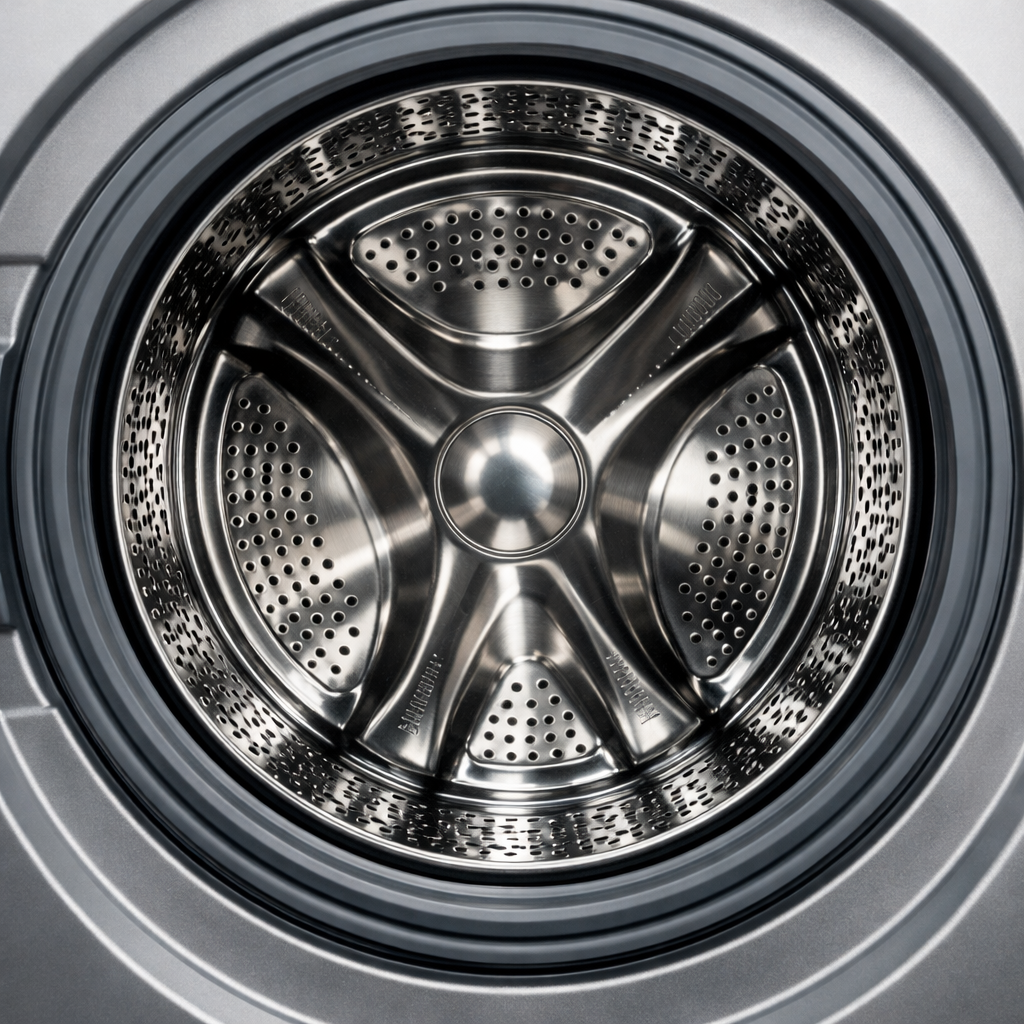
Unplug the dryer before doing anything else — contact with live components is a real shock hazard. Open the door and shine a flashlight around the full drum interior, looking specifically for loose screw heads proud of the surface, chipped or cracked baffle edges, and sharp weld seam burrs; any of these will snag and tear fabric during tumbling. This visual sweep tells you where the damage is coming from before you touch anything.
Step 2
The three plastic baffles (the curved scoops molded to the drum wall) lift and tumble clothes during the cycle, and each is held by one to two screws that can back out over time, leaving a raised screw head that acts like a file on fabric. From inside the drum, use a T20 Torx driver to snug down any loose screws until they sit flush. Pro tip: if a screw spins without tightening, the plastic boss behind it is stripped and the entire baffle needs replacement rather than just re-tightening.
Step 3
Run your bare hand slowly along the full circumference of the drum’s interior seam — a burr will catch your skin exactly the way it catches clothing fibers. Any rough spot you feel needs to be smoothed with 220-grit sandpaper using three to four firm passes, then wipe the area clean with a damp cloth to remove all metal dust. Skipping the wipe step leaves abrasive grit in the drum that can itself damage fabrics on the next load.
Step 4
Remove the front panel by taking out the lint screen housing screw and the two lower access screws, then locate the front drum glide pads — these are the small plastic or nylon pads that support the front edge of the drum as it spins. When glides wear through completely, the metal drum flange rides directly on metal cabinet surfaces, creating both a scratching edge and a grinding noise. Replace the full glide set rather than individual pads, because if one is worn through the others are at the same wear stage.
Step 5
With the front panel still open, inspect the felt seal that runs around the front drum flange — this strip creates a soft, close-fitting barrier between the rotating drum and the stationary cabinet. If the felt is torn, compressed flat, or bunching in spots, the exposed metal drum flange makes direct contact with the cabinet opening and will catch and tear fabric that drifts near the door. Reattach or replace the seal using a high-temperature adhesive rated for dryer use; standard craft or contact cement will fail under heat and make the problem return quickly.
Step 6
Reassemble all panels, making sure every screw is seated before plugging the dryer back in. Run an empty heat cycle first, then while the drum is still warm, slowly drag an old cotton T-shirt around the full interior by hand and feel for any snagging resistance. If the shirt moves smoothly with no catching, the repair is complete; any remaining snag point means one of the earlier steps needs to be revisited before running a real load.
Where to Buy Replacement Parts
Find genuine OEM and aftermarket replacement parts for your Samsung DVE45T3400W (Electric) on Amazon:
- Samsung DVE45T3400W drum baffle screw kit DC61-01215A
- Samsung electric dryer front drum seal DC97-07694A replacement
- Samsung dryer drum glide replacement DC93-00634A
When to Call a Professional
If the issue persists after completing all steps above, the problem may involve the sealed refrigerant system, a failed main control board, or wiring that requires specialized diagnostic equipment. Contact a licensed appliance technician — attempting sealed-system repairs without EPA 608 certification is illegal and unsafe.
“`html
How Much Does This Repair Cost?
DIY parts for fixing a scratching drum on the Samsung DVE45T3400W typically run between $10–$60, depending on whether you need drum support rollers, glides, or a new felt seal. A professional repair service call generally costs $150–$300 once you factor in labor. Tackling this repair yourself can save you $100 or more.
“`
Frequently Asked Questions
How do I know if the drum seal is causing the scratching on my Samsung DVE45T3400W?
Inspect the felt drum seal around the front opening for tears, hardening, or missing sections. A damaged seal can expose metal edges that snag and scratch fabrics during the spin cycle.
Can a worn drum glide cause clothes to get scratched?
Yes, worn or broken drum glides allow the drum to shift and rub against the cabinet interior. Replacing these small plastic slides typically resolves scratching and unusual scraping noises.
Is it safe to keep using my dryer while it’s scratching clothes?
You should stop using the dryer until the issue is fixed, as continued use can damage more clothing and potentially worsen internal component wear. Addressing the repair promptly saves both your garments and the appliance.
Recommended Products
These are the parts and tools we recommend for this repair, based on compatibility and customer reviews:
- Upgraded Sam-Sung Dryer Repair Kit for DC97-16782A Samsung Dryer Roller Replacement Kit, DC93-00634A Dryer Idler Pulley, 6602-001655 Dryer Belt, Replacement for Samsung Dryer Parts (Figures 6 and 7)
- (𝟐𝟎𝟐𝟔 𝙐𝙥𝙜𝙧𝙖𝙙𝙚𝙙) DC97-16782A Dryer Drum Roller with Update Bearings by Beaquicy – DC97-16782E Replacement for Samsung Dryer-Replaces DC97-07523A PS4221885 AP5325135 – Pack of 4
- Upgraded Sam-Sung Dryer Repair Kit Compatible with Samsung Dryer Roller Replacement Kit, Replacement for Samsung Dryer Parts DC97-16782A Dryer Roller, DC93-00634A Idler Pulley, 6602-001655 Belt
- FOMIUZY Dryer Drum Felt Gasket Seal Repair Replacement Kit DC97-07618A Fit for Samsung DV42H5200EP/A3 DV50K8600EV/A3 DV52J8700GP/A2 DV50K7500EV/A3 DV45K7600EW/A3 DV48J7700EW/A2 DV45H6300EG/A3 & More
As an Amazon Associate, I earn from qualifying purchases.


